
Headphones that only produce sound when the cable is bent, twisted, or held at an odd angle are dealing with a broken connection somewhere along the wire or inside the jack. This is one of the most common headphone problems out there, and the good news is that it can almost always be fixed at home with a few basic tools and about fifteen minutes of patience. This guide walks through the exact steps needed to find the break and repair it properly, so the sound stays consistent no matter how the cable sits.
Key Takeaways:
- A cable that needs bending to work usually has a broken wire strand or a loose solder joint near the jack or the earbud housing.
- The ‘bend test’ pinpoints the exact damaged spot before any repair starts.
- Small breaks near the plug can be fixed with electrical tape or heat shrink tubing.
- Deeper breaks near the driver housing usually need re-soldering or a full cable replacement.
- Testing the fix with a phone or laptop confirms the repair actually holds under normal use.
Step-by-Step Guide to Fix Headphones That Only Work When Bent
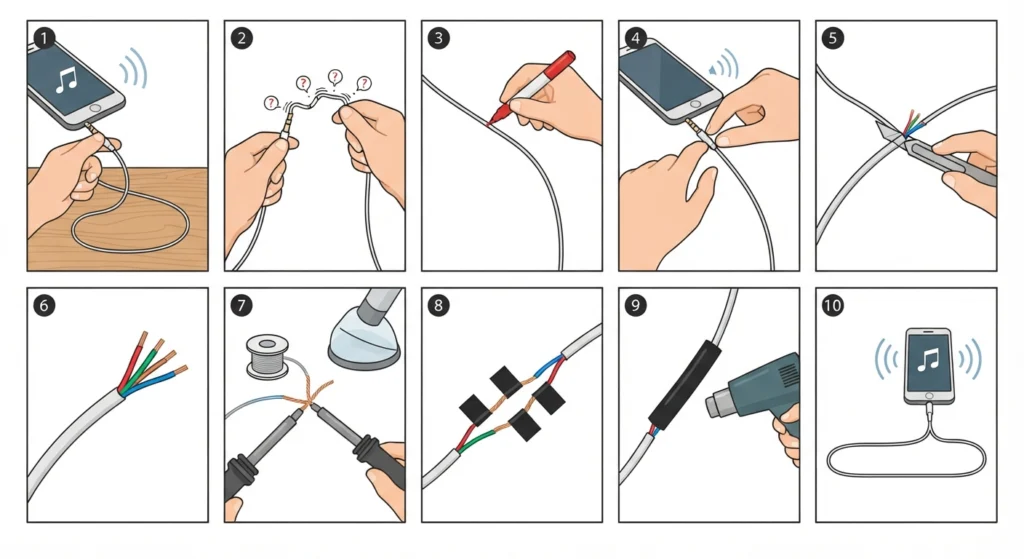
Before touching a soldering iron or scissors, locating the exact break point saves time and prevents cutting into a healthy section of cable. Follow these steps in order.
- Step 1: Plug the headphones into a phone, laptop, or any device that is already known to work fine with other headphones. Play a song or a voice memo at a steady volume so the audio dropout is easy to notice.
- Step 2: Starting near the jack, slowly bend the cable in small one-inch sections while listening for sound to cut in or out. Move down toward the earbuds or headphone cups one section at a time.
- Step 3: Mark the exact spot where the sound changes using a small piece of tape or a marker. This is almost always where a wire strand inside the cable has cracked or separated.
- Step 4: Once the spot is marked, gently squeeze that section between two fingers. If sound returns to normal only while pressure is applied, that confirms the break location.
- Step 5: Cut the outer rubber or fabric coating around the marked spot with a small utility knife, being careful not to slice through the thin copper wires underneath.
- Step 6: Separate the tiny colored wires inside (usually red, green, copper, and sometimes blue) and check each one for cracks, discoloration, or thinning.
- Step 7: Twist any separated wire strands back together by color, then solder each connection for a permanent bond. A cold solder joint is often the reason a ‘fixed’ cable breaks again within days, so make sure the joint looks shiny and smooth, not dull or grainy.
- Step 8: Wrap each soldered wire individually with a small strip of electrical tape to prevent the exposed wires from touching each other and causing a short.
- Step 9: Slide a piece of heat shrink tubing over the repaired section and apply heat from a hairdryer or lighter (kept at a safe distance) until the tubing shrinks tightly around the cable.
- Step 10: Plug the headphones back in and run the bend test again from Step 2 to confirm the sound stays steady with no dropouts at any angle.
Pro-Tip: Never solder directly over exposed wires without separating and twisting them first. A rushed solder joint is the number one reason people end up repeating this entire repair within a week.
Method 1: Fixing a Break Near the Headphone Jack
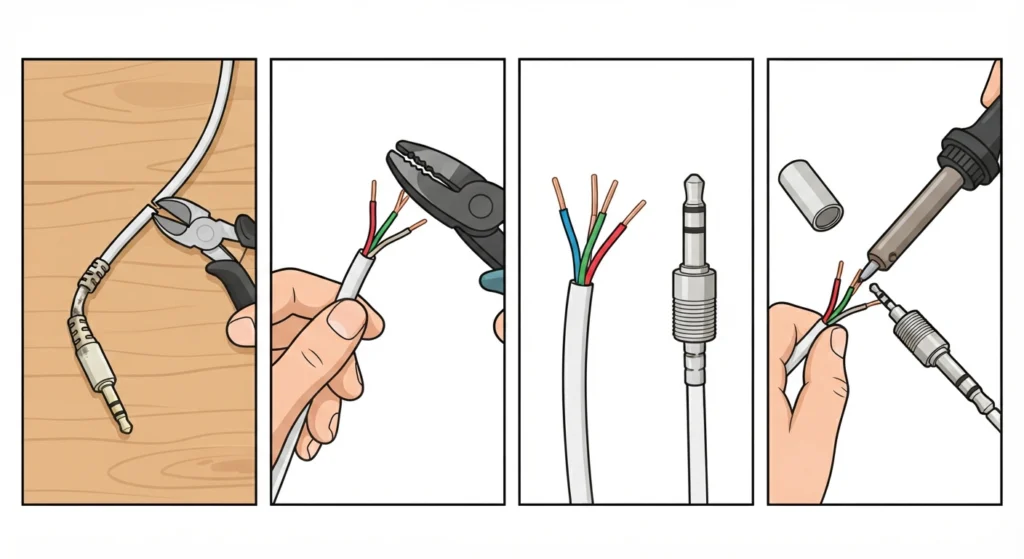
Most cable breaks happen within the first two inches of the plug because that section gets bent, yanked, and coiled the most. If the bend test points to this area, cutting off the damaged section and re-terminating the cable with a new 3.5mm plug is usually cleaner and more durable than trying to repair the original jack.
- Cut the cable about half an inch past the damaged section, closer to the earbuds.
- Strip roughly half an inch of the outer coating to expose the inner wires.
- Match the wire colors to the terminals on a replacement 3.5mm plug (most plugs include a color diagram).
- Solder each wire to its matching terminal and screw the plug housing back together.
Method 2: Fixing a Break Closer to the Earbud or Driver Housing
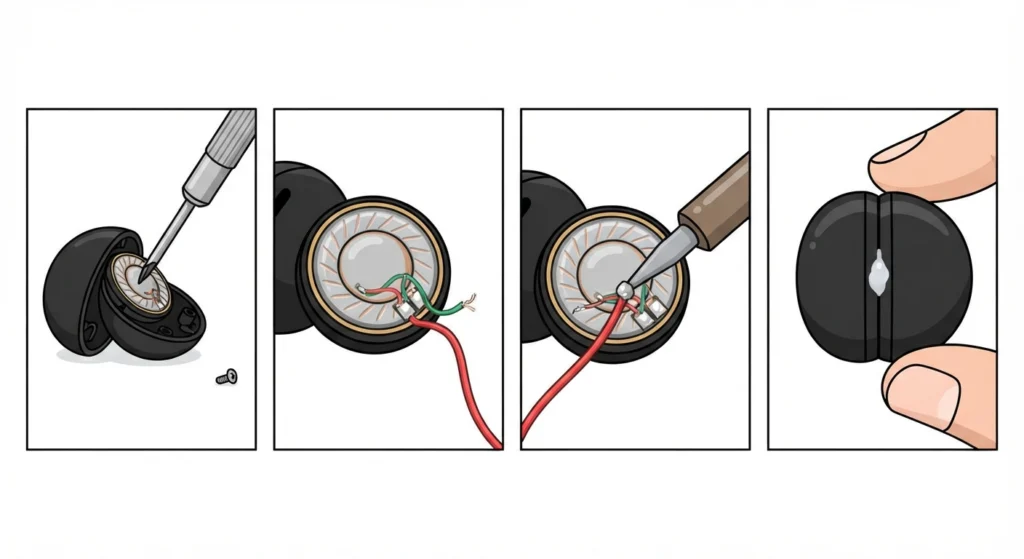
Breaks near the earbud housing are trickier because space is tight and the wires are thinner. In this case, opening the small plastic housing with a precision screwdriver reveals the driver and its two wire connections. Most of the time, one of these tiny solder points has simply come loose from vibration or repeated tugging.
- Open the earbud housing carefully, keeping track of any small screws.
- Look for a wire that has pulled away from the driver’s solder pad.
- Re-solder the wire back onto the pad, matching polarity if the driver has marked positive and negative points.
- Close the housing and secure it with a small dot of hot glue if the original clips feel loose.
Tips to Prevent the Cable From Breaking Again
Once the fix holds, keeping it that way mostly comes down to a few daily habits.
- Coil the cable loosely instead of wrapping it tightly around a phone or device.
- Avoid yanking the cable by the wire when unplugging; always pull from the plug itself.
- Add a small strain relief spring or a rubber sleeve near the jack, since this is the point that flexes the most.
- Store headphones in a case rather than a pocket or bag where they get crushed or knotted.
On the software side, sound issues are not always about the cable itself. If audio still sounds off after the physical repair, checking the audio output settings on Windows 11 rules out a settings-related cause rather than a hardware one. A quick audio settings reset on Windows 11 can also clear up any driver conflicts that built up while the headphones were cutting in and out.
Common Problems When Repairing Bent-Cable Headphones
Sound still cuts out after soldering
This usually means the break was missed during the bend test, or a second weak spot exists further down the cable. Repeating the bend test slowly, inch by inch, from the jack all the way to the earbuds usually reveals the second spot.
One side works but the other does not
This points to a wire that lost contact only on that specific channel, often the ground wire shared between both sides. Checking the ground connection at the jack first saves time before assuming the whole cable needs replacing.
Sound is scratchy even when the cable is straight
Scratchy or static sound after a repair usually comes from a solder joint that is not fully secure or from two wires touching where they should not be. Reopening the taped section and reinforcing the joint typically resolves it.
Microphone stopped working after the fix
Headsets with a built-in microphone have an extra wire that is easy to mix up during a repair. Double-checking the wire diagram for that specific headset model prevents this mix-up, and on Windows machines, resolving microphone detection issues helps confirm whether the problem is the wiring or the system recognizing the device.
Frequently Asked Questions
Why do headphones only work when the cable is bent?
A wire strand inside the cable has cracked or partially separated, and bending the cable temporarily pushes the broken ends back into contact. Once the cable straightens out again, the connection breaks and the sound cuts.
Can this problem be fixed without soldering?
Small breaks can sometimes be patched temporarily with electrical tape wrapped tightly around the damaged section, but this rarely lasts more than a few weeks. Soldering the wires back together gives a repair that holds up long-term.
Is it worth repairing cheap earphones with this issue?
For budget earphones under a few dollars, replacing them is often faster than repairing them. For higher-quality headphones or ones with sentimental value, a proper repair extends their life significantly.
How long does this repair usually take?
Once the break location is confirmed, the actual repair, including soldering and insulating the wires, typically takes between fifteen and thirty minutes.
What tools are needed for this fix?
A soldering iron, thin solder, a small utility knife or wire strippers, electrical tape, and heat shrink tubing cover most repairs. A precision screwdriver set is useful if the break is near the earbud housing.
Does this same fix work for Bluetooth earbuds?
Wireless earbuds do not have this specific cable issue since there is no wire carrying the audio signal. If a Bluetooth pair is dropping sound instead, the fix usually involves the wireless connection itself, and a guide on how to re-pair Bluetooth earbuds for stereo sound on Windows is the better starting point.
Why does the cable keep breaking in the same spot?
Repeated bending at one point, usually right where the cable meets the plug or the earbud housing, weakens the wire strands over time until they crack. Adding a strain relief sleeve at that exact point after the repair prevents the issue from returning.
Can a broken cable damage the headphone jack on a phone or laptop?
A frayed or shorted cable can occasionally cause a poor connection at the jack, but it rarely causes permanent damage to the device itself. If sound issues continue after the headphones are repaired and confirmed working on another device, checking the device’s own audio input device settings on Windows 11 helps rule out a device-side cause.
Is it safe to use a lighter for the heat shrink tubing step?
Yes, as long as the flame is kept a few inches away and moved constantly rather than held in one spot. A hairdryer on its hottest setting is a safer alternative that still shrinks the tubing effectively.
How can this problem be prevented in new headphones?
Handling the cable gently, avoiding tight wrapping, and always unplugging by the plug rather than the wire are the most effective habits. Braided or fabric-coated cables also tend to resist this type of internal wire damage better than plain rubber cables.