Quick answer: Open Settings, click System, select Sound, then open Volume Mixer and click Reset next to “Reset Sound Devices and Volumes for All Apps to the Recommended Defaults.”
That one click fixes most sound problems in under 10 seconds. But if it doesn’t, don’t start reinstalling drivers yet. There are eight other fixes below that solve the messier stuff — one app being silent while everything else works, sound that only breaks after you plug in headphones, or audio that resets itself every time you restart. This guide walks through all nine, in the order a technician would actually try them, for both Windows 11 and Windows 10.
When You Actually Need to Reset Your Audio Settings
Not every sound glitch needs a full reset, but these situations usually do:
- Sound stopped working right after a Windows update installed
- An app quietly changed your volume or switched your output device on its own
- You’ve been messing with settings and just want to start clean
- Audio sounds distorted, too quiet, or is playing through the wrong speakers
- You’re about to do recording or streaming work and need a clean baseline
- Your settings keep reverting every single time you restart the PC
A reset won’t touch your files. It only changes sound configuration, so it’s a safe first move before you go digging into drivers or Device Manager.
Quick Checks Before You Reset Anything
Half the “broken audio” tickets I’ve seen turn out to be one of these. Rule them out first:
- Look for the mute icon. A small X on the speaker icon in your taskbar means you’re muted. Click it or hit your keyboard’s mute key.
- Check the volume levels. Right-click the speaker icon, open Volume Mixer, and make sure nothing is muted or dragged down to zero.
- Confirm the right output device is selected. Click the speaker icon, then click the arrow next to the volume slider to see which device Windows is actually using.
- Check your cables and Bluetooth pairing. Loose cables and half-connected Bluetooth devices cause more silent speakers than people realize.
Still nothing? Move on to the methods below.
Method 1: Reset All App Volumes From the Volume Mixer
This is the fastest fix on this whole list. Under a minute, no restart, and it resets every app’s volume and device assignment in one click. Always start here.
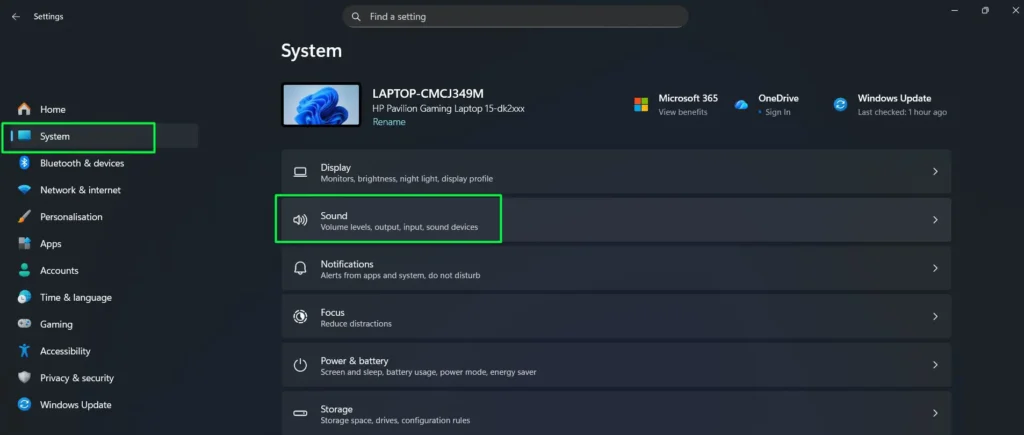
- Press Windows + I to open Settings.
- Click System in the left sidebar.
- Click Sound.
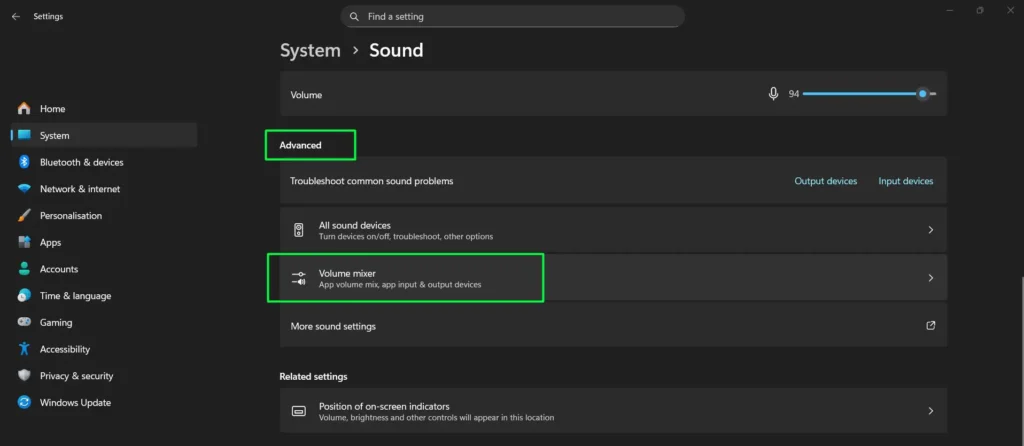
- Scroll to Advanced and click Volume mixer.
- Scroll to the bottom and find “Reset Sound Devices and Volumes for All Apps to the Recommended Defaults.”
- Click Reset.
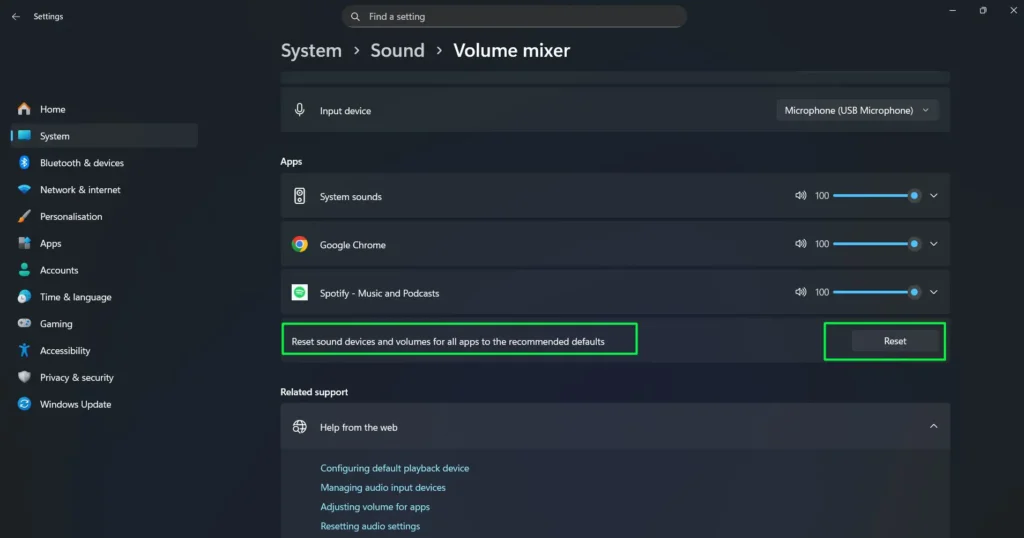
Every app volume and device assignment snaps back to default instantly. This is the exact fix for when one app is loud, another is silent, and nothing about it makes sense.
On Windows 10: Right-click the speaker icon in the taskbar, select Open Sound settings, scroll to App volume and device preferences, and click Reset. Same result, different menu label.
Method 2: Restart the Windows Audio Service
The audio service freezes sometimes. Restarting it clears the freeze without touching your settings or forcing a reboot. Use this when sound just stops mid-session for no reason.
- Press Windows + R to open Run.
- Type services.msc and press Enter.
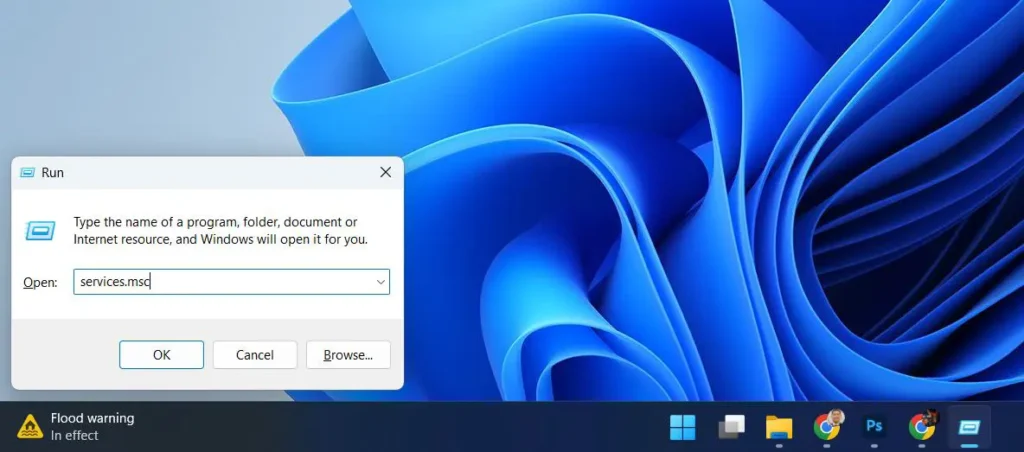
- Scroll down and find Windows Audio.
- Right-click it and select Restart.
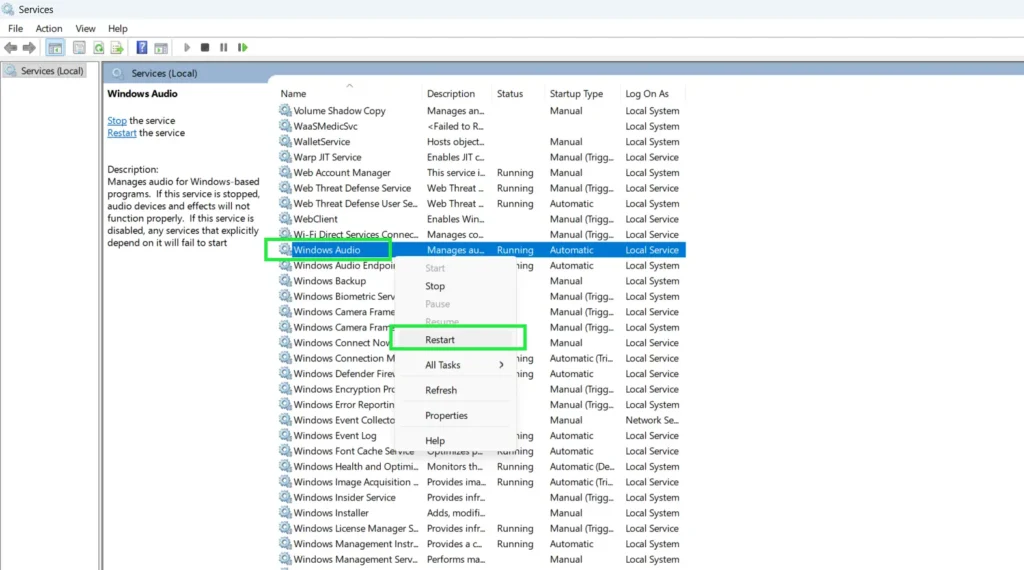
- Find Windows Audio Endpoint Builder just below it.
- Right-click it and select Restart too.
Test your sound now. These two services run all audio in Windows, on both 11 and 10, so restarting them clears the vast majority of sudden dropouts.
Faster option: Open Command Prompt as Administrator and type net stop audiosrv, press Enter, then type net start audiosrv. Same fix in two lines.
Method 3: Restart the Audio Driver
Disabling and re-enabling the driver forces Windows to reload it from scratch. No files get removed, no reboot needed. Try this when your device shows up fine but just won’t output sound.
- Press Windows + R.
- Type devmgmt.msc and press Enter.
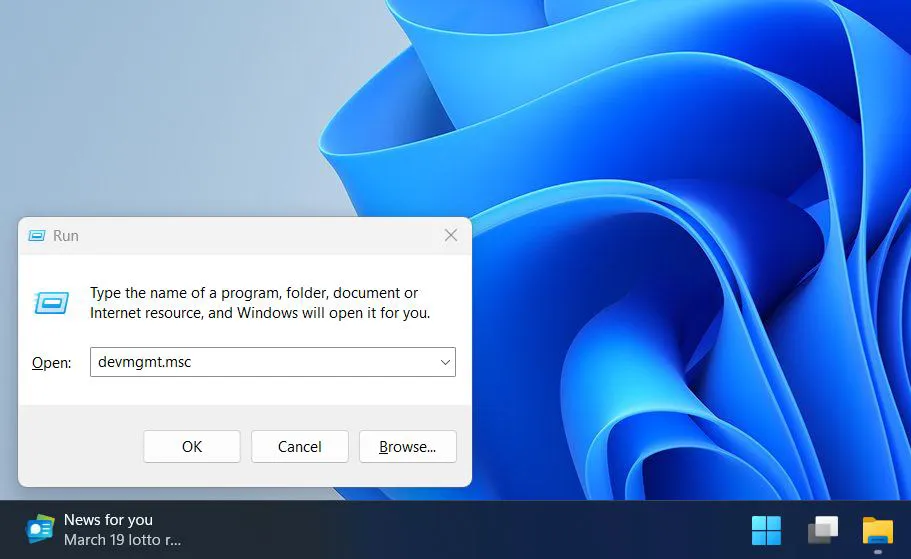
- Expand Sound, video and game controllers.
- Right-click your audio device and select Disable device.
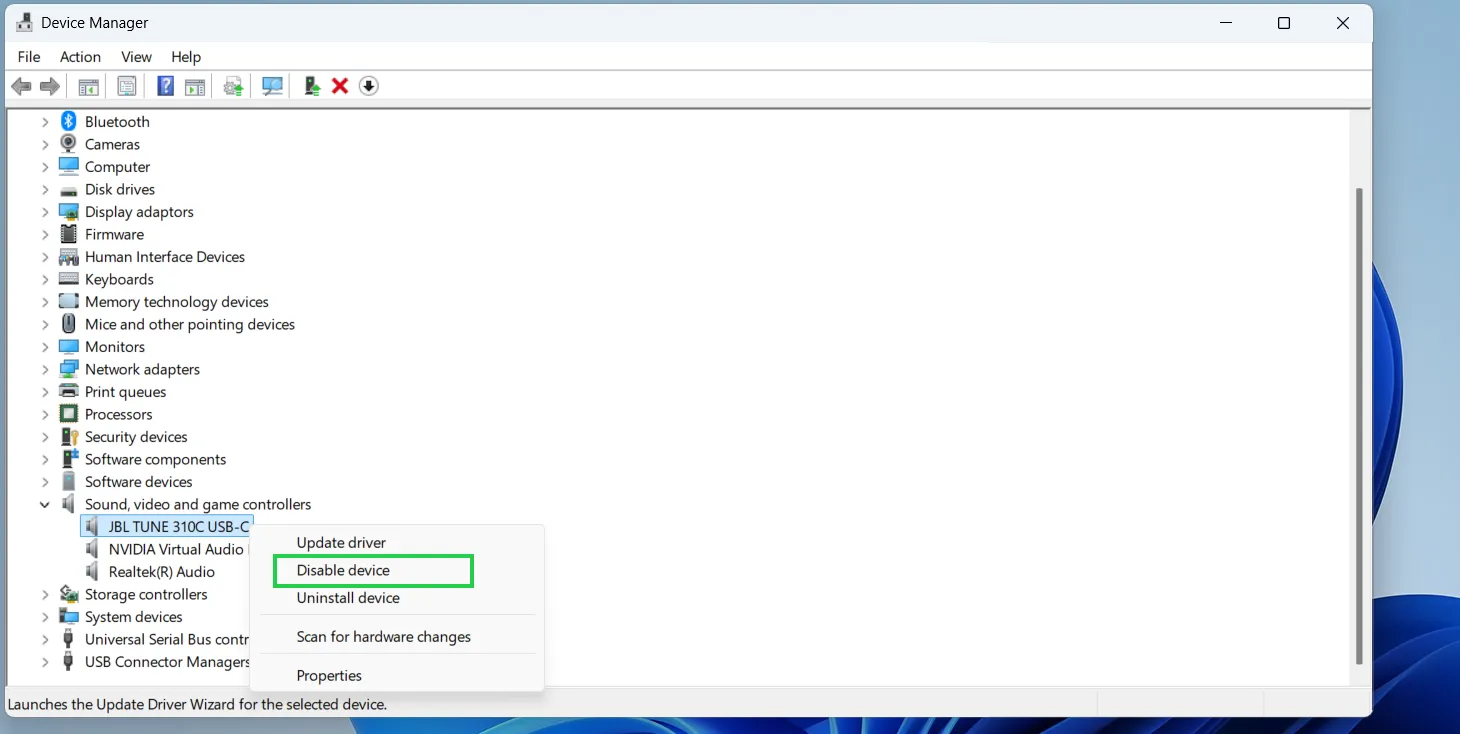
- Click Yes to confirm.
- Right-click it again and select Enable device.
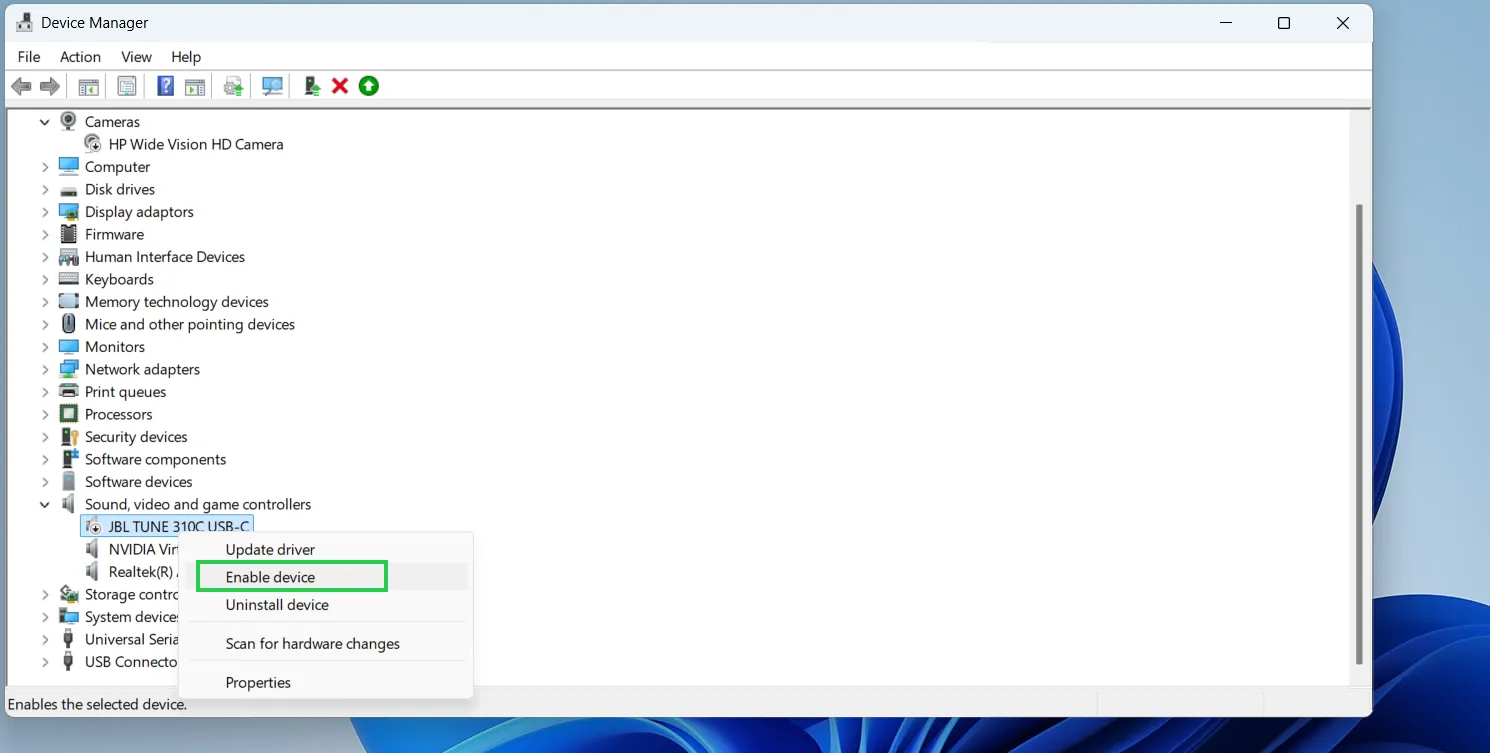
- Wait a few seconds, then test your sound.
Quicker than a full reinstall, and it fixes most sudden failures without ever touching your driver files.
Method 4: Reset Just One Audio Device
Sometimes it’s not everything, it’s just your headphones or just your speakers. Reset that one device without disturbing anything else that’s already working fine.
- Press Windows + I to open Settings.
- Click System, then Sound.
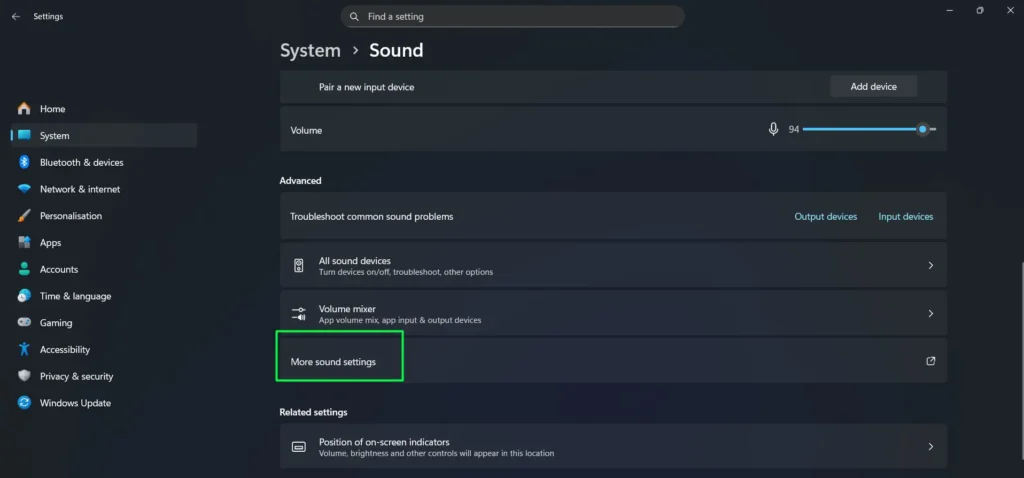
- Scroll down and click More sound settings.
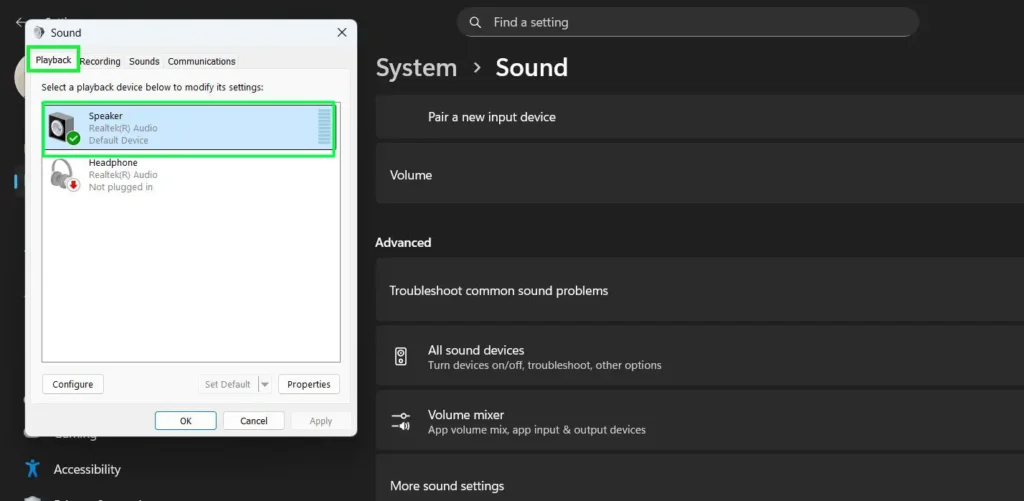
- Confirm you’re on the Playback tab.
- Double-click the device that’s misbehaving.
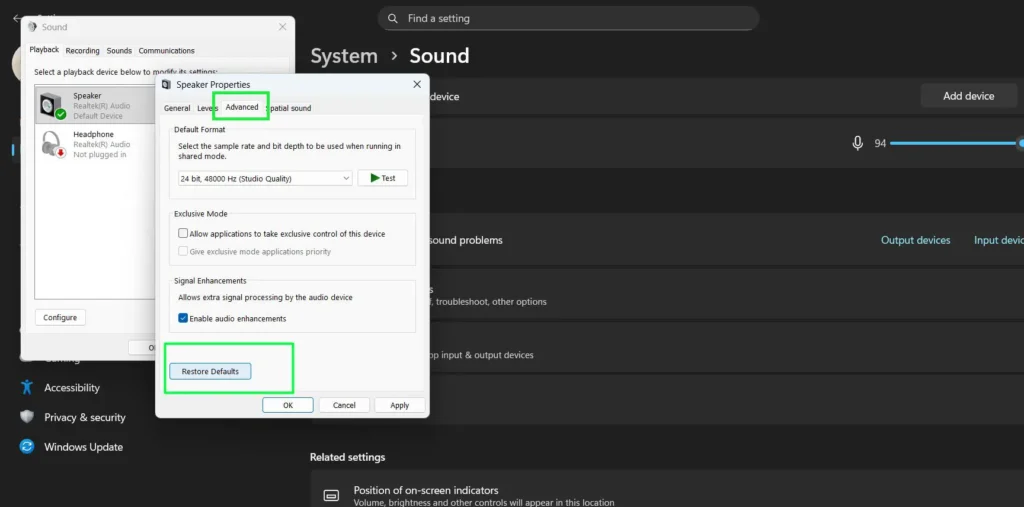
- Click Advanced, then click Restore Defaults.
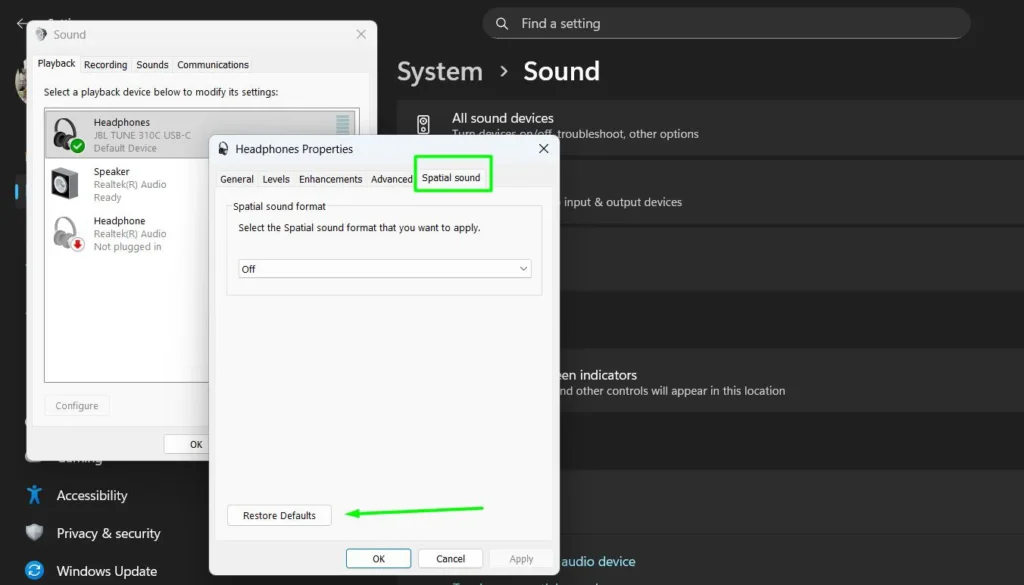
- Click Spatial Sound, then click Restore Defaults there too.
- If you see an Enhancements tab, click it and restore defaults there as well.
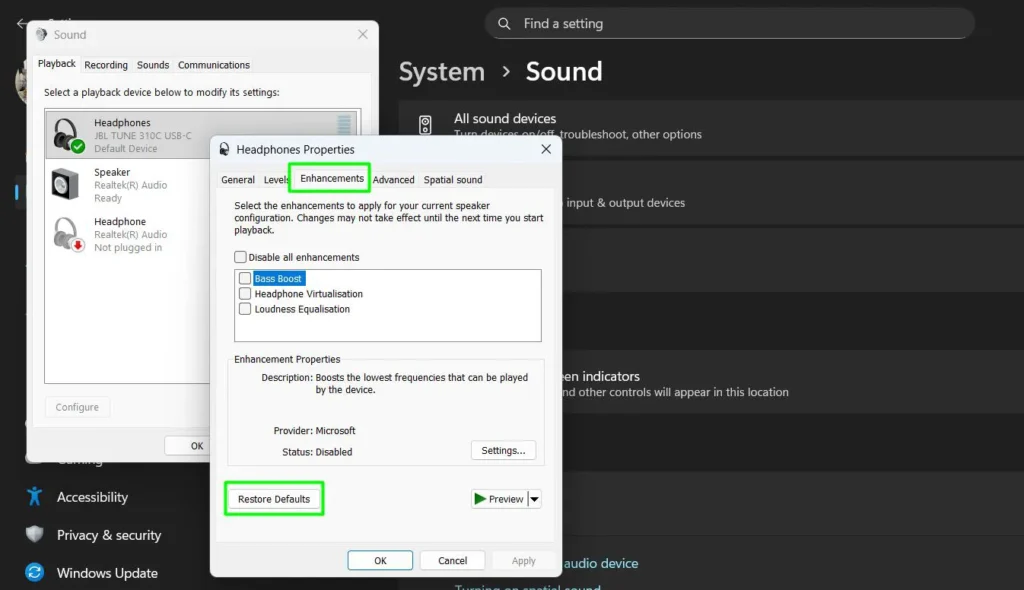
- Click Apply, then OK.
Note: Got more than one output device? Repeat this for each one. If Restore Defaults is greyed out on a tab, that tab’s already at default, nothing to do there.
Method 5: Reset System Sounds Back to Default
If your notification chimes and error sounds feel off, that’s the Sound Scheme, not your speakers. Here’s how to put it back.
- Press Windows + I, click System, then Sound.
- Click More sound settings.
- Click the Sounds tab.
- From the Sound Scheme dropdown, pick Windows Default.
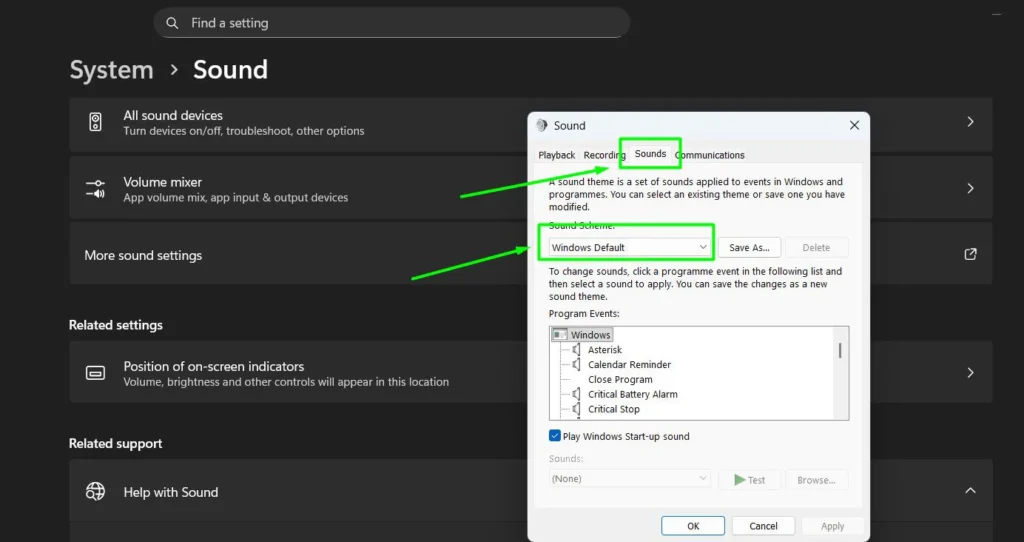
- Click Apply, then OK.
This only resets notification and event sounds. Your speaker volume and output device stay exactly as they were.
Method 6: Turn Off Audio Enhancements
Windows likes to “improve” your sound with built-in effects. On plenty of hardware, that causes crackling, stuttering, or dead silence instead. Turning enhancements off gives you raw, unprocessed audio.
Which menu you see depends on your build. Try the first one; if you don’t have it, use the second.
Newer builds (Settings app):
- Press Windows + I, click System, then Sound.
- Under Output, click your active device.
- Scroll to Advanced settings and set Audio enhancements to Off.
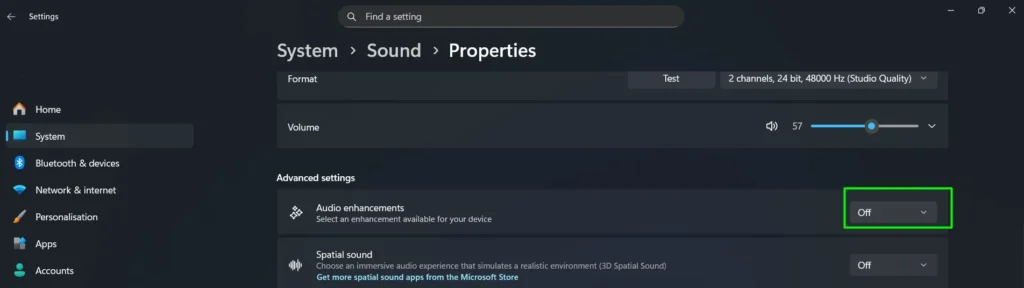
- Done. No restart needed, it applies right away.
Older path, and this is the standard route on Windows 10 (Control Panel):
- Click Sound, then click More sound settings.
- Click the Playback tab, then double-click your active device.
- Click the Advanced tab.
- Uncheck “Enable audio enhancements.”
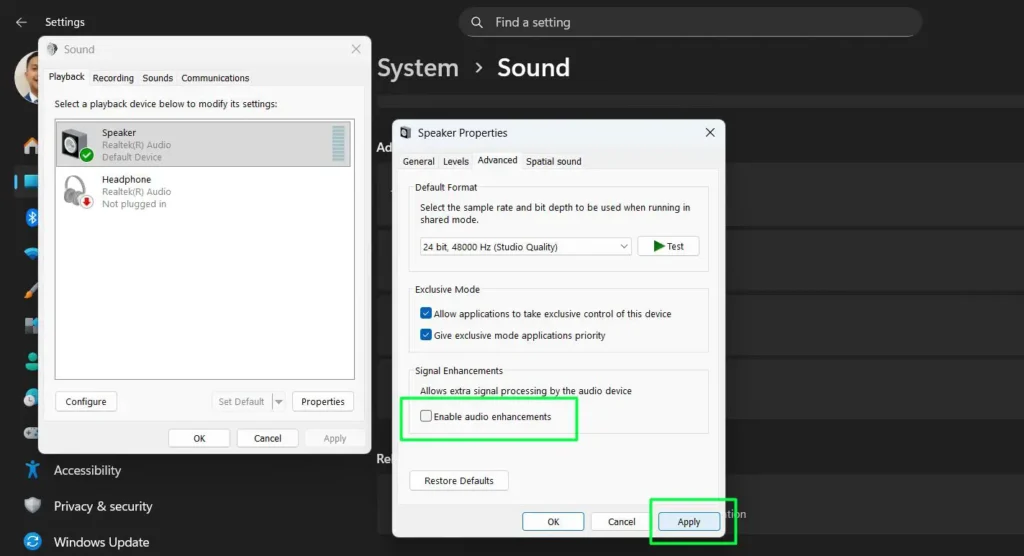
- Click Apply, then OK.
Test your audio now. If this was the fix, turn enhancements back on one at a time to catch the exact one causing trouble.
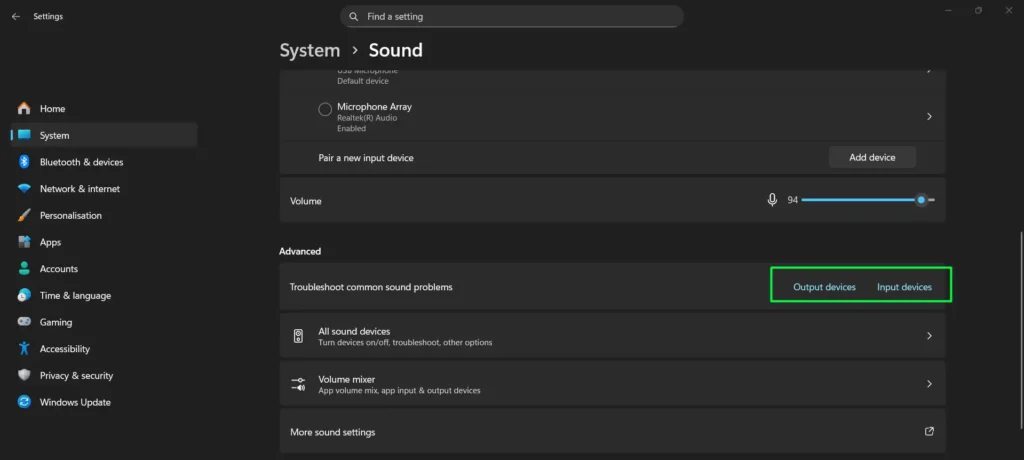
Method 7: Run the Built-In Audio Troubleshooter
Not sure what’s actually wrong? Let Windows figure it out. The built-in troubleshooter checks devices, drivers, and services, then fixes what it finds. It works the same way on Windows 10 and 11, and it’s the tool I’d hand a non-technical friend.
- Press Windows + I to open Settings.
- Click System, then Sound.
- Under “Troubleshoot common sound problems,” click Output devices for speaker or headphone issues, or Input devices for microphone issues.
- Follow the prompts and let it apply fixes automatically.
One pass checks your device selection, volume, driver status, and the audio service, all in one go.
Method 8: Update the Audio Driver
Before you rip the driver out entirely, try updating it. An outdated driver causes plenty of the exact symptoms people blame on “broken audio settings,” and updating is far less disruptive than a full reinstall.
- Right-click the Start button and select Device Manager.
- Expand Sound, video and game controllers.
- Right-click your audio device and select Update driver.
- Click Search automatically for drivers and let Windows find and install the latest version.
- No update found? Head to Settings, click Windows Update, click Advanced options, then Optional updates, and check for a driver update listed there.
For the most reliable results, skip the generic Windows driver and download the one built specifically for your hardware from your motherboard or sound card manufacturer’s website.
Method 9: Reinstall the Audio Driver (Last Resort)
Nothing else worked? This clears out deeper software conflicts a simple settings change can’t touch. Windows reinstalls the driver on its own after you restart.
- Right-click the Start button and select Device Manager.
- Expand Sound, video and game controllers.
- Right-click your audio device and select Uninstall device.
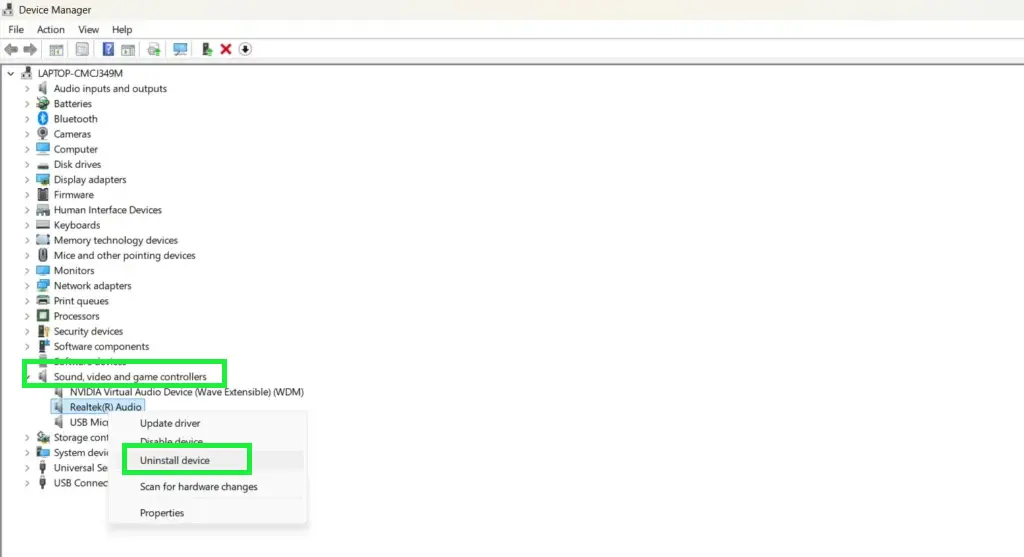
- Click Uninstall to confirm. Leave “delete driver files” unchecked.
- Restart your PC.
- Windows detects and reinstalls the driver on its own after restart.
Test sound once your desktop loads. If Windows doesn’t auto-reinstall, open Device Manager, click Action, then click Scan for hardware changes.
Quickest path: Start with Method 1. If that doesn’t do it, try Methods 2 and 3, both under a minute with no reboot. Then move to a single device reset, enhancements, and the troubleshooter. Update the driver before you reinstall it. Reinstalling is always the last move, not the first.
How to Stop This From Happening Again
- Keep Windows updated. Audio bugs and driver fixes ship in regular updates more often than people expect.
- Restart weekly. A full restart clears out background service issues that build up over days of sleep-mode use.
- Unpair Bluetooth devices you’re not using. A Bluetooth speaker sitting connected in the background is a classic cause of random output switching.
- Check the Volume Mixer now and then. Apps mute themselves more often than you’d think.
- Install the manufacturer’s driver, not just the generic one. Realtek, Intel, or AMD’s own driver is more stable and survives updates better.
- Turn off Fast Startup if settings won’t stick. Open Control Panel, click Power Options, click “Choose what the power buttons do,” click “Change settings that are currently unavailable,” then uncheck Turn on fast startup.
Frequently Asked Questions
Will resetting my audio settings delete my music or files?
No. A reset only touches sound configuration, things like volume levels, enhancements, output routing, and the sound scheme. Your music, documents, apps, and photos aren’t affected at all.
What’s the difference between restarting, updating, and reinstalling the driver?
Restarting the driver (disable, then enable) just reloads it, no files touched, no reboot needed. Updating it fetches a newer version while keeping your current one as backup. Reinstalling wipes the driver out completely and lets Windows install a fresh copy after a restart. Try them in that order, restart first, then update, then reinstall only if nothing else worked.
What if my audio still doesn’t work after trying everything here?
At that point it’s probably hardware, not software. Test a different pair of speakers or headphones to rule out a dead output device. Check Windows Update for pending audio fixes. Grab the latest driver straight from your motherboard or sound card maker’s site. If it’s still silent after all that, get the hardware checked.
Can I do any of this without restarting my PC?
Yes, most of it. The Volume Mixer reset, the audio service restart, a single device reset, turning off enhancements, updating the driver, and restarting the driver through Device Manager all work with zero reboot. Only Method 9, the full driver reinstall, needs a restart afterward.
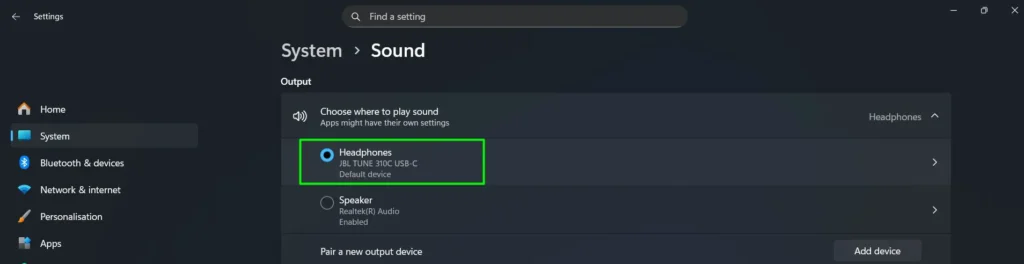
Why does my PC keep switching output devices on its own?
Windows defaults to auto-switching to whatever device just connected, plug in a new one or reconnect Bluetooth, and it takes over. To stop it, go to Settings, click System, click Sound, and set your preferred device under “Choose where to play sound.” You can also open More sound settings, right-click your preferred device, and select “Set as Default Device” to lock it in place.
Why do my audio settings keep resetting every time I restart?
Two usual suspects. One, Windows is running the generic High Definition Audio Device driver instead of the real one, installing the correct Realtek, Intel, or AMD driver fixes this most of the time. Two, Fast Startup can stop settings from saving properly. Turn it off through Control Panel, click Power Options, click “Choose what the power buttons do,” click “Change settings that are currently unavailable,” then uncheck Turn on fast startup.
Does any of this fix microphone problems too?
Some of it. The Volume Mixer reset and the audio service restart cover microphones along with everything else. Method 7’s troubleshooter has a dedicated Input devices option for mic-specific issues. For a mic that’s still acting up, open More sound settings, click the Recording tab, select your microphone, and click Restore Defaults.
Why does sound work in some apps but not others?
That’s almost always an app-specific volume issue, not a system problem. Open Settings, click System, click Sound, then click Volume Mixer, and check whether the silent app is muted or set to zero. Click Reset at the bottom to fix all app volumes at once. Also double check the volume setting inside the app itself.
Does this guide work the same way on Windows 10?
Mostly, yes. Windows 10 uses the same underlying audio service and driver system as Windows 11, so every method here works. The main difference is navigation, Windows 10 leans more on right-clicking the taskbar speaker icon and the Control Panel Sound window, where Windows 11 puts more of it inside the Settings app. Wherever the paths differ, this guide calls it out.