Mic worked fine yesterday. Today Zoom shows a flat line, your voice sounds like it’s coming through a tin can, or Windows randomly hops to a different device mid-call. You know the drill — you’re already dreading the “can you hear me now?” moment. Good news: this is one of the most common Windows headaches out there, and almost every case of it has a five-minute fix.
This guide covers the whole picture — finding the mic Windows can actually see, locking in the right default, clearing privacy blocks, updating drivers, and running down the specific fixes for muffled audio, dead input, and default-switching chaos. Straight steps, no filler. Works for both Windows 11 and Windows 10.
What Counts as an Audio Input Device on Windows
An audio input device is anything that captures sound and hands it to your PC — built-in laptop mic, USB desk mic, headset, webcam mic, or an XLR mic running through an audio interface. Windows 11 and Windows 10 can see multiple input devices at once, but only one is ever the active default. Every app uses that default unless you tell it otherwise inside its own settings.
Fixing a mic problem always comes down to one of six things:
- Picking the right device — switching between a built-in mic, USB mic, or headset when more than one is plugged in.
- Getting the levels right — input volume, mic boost, and audio format for cleaner calls and recordings.
- Per-app settings — Teams, Zoom, Discord, and OBS each have their own mic picker that overrides the Windows default.
- Privacy permissions — Windows 11 gates which apps can touch your mic, and these toggles love to reset after big updates.
- Drivers and services — keeping audio drivers and the Windows Audio service current stops most detection failures before they start.
- Troubleshooting — fast fixes for low volume, echo, a mic that vanished, and Windows switching your default on its own.
See Every Audio Input Device Windows Can Detect
Before you touch a single setting, check what Windows actually sees. Here’s the fastest way to pull the full list on both Windows 11 and Windows 10.
Step 1: Right-click the speaker icon in the system tray. Click Sound settings.![]()
Step 2: Scroll to Input. You’ll see “Choose a device for speaking or recording” with every mic Windows detects listed below it.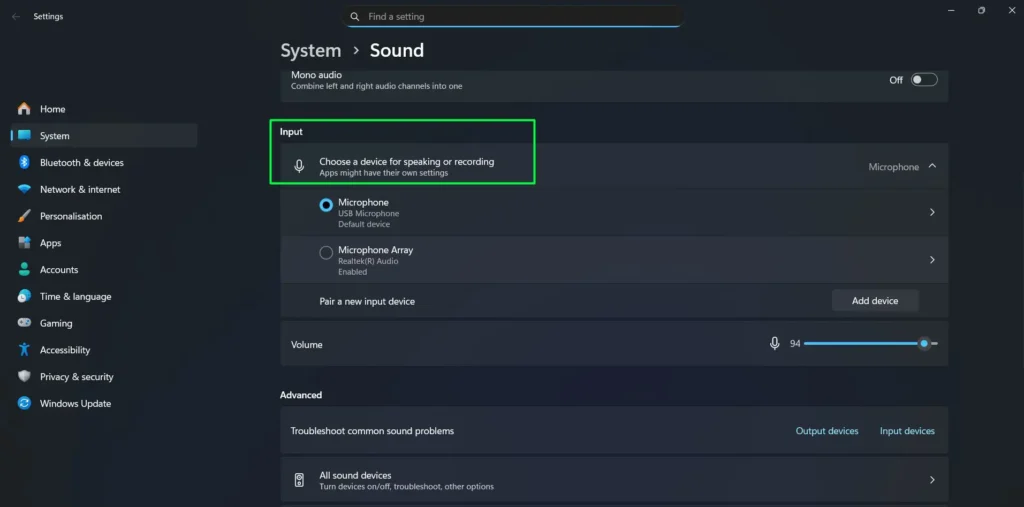
Step 3: Check the list. Windows 11 tags each device with its connection type — USB, Bluetooth, or built-in — so you’re not guessing which one is which.
Under the device list sits a volume slider and a live test bar. Talk into your mic and watch the blue bar. If it moves, the mic works. No extra software required.
Windows 10 shortcut: Press Windows + I, go to System > Sound, and use the “Choose your input device” dropdown under Input.
Mic plugged in but nowhere to be found? It’s probably disabled or missing a driver. Both are covered below.
Set Your Default Microphone (So It Stops Changing on You)
Locking in the right default input means Windows and every app on it grab the correct mic without you touching a setting each time. Do it through the Settings app for a quick fix, or the classic Sound Control Panel if you want it to actually stick.
Option A: The Settings App
Step 1: Open Settings > System > Sound. Scroll to Input.
Step 2: Click your mic. It’s now the default input, instantly.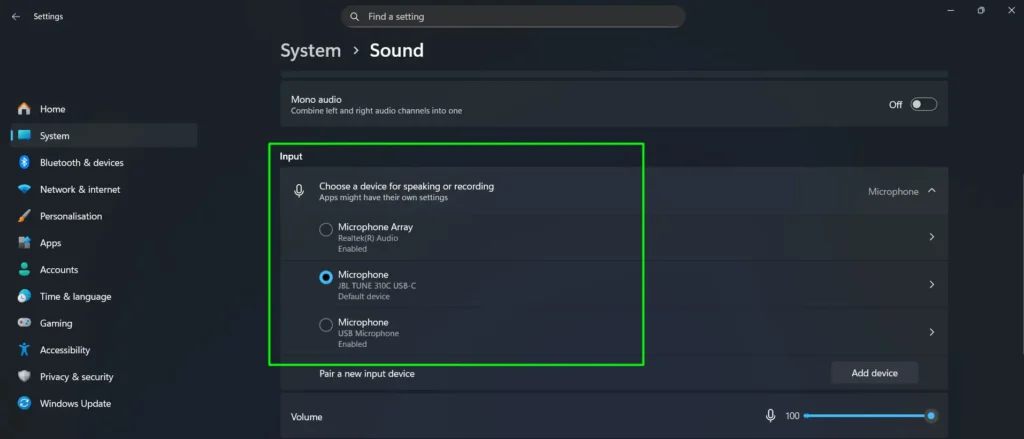
Option B: The Sound Control Panel (Sticks Better)
Step 1: Press Windows + R. Type mmsys.cpl. Hit Enter.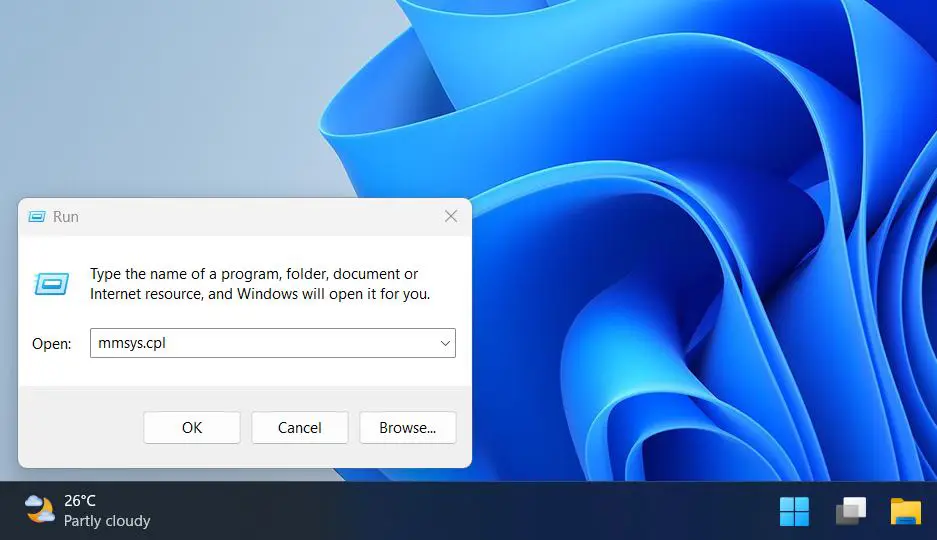
Step 2: Click the Recording tab. Right-click an empty spot in the list. Turn on “Show Disabled Devices” and “Show Disconnected Devices.” Hidden mics show up here.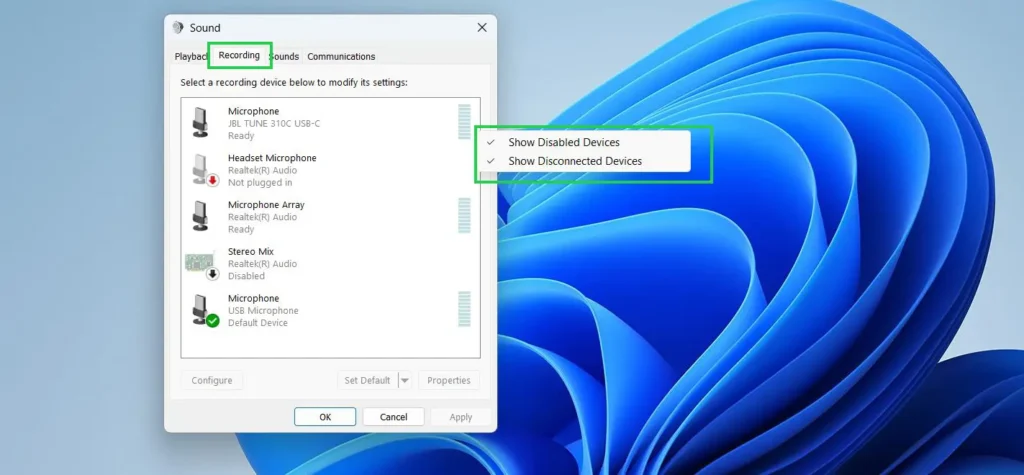
Step 3: Right-click your mic. Pick “Set as Default Device.” Anything using the Windows default now uses this mic.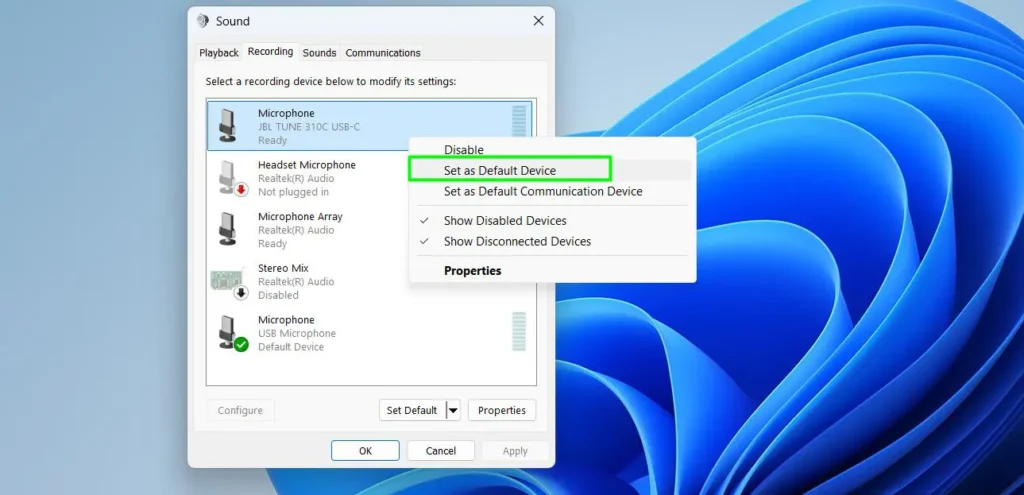
Step 4: Want one mic for calls and a different one for recording? Right-click the same mic. Choose “Set as Default Communication Device.” Now both jobs run at once without conflict.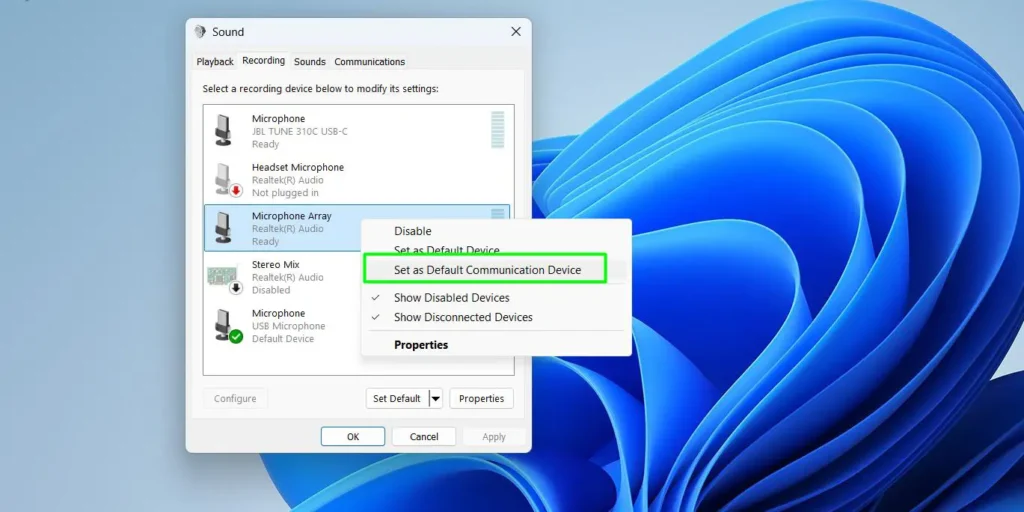
Set both defaults properly and Windows stops jumping to a random mic every time you plug in a headset, webcam, or USB dongle.
Switch Microphones Fast (Without Digging Through Menus)
Bouncing between a headset and a desk mic all day? You don’t need the full Settings trip every time.
Step 1: Right-click the speaker icon in the tray. Click Sound settings.![]()
Step 2: Scroll to Input. Every connected mic is listed there.
Step 3: Click the mic you want. Windows switches instantly. No restart.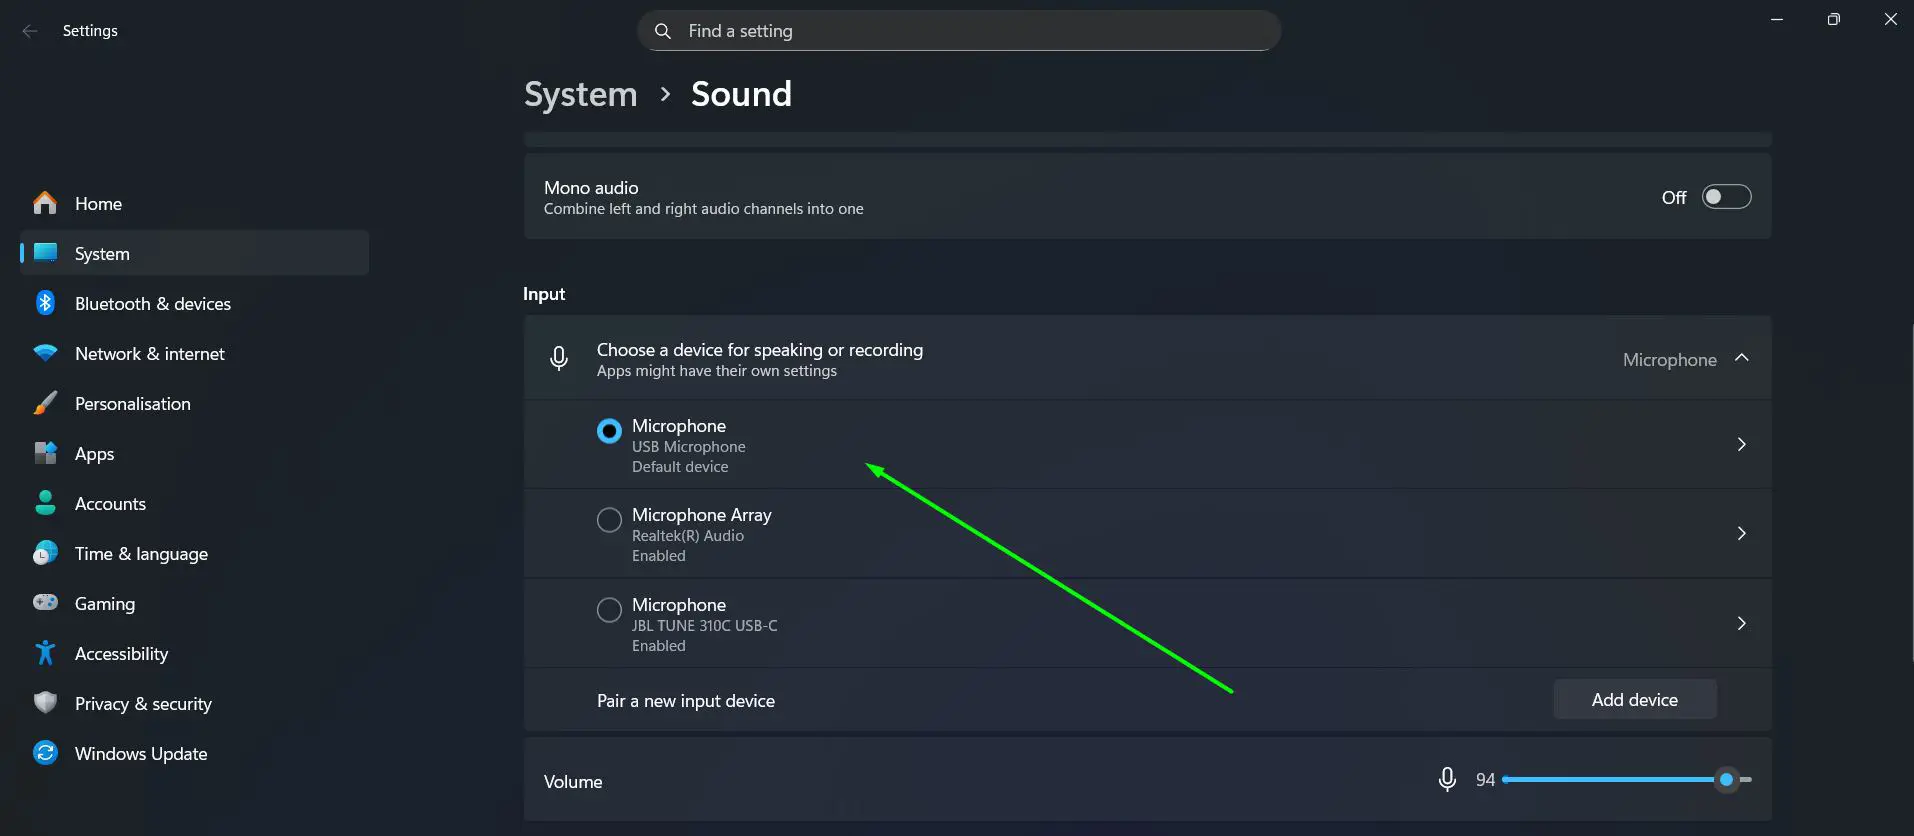
Step 4: Or go to Settings > System > Sound and use the “Choose a device for speaking or recording” dropdown. Two clicks, done.
Heads up: The Quick Settings panel (Windows + A) only swaps output devices — speakers and headphones. It doesn’t touch mic selection. Use Sound settings or the Settings app for that.
Dial In Input Volume and Mic Levels
Set the level wrong and you either sound like you’re across the room or your voice claps and distorts every time you raise it. Here’s how to get it right.
Step 1: Go to Settings > System > Sound. Scroll to Input. Click the arrow next to your mic to expand it.![]()
Step 2: Drag the Input volume slider. Start around 75–80%. Talk and watch the level bar move.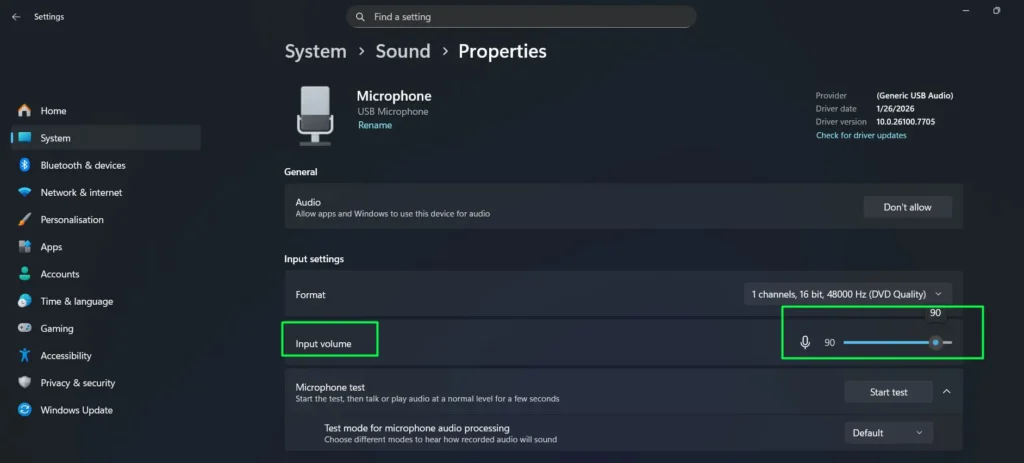
Step 3: Need finer control? Open mmsys.cpl > Recording tab. Double-click your mic. Go to Levels. You get a main volume slider plus a separate Microphone Boost slider in dB steps.
Step 4: Push boost up in small increments. More boost means more background noise too — keep it as low as you can while still getting a strong signal.
Level bar totally flat? The mic is muted, disabled, or not the default. Skip to troubleshooting below.
Configure Mic Properties and Audio Format
The device properties page has more than a volume slider — you get format selection and a proper mic test built right in.
Step 1: In Sound Settings, go to Input. Click the arrow next to your input device.![]()
Step 2: Click “Start test” under Test your microphone. Talk normally. Watch the progress bar.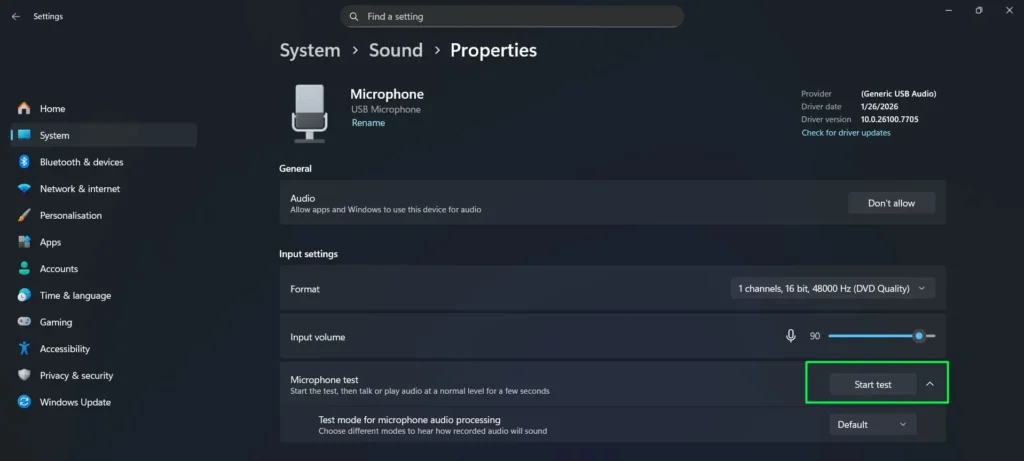
Step 3: Open the Format dropdown. For everyday use, pick 1 channel, 16-bit, 44100 Hz or 48000 Hz. Go higher only if you’re recording professionally.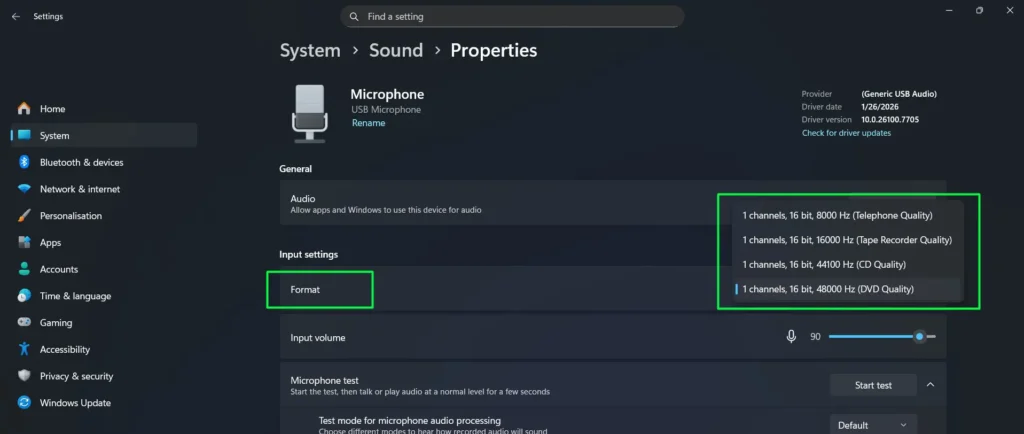
Scroll to the bottom of this page and you’ll find More sound settings (the classic Control Panel) and Troubleshoot common sound problems — both worth bookmarking mentally.
Use the Classic Sound Control Panel for Deeper Control
The old Sound Control Panel still beats the modern Settings app for one reason: it has Exclusive Mode, deeper level control, and Enhancements. Here’s how to get in and put it to work.
Step 1: Press Windows + R. Type mmsys.cpl. Press Enter. Or go to System > Sound and click “More sound settings” at the bottom.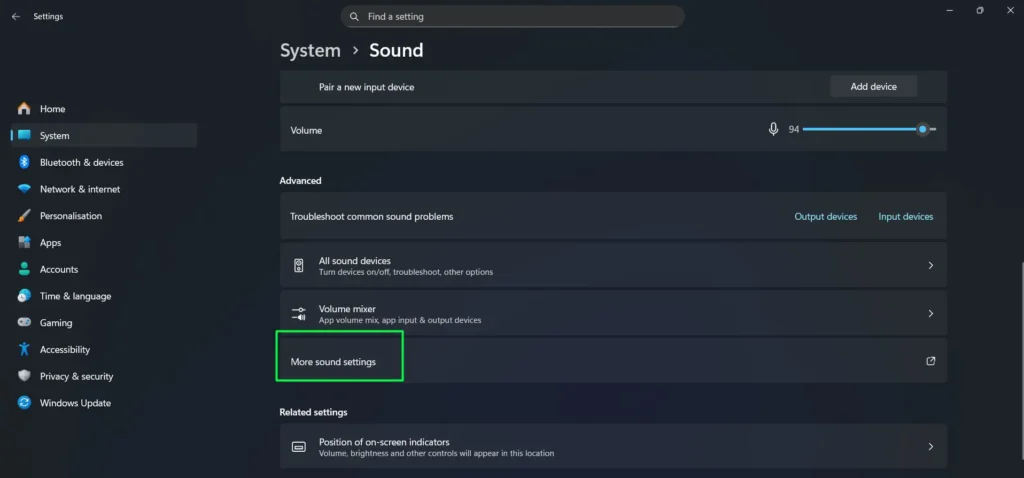
Step 2: Click “Recording.” Right-click an empty area. Turn on “Show Disabled Devices” to reveal mics the modern Settings app hides.
Step 3: Find your active mic. It’ll have a green checkmark and animated green bars when it picks up sound.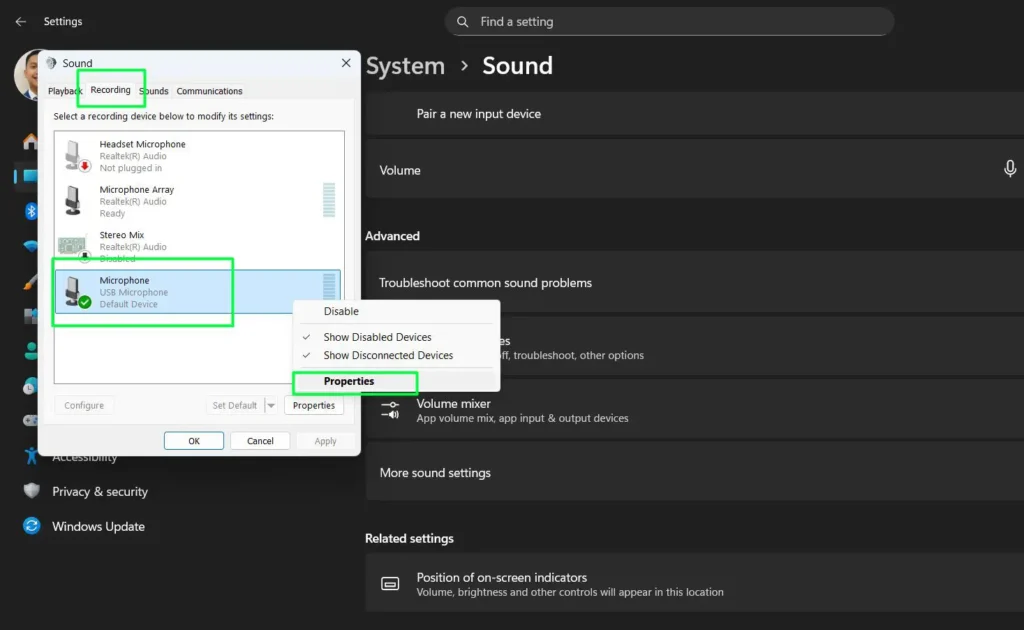
Step 4: Right-click it. Select “Properties.”
Step 5: Click through General, Listen, Levels, Enhancements, and Advanced. That’s every option you have.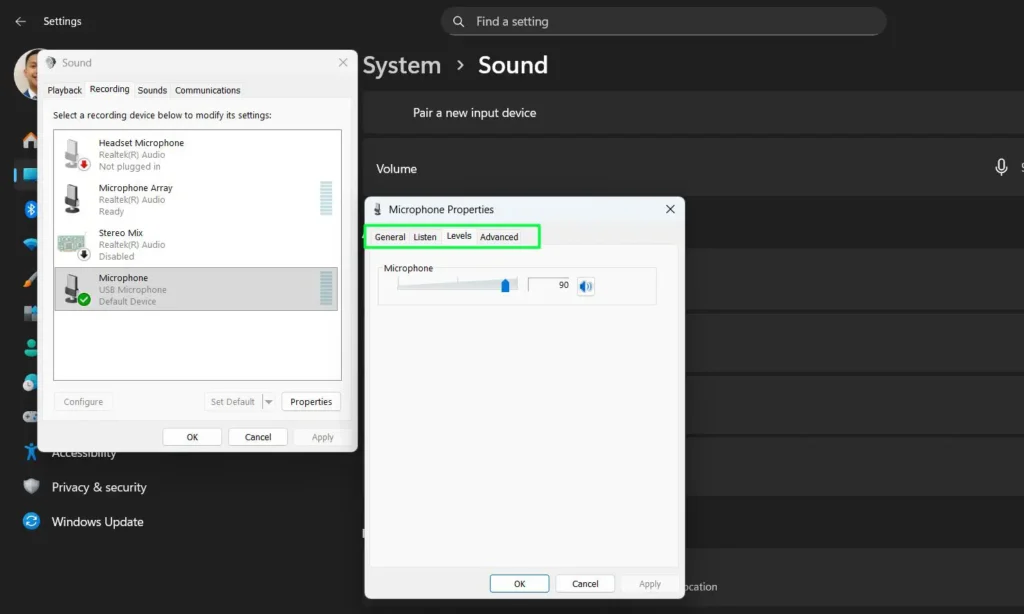
Step 6: In Levels, nudge volume and Microphone Boost up in small steps. Too much boost drags background noise up right alongside your voice.
Step 7: In Advanced, uncheck “Allow applications to take exclusive control of this device.” This stops apps from fighting over the mic and locking each other out.
Pro tip for podcasters and streamers: Browser tools like Riverside.fm, Zencastr, or BandLab clash with Exclusive Mode constantly. If Teams is open in the background, it can grab your mic and throw a “Microphone Blocked” error in your browser. Turning off Exclusive Mode is usually the fastest fix.
The General tab shows device info and lets you enable or disable the mic. The Listen tab lets you hear your own mic through your speakers — leave “Listen to this device” unchecked, or you’ll hear yourself echo on every call.
Turn On Audio Enhancements (Including AI Noise Cancellation)
Windows 11 has built-in processing to clean up your mic signal. Here’s what’s worth turning on and what you can skip.
Step 1: Go to System > Sound. Click “More sound settings.”
Step 2: Click “Playback.” Right-click your audio device. Select “Properties.”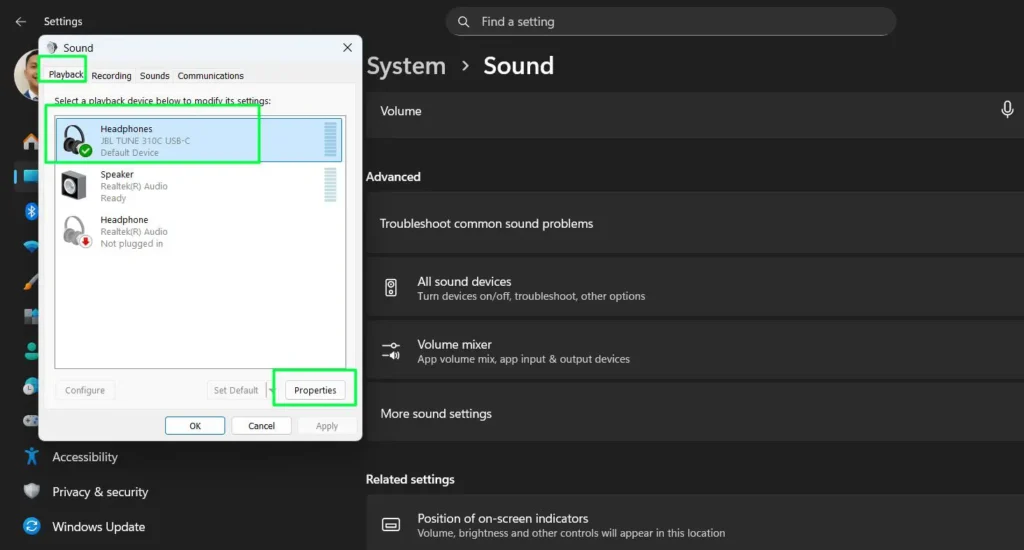
Step 3: Click “Enhancements” to see what’s available.
Step 4: The common ones:
- Bass Boost — adds low-frequency depth
- Headphone Virtualisation — fakes surround sound on headphones
- Noise Suppression — cuts ambient background noise
- Acoustic Echo Cancellation — stops your own mic audio from looping back through your speakers
Step 5: Check the boxes for what you want. Recording in a DAW? Check “Disable all enhancements” instead, for a clean raw signal.
Step 6: Click “Apply” to test it live. Click “OK” to save.
Copilot+ PC note: Got a Neural Processing Unit (NPU)? You’ll see Windows Studio Effects right in Sound Settings under your mic properties. Flip Voice Focus on for AI noise cancellation — it isolates your voice and strips out typing, dogs, and background chatter without dragging down CPU performance.
Set Different Mics for Different Apps
Windows won’t natively assign separate mics to separate apps. But Teams, Zoom, Discord, and OBS all have their own device pickers that override the system default. Here’s where to find each one.
Fast route via the taskbar: Press Windows + A for Quick Settings, click the Volume Mixer icon next to the volume slider, and adjust input/output per app right there. For deeper control, go into each app.
Step 1: Open the app. Find its audio settings — usually under Settings > Audio or Settings > Devices.
Step 2: Microsoft Teams — go to Settings > Devices. Pick your mic from the Microphone dropdown.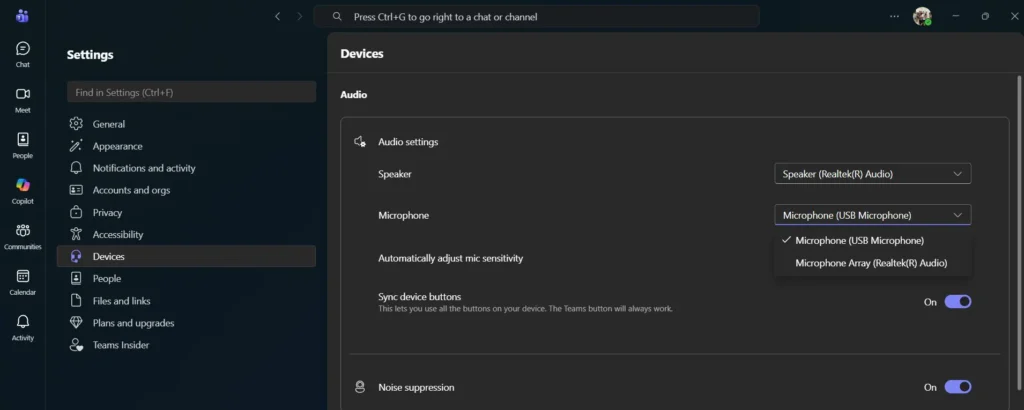
Step 3: Zoom — go to Settings > Audio. Set your mic in the Microphone dropdown for every call.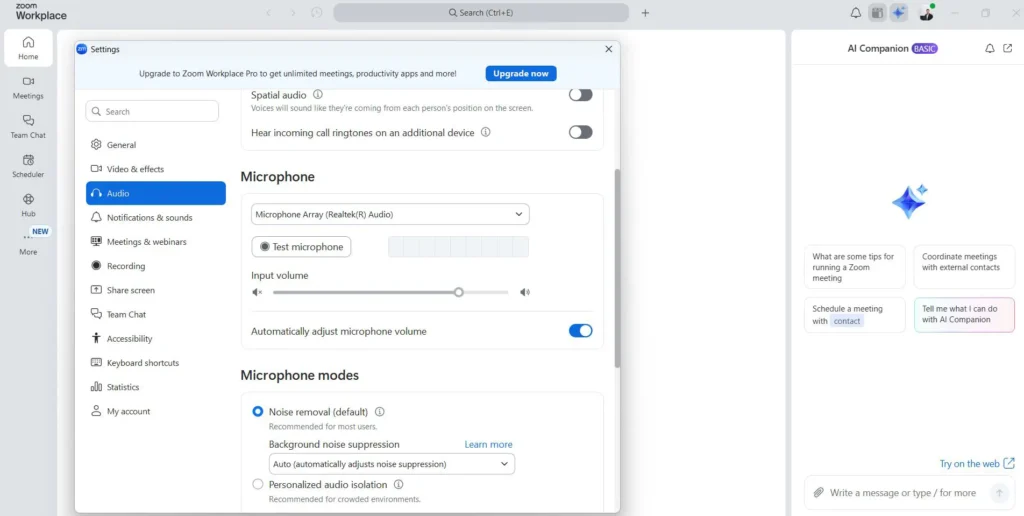
Step 4: Discord — go to User Settings > Voice & Video. Change Input Device to the mic you want Discord to use.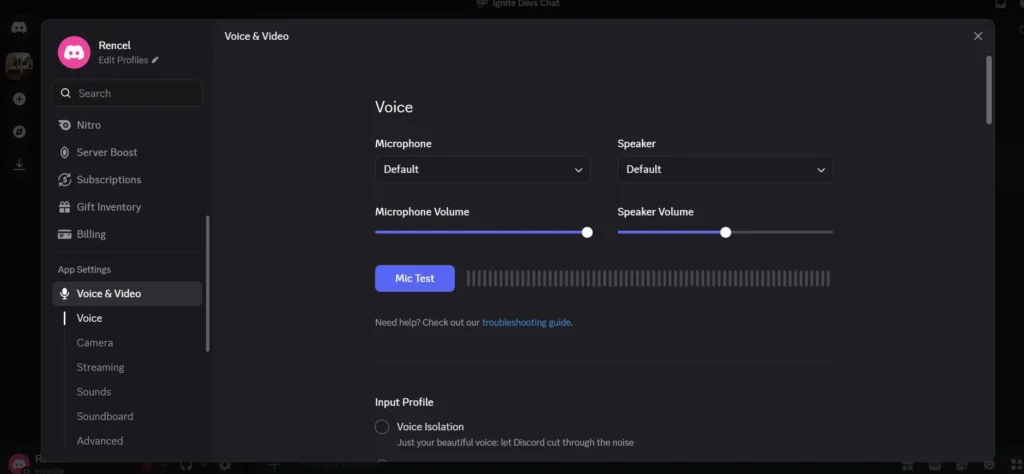
Step 5: OBS Studio — go to Settings > Audio. Set Mic/Auxiliary Audio to route specific mics to specific tracks in your recording or stream.
Step 6: Multi-app routing — use VoiceMeeter Banana to build virtual inputs that send different physical mics to different apps at the same time.
Fix Microphone Privacy and Permission Blocks
Hardware fine but apps still won’t see your mic? Ninety percent of the time it’s a privacy toggle, not the mic itself. These reset after major Windows updates, so check them first whenever your mic breaks right after a patch.
Step 1: Open Settings. Click Privacy & security.
Step 2: Scroll to App permissions. Click “Microphone.”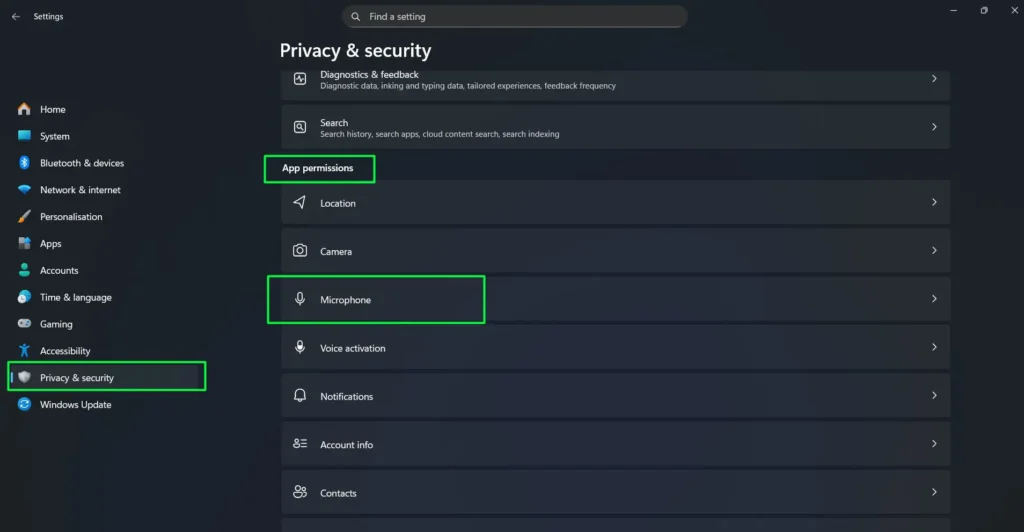
Step 3: Confirm “Microphone access” is On. This is the master switch. Off here means nothing gets mic access, no matter what else you set.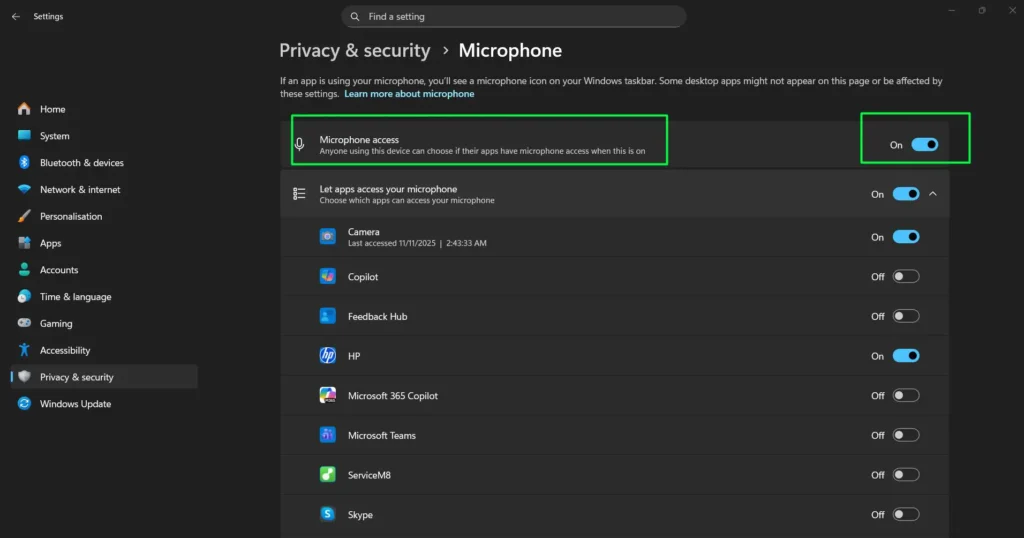
Step 4: Turn on “Let apps access your microphone” for Microsoft Store apps — Camera, Copilot, Teams, Skype.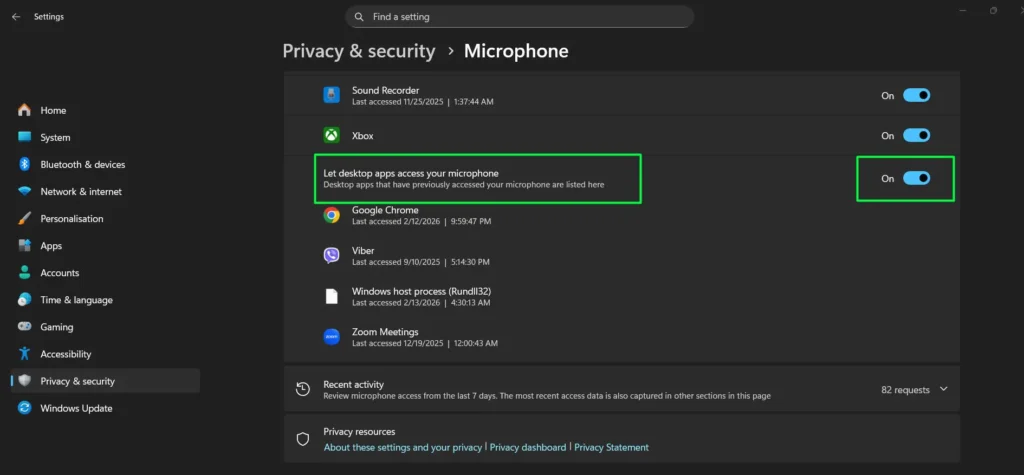
Step 5: Scroll down. Turn on “Let desktop apps access your microphone.” This is the toggle almost everyone misses. Mic works in your browser but not in a desktop app like Zoom? This is why.
Step 6: Check Recent activity to see which apps touched your mic in the last 7 days. Good for catching anything you didn’t expect.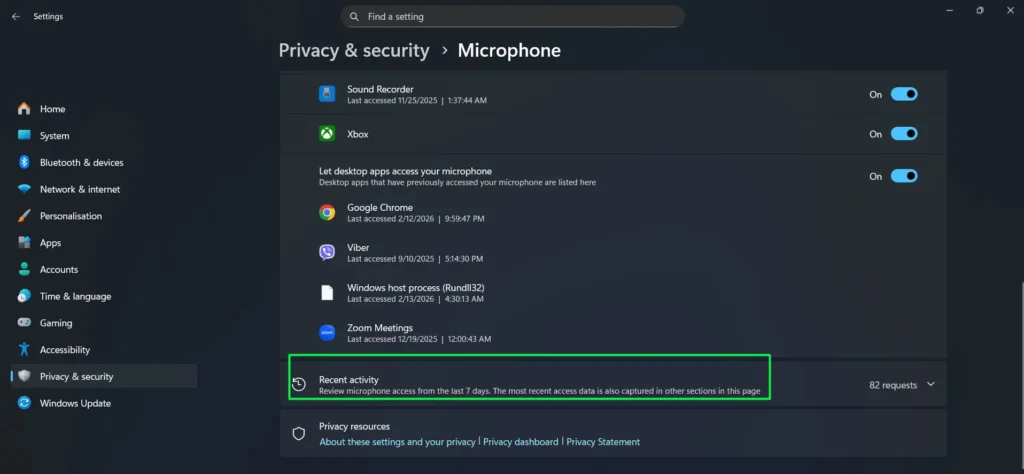
Step 7: Flip individual app permissions on or off based on what you actually trust with mic access.
Manage Bluetooth Microphones and Headsets
Bluetooth mics play by different rules. They run two audio profiles — A2DP for high-quality stereo playback, and HFP/HSP for mic input at noticeably lower quality. The instant an app grabs your mic, Windows historically switched to HFP, which is exactly why your headset sounds worse the moment a call starts.
Step 1: Go to Settings > Bluetooth & devices. Confirm your headset shows Connected.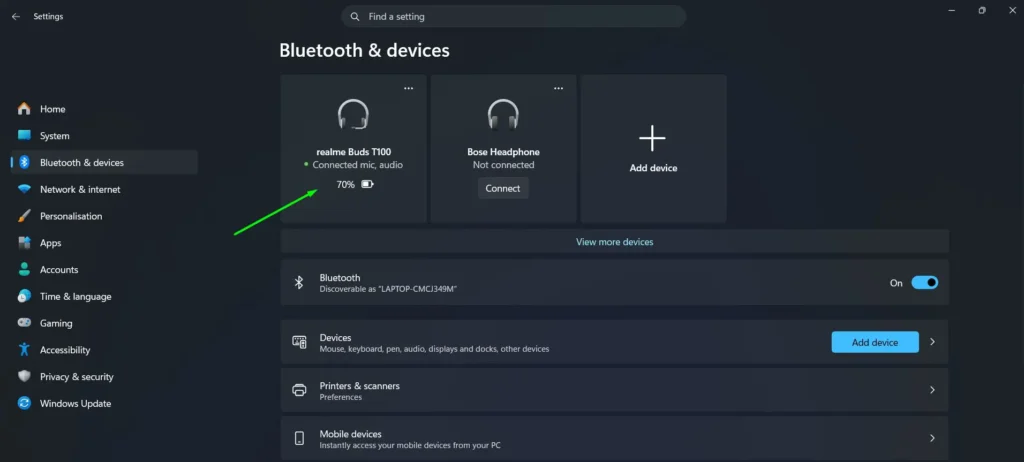
Step 2: Open Settings > System > Sound > Input. Your headset should show up as its own input device. Click it to set it as default.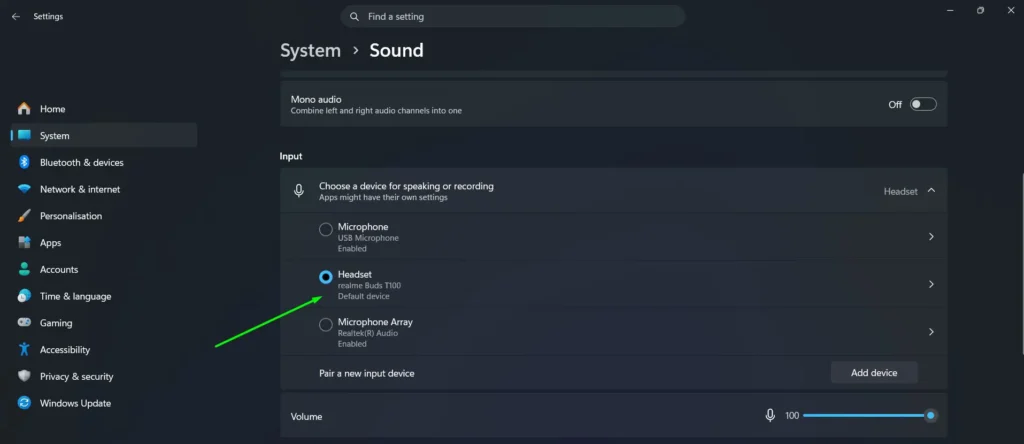
Step 3: Not showing up? Press Windows + R > mmsys.cpl > Recording tab. Right-click an empty area, turn on “Show Disabled Devices,” and look for it there.
Step 4: To fix the quality drop on calls — open mmsys.cpl > Recording tab, right-click your headset, go to Properties > Advanced, and set Default Format to the highest rate it supports, usually 16000 Hz (16-bit) on the older HFP path.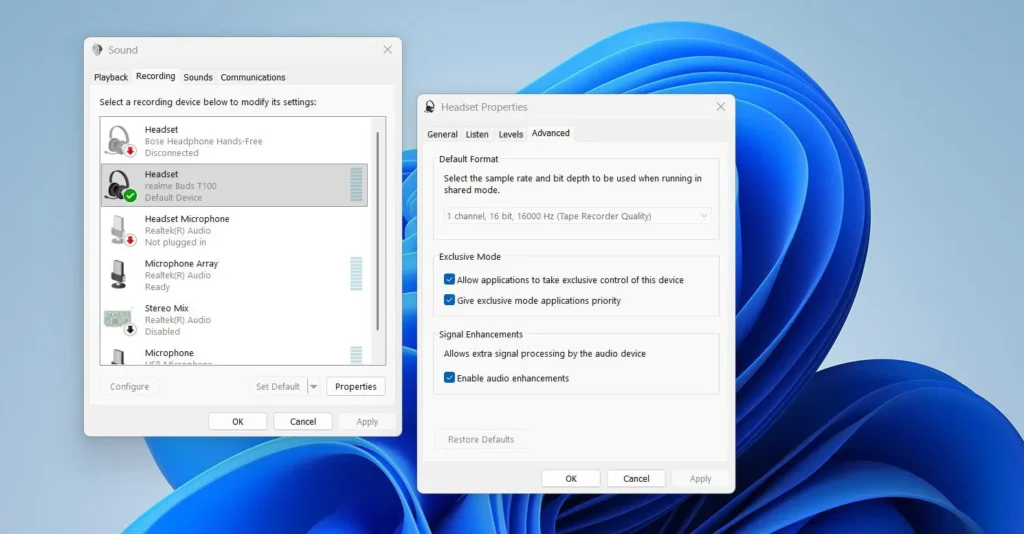
Step 5 — newer fix worth knowing about: Microsoft has been rolling out Bluetooth LE Audio support with “super wideband stereo” on recent Windows 11 builds. On supported hardware, this stops the old mono/HFP downgrade entirely — your headset keeps stereo quality even while the mic is active on a call. To get it, you need a newer Bluetooth radio, an updated Bluetooth driver, and an LE Audio-capable headset (check the manufacturer’s spec page for “LE Audio” or “LC3” support). If your PC and headset both qualify, this is a real upgrade over fiddling with sample rates manually.
Step 6: Headset dropping out or lagging? Open Device Manager. Expand Bluetooth, right-click your adapter, select Update driver.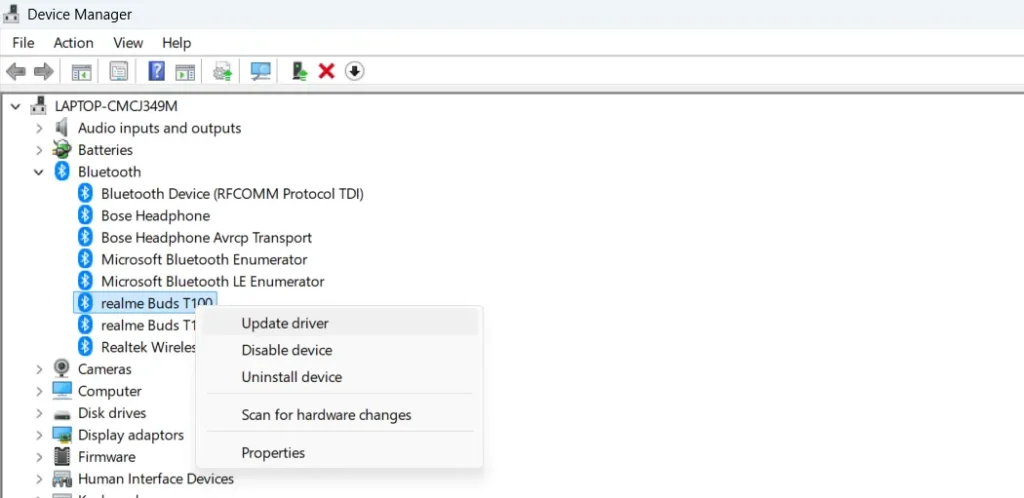
Update or Reinstall Your Microphone Driver
An outdated or corrupted audio driver is one of the top reasons a mic just stops showing up — especially right after a big Windows update or a fresh install.
Step 1: Press Windows + X. Click Device Manager.
Step 2: Expand “Audio inputs and outputs.” Look for a yellow warning triangle. That flags a driver problem.
Step 3: Right-click your mic. Choose Update driver > Search automatically for drivers. Restart once it’s done.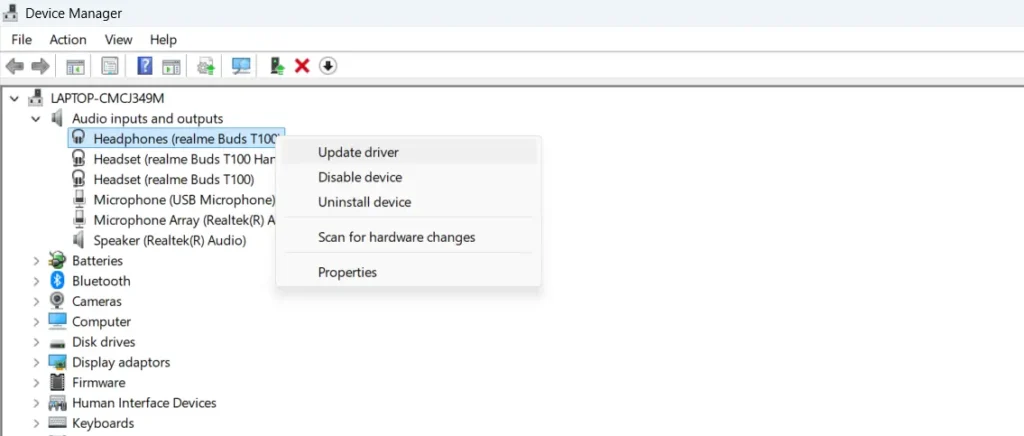
Step 4: Still broken? Right-click the device again. Choose Uninstall device. Check “Attempt to remove the driver for this device” before confirming. Restart. Windows reinstalls it fresh.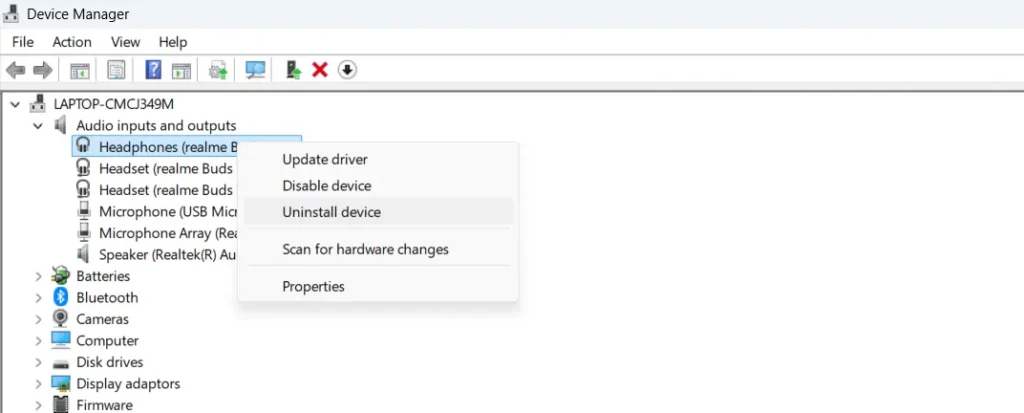
Step 5: Dell, HP, Lenovo, ASUS laptop? Skip Windows Update and grab the official Realtek or Waves driver straight from your manufacturer’s support page for your exact model. These almost always fix what Windows Update misses.
Restart the Windows Audio Service
Mic vanished from Settings even though your drivers and permissions look fine? The Windows Audio service probably crashed in the background. Restarting it takes under a minute.
Step 1: Press Windows + R. Type services.msc. Press Enter.
Step 2: Scroll to Windows Audio. Double-click it.
Step 3: Click Stop. Wait five seconds. Click Start. Confirm Startup type is Automatic — switch it if it’s set to Disabled.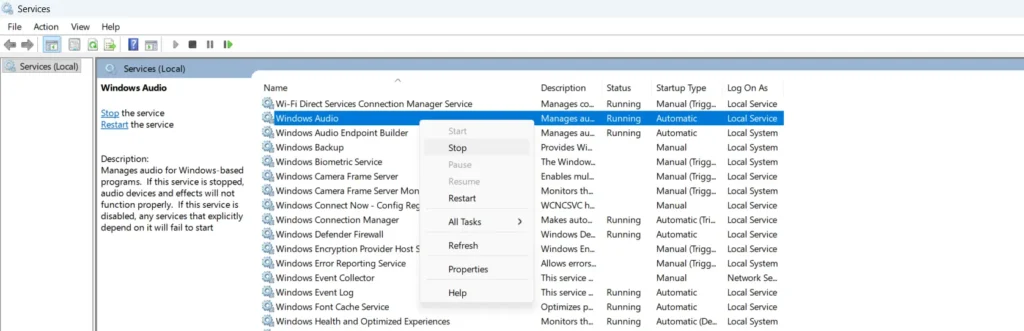
Step 4: Do the same for Windows Audio Endpoint Builder. Right-click. Select Restart.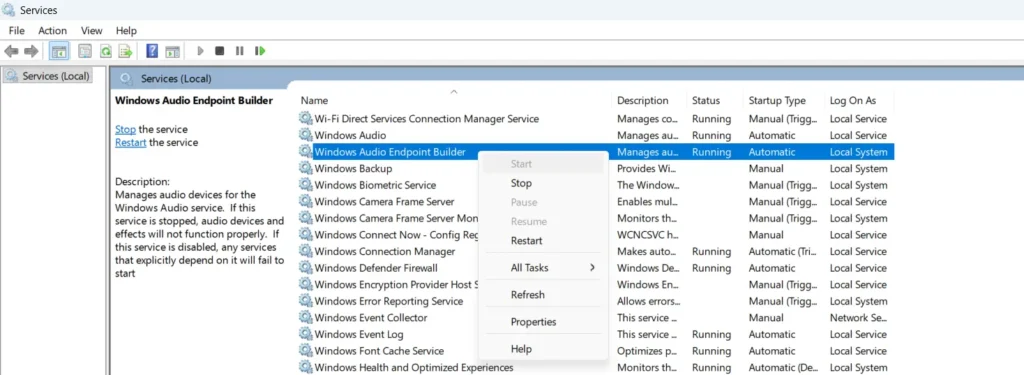
Step 5: Faster route — press Windows + X, open Terminal (Admin), type net stop audiosrv && net start audiosrv, and press Enter. Your devices should reappear in seconds.
Windows Audio set to Disabled instead of Automatic is exactly what causes the “no audio devices installed” error after a Windows reinstall. Switch it to Automatic and start the service — problem solved.
Test Your Microphone Before It Matters
Changed any settings? Test the mic before your meeting, recording, or stream starts — not during it. Three quick ways to confirm it works.
Step 1: Go to Settings > System > Sound. Scroll to Input. Click the arrow next to your mic. Click “Start test,” talk, watch the bar. Click “Stop test” — Windows shows the percentage of maximum input volume it caught.![]()
Step 2: Open the Sound Control Panel via mmsys.cpl > Recording tab. Talk and watch for animated green bars next to your mic. Moving bars mean the right device is active.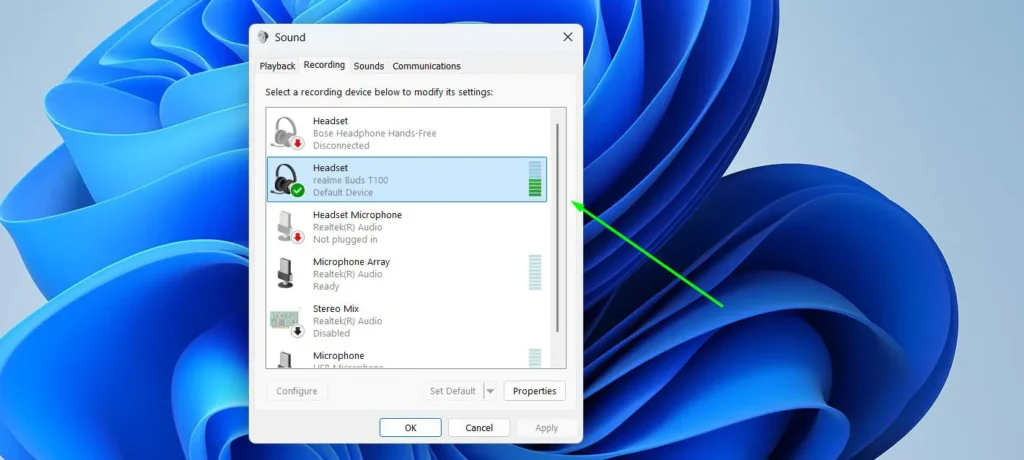
Step 3: Search Voice Recorder or Sound Recorder in the Start menu. Hit record, say a few words, play it back. This confirms both the right mic was used and the audio actually sounds good.
Bar stays flat no matter what you do? The mic is muted, disabled, or isn’t the default input. Head to the troubleshooting section below.
Fixing the Most Common Windows Microphone Problems
Even with everything set up right, mics still act up. Here’s exactly what to do for each common failure.
Run the built-in troubleshooter first: Go to Settings > System > Troubleshoot > Other troubleshooters, find Recording Audio, click Run. On Windows 11 24H2 and newer, you can also hit the Copilot key and type “My microphone isn’t working” — Copilot will jump straight to the troubleshooter or the right settings page.
Microphone Not Recognized At All
Work through these in order:
- Step 1: Check the physical connection. Unplug and reconnect. USB mic? Try a USB 3.0 port directly on the motherboard, not through a hub.
- Step 2: Open Device Manager. Expand “Audio inputs and outputs.” Look for a yellow warning symbol.
- Step 3: Right-click the flagged device. Choose Update driver or Uninstall device, then reconnect the mic so Windows reinstalls it clean.
- Step 4: Open mmsys.cpl > Recording tab. Right-click an empty area. Turn on “Show Disabled Devices.” If your mic shows grayed out, right-click it and hit Enable.
- Step 5: Check Settings > Privacy & security > Microphone. All three toggles need to be on.
- Step 6: Test the mic on another computer. Works there? It’s a Windows setting issue, not the hardware. Fails there too? Time to replace the mic.
Microphone Volume Too Low
- Step 1: Open the Sound Control Panel. Go to Recording. Right-click your mic. Select Properties.
- Step 2: Go to Levels. Raise volume and boost slowly. More boost also means more background noise.
- Step 3: Confirm the mic isn’t muted — check both the system tray and inside the app itself.
Echo or Feedback During Calls
- Step 1: Open mic Properties in the Sound Control Panel. Go to Listen. Make sure “Listen to this device” is unchecked — leaving it on sends your mic straight through your speakers and creates the feedback loop.
- Step 2: Turn down speaker volume, or switch to headphones, so audio stops re-entering the mic.
- Step 3: Turn on Acoustic Echo Cancellation in Enhancements if your device supports it.
Windows Keeps Switching Your Default Mic
- Step 1: Open mmsys.cpl > Recording tab. Set your mic as both Default Device and Default Communication Device.
- Step 2: Open mic Properties > Advanced. Uncheck “Allow applications to take exclusive control of this device.” This stops new devices from stealing your default.
- Step 3: Re-set your main mic as default any time you connect a new audio device — each new connection can trigger Windows to reassign the default on its own.
Microphone Broke After a Windows Update
- Step 1: Check your default input is still set right in Settings > System > Sound.
- Step 2: Check Privacy & security > Microphone — updates reset all three toggles more often than you’d think.
- Step 3: Open Device Manager. Find your mic under “Audio inputs and outputs.” Right-click. Select Update driver.
- Step 4: Restart Windows Audio and Windows Audio Endpoint Builder in services.msc. Still nothing? Grab the latest driver directly from your manufacturer’s site.
Get Better Mic Audio Without Buying New Gear
A few habits that make any mic on Windows 11 sound noticeably better.
Get Your Input Level Right
Too low sounds distant and thin. Too high clips and distorts. Use the live test bar in Sound Settings before anything important. Aim for the bar sitting around 70–80% when you’re talking at normal volume.
Cut Background Noise
Turn on Noise Suppression in the Enhancements tab and keep mic boost as low as you can — boost amplifies everything, not just your voice. The single biggest improvement is just moving the mic closer to your mouth. For genuinely noisy environments, third-party tools like Krisp or NVIDIA Broadcast still beat Windows 11’s built-in processing by a real margin.
Set Array Mics to Directional Mode for Remote Work
Most newer laptops have array mics — several microphones built into the display bezel. In mic properties, switch between 360-degree mode (picks up the whole room) and Directional/Personal mode (focuses on whoever’s sitting in front of the screen). Flipping to Directional mode is one of the quickest wins you can make for call quality on a laptop.
Keep Drivers Current
Check your mic or audio interface manufacturer’s site for driver updates monthly — not just Windows Update. After any big Windows 11 update, retest your setup. Updates silently reset audio settings or break driver compatibility more often than people expect.
Pick the Right Audio Format for the Job
Match format to what you’re actually doing. Calls and streaming: 16-bit, 48000 Hz — solid quality, light on the CPU. Podcasting and pro recording: 24-bit, 48000 Hz or higher — more room to edit later. Gaming: 16-bit, 48000 Hz hits the sweet spot.
AI transcription tip: Local tools like Whisper and Windows 11’s Live Captions are everywhere now. Keep your mic at least at 16-bit, 48000 Hz. Drop to telephone-quality 8000 Hz and Copilot voice commands, plus most transcription tools, start making mistakes.
Keep Your Mic Working Well Long-Term
Good settings don’t hold forever on their own. Here’s how to keep your audio input reliable month after month.
Clean the Mic Itself
Follow the manufacturer’s cleaning guidelines. Compressed air on grilles, gentle solutions on foam covers. Dust buildup muffles audio gradually with zero Windows-side cause — it’s easy to blame settings when it’s actually just grime.
Write Down Your Working Settings
Note your best volume, boost, format, and active enhancements for each mic. When a Windows update wipes everything, you restore it in minutes instead of troubleshooting from zero.
Do a Monthly Quality Check
Record the same short phrase every month. Listen for changes in gain, background noise, or clarity. Gradual decline usually points to failing hardware, not a Windows setting.
Check Cables and Connectors
Inspect cables every few months for fraying, kinks, or corroded connectors. A damaged cable is one of the most overlooked causes of bad audio — no driver update on earth fixes it.
Keep a Backup Mic Ready
Streaming or recording professionally? Keep a spare mic on hand. If your main one fails mid-session, a backup saves the entire recording.
Pro tip: If the same problem keeps coming back no matter what you try, it might be time to replace the hardware instead of chasing software fixes. Sometimes it really is the mic, not Windows.
Frequently Asked Questions
How do I manage audio input devices in Windows 11?
Right-click the speaker icon and open Sound settings. Scroll to Input, click your mic to set it as default, then click the arrow next to it to adjust volume, run a test, and change the audio format.
How do I view all connected audio input devices in Windows 11?
Go to Settings, then System, then Sound, and scroll to Input. To see disabled or hidden devices too, press Windows + R, type mmsys.cpl, open the Recording tab, right-click an empty area, and turn on Show Disabled Devices.
How do I fix microphone permissions in Windows 11?
Go to Settings, then Privacy and security, then Microphone. Turn on all three toggles: Microphone access, Let apps access your microphone, and Let desktop apps access your microphone. That third toggle is the one people miss, and it’s usually why a desktop app like Zoom can’t find the mic.
Why does my microphone sound muffled in Windows 11?
Open mic Properties through mmsys.cpl, go to Advanced, and set the format to 16-bit 48000 Hz. Also check Enhancements — stacking too many effects at once can actually make audio sound worse, not better.
Why is my USB microphone not showing up in Windows 11?
Try a different USB 3.0 port on the motherboard instead of a hub. Open mmsys.cpl, go to the Recording tab, and turn on Show Disabled Devices — it’s often connected but disabled, not actually missing.
Why does Windows keep switching my default microphone automatically?
Windows reassigns the default input every time a new audio device connects. Open mmsys.cpl, set your mic as both Default Device and Default Communication Device, then open its Properties and uncheck Allow applications to take exclusive control of this device under Advanced.
Can I use two microphones at the same time in Windows 11?
Windows 11 only runs one default input at a time on its own. To combine multiple mics into a single input, use VoiceMeeter Banana — assign your mics to Hardware Input 1 and 2, then set VoiceMeeter Input as your Windows default. Zoom, Teams, and OBS will all pick up the combined signal.
What is the best audio format for a microphone in Windows 11?
Use 16-bit 48000 Hz for calls, gaming, and streaming. Use 24-bit 48000 Hz or higher for professional recording and podcasting. Set it under mic Properties in mmsys.cpl, in the Advanced tab’s Format dropdown.
What should I do if my microphone stops working after a Windows 11 update?
Check that your default input device is still set correctly, and confirm all three mic permission toggles under Privacy and security haven’t been reset. Then update your audio driver in Device Manager and restart Windows Audio and Windows Audio Endpoint Builder in services.msc.
Why does my Bluetooth headset microphone quality drop on calls?
Classic Bluetooth switches from the high-quality A2DP profile to the lower-quality HFP profile the moment an app requests mic access. Open mmsys.cpl, go to Recording, open your headset Properties, go to Advanced, and set Default Format to 16000 Hz for the best quality that profile allows. If both your PC and headset support Bluetooth LE Audio, updating Windows and your Bluetooth driver can eliminate this drop entirely instead of just working around it.
How do I enable Windows Studio Effects for my microphone?
Go to Settings, then System, then Sound, and click the arrow next to your mic. PCs with a Neural Processing Unit (NPU), including Copilot+ devices, show a Windows Studio Effects section. Toggle Voice Focus on for AI noise cancellation with no meaningful CPU hit.
How do I stop my laptop’s built-in mic from picking up background noise?
Turn on Noise Suppression and Acoustic Echo Cancellation in mic Enhancements through mmsys.cpl. If your laptop has an array mic, switch to Directional mode in mic properties to focus pickup toward your face and cut room noise noticeably.