A loose headphone jack connection is one of the most frustrating audio problems out there. One moment the sound is perfect, and the next it cuts out, crackles, or only plays through one ear. The good news? Most of the time, this is completely fixable without any special tools or professional help. Whether the issue is dust buildup, a bent connector, or a worn-out port, this step-by-step guide covers every practical fix that actually works.
Quick Summary – Key Takeaways
- A loose headphone jack is usually caused by dust, lint, a bent connector, or a worn-out port
- Cleaning the jack port is the first and most effective fix for most users
- Bending the connector tip slightly can restore a firm connection in many cases
- Software audio settings on Windows 11 can also cause symptoms that mimic a physical jack problem
- If the port is physically broken, replacing it or using a Bluetooth adapter are the best long-term solutions
- Regular cleaning and careful unplugging habits prevent most loose jack issues from developing
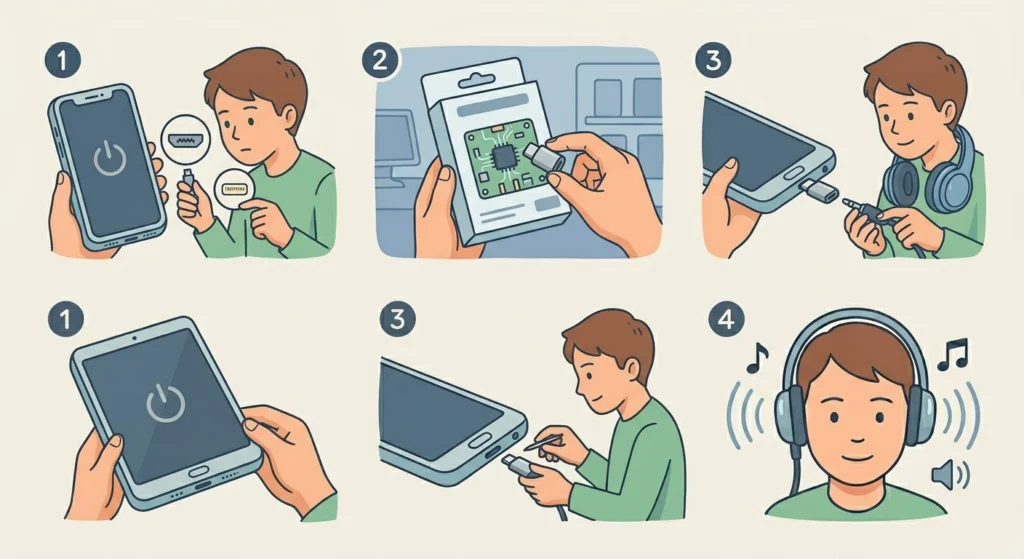
How to Fix a Loose Headphone Jack Connection Step by Step
Fix 1: Clean the Headphone Jack Port
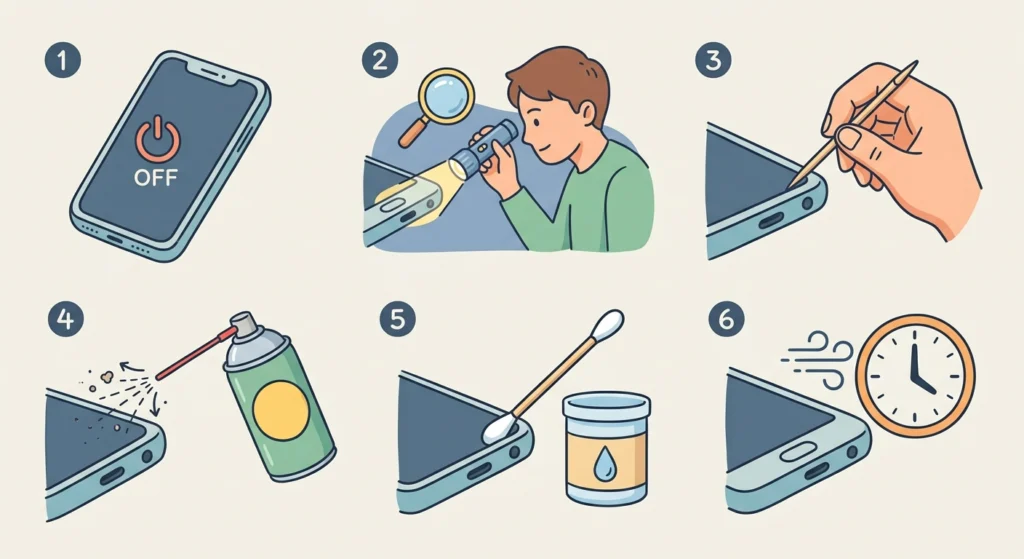
Dust and lint packed inside the port is the number one cause of a loose or intermittent headphone connection. When debris builds up, the connector cannot sit fully inside the port, making it feel loose and causing audio dropouts.
- Step 1: Power off the device before cleaning to avoid short circuits.
- Step 2: Shine a small flashlight into the jack port to check for visible debris.
- Step 3: Take a wooden or plastic toothpick and gently scrape along the inner walls of the port. Never use metal objects – they can scratch and damage the internal contacts.
- Step 4: Use a can of compressed air to blow out any loosened particles. Hold the can upright and use short bursts directly into the port.
- Step 5: Dip a cotton swab very lightly in isopropyl alcohol (90% or higher) and carefully clean the inside of the port. Make sure it is barely damp, not wet.
- Step 6: Allow the port to dry completely for at least 5 minutes before plugging headphones back in.
This works best when the device has been carried in a pocket or bag regularly, as these environments push lint directly into open ports.
Fix 2: Straighten or Adjust the Headphone Connector Tip
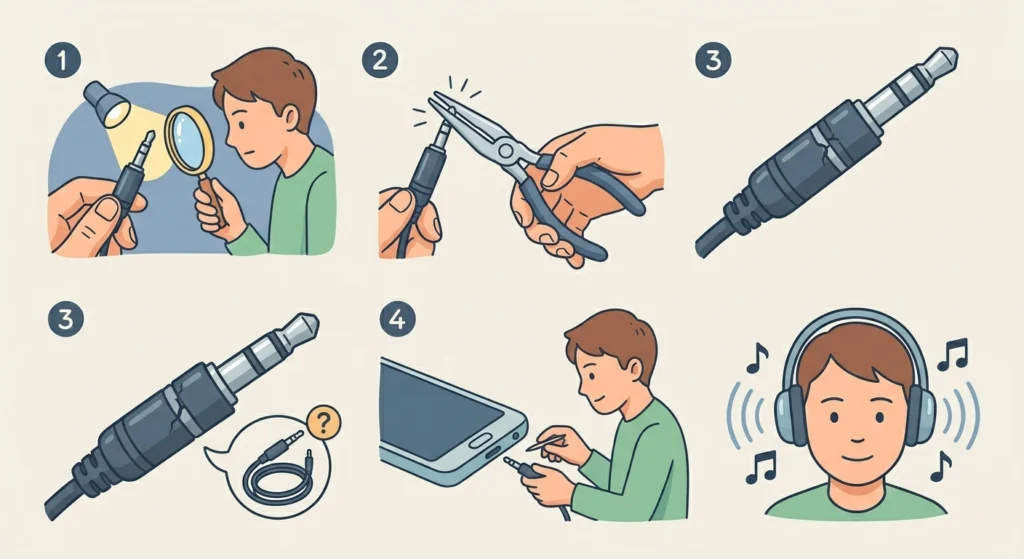
Sometimes the problem is not the port at all – it is the headphone plug itself. A slightly bent or misaligned connector tip will not make full contact inside the port, resulting in one-sided audio or crackling. Inspect the metal tip of the headphone jack under good lighting.
- Step 1: Examine the 3.5mm plug tip closely. Look for any bending, flattening, or dents on the metal barrel.
- Step 2: If the tip appears slightly bent, use a pair of needle-nose pliers to gently straighten it. Apply very light pressure – the goal is minor correction, not reshaping.
- Step 3: Check the black rubber or plastic rings (called insulators) along the plug. If any are cracked or missing, the signal bands are touching incorrectly. This requires a new plug or cable replacement.
- Step 4: Plug the connector back in and test audio in both ears.
Most people find that even a 1-2mm bend on the tip is enough to cause intermittent connection issues, especially with snug ports.
Fix 3: Tighten the Headphone Jack Port on the Device
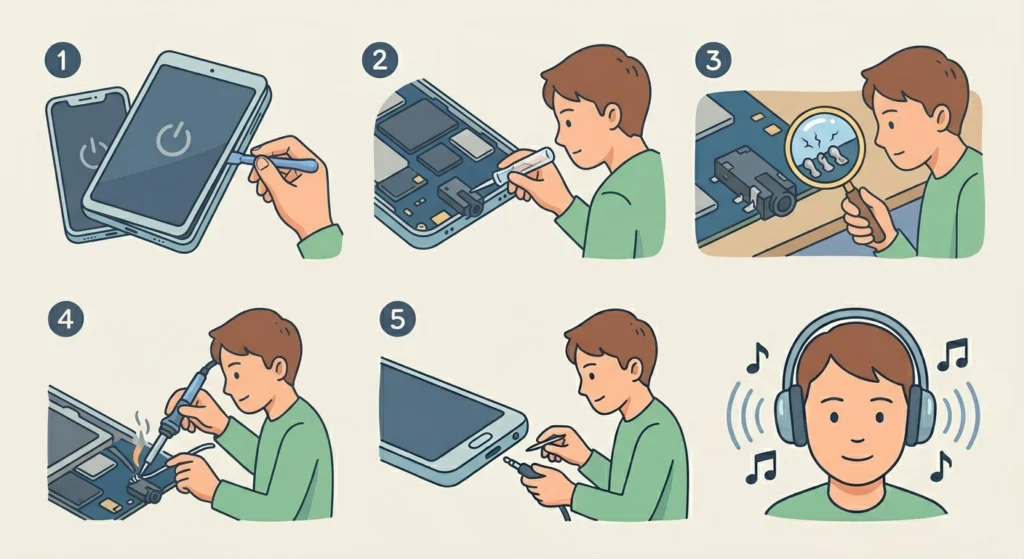
The jack port itself can work loose from the internal PCB over time, especially on devices that frequently have cables plugged and unplugged. When the port shifts position, it no longer grips the connector firmly.
- Step 1: If comfortable with basic electronics, power off the device completely and remove the back cover or panel (varies by device model – look up the specific teardown for the device).
- Step 2: Locate the headphone jack port on the motherboard or audio board.
- Step 3: Check if the solder joints holding the port to the board look cracked, dull, or broken. Healthy solder joints appear smooth and shiny.
- Step 4: If cracked solder joints are visible, use a soldering iron to reflow the existing solder or add a small amount of fresh solder to each joint.
- Step 5: Reassemble the device and test.
This fix is for those comfortable with soldering. If not, a local phone or electronics repair shop can handle this quickly and affordably – usually within an hour.
Pro-Tip: Before attempting any internal repair, check if the device is still under warranty. Opening the device can void the warranty. Always back up data on smartphones before disassembly.
Fix 4: Check and Adjust Audio Settings on Windows 11
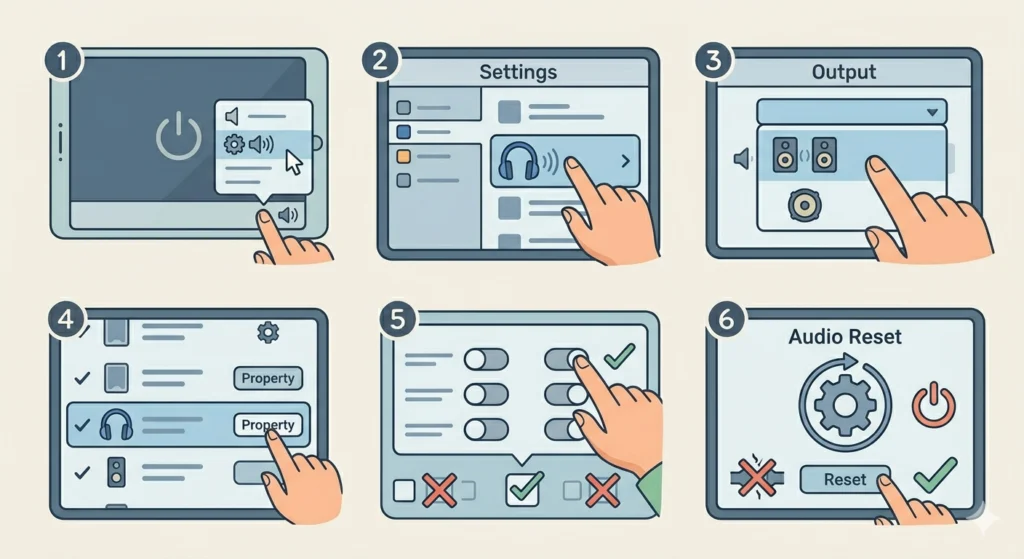
Not every loose-sounding connection is a physical problem. On Windows 11, incorrect audio output settings can create symptoms that sound exactly like a bad physical connection – including audio cutting to one channel or intermittent dropouts. Before tearing anything apart, rule out software first.
- Step 1: Right-click the speaker icon in the Windows 11 taskbar and select ‘Sound settings’.
- Step 2: Under ‘Output’, confirm the correct audio device (headphones) is selected.
- Step 3: Click on the headphone device and check ‘Channels’ – make sure it is set to ‘Stereo’, not ‘Mono’.
- Step 4: Scroll down and click ‘More sound settings’, then go to the ‘Playback’ tab.
- Step 5: Right-click the headphone device and select ‘Properties’, then go to the ‘Enhancements’ tab and disable all enhancements to rule out processing conflicts.
- Step 6: If issues persist, try resetting audio settings on Windows 11 to restore defaults.
Fix 5: Use a Headphone Jack Adapter or Replacement
When the port is too worn or physically damaged to hold a firm connection, the most practical solution is to work around it entirely. A USB-C to 3.5mm adapter or Bluetooth adapter gives full audio quality without depending on the damaged port.
- Step 1: Identify the available ports on the device (USB-C, micro-USB, Lightning, or Bluetooth).
- Step 2: Purchase a quality DAC adapter that matches the available port. Avoid very cheap adapters – low-quality DAC chips introduce noise and poor stereo separation.
- Step 3: Plug the adapter into the working port, then connect headphones to the adapter’s 3.5mm output.
- Step 4: Test audio quality in both channels at different volume levels.
The key is to choose an adapter from a reputable brand. A good USB-C DAC adapter will often sound better than a worn-out analog jack port anyway.
Pro-Tip: If switching to Bluetooth headphones as a permanent solution, make sure to properly pair the devices for stereo output. An incorrectly paired Bluetooth device can play mono or drop audio just like a bad wired connection.
Tips for Keeping the Headphone Jack Connection Secure
- Always unplug headphones by gripping the connector body, never by pulling the cable. Pulling the cable stresses the solder joints inside the plug and at the port.
- Clean the jack port every few months using compressed air, especially on devices used outdoors or carried in pockets.
- Avoid bending the cable at a sharp angle near the plug. A 90-degree connector style reduces strain for devices in pockets or bags.
- Store headphones with the cable loosely coiled, not tightly wrapped. Tight wrapping fatigues the wire near the connector over time.
- Use a port cover or case plug on rarely-used devices to keep lint and dust out of the jack port.
Common Headphone Jack Problems and Solutions
Audio Only Plays in One Ear
This almost always points to a connection issue at one of the signal bands on the 3.5mm plug. Check the insulators (black rings) on the plug for damage, clean the port thoroughly, and verify stereo output is enabled in system audio settings.
Crackling or Static Sound
Crackling during movement usually means dirty or oxidized contacts inside the port or on the plug. Clean both with a cotton swab and isopropyl alcohol. Static that occurs even when the headphones are still can indicate a driver or software issue – check the audio driver in Device Manager on Windows 11.
Audio Cuts Out When the Cable Moves
This is a classic sign of a broken wire near the connector. The break is usually just inside the rubber strain relief at the base of the plug. Gently flex the cable near the plug while listening – if audio cuts in and out at a specific flex point, the wire is broken internally at that spot and the cable needs replacement or re-termination.
No Sound at All After Plugging In
If there is zero audio after plugging in, first check audio input device settings on Windows 11 to confirm the system recognized the headphone connection. Also check if the device has a separate audio switch or selector that defaults to speakers.
Headphones Work on Some Devices but Not Others
This suggests the plug and the port have an impedance or connector standard mismatch. Some headphones use TRRS (4-pole) connectors for combined audio and microphone, while older ports expect TRS (3-pole). A simple TRRS to TRS adapter typically resolves this.
Frequently Asked Questions
Why does the headphone jack feel loose on my phone?
The most common reasons are lint or dust packed into the port preventing full insertion, a worn-out port after thousands of plug cycles, or a slightly bent connector on the headphone plug itself. Cleaning the port is the best first step since it resolves the problem in the majority of cases.
Can a loose headphone jack be fixed without soldering?
Yes, in most cases. Cleaning the port, straightening the connector tip, and using a quality adapter are all no-solder solutions. Soldering is only needed when the port has physically detached from the circuit board inside the device.
Is it safe to clean the headphone jack with alcohol?
Yes, isopropyl alcohol at 90% concentration or higher is safe for cleaning headphone jack ports. The key is to use a barely-damp swab – not a wet one – and to allow the port to dry completely before use. Avoid lower-concentration rubbing alcohol as the extra water content takes longer to evaporate.
How do I know if the headphone jack port is damaged beyond repair?
Signs of irreparable damage include the port visibly moving or wiggling inside the device when a plug is inserted, broken plastic tabs inside the port that no longer grip the connector, or fully detached solder joints with no continuity. In these cases, a USB adapter or Bluetooth solution is the most practical path forward.
Why does audio crackle only when the cable moves?
Movement-dependent crackling almost always indicates an internal wire break near the connector, inside the strain relief. The broken wire strands make intermittent contact only when the cable flexes a certain way. The fix is to re-terminate the connector by cutting off the damaged end and soldering on a new 3.5mm plug.
Does a loose headphone jack affect microphone quality?
Yes. On TRRS headsets that include a microphone, a loose connection affects the microphone channel as well as the audio channels. Crackling, dropped mic signal, or no microphone detection can all result from a poor jack connection. Fixing the physical connection or checking microphone detection settings on Windows 11 will address this.
Why does the headphone jack work when held at a certain angle?
This means the connector is not making full contact with the port contacts in its normal position – it only lines up correctly when tilted. This is caused by either a bent connector tip, a worn port with spread contacts, or debris preventing full insertion. Clean the port first, then inspect the connector for bending.
Can I use super glue to secure a loose headphone jack?
This is not recommended. Super glue can seep inside the port and permanently bond the connector in place or damage the internal contacts. A tight-fitting adapter or jack port replacement is a far safer and more effective permanent solution.
How long does a headphone jack port typically last?
Most 3.5mm jack ports are rated for around 5,000 insertion cycles. For daily users who plug and unplug headphones multiple times a day, this can mean the port wears out within a few years. Gentle handling and occasional cleaning significantly extend the usable life of the port.
What is the difference between a 3-pole and 4-pole headphone jack?
A 3-pole (TRS) connector has two black rings and carries stereo audio only – left channel, right channel, and ground. A 4-pole (TRRS) connector has three black rings and also carries a microphone signal. Using a 4-pole headset in a 3-pole port, or vice versa, can cause one channel to go silent or the microphone to not work. A simple adapter resolves compatibility between the two standards.