A headphone mic picking up too much background noise is one of the most frustrating audio problems – whether it is ruining calls, recordings, or streams. The good news is that most causes are fixable in minutes with the right adjustments. This guide walks through every proven fix, from quick Windows settings to hardware tweaks, so the mic only captures what it should.
Quick Summary
- Lower the microphone input level in Windows sound settings to reduce sensitivity
- Disable or reduce microphone boost, which amplifies background noise alongside the voice
- Turn off audio enhancements that can sometimes make background noise worse
- Enable noise suppression or noise cancellation if available in the mic properties
- Check the physical mic placement – distance and direction matter a lot
- Use a noise gate app or software as a final layer of noise control
Step-by-Step Fixes for Headphone Mic Picking Up Too Much Background Noise
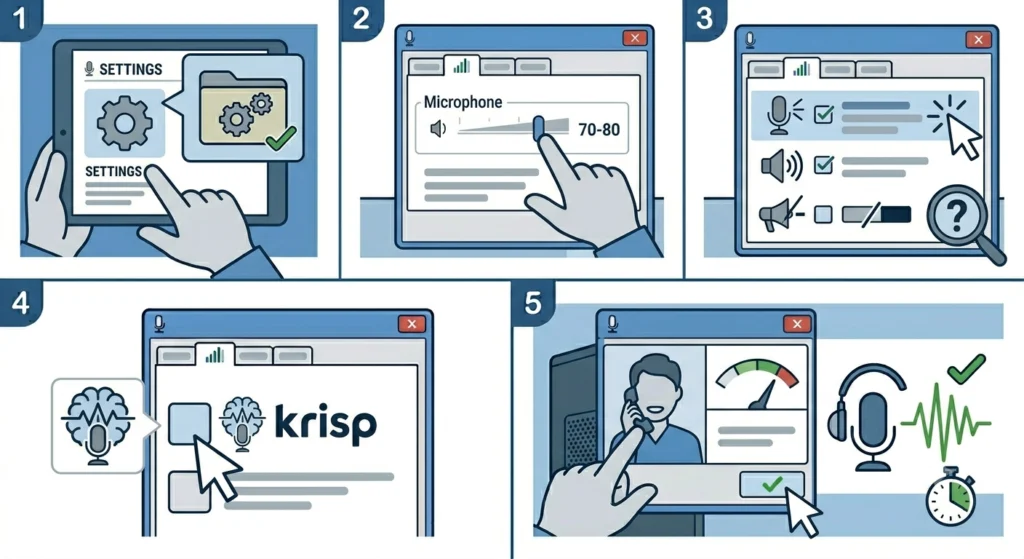
Fix 1: Lower the Microphone Input Volume in Windows
One of the fastest ways to reduce background noise pickup is simply lowering the microphone sensitivity in Windows. A mic set too high will catch every fan hum, keyboard click, and ambient sound in the room.
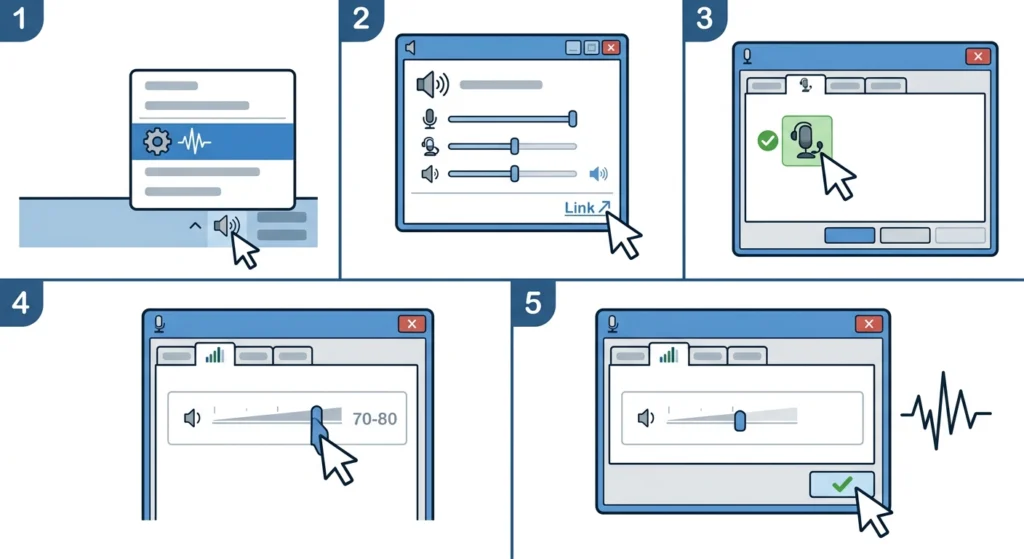
- Step 1: Right-click the speaker icon in the taskbar and select ‘Sound settings’
- Step 2: Scroll down and click ‘More sound settings’ to open the classic Sound panel
- Step 3: Go to the ‘Recording’ tab and double-click the headphone microphone
- Step 4: Open the ‘Levels’ tab and lower the microphone volume – try starting at 70-80 instead of 100
- Step 5: Click ‘Apply’ and test by speaking normally to see if background noise is reduced
The key is finding the lowest level where the voice still comes through clearly. Most people find that 70 to 85 is the sweet spot – loud enough for the voice, quiet enough to stop picking up the room.
Fix 2: Disable or Reduce Microphone Boost
Microphone boost is a Windows feature that amplifies the mic signal when the input is too weak. The problem is it boosts everything equally – the voice and every background sound at the same time. If the headphone mic is picking up too much noise, microphone boost is often the culprit.
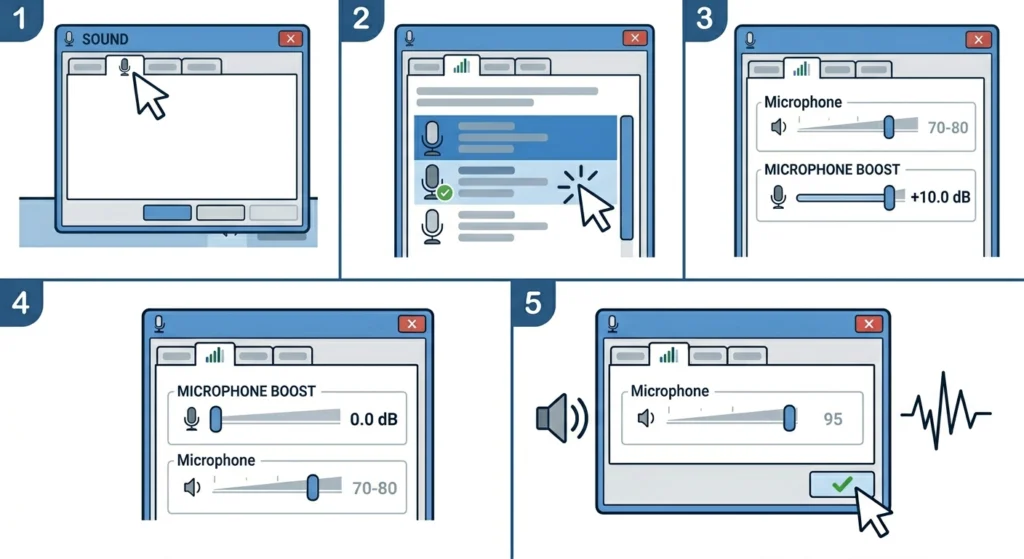
- Step 1: Follow the same path: Sound settings – More sound settings – Recording tab
- Step 2: Double-click the headphone mic and go to the ‘Levels’ tab
- Step 3: Look for the ‘Microphone Boost’ slider just below the main volume slider
- Step 4: Set it to +0.0 dB (completely off) or as low as possible
- Step 5: Apply and test – if the voice is now too quiet, increase the main mic level slightly instead
This works best when combined with Fix 1. Raise the main microphone level to compensate for removing the boost, rather than relying on amplification that picks up noise indiscriminately.
Pro-Tip: Microphone boost should ideally stay at 0 dB at all times. If the voice sounds too quiet without it, the physical mic placement is likely the real issue – move it 2 to 3 inches closer to the mouth rather than boosting the signal.
Fix 3: Enable Noise Suppression in Microphone Enhancements
Windows includes built-in audio processing tools that can significantly reduce background noise. Not all headphone mics have this option, but it is worth checking first before installing any third-party software.
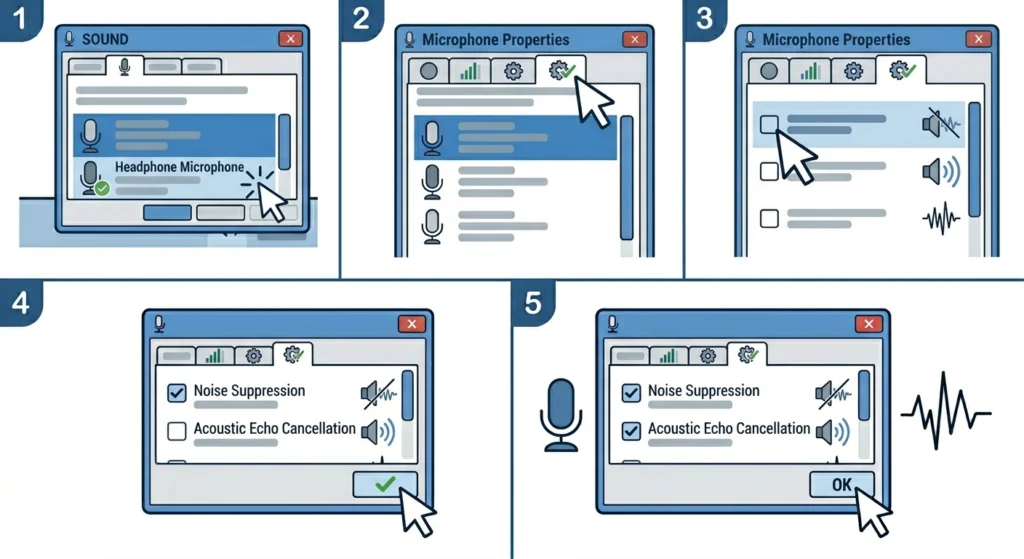
- Step 1: Open the Recording tab in Sound settings and double-click the headphone mic
- Step 2: Click the ‘Enhancements’ tab (on some systems it appears as ‘Advanced’ or ‘Effects’)
- Step 3: Look for checkboxes labeled ‘Noise Suppression’, ‘Acoustic Echo Cancellation’, or ‘Noise Reduction’
- Step 4: Check ‘Noise Suppression’ first, click Apply, and test the mic
- Step 5: Enable ‘Acoustic Echo Cancellation’ if there is also an echo problem
If the Enhancements tab is missing entirely, the headphone mic driver may not support it. In that case, jump to Fix 5 for a software-based solution. For more advanced audio setting adjustments on Windows 11, adjusting audio output settings can also help clean up the overall sound profile.
Fix 4: Disable All Audio Enhancements (If Noise Gets Worse)
This might sound counterintuitive, but sometimes Windows audio enhancements actually make background noise worse, not better. Certain processing effects can introduce artifacts or amplify unwanted frequencies. If enabling enhancements made things worse, try disabling them entirely.
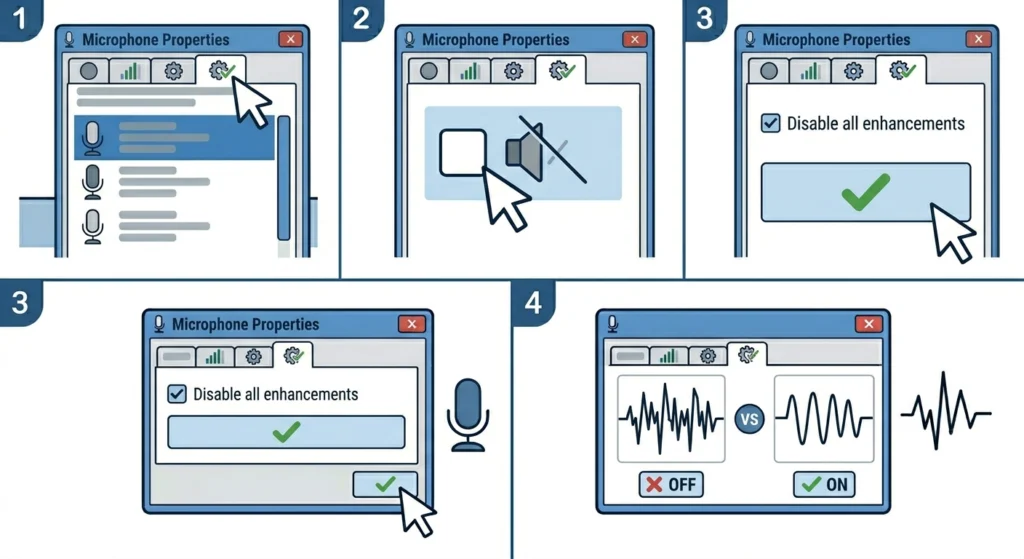
- Step 1: In the microphone properties window, go to the ‘Advanced’ tab
- Step 2: Check the box labeled ‘Disable all enhancements’ or ‘Disable all sound effects’
- Step 3: Click Apply and do a fresh microphone test
- Step 4: Compare the result to having enhancements enabled – keep whichever sounds cleaner
Disabling enhancements passes the raw mic signal through without any Windows processing. For some headphone mics, especially ones with built-in noise cancellation hardware, this actually produces a much cleaner result.
Fix 5: Use a Noise Gate App (NVIDIA RTX Voice, Krisp, or Similar)

When Windows settings alone are not enough, a dedicated noise gate or AI noise cancellation app is the most powerful solution available. These tools process the microphone signal in real time and remove everything that does not sound like a human voice.
- Step 1: Download one of the following free tools: NVIDIA RTX Voice (for NVIDIA GPU users), Krisp (cross-platform, free tier available), or Discord’s built-in Krisp noise suppression
- Step 2: Install the app and follow its setup – most will create a virtual microphone device
- Step 3: In whatever app is being used (Discord, Zoom, OBS, Windows), change the microphone input to the new virtual mic created by the noise suppression app
- Step 4: Adjust the suppression strength inside the app – most have a slider from light to heavy suppression
- Step 5: Test with a voice call or recording to confirm background noise is removed
This works best when the Windows mic levels are already optimised from Fixes 1 and 2. Running AI noise suppression on top of a properly configured mic input gives the cleanest results.
Pro-Tip: NVIDIA RTX Voice works even on non-RTX graphics cards by editing one line in its config file. Search for the RTX Voice non-RTX workaround – it is widely documented and completely free.
Fix 6: Check and Adjust Physical Mic Placement
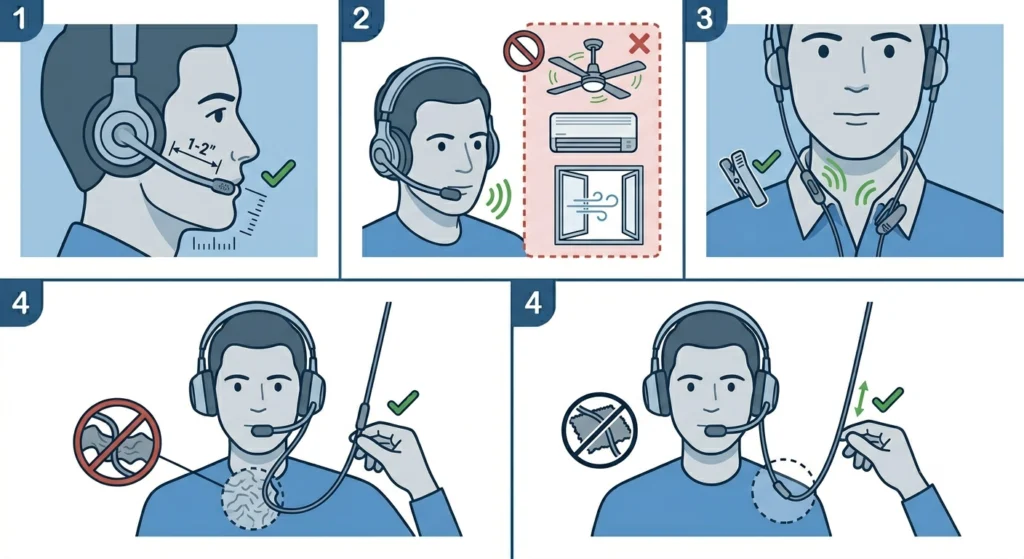
No software fix can fully compensate for poor physical mic positioning. The closer the mic is to the mouth and the further it is from noise sources, the less background noise it captures. This is especially important for headphones with boom mics.
- Step 1: Position the boom mic about 1 to 2 inches from the corner of the mouth, not directly in front – side positioning reduces breath pops and picks up less room noise
- Step 2: Make sure the mic is not pointing toward a fan, air conditioner, or open window
- Step 3: If the headphones have an inline mic on the cable, clip it higher up near the collarbone for better voice pickup and less body movement noise
- Step 4: Avoid having the mic cable rub against clothing – this creates constant rustling noise that software cannot always filter
Fix 7: Update or Reinstall the Headphone Audio Driver

A corrupted or outdated audio driver can cause the mic to behave erratically, sometimes recording at the wrong sensitivity or failing to apply noise suppression properly. Updating the driver often resolves these invisible issues.
- Step 1: Right-click the Start button and open ‘Device Manager’
- Step 2: Expand ‘Audio inputs and outputs’ and find the headphone microphone
- Step 3: Right-click it and select ‘Update driver’, then choose ‘Search automatically for drivers’
- Step 4: If no update is found, visit the headphone manufacturer’s website and download the latest driver manually
- Step 5: Restart the computer after installing and retest the microphone
If updating does not help, try uninstalling the driver entirely and restarting – Windows will reinstall a fresh copy automatically. This resolves corrupted driver states that updates alone cannot fix. For more help with managing audio input devices in Windows 11, including switching between multiple mics, that guide covers everything in one place.
Fix 8: Check App-Specific Microphone Settings
Many apps – Discord, Zoom, Microsoft Teams, OBS – have their own independent microphone sensitivity and noise suppression settings. Even if Windows is perfectly configured, an app set to high input sensitivity will still pick up background noise. Always check both levels.
- Step 1: Open the audio or voice settings inside the specific app being used
- Step 2: Find the microphone input volume or sensitivity slider and reduce it if it is set above 80%
- Step 3: Look for built-in noise suppression, echo cancellation, or noise gate options and enable them
- Step 4: In Discord specifically: User Settings – Voice and Video – enable ‘Noise Suppression’ powered by Krisp
- Step 5: Run a test call or use the app’s mic test feature to confirm the improvement
Tips to Keep Background Noise Under Control
- Record in smaller, carpeted rooms when possible – hard surfaces reflect sound and increase room noise pickup
- Close windows and doors before important calls or recordings to reduce outside noise
- Turn off fans, air conditioners, or other appliances temporarily if they are being picked up
- Use a directional (cardioid) mic headset rather than omnidirectional – it only picks up sound from the front
- Keep mic cables away from power cables – electrical interference can add a constant hum to recordings
- If using a USB headset, try a different USB port – some ports introduce electrical noise into audio
Common Problems and Quick Solutions
Mic picks up keyboard typing loudly
Lower microphone boost to 0 dB and reduce input volume to around 70. Use a noise gate app to cut sound below a certain threshold – typing usually falls just below normal voice volume.
Fan noise is constantly audible in recordings
Enable noise suppression in Windows mic enhancements or use NVIDIA RTX Voice or Krisp. These tools are specifically designed to remove steady background hum like fans.
Echo from speakers is being picked up by the mic
Enable ‘Acoustic Echo Cancellation’ in the mic enhancements tab. Alternatively, use headphones with audio rather than speakers while the mic is active.
Background noise started after a Windows update
Windows updates sometimes reset audio settings or change driver configurations. Check microphone levels and re-enable noise suppression after any major update. If needed, resetting audio settings in Windows 11 can restore clean defaults quickly.
Mic sounds fine in Windows but noisy in one specific app
The app has its own sensitivity settings. Go into that app’s audio settings and lower the input volume, then enable any built-in noise suppression it offers.
Noise suppression makes the voice sound robotic or choppy
The suppression strength is set too high. Lower it to a medium setting – most AI noise tools have a slider. A light suppression setting usually removes background noise without affecting voice quality.
Frequently Asked Questions
Why is the headphone mic picking up so much background noise?
The most common reasons are: the microphone input volume is set too high, microphone boost is enabled, or the mic is positioned too far from the mouth. A mic that is too sensitive will pick up everything in the room equally. Lowering the input level and disabling boost are usually the first fixes to try.
Does microphone boost cause background noise?
Yes. Microphone boost amplifies the entire input signal without discrimination. It makes the voice louder but also makes every background sound – fans, typing, room noise – proportionally louder as well. Setting boost to 0 dB and compensating by moving closer to the mic is the better approach.
What is the best free app to remove background noise from a mic?
NVIDIA RTX Voice and Krisp are both excellent free options. NVIDIA RTX Voice works even without an RTX GPU with a small workaround. Krisp has a free tier that covers most casual use. Discord also includes Krisp noise suppression built in for free.
Should audio enhancements be enabled or disabled for microphone noise?
It depends on the headphone mic model. Some mics benefit from Windows noise suppression enhancements. Others, particularly those with built-in noise cancellation hardware, actually perform better with all Windows enhancements disabled. Try both and compare.
Why does the mic sound fine in Windows but noisy in Discord or Zoom?
These apps have independent microphone sensitivity settings that override Windows levels. Open the voice settings inside the app and lower the input volume there. Also enable the app’s built-in noise suppression if available.
How far should a headset boom mic be from the mouth?
Ideally 1 to 2 inches from the corner of the mouth, positioned slightly to the side rather than directly in front. Side placement reduces breath pops and background noise pickup while keeping voice clarity high.
Can background noise be removed without any extra software?
Yes. Lowering microphone input volume, disabling microphone boost, and enabling Windows built-in noise suppression in the microphone enhancements tab can significantly reduce background noise without installing anything extra. These steps alone solve the problem for most users.
Does the USB port affect microphone noise?
Yes, for USB headsets. Some USB ports, especially those near power circuitry on cheaper motherboards, can introduce electrical interference that appears as a constant hum in the mic signal. Trying a different USB port, particularly one on the back of the desktop, often resolves this.
Why does noise suppression make the voice sound robotic?
The suppression intensity is too aggressive. AI noise tools work by identifying and removing sounds that do not match a voice pattern. When set too high, they can cut out parts of quieter consonants or breathing, creating a choppy or robotic sound. Reducing the suppression strength to a medium or light setting usually fixes this.
Does the room itself affect how much background noise the mic picks up?
Significantly. Hard surfaces like bare walls, tile floors, and glass windows reflect sound waves and increase how much ambient noise reaches the mic. Softer rooms with carpet, curtains, and furniture absorb more sound. Recording in a smaller, furnished room always produces a cleaner mic signal than a large, bare space.