
Key Takeaways
- Charge the headphones fully with the included USB-C cable before the first setup.
- Press and hold the power button for 1 second to turn on the headphones and start pairing mode.
- Select ‘Crusher ANC 2’ from the Bluetooth list on the connecting device and confirm the pairing prompt.
- Download the Skull-iQ app to unlock custom sound profiles, EQ settings, and multipoint controls.
- Multipoint pairing lets the headphones stay connected to two devices at the same time.
- A quick reset through the Volume Down button solves most stubborn pairing issues.
Setting up Skullcandy Crusher ANC 2 headphones takes only a few minutes once the charging, pairing, and app steps are done in the right order. Most people find that skipping the charging step or rushing the pairing mode is exactly what causes confusion later, so following each stage properly makes the whole process smoother.
Setting Up Skullcandy Crusher ANC 2: Step-by-Step
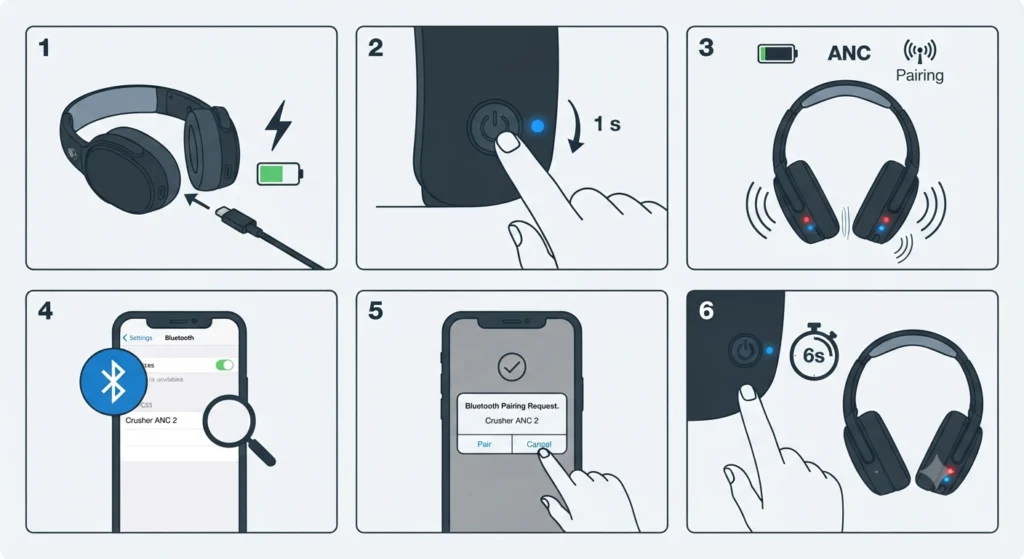
This works best when the headphones are fully powered and the connecting device has Bluetooth turned on before starting. Here is the full setup process from unboxing to a confirmed connection.
- Step 1: Connect the included USB-C cable to the headphones and a power source, then let them charge fully before first use. A full charge typically provides up to 50 hours of listening time.
- Step 2: Press and hold the power button for about 1 second. A tone plays and the LED turns blue, confirming the headphones are powered on.
- Step 3: Listen for the voice prompts. The headphones announce the current battery level, then say ‘ANC ON,’ followed by ‘Ready to Pair.’ At this point, the LED pulses red and blue.
- Step 4: Open the Bluetooth settings menu on the phone, tablet, or computer being used, and wait for ‘Crusher ANC 2’ to appear in the list of available devices.
- Step 5: Tap or select ‘Crusher ANC 2,’ then confirm the pairing prompt that appears on the screen. Once connected, a voice prompt says ‘connected,’ and the headphones are ready to use.
- Step 6: For a faster route into pairing mode later, hold the power button for 6 seconds while the headphones are off. This powers them on and drops them straight into pairing mode without needing to wait through the earlier prompts.
Setting Up the Skull-iQ App
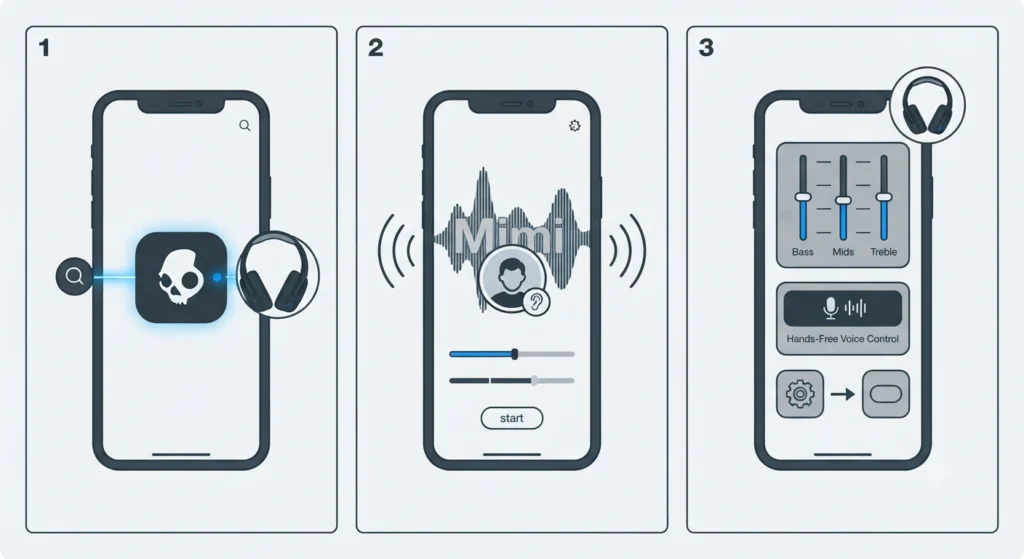
The Skull-iQ app is where the real customization happens, and it is worth setting up right after the initial Bluetooth pairing. Search for ‘Skull-iQ’ in the Apple App Store or Google Play Store, install it, and follow the on-screen instructions to link it to the headphones.
- Step 1: Open the Skull-iQ app once installed and allow it to detect the connected Crusher ANC 2 headphones.
- Step 2: Run the Personal Sound hearing test, which uses Mimi technology to build a custom sound profile based on individual hearing.
- Step 3: Adjust EQ settings, assign custom button functions, and turn on Hands-Free Voice Control if preferred.
Pro-Tip: Running the Personal Sound hearing test early makes a noticeable difference in how balanced the bass and vocals sound, especially for anyone who finds default headphone tuning either too sharp or too muddy.
Setting Up Multipoint Pairing
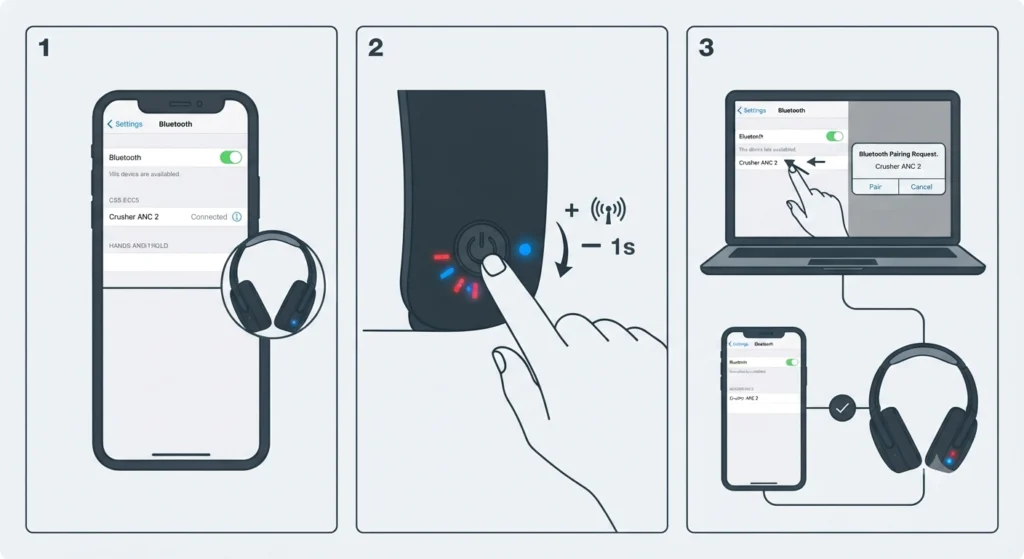
Multipoint pairing lets the Crusher ANC 2 stay connected to two devices at once, which is handy for switching between a laptop and a phone without repairing every time.
- Step 1: Pair the headphones with the first device by following the standard pairing steps above.
- Step 2: With the headphones already connected to the first device, press the power button once, then press and hold it again briefly to re-enter pairing mode.
- Step 3: Open Bluetooth settings on the second device, select ‘Crusher ANC 2,’ and confirm the pairing prompt. Both devices now stay connected, and the headphones switch audio automatically depending on which one is active.
Multipoint pairing can be turned off inside the Skull-iQ app for anyone who prefers connecting to just one device at a time.
Connecting Crusher ANC 2 on a Windows 11 Computer
Pairing with a Windows 11 laptop or desktop follows the same basic steps as any other device, though a few extra settings sometimes need attention afterward. Once the headphones show up and connect through Windows Bluetooth settings, it helps to check that the correct audio output is selected so sound actually plays through the headphones rather than the built-in speakers, and a quick look at adjusting the audio output settings clears that up in seconds. If the connection ever drops or sounds one-sided, going through the steps to re-pair the Bluetooth headphones for stereo sound usually restores a clean, balanced connection.
Tips for a Smooth Setup
- Keep the headphones within a few feet of the connecting device during the first pairing attempt, since a weak signal can interrupt the process.
- Turn off Bluetooth on other nearby devices temporarily if the headphones keep connecting to the wrong one.
- Use the Crusher intensity wheel on the earcup to fine-tune the bass level once the headphones are paired, rather than relying only on app EQ settings.
- Toggle the ANC switch to cycle between full noise cancellation, Stay-Aware mode, and off, depending on the environment.
Common Setup Problems and Fixes
Fix 1: Headphones Do Not Appear in the Bluetooth List
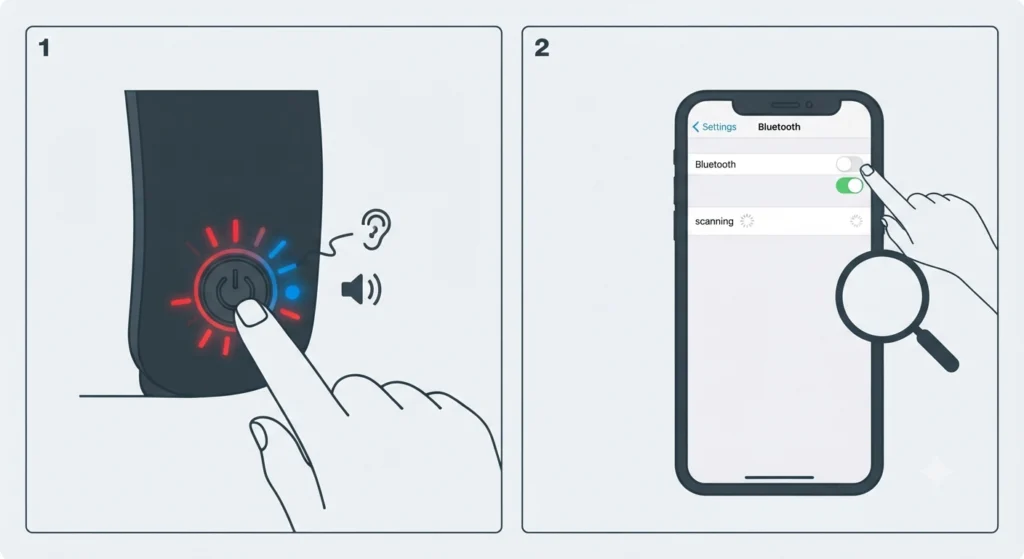
Make sure the headphones are actually in pairing mode by listening for the ‘Ready to Pair’ voice prompt and watching for the red and blue pulsing LED. If nothing shows up after that, turn Bluetooth off and back on on the connecting device, then search again.
Fix 2: Pairing Keeps Failing
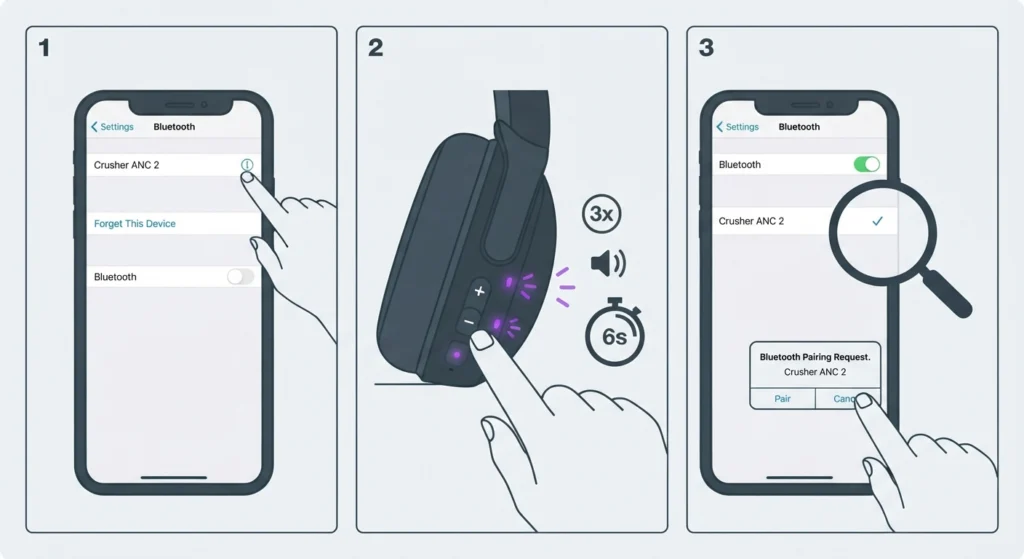
A full reset usually solves this. Remove ‘Crusher ANC 2’ from the device’s Bluetooth paired list and turn Bluetooth off. Power the headphones on, then press and hold the Volume Down button for 6 seconds. A tone plays and the LED flashes purple three times, followed by the ‘Ready to Pair’ prompt. Turn Bluetooth back on, select the headphones again, and accept the pairing prompt.
Fix 3: No Sound After Connecting
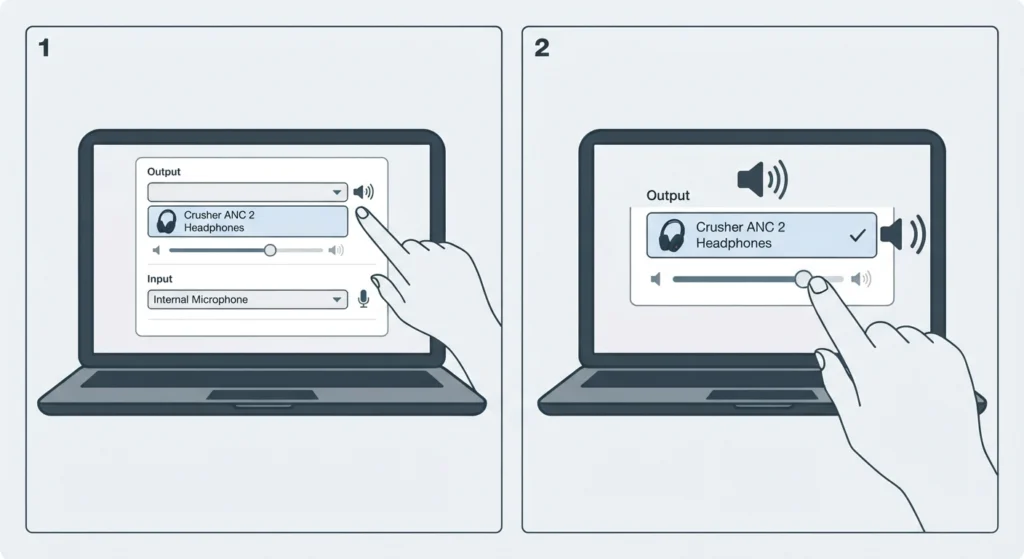
This is almost always an audio output setting issue rather than a pairing problem. Checking the input and output device list on the computer resolves this in most cases, and reviewing how to manage audio input devices can help if a microphone or call feature is also acting up.
Frequently Asked Questions
How do you turn on Skullcandy Crusher ANC 2 for the first time?
Press and hold the power button for about 1 second. A tone and blue LED confirm power on, followed by voice prompts announcing battery life and pairing status.
How long does the battery last on Crusher ANC 2?
A full charge provides up to 50 hours of listening time, and a 10-minute rapid charge adds roughly 4 hours of playback.
Can Crusher ANC 2 connect to two devices at once?
Yes, multipoint pairing allows the headphones to stay connected to two devices simultaneously, with audio switching automatically between them.
What app is needed for Skullcandy Crusher ANC 2?
The Skull-iQ app handles personalized sound profiles, EQ adjustments, custom button controls, and multipoint settings.
How do you reset Crusher ANC 2 if pairing fails?
Remove the headphones from the device’s Bluetooth list, turn the headphones on, then hold the Volume Down button for 6 seconds until the LED flashes purple and the Ready to Pair prompt plays.
How do you turn off noise cancellation on Crusher ANC 2?
Toggle the ANC switch on the earcup to cycle between full noise cancellation, Stay-Aware mode, and ANC off.
How fast does Crusher ANC 2 charge?
A 10-minute charge through the included USB-C cable provides more than 4 hours of playback time.
Do Crusher ANC 2 headphones work with Windows 11 computers?
Yes, they pair through standard Windows 11 Bluetooth settings, though checking the audio output settings afterward ensures sound plays correctly.
How do you adjust bass on Crusher ANC 2?
Scroll the Crusher intensity wheel on the earcup up or down to increase or decrease the sensory bass level.
Is Tile tracking included with Crusher ANC 2?
Yes, Tile finding technology is built in. Downloading the Tile app and following the on-screen setup steps activates the tracking feature.