If audio sounds louder in one ear — or your headphones feel completely off-center — your volume balance is almost certainly the culprit. It’s one of those Windows settings that’s easy to accidentally knock out of place and surprisingly hard to find if you don’t know where to look.
The good news: you don’t need any third-party software. Windows 10 and 11 both have built-in left/right channel controls that fix the problem instantly. This guide walks you through every working method — including the Bluetooth fix when the Balance button is greyed out.
Quick answer for Windows 11: Press Windows + I, go to System > Sound, click your output device, expand the Volume row, then drag the Left and Right channel sliders. Both default to 100%.
All steps below are verified on Windows 11 24H2 and Windows 10 22H2.
Understanding Volume Balance Settings in Windows 10 and 11
Volume balance controls how audio splits between the left and right channels. By default, both are set to 100% — perfectly equal. Shift either slider and audio leans toward that side.
Problems a balance adjustment can fix:
- Sound louder in one ear
- Audio not centered in headphones or earbuds
- Uneven volume from worn or damaged speakers
- Stereo imbalance during gaming, music, or video calls
- Hearing differences between ears
- Balance button missing or greyed out on Bluetooth headphones
How to Adjust Volume Balance on Windows 11
Windows 11 has three ways to reach the balance controls. Method 1 is the fastest and works for Bluetooth devices too. Methods 2 and 3 both open the classic Sound Control Panel — use whichever feels quicker.
Method 1: Via Windows 11 Settings App (Recommended)
This is the go-to method. It’s fast, it works on Bluetooth headphones where the Control Panel Balance button gets blocked, and it doesn’t require navigating the old Sound panel.
Shortcut tip: Press Windows + Ctrl + V to open Volume Mixer directly, then click “More volume settings” to jump straight to Step 2.
- Step 1: Press Windows + I. Click System, then Sound.

- Step 2: Under Output, click your active device — Speakers or Headphones — to open its Properties page.
Alternative: Scroll to Advanced, click All sound devices, then pick your device. Same result.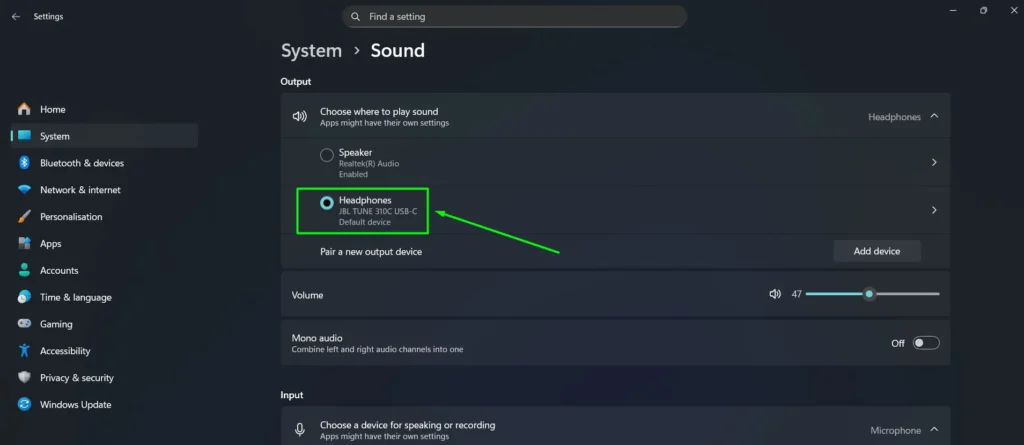
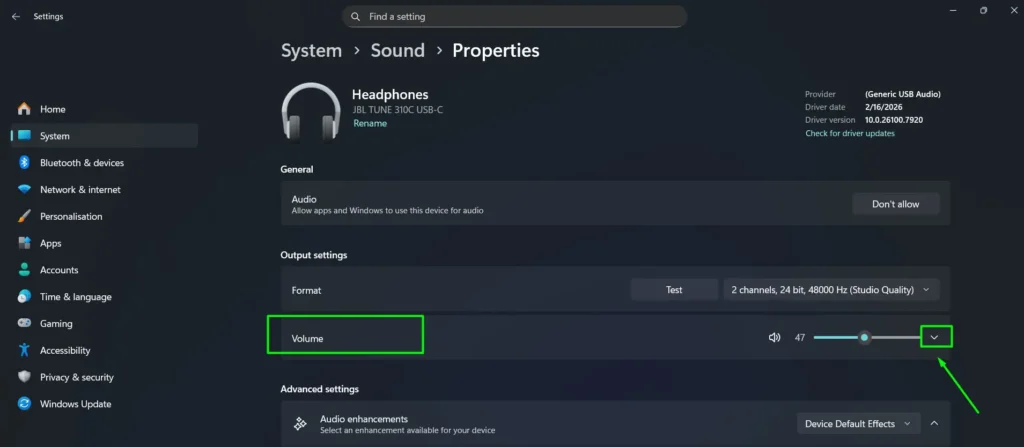
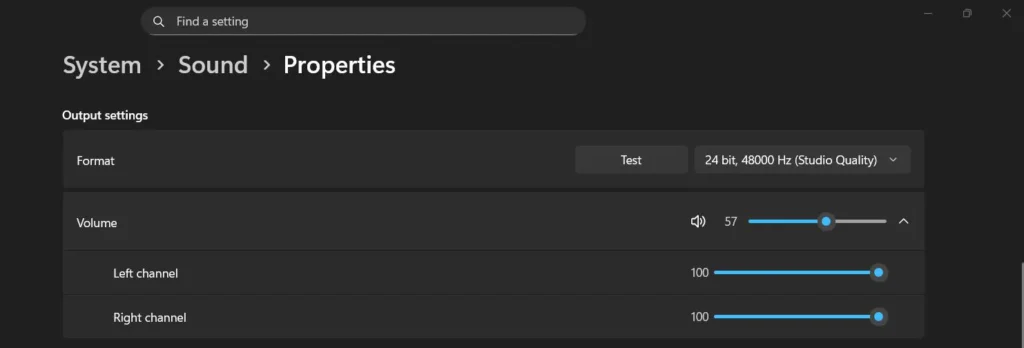
- Step 3: Click the arrow on the Volume row to expand it. You’ll see a Left channel and Right channel slider appear.
- Step 4: Drag either slider to adjust. Both default to 100%. Lowering one shifts audio toward the other. Changes apply instantly.
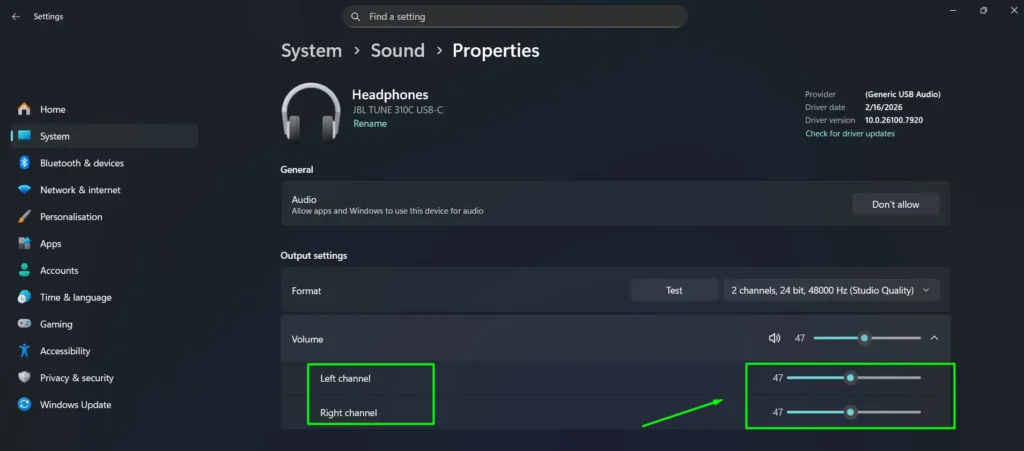
Pro Tip: Can’t find the sliders? The Volume row is probably collapsed — click the arrow to expand it. Once a slider is selected, tap the arrow keys for precise 1% adjustments.
Method 2: Via System Tray (Sound Control Panel)
Gets you to the classic Sound Control Panel straight from the taskbar. Useful if you prefer the older interface or are on an earlier Windows 11 build.
Shortcut: Press Windows + R, type mmsys.cpl, and hit Enter — skips all the steps below and opens the Sound panel directly.
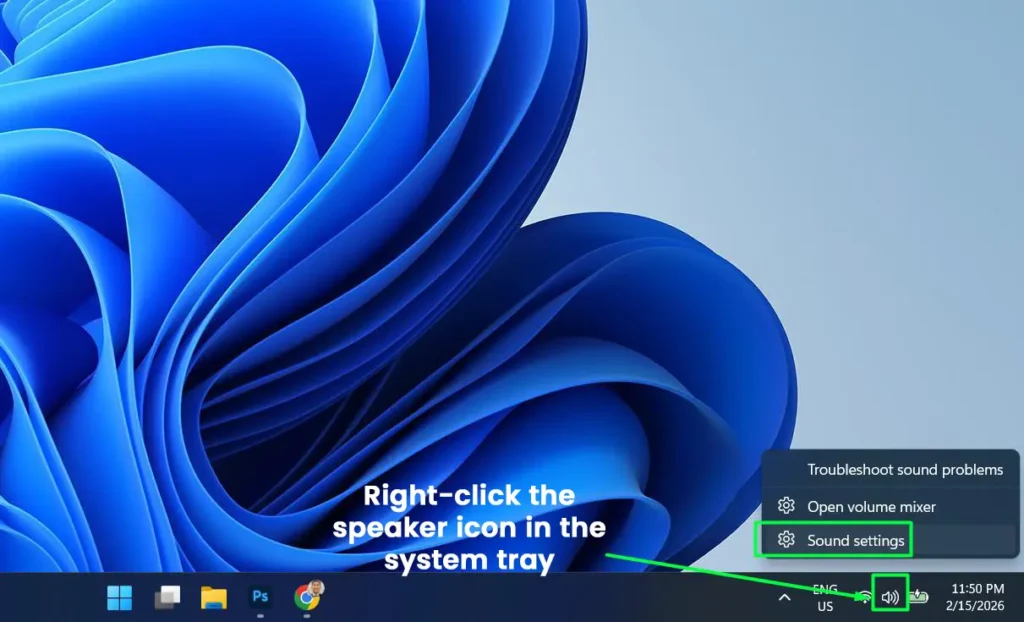
- Step 1: Right-click the speaker icon in the system tray. Click Sound settings.
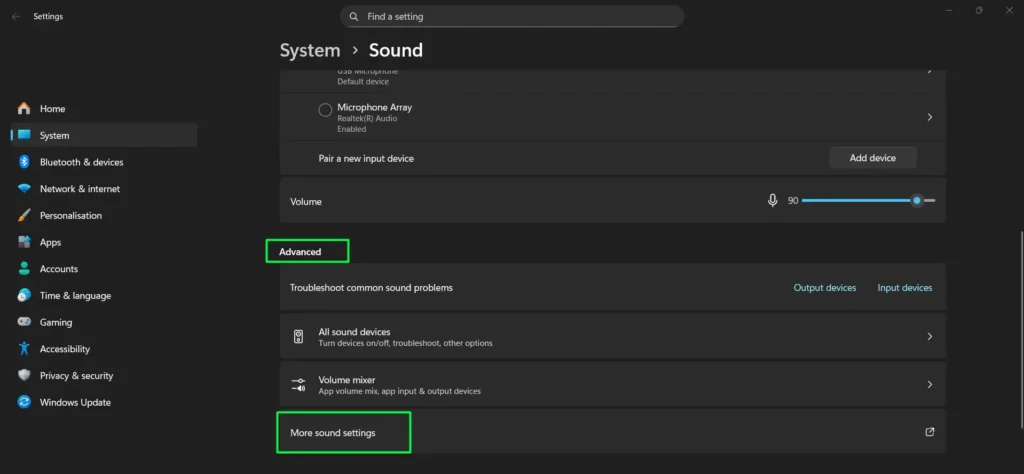
- Step 2: Scroll down. Click More Sound settings under Advanced.
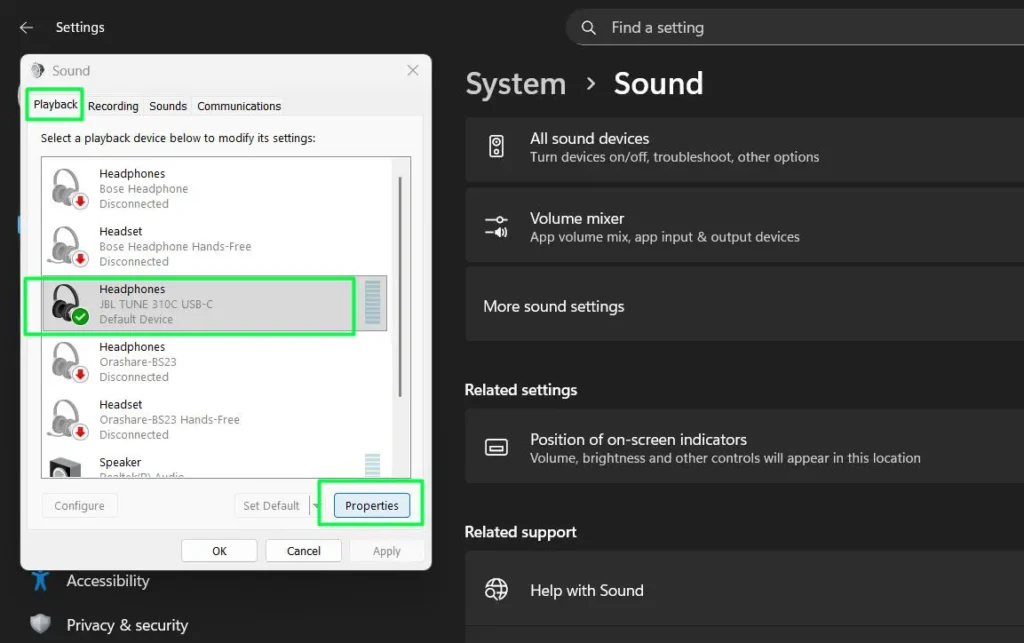
- Step 3: Go to the Playback tab. Click your playback device to select it.
- Step 4: Click Properties.
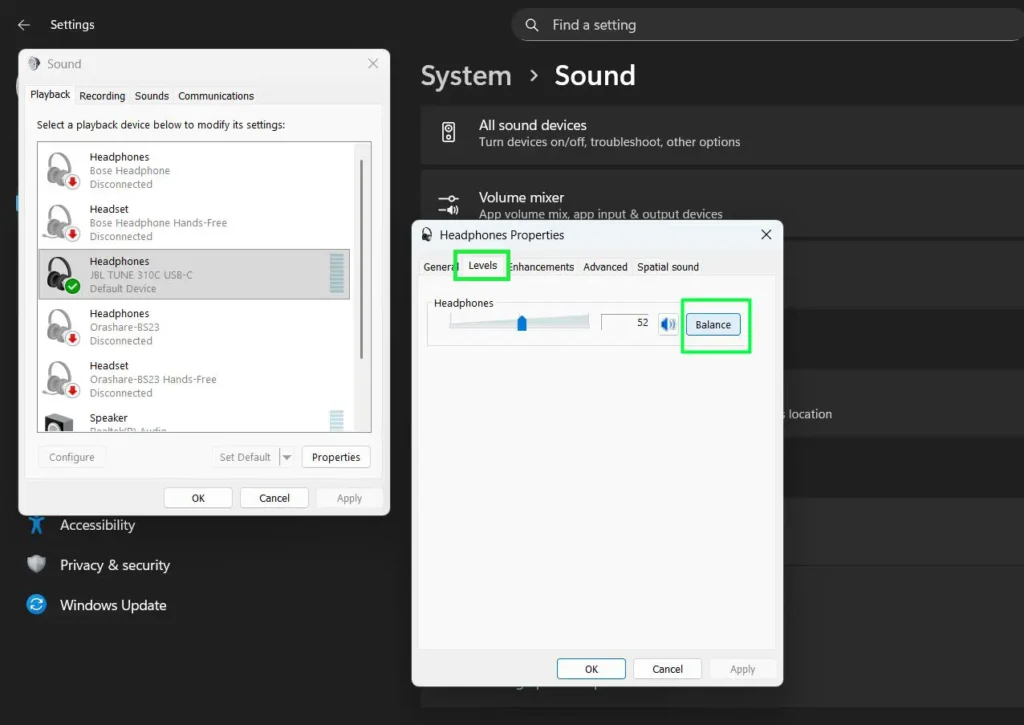
- Step 5: Open the Levels tab. Click Balance.
- Step 6: Drag the Left (L) and Right (R) sliders. Both default to 100.
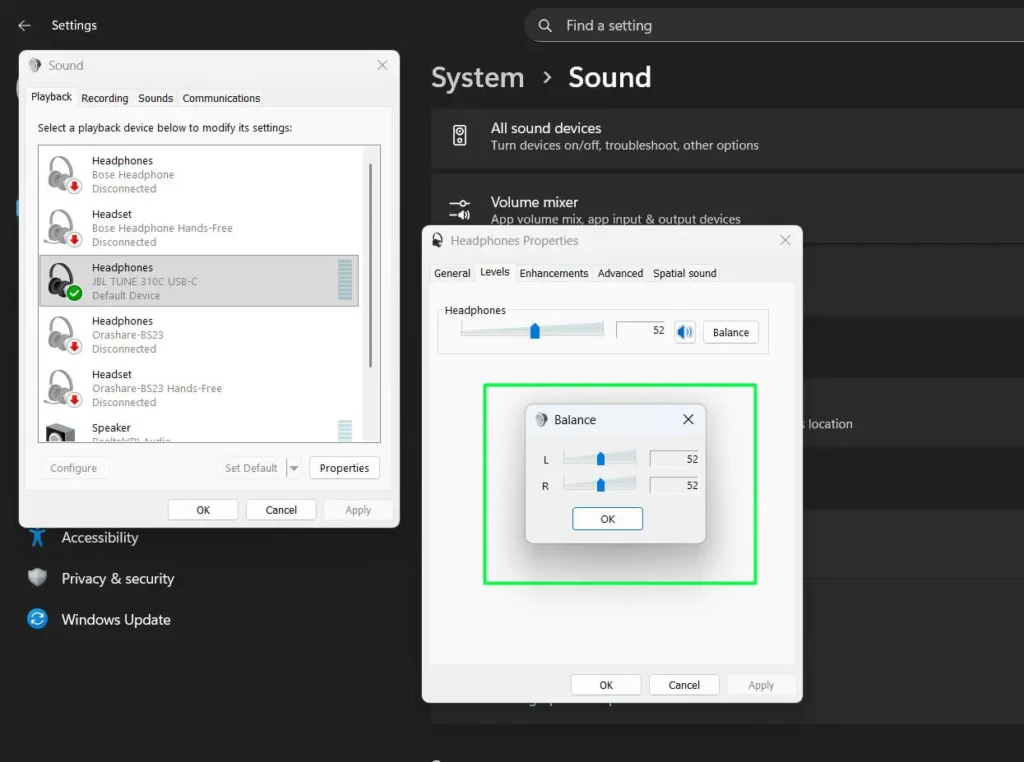
- Step 7: Click OK, then OK again to close.
How to Adjust Audio Balance on Windows 10
Windows 10 uses the same underlying controls — just laid out a little differently. The mmsys.cpl shortcut (Windows + R → type mmsys.cpl → Enter) works here too.
Method 1: Via Windows 10 Settings App
- Step 1: Press Windows + I. Click System, then Sound.
- Step 2: Under Output, pick your device from the drop-down. Click Device properties.
- Step 3: Drag the Left and Right balance sliders. Both default to 100.
- Step 4: Close Settings. Changes apply immediately.
Method 2: Via Windows 10 Control Panel
- Step 1: Open Control Panel. Set view to Large icons, then click Sound. Or press Windows + R, type mmsys.cpl, press Enter.
- Step 2: Click the Playback tab. Double-click your output device.
- Step 3: Go to the Levels tab. Click Balance.
- Step 4: Adjust the Left (L) and Right (R) sliders. Both default to 100. Click OK.
- Step 5: Click OK on Properties, then OK again to close Sound.
Spatial Sound and Volume Balance: What to Know
Running Windows Sonic, Dolby Atmos, or DTS Headphone:X? Balance sliders may do nothing — or reset on their own. Spatial audio formats lock both channels at 100/100 to preserve the 3D soundstage.
If sliders are greyed out and you’re not on Bluetooth, turn off Spatial Sound first. Go to System > Sound > [Your Device] > Spatial sound, set it to Off, then try again.
Bluetooth note: If Absolute Volume is active, the Control Panel Balance button gets blocked. Use the Settings app instead — its L/R sliders aren’t affected. Or follow the Registry fix in the troubleshooting section below.
Why You Might Need to Adjust Volume Balance
Hearing Differences Between Ears
Partial hearing loss, noise exposure, or age-related changes can make one ear pick up less than the other. Shifting the balance toward the stronger ear brings audio back to center without seeing an audiologist first.
Headphone or Speaker Imbalances
Worn drivers, damaged cables, or manufacturing tolerances can make one channel louder. Try the balance fix before buying new gear — it often solves the problem for free.
Gaming and Streaming
Gaming headsets with chat/game mix dials can accidentally shift balance as a side effect of hardware mixing. A quick Windows-level adjustment fixes this without touching in-game audio settings.
Professional Audio Work
Producers and engineers use system-level balance to quickly check how a mix translates across the stereo field — no DAW needed for a fast reference check.
Accessibility
For users with significant hearing loss in one ear, balance controls are essential. Shift everything toward the working ear so stereo content stays fully audible. Windows 11 also has a dedicated Mono Audio toggle under Settings > Accessibility > Audio for a one-click solution.
Common Volume Balance Issues and Fixes
One Side Completely Silent
First check that the balance slider hasn’t drifted all the way to one side. If it’s centered and one channel is still dead, test with a different audio source and device. Silence that follows the headphones points to a hardware fault — silence that stays on your PC points to a driver or connection problem.
Balance Button Greyed Out on Bluetooth Headphones
This happens when Absolute Volume is active. Windows treats the Bluetooth device as a single audio source and blocks separate L/R controls in the Control Panel.
Fix 1 — Use the Settings app: Go to Settings > System > Sound > [Device] > Volume. The Left and Right sliders here are not blocked by Absolute Volume. This is the recommended fix for most people.
Fix 2 — Disable Absolute Volume via Registry: Use this only if you specifically need the Control Panel Balance button.
- Step 1: Press Windows + R, type regedit, press Enter.
- Step 2: Navigate to:
HKEY_LOCAL_MACHINE\SYSTEM\ControlSet001\Control\Bluetooth\Audio\AVRCP\CT - Step 3: Double-click DisableAbsoluteVolume.
- Step 4: Change the value from 0 to 1. Click OK.
- Step 5: Restart your PC and reconnect the Bluetooth device. To revert, set it back to 0.
Important: Back up the Registry first. Go to File > Export in Registry Editor and save a copy.
Balance Sliders Not Visible in Windows 11 Settings
The Volume row is collapsed. Click the arrow icon next to it on the device Properties page — the Left and Right sliders are hidden until you expand it.
Balance Shifts Between Apps
Some apps — media players, DAWs, streaming services — have their own pan or balance controls that override Windows. Check the audio settings inside the specific app when balance only shifts in one program.
Balance Settings Keep Resetting
This is usually caused by a Windows update, a driver change, or a known OS bug that triggers when the master volume slider moves. Make sure Windows and audio drivers are fully updated. The Settings app retains balance changes more reliably than Control Panel. For persistent drift, Balance Lock (available on the Microsoft Store and GitHub) sits in the system tray and locks your L/R ratio in place — the most reliable long-term fix short of a driver replacement.
Balance Sounds Different Depending on the Source
Some recordings are mixed with instruments or vocals panned heavily to one channel. That’s a property of the audio file — not a Windows problem. No system setting can re-center a mono or heavily panned source.
Best Practices for Adjusting Volume Balance
Check Your Physical Knobs First
Before touching any digital sliders, check your hardware. Many speakers, gaming headsets, and DACs have a physical Balance or Game/Chat Mix dial. If that knob is off-center, no Windows adjustment will fully fix it.
Start at Center, Then Adjust in Small Steps
Reset both channels to 100% and listen first. Many perceived imbalances come from the source material. When you do adjust, use the arrow keys for 1% increments — small moves are easier to fine-tune than big jumps.
Test with Familiar Audio
Use music or a video you know well — you’ll hear imbalances more clearly. Pick something with distinct left/right separation for the most accurate assessment.
Test Each Channel Individually
Drag balance fully left, listen, then fully right. If one side sounds distorted or silent even at 100%, hardware is the likely cause. Test with another device to confirm.
Factor in Room Acoustics
Speaker placement, reflective surfaces, and your seating position can all make audio feel off-balance. Try moving speakers or shifting your position before adjusting any settings — you might not need to change anything in Windows at all.
Advanced Balance Adjustment Techniques
Using Third-Party Audio Software for Precise Control
Equalizer APO with the Peace GUI is the best free system-wide option. It applies per-channel gain adjustments that persist across all apps — far more reliable than the built-in sliders for users who need permanent correction. VLC and Foobar2000 also have precise in-app balance controls with numerical values if you only need per-player adjustment.
Saving Balance Profiles for Different Uses
Gaming, music listening, and video calls often need different balance settings. Voicemeeter lets you save multiple audio profiles and switch between them without reopening Windows settings every time.
Combining Balance with EQ
Balance adjusts volume between channels. EQ adjusts frequency response. If one ear sounds both quieter and thinner, you may have both a level difference and a frequency difference — combining a balance shift with per-channel EQ (via Equalizer APO) gives the most complete correction.
Accessibility Features for Audio Balance
Mono Audio
Mono Audio folds the left and right channels into one signal sent equally to both ears — ideal for users with hearing loss in one ear. On Windows 11: Settings > Accessibility > Audio > toggle Mono audio. On Windows 10: Settings > Ease of Access > Audio. It works independently of the balance sliders.
Audio Ducking
Windows can automatically reduce background audio when notifications or communication apps play. This works alongside your balance settings — just be aware it can make an already imbalanced mix sound more dramatic when it kicks in.
Hearing Aid Compatibility
Windows 11 includes hearing aid-specific options under Settings > Accessibility > Audio. Check there for device-specific controls that go beyond standard balance sliders.
Related Guides
- Troubleshooting Headphone Detection — Fix common headphone detection problems on Windows 11.
- Re-pair Bluetooth Earbuds for Stereo Sound on Windows — Restore stereo sound after Bluetooth pairing issues.
- Toggle Bluetooth Settings Easily on Windows — Quick methods to manage Bluetooth audio connections.
Frequently Asked Questions
What is the fastest way to adjust audio balance on Windows 11?
Press Windows + I, go to System > Sound, click your output device, then click the arrow on the Volume row to reveal the Left and Right channel sliders. Both default to 100%. No Control Panel needed.
How do I adjust audio balance on Windows 10?
Press Windows + I, go to System > Sound, choose your output device, click Device properties, and drag the Left and Right sliders. Or press Windows + R, type mmsys.cpl, press Enter, select your device on the Playback tab, click Properties, then go to the Levels tab and click Balance.
Where are the Left and Right channel sliders in Windows 11?
They’re hidden by default. Go to Settings > System > Sound, click your output device, then click the dropdown arrow on the Volume row. The Left and Right sliders appear underneath once you expand it.
Why is the Balance button greyed out on my Bluetooth headphones?
Absolute Volume is blocking it. When active, Windows treats the Bluetooth device as a single audio source and disables the separate L/R controls in Control Panel. Use the Settings app instead — its Left and Right channel sliders work regardless of Absolute Volume. If you specifically need the Control Panel button, disable Absolute Volume via Registry Editor as shown in the troubleshooting section above.
Why does my balance setting keep resetting?
The most common causes are Windows updates, audio driver changes, or a known Windows bug where adjusting master volume resets the balance. Keep drivers updated, use the Settings app method (it saves more reliably than Control Panel), and consider Balance Lock from the Microsoft Store for a permanent fix.
Does adjusting volume balance affect audio quality?
No — a balance adjustment changes the relative volume between channels without adding distortion or compression. For users with hearing differences or equipment imbalances, a corrected balance typically improves the listening experience rather than degrading it.
One headphone is much quieter than the other — what should I do?
Start by cleaning the headphone — earwax blocking the driver is the most common cause. Then test on a different device. If the imbalance follows the headphones, a driver repair may be needed. If it only appears on your PC, check Windows balance settings and the physical connection for corrosion or a loose plug.
Should I adjust balance in Windows settings or in individual apps?
Set a system baseline in Windows Settings — it affects all audio consistently. Use app-specific controls only when one program needs a different setting from everything else. Most users set it once in Windows and never need to touch it again.