A broken headphone wire is one of the most frustrating things that can happen to a favorite pair of headphones. The good news is that fixing a broken headphone wire at home is very doable – even without professional tools. Whether the wire is frayed near the jack, cut in the middle, or the audio is cutting in and out, the right repair method can bring those headphones back to life in under an hour.
Key Takeaways
- Most headphone wire breaks happen near the 3.5mm jack or earcup connection
- A soldering iron gives the most reliable fix for a clean wire repair
- Electrical tape and heat shrink tubing can protect the repaired area from future damage
- No soldering skills? A headphone jack replacement kit is an easy alternative
- The total cost of repair materials is usually under $10
- Testing with a multimeter helps pinpoint the exact break location before cutting
Step-by-Step Guide to Fixing a Broken Headphone Wire
Before starting, gather the necessary tools. Having everything ready makes the process smooth and reduces the chance of mistakes.
Tools and Materials Needed
- Soldering iron and solder
- Wire stripper or sharp blade
- Heat shrink tubing (optional but recommended)
- Electrical tape
- Multimeter (to locate the break)
- Replacement 3.5mm jack (if the jack end is damaged)
- Helping hands tool or small clamp
- Sandpaper (fine grit, for scraping enamel coating off wires)
Fix 1: Repair a Frayed or Cut Wire in the Middle
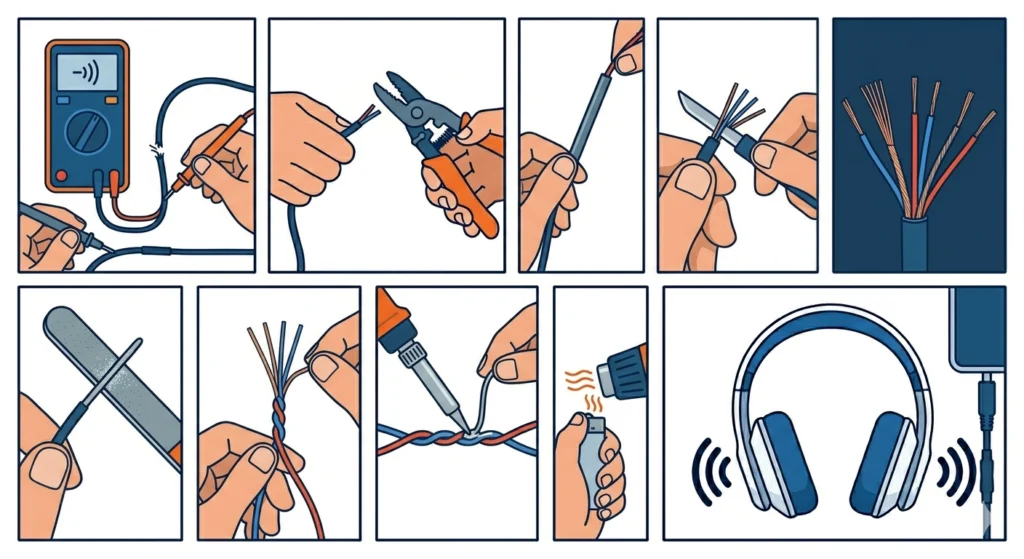
This is the most common type of damage – a visible break, cut, or worn-through section somewhere along the cable length.
- Step 1: Use a multimeter set to continuity mode. Run the probe along the wire to find exactly where the signal stops. This avoids cutting too much cable unnecessarily.
- Step 2: Cut out the damaged section cleanly using scissors or a wire cutter. Leave a few extra centimeters on each side of the break to work with.
- Step 3: Slide a piece of heat shrink tubing onto one side of the wire before connecting – this step is easy to forget and impossible to add later.
- Step 4: Strip back about 1.5 cm of the outer rubber insulation on both ends using a wire stripper or a careful blade.
- Step 5: Inside, there will be two to four thin strands – typically copper (ground), red (right channel), and green or bare (left channel). Some headphones use different color coding, so take a photo before separating them.
- Step 6: Lightly sand each wire strand with fine sandpaper to remove the enamel coating. This step is critical – the enamel prevents solder from bonding properly.
- Step 7: Twist matching colored wires together from each end of the cable.
- Step 8: Apply a small amount of solder to each twisted pair. Hold the soldering iron tip against the wire until the solder flows into it – do not apply solder to the iron first.
- Step 9: Let the joints cool for 30 seconds, then slide the heat shrink tubing over the repaired area and apply heat with a heat gun or lighter to shrink it snugly.
- Step 10: Test the headphones by plugging them in before adding any final tape. This saves time if adjustments are needed.
Pro Tip: Enamel-coated wires are the number one reason solder joints fail. Always scratch the colored wire strands with sandpaper until the copper shines through before applying any solder. Skipping this step means the joint will look fine but carry no signal.
Fix 2: Replace a Damaged 3.5mm Headphone Jack
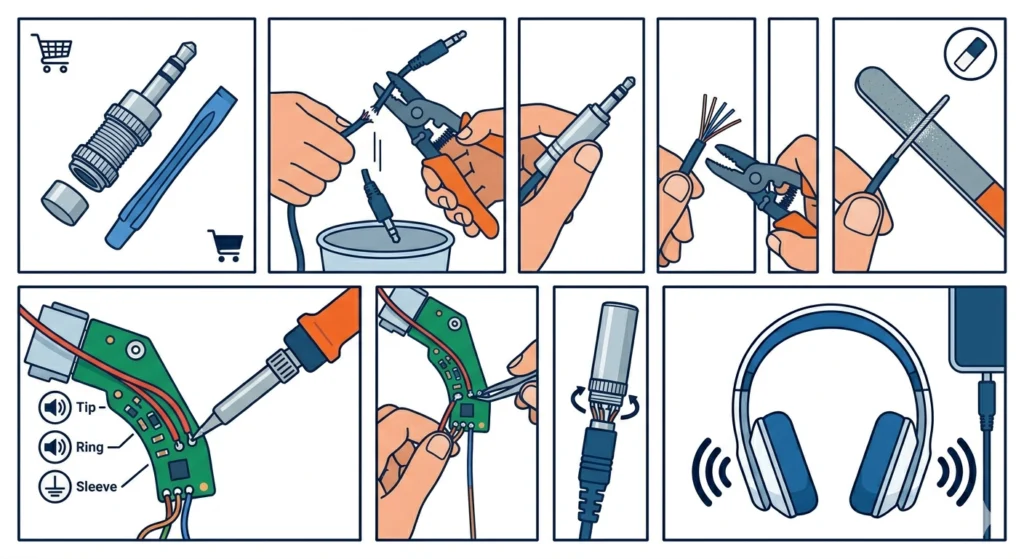
When audio cuts out only when wiggling the plug, the jack itself is usually the problem. Replacing it is often simpler than it sounds.
- Step 1: Purchase a replacement 3.5mm stereo jack. These are available at electronics stores and online for under $5. Get a screw-type jack if soldering feels intimidating.
- Step 2: Cut the damaged jack off about 3 cm from the tip, leaving enough cable to work with comfortably.
- Step 3: Slide the outer casing of the new jack onto the cable before stripping any wires.
- Step 4: Strip back about 2 cm of outer insulation to expose the inner wire strands.
- Step 5: Sand each individual wire to remove the enamel coating, just as described in Fix 1.
- Step 6: Identify the three solder points on the jack: tip (left audio), ring (right audio), and sleeve (ground). On most jacks, the sleeve is the longest post.
- Step 7: Solder the left channel wire to the tip terminal, the right channel wire to the ring terminal, and the copper (ground) strands to the sleeve.
- Step 8: Tug each wire gently after the solder cools to confirm a solid connection. A loose wire at this stage is easier to fix now than after the casing is closed.
- Step 9: Slide the outer casing up and screw or snap it closed over the soldered connections.
- Step 10: Plug in and test both audio channels before using the headphones normally.
Fix 3: Fix a Loose or Broken Wire at the Earcup
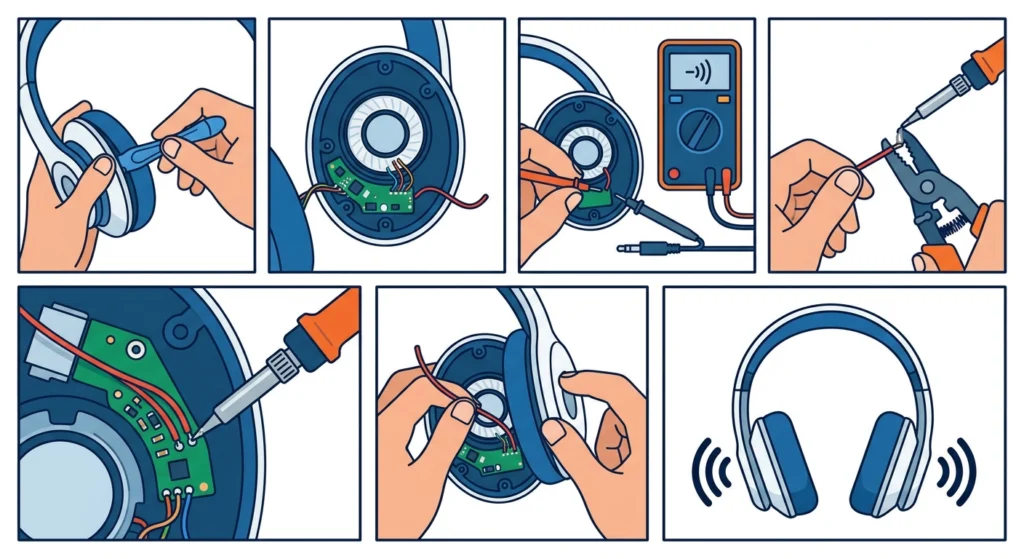
When only one earcup produces sound, the internal wire where it enters the earcup has likely broken. This is a slightly more involved repair but still manageable at home.
- Step 1: Carefully pry open the earcup housing using a plastic spudger or flat tool. Avoid metal tools that can scratch or crack the plastic casing.
- Step 2: Locate the small circuit board or solder pads inside the earcup where the cable connects to the speaker driver.
- Step 3: Use a multimeter to confirm which wire is broken by testing continuity from the jack end to the solder pad.
- Step 4: If the wire has pulled free from its solder pad, strip and re-tin the wire end with fresh solder.
- Step 5: Re-solder the wire back onto its original pad. Use minimal solder to avoid bridging adjacent pads, which would short the circuit.
- Step 6: Gently reassemble the earcup, making sure no wires are pinched between the housing pieces.
- Step 7: Test before fully snapping the housing closed.
Pro Tip: Taking a photo of the internal wiring before disconnecting anything is one of the best habits to develop. Headphone internals are small and the wire colors are not always intuitive. A reference photo eliminates guesswork during reassembly.
Tips for a Long-Lasting Headphone Wire Repair
- Always use heat shrink tubing instead of just electrical tape when possible. Heat shrink creates a tighter, more durable seal that holds up much longer with daily use.
- Reinforce strain relief points at the plug and earcup entry. These are the areas that flex the most and typically fail first. Wrapping with a bit of extra rubber or spring-coil strain relief extends cable life significantly.
- When re-routing cables inside earcups, avoid bending wires at sharp angles. A gradual curve keeps the internal wires from breaking again at the same point.
- For Bluetooth headphones experiencing audio dropouts, the issue is rarely a physical wire break – a Bluetooth re-pairing process for stereo sound often resolves the problem without any physical repair.
- After completing any headphone repair, test audio in both channels using a stereo test track before considering the job done.
Common Problems and How to Fix Them
Audio Only Comes from One Side After Repair
This usually means the left or right channel wire was not properly soldered. Reopen the repair joint, check that the enamel coating was fully removed, and re-solder. Confirm the correct wire is on the correct terminal using a multimeter for continuity.
Sound Is Distorted or Buzzing After Repair
Buzzing or distortion often means a solder bridge – two wires accidentally touching. Inspect the solder joints closely and use a desoldering wick to remove excess solder if needed. Also check that no bare wire is touching the housing metal.
The Solder Will Not Stick to the Wire
This is almost always the enamel coating issue. Headphone wires use thin enamel-coated copper that is invisible to the eye. Sand the wire until it visibly changes color from copper-red to bright shiny copper, then solder immediately.
Headphones Work When Still but Cut Out When Moving
A solder joint that only fails under movement is a ‘cold joint’ – the solder bonded to the wire without fully flowing into it. Reheat the joint with the soldering iron until the solder becomes liquid, then let it cool undisturbed. A good joint looks shiny and smooth, not dull or grainy.
Microphone Stopped Working After a Jack Replacement
If the headphones include a microphone and it stopped working after replacing the jack, the microphone wire may have been soldered to the wrong terminal. Some 3.5mm jacks are TRRS (4-pole) with an extra ring for mic input. Check that the mic wire is connected to the second ring and not the sleeve. Windows users experiencing microphone detection issues after a repair can also check this guide for resolving microphone detection problems on Windows 11.
Frequently Asked Questions
Can a broken headphone wire be fixed without soldering?
Yes, for minor breaks. Screw-type replacement jacks require no soldering at all. Twist the matching wires together, insert them into the screw terminals, and tighten. However, soldered connections are always stronger and more reliable for long-term use. No-solder fixes work well as temporary solutions.
How do you know which wire is broken in headphones?
A multimeter set to continuity mode is the most accurate method. Touch the probes to each end of an individual wire – if the meter beeps or shows near-zero resistance, the wire is intact. No reading means a break exists somewhere along that wire. Moving the cable slowly while testing helps pinpoint the exact location of the break.
Why does only one side of my headphones work?
Single-sided audio is almost always caused by a broken wire in the left or right channel, a loose solder joint at the jack or earcup, or a damaged connector. Wiggling the plug while audio plays can help confirm if the break is at the jack. If sound cuts in and out during the wiggle, the jack is the most likely culprit.
Is it worth fixing broken headphone wires?
Absolutely – especially for mid-range to high-end headphones where the audio quality is significantly better than budget replacements. The repair materials typically cost under $10 and the job takes less than an hour. Even for affordable headphones, a quick repair reduces electronic waste and saves money.
What type of solder is best for headphone wire repair?
60/40 rosin-core solder (60% tin, 40% lead) is the most forgiving for small electronics work. It flows easily at lower temperatures, which is important when working with the thin wires inside headphone cables. Lead-free solder works too but requires higher temperatures and is slightly harder to work with for beginners.
How long does a soldered headphone wire repair last?
A properly soldered repair protected with heat shrink tubing can last for years – often as long as the rest of the headphone cable. The key is good strain relief at the repair point. Without strain relief, the repaired area experiences repeated flexing that eventually breaks the new joint just as it broke the original wire.
Can headphone wires be repaired if the insulation is just cracked but the wire inside is intact?
Yes. If the copper wire inside is still connected and audio works normally, the fix is simple – wrap the cracked section with self-amalgamating tape or apply a thin bead of silicone adhesive over the cracked area. This stops moisture from reaching the copper and prevents the crack from spreading with further flexing.
What causes headphone wires to break so often near the plug?
The area just above the 3.5mm plug is the most stressed part of any headphone cable. Every time the plug is inserted, removed, or tugged at an angle, that section bends. Over time, the repeated bending fatigues the copper strands inside. Headphones with poor or absent strain relief at the plug fail much faster than those with proper reinforcement.
Do wireless headphones have wire repair issues too?
Wireless headphones still have internal wires connecting the battery, drivers, and microphone inside the earcup. These can break from physical damage or manufacturing defects. However, audio dropouts on Bluetooth headphones are more often a connection issue than a physical wire break, and re-pairing the device usually resolves it without any hardware repair.
Is a multimeter necessary for headphone wire repair?
Not strictly necessary, but it saves significant time and frustration. Without a multimeter, finding an invisible break inside an otherwise intact-looking cable requires cutting and testing at multiple points, which shortens the cable more than needed. A basic multimeter is inexpensive and useful for many home electronics repairs beyond just headphones.