
Quick answer: Right-click the speaker icon in the taskbar and select Open volume mixer. Every app currently playing sound appears with its own slider — drag one left to lower it or right to raise it. The change is instant, applies only to that app, and needs no admin rights or extra software.
Windows 11 lets you set a different volume for every app. You can silence a noisy browser tab, balance game audio against voice chat, or send one app to your headphones while another plays through your speakers — all from built-in controls. This guide covers all four native methods, per-app device routing, the Game Bar mixer for fullscreen games, the Windows 10 equivalent, and fixes for the mixer problems people actually run into.
Tested on Windows 11 25H2 and 24H2 with onboard Realtek audio, a USB audio interface, and Bluetooth headphones. Windows 10 steps confirmed on 22H2.
What Is the Volume Mixer in Windows 11
The Volume Mixer is a built-in Windows feature that lists every app currently making sound and gives each one its own slider, separate from the master system volume — like a mixing board where every channel moves independently.
If you are looking for “App volume and device preferences”: that is the older Windows 10-era name for the same screen. In current Windows 11 builds it is simply called Volume mixer, and it sits under Settings → System → Sound → Advanced.
Two details worth knowing before you start. App volume levels are tied to the active output device, so if you switch from speakers to headphones the mixer may show different levels or look empty — always confirm the correct output device is selected at the top. And no administrator rights are needed; standard accounts can adjust per-app volume freely, except on managed corporate systems where group policy locks audio settings.
Why Use Individual App Volume Control
- Avoid interruptions – Lower noisy apps like browsers or games without touching your call or music
- Balance audio sources – Set each app to its own level so nothing overpowers another
- Mute without closing – Silence a specific app instantly, no pause button needed
- Gaming and voice chat – Keep game sound and chat apps at separate, ideal levels
- Route audio to different devices – Send a movie to your TV while notifications stay on your headset
- No third-party tools needed – It is all built into Windows, free and always available
| Method | How to Open | Best For |
|---|---|---|
| Right-Click Speaker Icon | Right-click speaker → Open volume mixer | Fastest single-action method |
| Quick Settings Panel | Click speaker icon → arrow icon | Adjusting without leaving the desktop |
| Settings App | Windows + I → System → Sound → Volume mixer | Volume plus device routing in one screen |
| Classic Mixer (sndvol) | Windows + R → sndvol → Enter | Floating window during multitasking |
| Windows Search | Windows + S → “Sound mixer options” | Keyboard-only access in three seconds |
| Xbox Game Bar | Windows + G → Audio → Mix | Fullscreen games, no alt-tab needed |
Every method opens the same per-app sliders, so pick whichever fits your workflow — any one of them gets the job done.
4 Ways to Adjust Volume for Apps in Windows 11
Method 1: Right-Click the Speaker Icon (Fastest)
This is the shortest route in Windows 11 — two clicks from anywhere on the desktop.
- Right-click the speaker icon in the taskbar system tray.
- Click Open volume mixer.
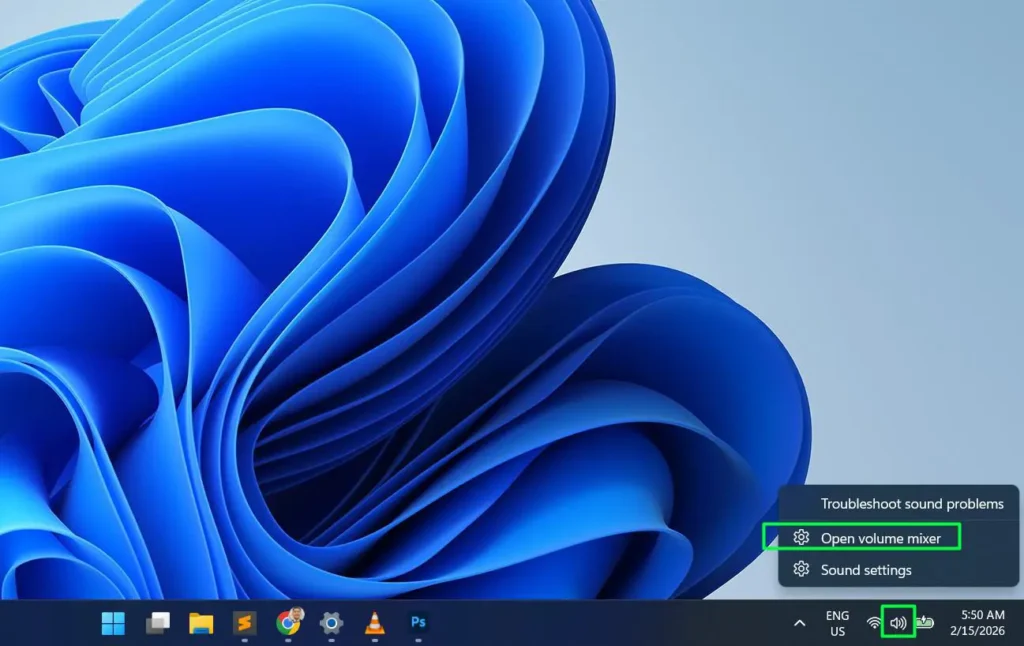
- The Volume Mixer opens with a slider for every active app.
- Drag a slider left to lower or right to raise that app’s volume.
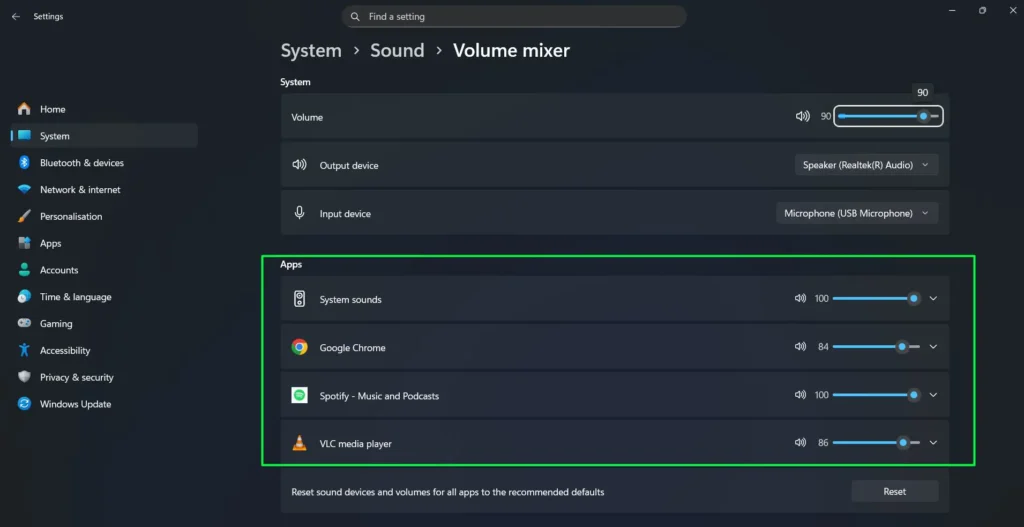
- Repeat for any other apps. There is no save button — changes apply the moment you release the slider.
Pro-Tip: If an app is missing, it is not currently making sound. Play something in it first, then reopen the mixer and it will appear.
Method 2: Using the Quick Settings Panel
- Click the speaker icon in the taskbar system tray (bottom-right of the screen).

- Click the small arrow icon next to the speaker on the volume slider row.

- The Sound output panel opens, showing spatial audio options and the Volume Mixer below.
- Scroll to the Volume Mixer. Each active app appears with its own slider.
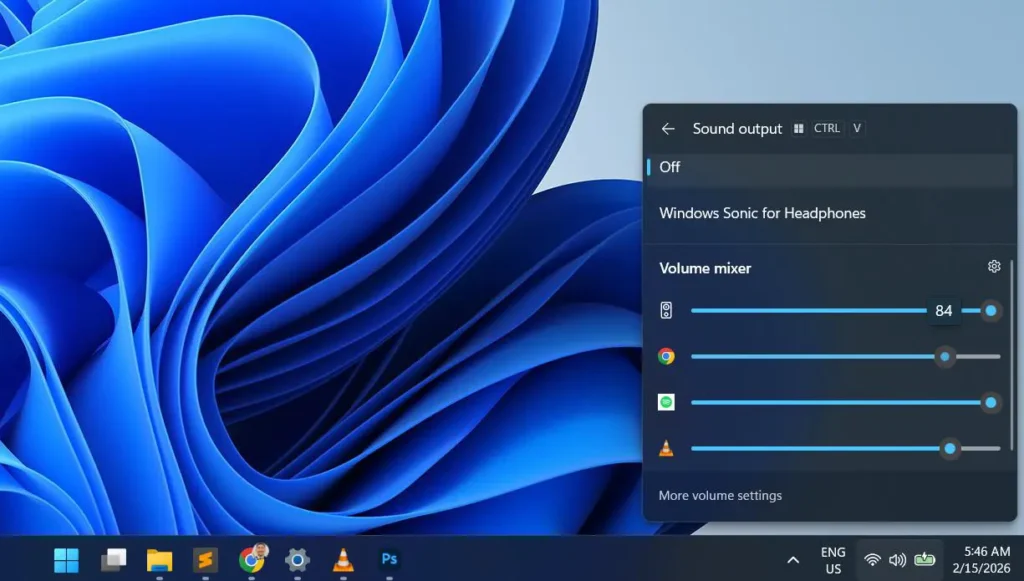
- Drag the slider left to lower or right to raise. Changes apply instantly.
Getting to More Volume Settings From the Same Panel
The same panel is also the shortcut into the full Sound settings page, where spatial audio and per-app device routing live.
- Click the speaker icon in the taskbar, then the arrow icon next to the volume slider.
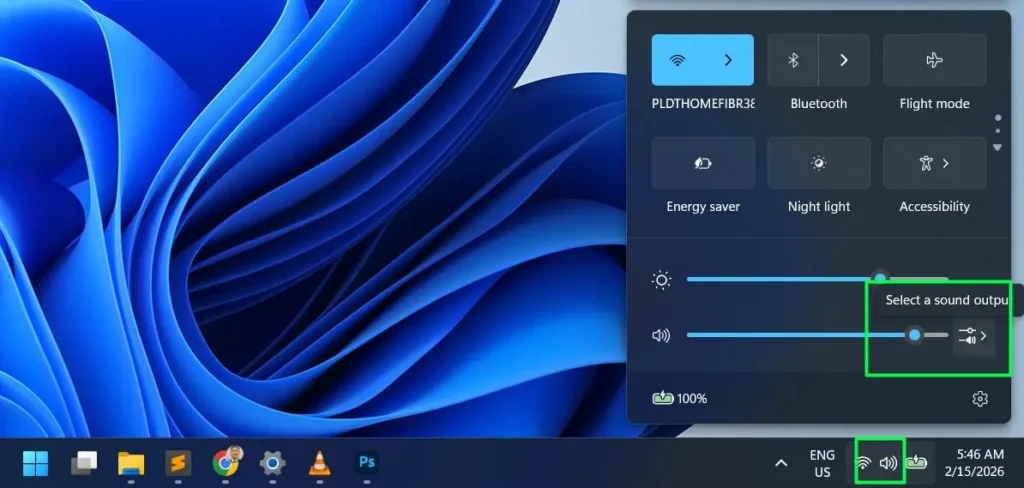
- Click More volume settings at the bottom of the panel.
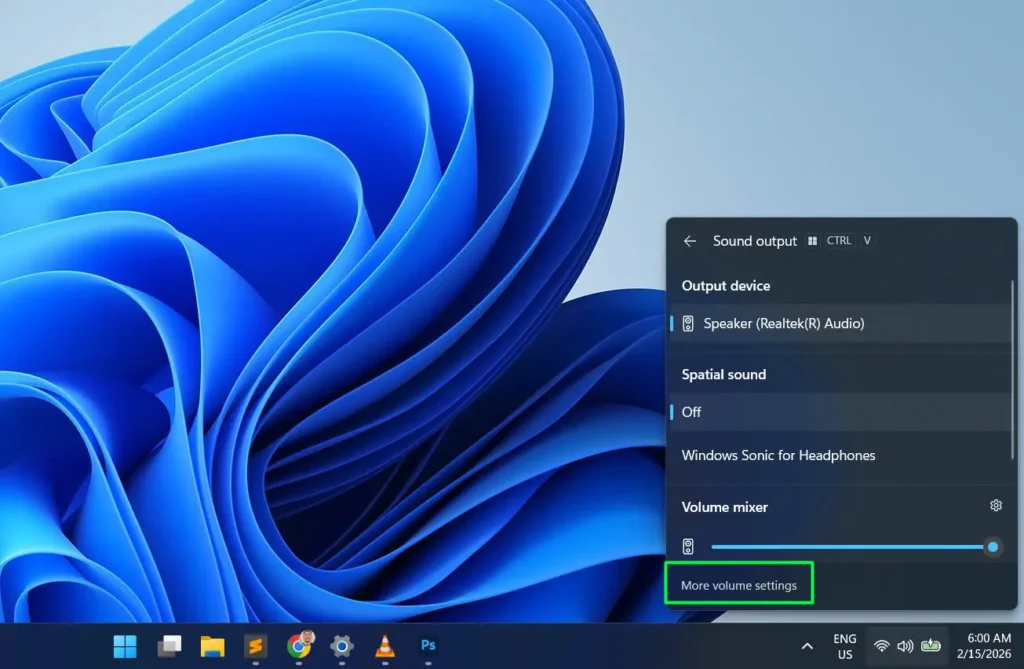
- The full Sound settings page opens with spatial audio, mono audio, and per-app output device controls.
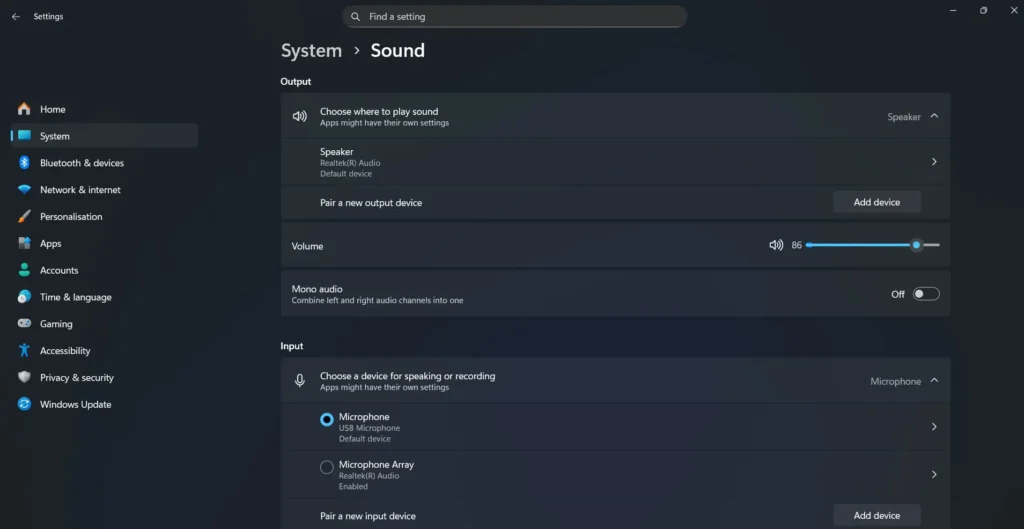
Method 3: Using the Settings App
This opens the fullest Volume Mixer — it manages volume levels and per-app output devices in one place, and it is the only screen with a Reset button.
- Press Windows + I to open Settings.
- Click System, then Sound.
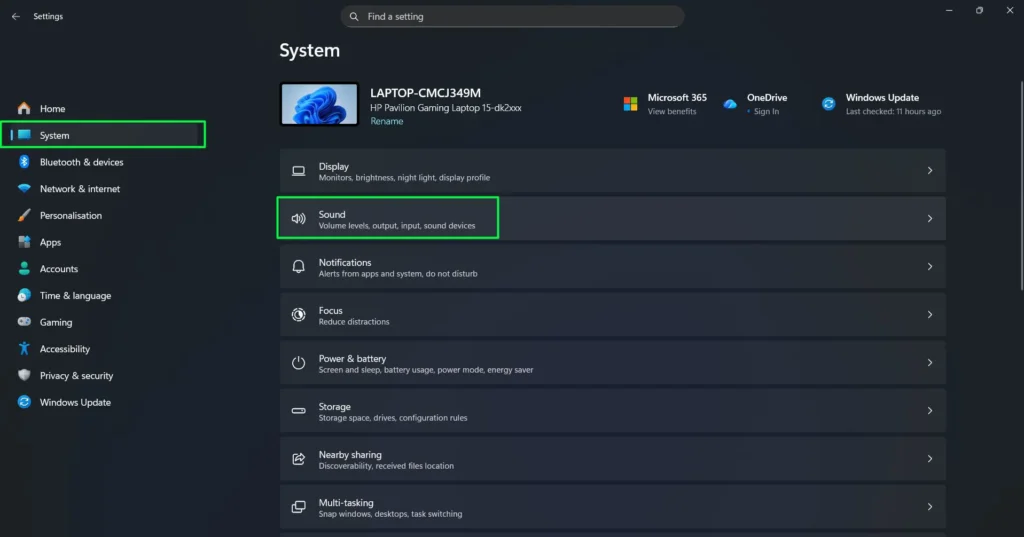
- Under the Advanced section, click Volume mixer.
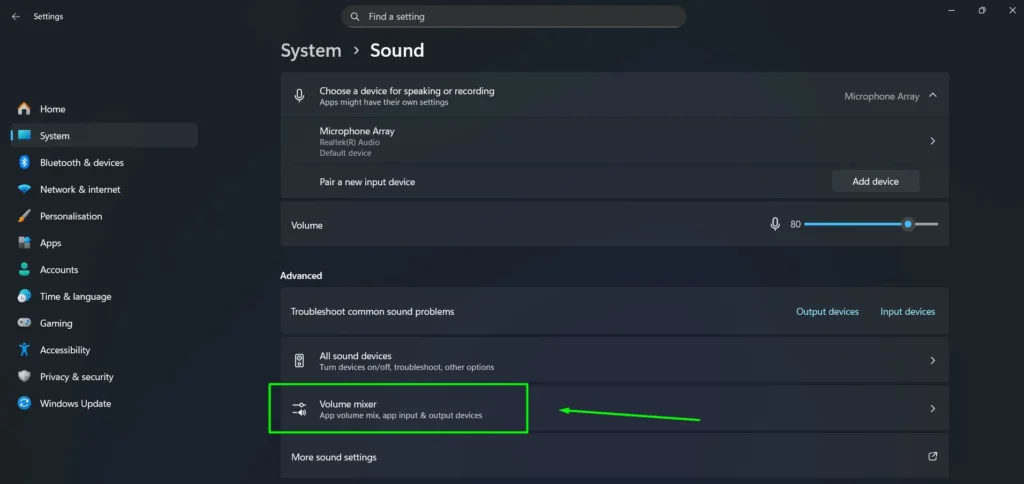
- Every app making sound appears with its own slider. Drag any slider to adjust it independently.
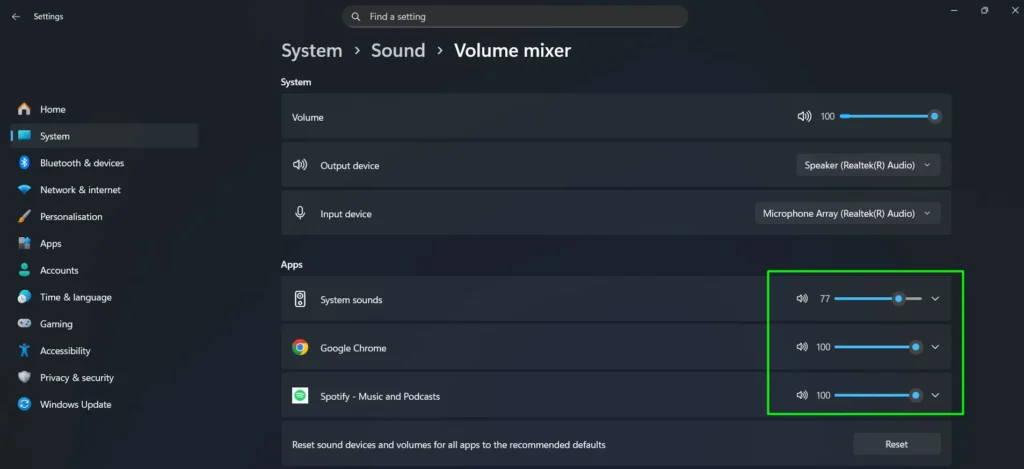
- Each app also has an output device dropdown for routing it to a different speaker or headset — full steps further down.
Pro-Tip: Skip the menus entirely. Press Windows + R, type ms-settings:apps-volume and press Enter to land straight on this screen. Right-click the desktop and choose New → Shortcut with that same command to pin it for one-click access.
Method 4: Using the Classic Volume Mixer (sndvol)
The classic mixer from older Windows versions still ships with Windows 11 and is the best option for quick adjustments mid-task.
- Press Windows + R to open the Run dialog.
- Type sndvol and press Enter.
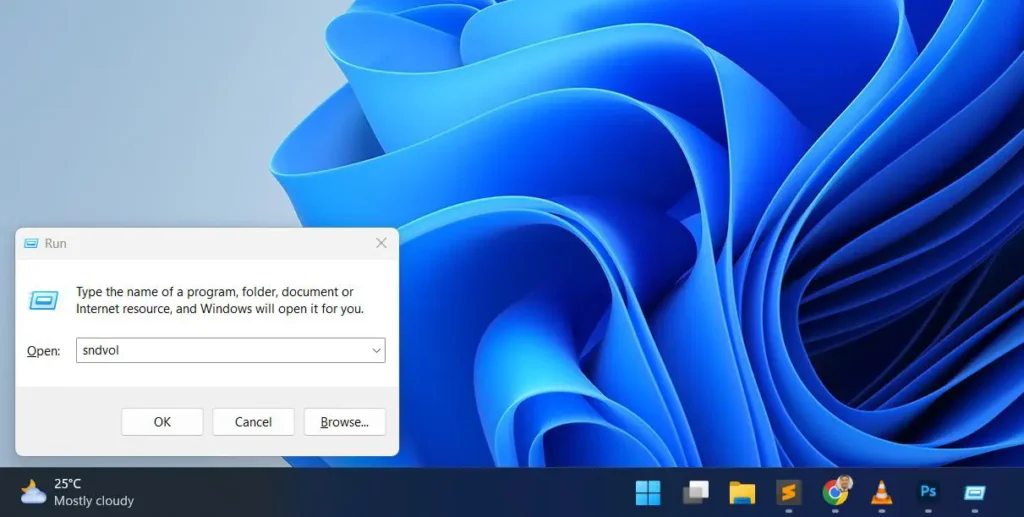
- The classic mixer opens with vertical sliders for each active app.
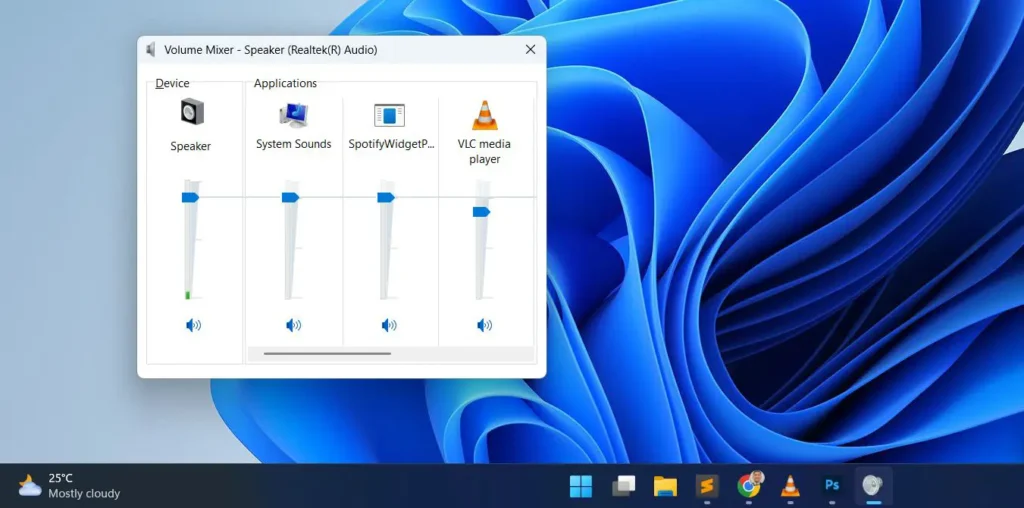
- Drag the sliders up or down to adjust each app.
This mixer floats as a small, movable window that stays visible while you switch apps — ideal for quick tweaks without opening Settings.
Keyboard shortcut alternative: press Windows + S, type sound mixer options, and press Enter. It drops you on the modern Volume mixer page in about three seconds without touching the mouse.
How to Adjust App Volume While Gaming (Xbox Game Bar)
Every method above requires leaving your game. The Xbox Game Bar does not — it overlays the mixer on top of whatever is running, which makes it the only practical option for fullscreen and exclusive-fullscreen titles.
- Press Windows + G while the game is running.
- Open the Audio widget. If it is not visible, click the widget menu at the top and select Audio.
- Switch to the Mix tab. Every app producing sound appears with its own slider, including the game itself.
- Drag the game slider down or your chat app slider up until the balance is right.
- Press Windows + G again to close the overlay. Levels stay exactly where you set them.
Pro-Tip: Pin the Audio widget using the pin icon. It then stays on screen whenever you open the Game Bar, so rebalancing mid-match takes one keystroke and one drag.
How to Send Each App to a Different Audio Device
You can route each app to its own output or input device — play a movie through your TV soundbar while notifications stay on your headset, at the same time.
- Press Windows + I, then go to System > Sound > Volume mixer.
- Find the app you want to route and expand it.
- Use its Output device (or Input device) dropdown to pick a specific speaker, headset, or mic.
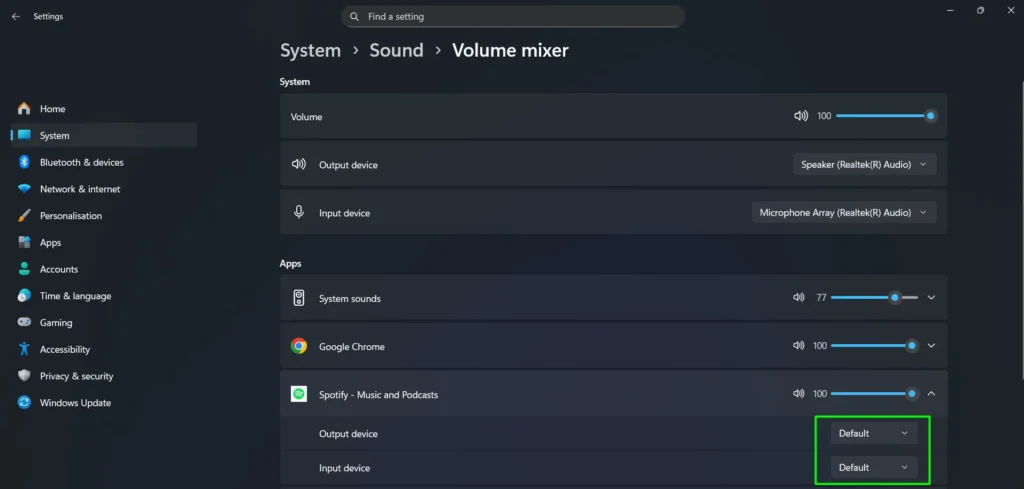
- Changes apply immediately — no save button needed.
Pro-Tip: This is the only built-in screen where volume levels and per-app device routing appear together. Set both here instead of jumping between menus. Note that each app remembers a separate volume level per device, so an app set to 40 percent on speakers may still be at 100 percent when you switch to headphones.
How to Mute a Specific App Without Closing It
- Open the Volume Mixer using any method above.
- Find the app you want to mute.
- Click the small speaker icon beside its slider.
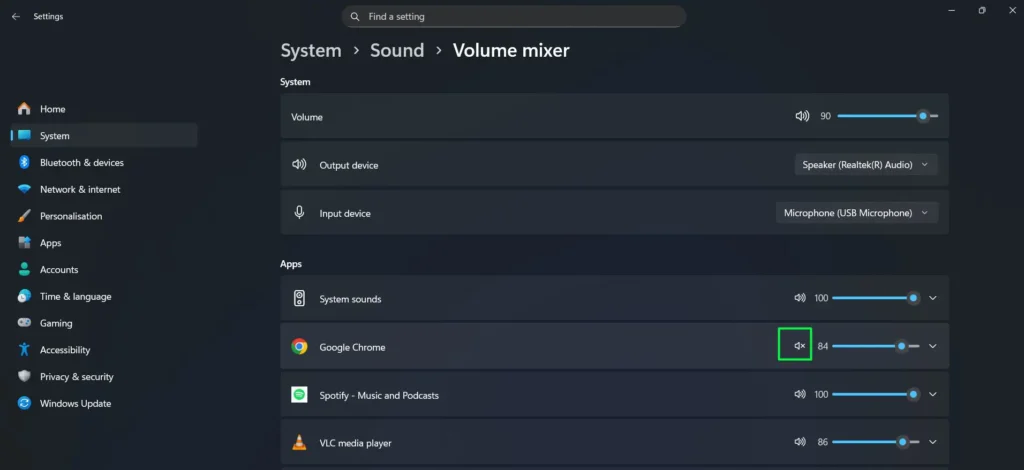
- The icon shows a muted symbol. That app is silenced while everything else keeps playing.
- Click the same icon again to unmute.
This is perfect for silencing an auto-playing video without hunting through browser tabs for the pause button.
How to Turn Down Windows System Sounds Separately
Notification pings, error chimes, and USB connect sounds are grouped under a single entry called System sounds — and it has its own slider, separate from every app.
- Go to Settings > System > Sound > Volume mixer.
- Look for System sounds in the Apps list. It stays listed permanently, unlike apps that only appear while playing.
- Drag it down to around 20 percent, or mute it entirely.
This is the fastest way to kill notification noise during a recording or a call without touching your music or the master volume.
How to Reset All App Volume Levels
If your levels have drifted into a mess, one button restores everything.
- Go to Settings > System > Sound > Volume mixer.
- Scroll to the Reset option and click Reset.
- Every per-app volume level and device assignment returns to Windows defaults.
Reset applies to all apps at once. There is no built-in way to reset a single app — for that, close the app, reopen it, and set its slider manually.
How to Adjust Volume for Apps in Windows 10
Windows 10 has the same underlying capability, including per-app device routing — it is just located differently and named differently.
The Classic Mixer in Windows 10
- Right-click the speaker icon in the taskbar.
- Select Open Volume Mixer.
- A horizontal panel opens with a vertical slider for each active app plus a master Device slider on the left.
- Drag any slider up or down, or click the speaker icon beneath a slider to mute that app.
App Volume and Device Preferences (Per-App Routing)
- Press Windows + I and go to System > Sound.
- Under Advanced sound options, click App volume and device preferences.
- Each app shows a volume slider plus Output and Input dropdowns.
- Set the volume and, if you want, assign a different speaker, headset, or microphone to that app.
This screen was added in Windows 10 version 1803 and is the direct ancestor of the Windows 11 Volume mixer. If a guide tells you per-app routing is Windows 11 only, it is out of date — what Windows 11 changed is the name and the layout, not the capability.
Troubleshooting Per-App Volume Problems
An App Is Missing From the Mixer
The mixer only lists apps with an open audio session. Play something in the app, then reopen the mixer. A few apps — some games with their own audio engines and certain virtual machines — deliberately hide their session and will never appear. If a normally visible app has vanished, confirm the correct output device is selected at the top of the mixer, since each device keeps its own app list.
The Slider Is Grayed Out or Stuck
This usually means the app stopped producing sound or the active output device changed while the mixer was open. Close and reopen the mixer first. If it persists, the app may have taken exclusive control of the device: go to Sound settings, open the device’s properties, and uncheck the option that lets applications take exclusive control.
Restart the Windows Audio Service
When the mixer is blank or completely unresponsive, restarting the audio stack fixes it more often than a reboot.
- Press Windows + R, type services.msc and press Enter.
- Find Windows Audio in the list.
- Right-click it and choose Restart.
- Do the same for Windows Audio Endpoint Builder if the problem continues.
App Volume Drops by Itself During Calls
Windows automatically reduces other app volumes when it detects a voice call. To stop it, search Sound in the Start menu, open the Control Panel version, go to the Communications tab, and set it to Do nothing.
Levels Reset After a Restart or Update
Windows stores per-app levels against the app’s executable path. When an app updates and changes that path — browsers and launcher-based games are the usual offenders — the saved level is orphaned and the app returns to default. Media players and chat apps like Teams or Zoom hold their levels far more reliably. Check the mixer after your first restart following a big update if a consistent volume balance matters to you.
Check Your Audio Drivers
If apps that are clearly playing never appear in the mixer, a driver issue is often the cause. Generic or outdated drivers can hide sliders. Open Device Manager, confirm the sound device is listed normally with no warning icon, and install the manufacturer’s driver rather than the generic Windows default — especially after a feature update.
When to Use EarTrumpet Instead
The built-in mixer covers most needs, but EarTrumpet — a free open-source app from the Microsoft Store — is worth installing if you want any of the following:
- Per-app volume hotkeys, which Windows itself does not offer
- All apps and all output devices visible in a single taskbar flyout
- Moving an app to another device by dragging it, instead of using a dropdown
- Per-app levels that survive app updates more reliably than the built-in mixer
It works as a drop-in replacement for the taskbar volume icon and runs on both Windows 10 and Windows 11.
Recommended App Volume Levels
Gaming and Voice Chat
Set game audio to 50–70 percent and voice chat to 80–90 percent. Chat sits above the game so a teammate’s callout cuts through gunfire or engine noise instead of competing with it.
Browsers
Browsers are the loudest offenders thanks to auto-playing ads and videos. A 60–70 percent baseline absorbs those spikes, and you can raise the master volume temporarily when a video genuinely needs more.
Avoid Maxing Out Individual Sliders
An app slider at 100 percent alongside a maxed master volume pushes laptop speakers into clipping. Keep app-level volume around 80–85 percent and use the master slider for overall loudness — the sound stays clean and the crackling stops.
Before a Call or Meeting
Drop non-essential apps to 20–30 percent, or mute them outright, a minute before you join. Pair that with System sounds turned down and nobody hears your notification pings through your microphone.
For more like this, browse the full collection of step-by-step guides covering audio, software, and system tips.
Frequently Asked Questions
How do I adjust the volume of a specific app in Windows 11?
Right-click the speaker icon in the taskbar and select Open volume mixer. Find the app and drag its slider left to lower or right to raise the volume. Only that app changes. You can also press Windows + I, then go to System, Sound, and Volume mixer for the same controls.
Why is an app not showing up in the Volume Mixer?
An app only appears while it holds an open audio session. Play sound in it, then reopen the mixer. If it still does not appear, check that the correct output device is selected at the top of the mixer, and confirm your audio driver is the manufacturer’s rather than a generic Windows one.
Where is “App volume and device preferences” in Windows 11?
It was renamed. In Windows 11 the same screen is called Volume mixer and lives under Settings → System → Sound → Advanced. Everything the old page did — per-app volume, per-app output and input devices — is still there.
Does changing app volume in the mixer affect the system volume?
No. An app slider only changes that app’s level, and it is measured as a percentage of the master volume. The master slider and every other app stay unaffected.
Why does my app volume keep changing on its own?
A built-in communication setting lowers other app volumes whenever Windows detects a voice call. Search Sound in the Start menu, open the Control Panel version, go to the Communications tab, and set it to Do nothing.
Can I control app volume with keyboard shortcuts?
Not natively — the media keys only move the master volume. The closest built-in option is Windows + S then “sound mixer options” to open the mixer by keyboard. For true per-app hotkeys, EarTrumpet from the Microsoft Store adds them.
Does per-app volume control work for fullscreen games?
Yes. Games, Microsoft Store apps, browsers, and desktop programs all appear in the mixer while playing. For fullscreen titles, press Windows + G and use the Game Bar’s Audio widget instead of alt-tabbing out.
Can Windows 10 route apps to different audio devices?
Yes. Go to Settings → System → Sound → App volume and device preferences. Each app has Output and Input dropdowns there. The feature arrived in Windows 10 version 1803; Windows 11 renamed and redesigned the screen rather than adding the capability.