Worn-out headband padding on headphones is one of the most frustrating problems any audio enthusiast runs into. The foam cracks, the pleather peels, and what used to be a comfortable fit turns into something that feels like resting a bare plastic frame on your head. The good news? This is very fixable – and it does not require any special background or expensive tools.
This guide walks through every practical method to fix worn-out headband padding, from the simplest same-day solutions to more involved replacements. Each fix is straightforward, and most can be done with materials already at home or available at any local hardware or craft store.
Key Takeaways
- Worn headband padding can be repaired or replaced without professional help
- The most common fixes include wrap padding, foam replacement, and third-party covers
- Most repairs cost under $15 and take less than an hour
- Choosing the right material (memory foam, neoprene, or faux leather) affects long-term comfort
- Proper prep and clean adhesion are the keys to a lasting repair
- Regular cleaning after repair extends the life of new padding significantly
Fix 1: Use a Headband Wrap or Cushion Cover (Quickest Method)
This is the fastest and most beginner-friendly fix available. Headband cushion covers are sleeves made from neoprene, leather, or knit fabric that slide or wrap directly over the existing headband. No adhesive, no tools, no mess.
Most people find that this works best when the original padding is still structurally intact but just looks bad or feels uncomfortable. If the foam underneath is still holding its shape, a cover will restore both look and comfort in minutes.
- Step 1: Measure the length and width of the headband before purchasing a wrap
- Step 2: Order a compatible wrap from Amazon, AliExpress, or a local music gear store – search using your headphone brand and model
- Step 3: Slide the wrap over the headband starting from one end
- Step 4: Center the wrap so coverage is even on both sides
- Step 5: Secure any velcro tabs or elastic bands included with the wrap
This method is reversible, which makes it especially useful for anyone who wants to preserve the original look of the headband or plans to sell the headphones later.
Fix 2: Replace the Foam Padding with New Material
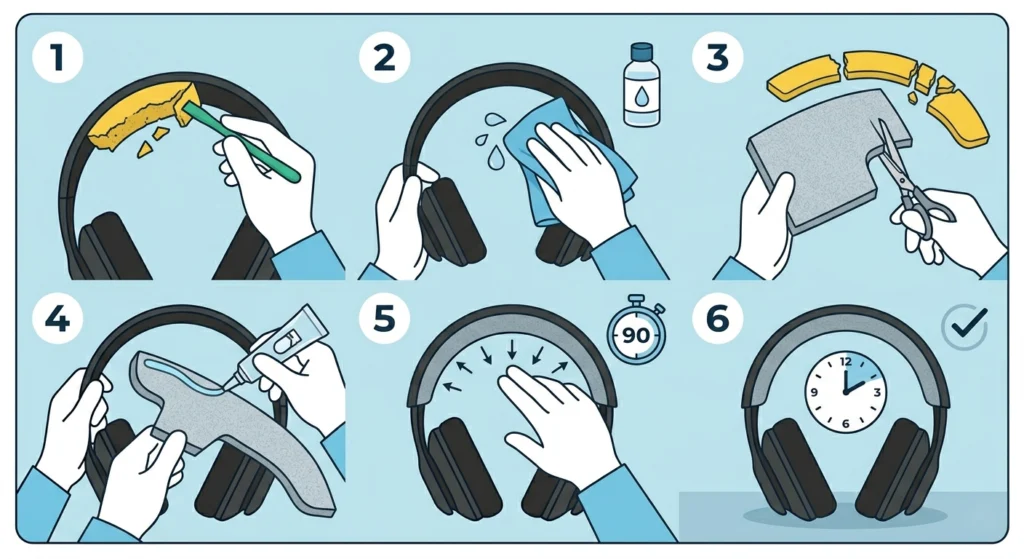
When the old foam has fully collapsed, crumbled, or separated from the headband shell, a proper foam replacement is the right call. This takes a bit more effort but delivers results that are closest to the original feel – sometimes even better, depending on the foam type chosen.
The key is using the right foam density. Memory foam is excellent for long listening sessions. Standard open-cell foam is lightweight and affordable. Neoprene padding is more durable and moisture-resistant, which works well for people who use headphones during workouts.
- Step 1: Remove the old padding by peeling it away from the headband shell carefully – use a plastic spudger or an old credit card to avoid scratching the plastic
- Step 2: Clean off any leftover adhesive residue using isopropyl alcohol and a lint-free cloth – let it dry completely before moving on
- Step 3: Cut the new foam to match the shape and size of the headband using scissors or a craft knife – use the old foam as a template if it is still in one piece
- Step 4: Apply a thin, even layer of contact cement or strong fabric adhesive to both the headband surface and the back of the foam
- Step 5: Wait 60 to 90 seconds for the adhesive to become tacky, then press the foam firmly onto the headband, starting from the center and working outward
- Step 6: Hold the foam in place for two to three minutes, then leave it to cure for at least two hours before using the headphones
Pro-Tip: Always cut the replacement foam slightly larger than the headband outline, then trim it down to a perfect fit after pressing it in place. Cutting too small the first time leaves gaps that are hard to fix cleanly.
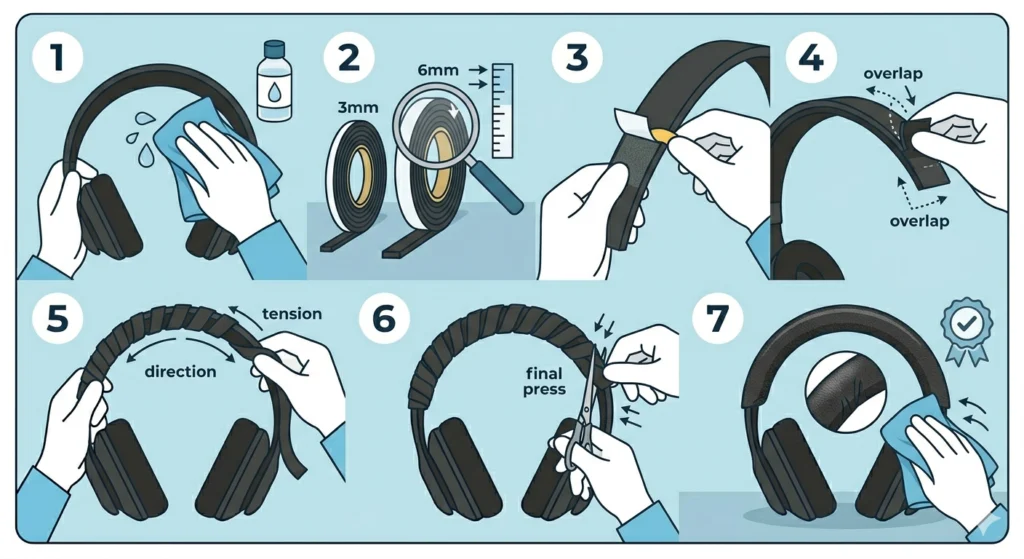
Fix 3: Wrap the Headband with Self-Adhesive Foam Tape
Self-adhesive foam tape – the kind sold in hardware stores for door sealing and weatherstripping – is a surprisingly effective padding material. It comes in rolls, sticks directly to the headband, and costs almost nothing.
This works best when the headband has an irregular or curved shape that is difficult to cut flat foam for. The tape conforms to curves naturally as it wraps around.
- Step 1: Clean the headband surface thoroughly with isopropyl alcohol and let it dry
- Step 2: Choose foam tape that is 3mm to 6mm thick for adequate cushioning – thinner tape will not provide enough comfort
- Step 3: Start at one end of the headband and peel back a few centimeters of the tape backing
- Step 4: Press the tape firmly to the underside of the headband, wrapping in a spiral pattern with slight overlap between each pass
- Step 5: Continue wrapping toward the other end, keeping tension consistent so the padding sits evenly
- Step 6: Trim any excess tape at the end and press all edges down firmly
- Step 7: Optionally, wrap the foam with faux leather or fabric tape for a cleaner appearance and improved durability
Fix 4: Apply a Faux Leather or Fabric Covering
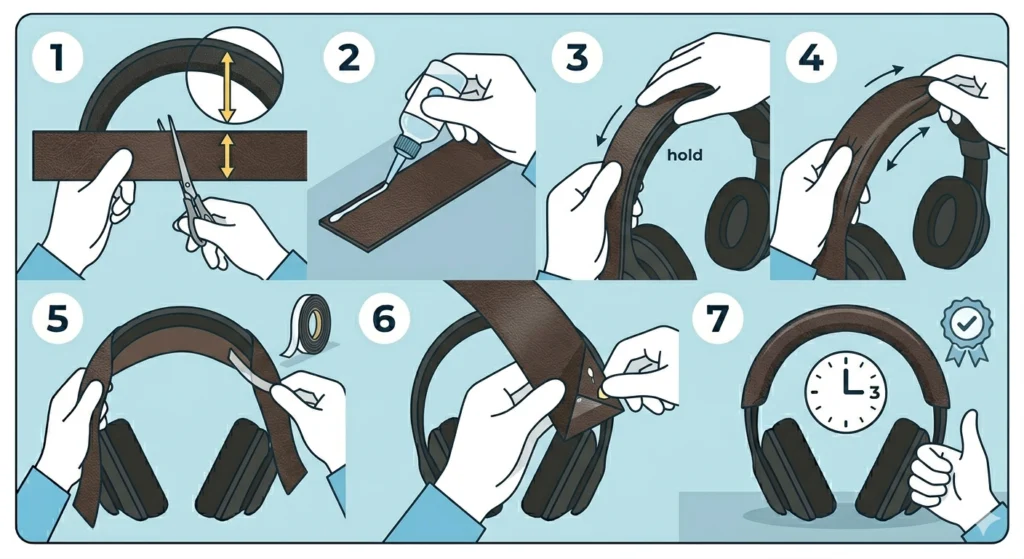
After replacing the foam, the headband may look rough or unfinished. Adding a faux leather or fabric cover over the foam gives it a polished look and protects the foam from sweat, oils, and daily wear.
Faux leather is the most popular choice because it wipes clean easily and looks close to the original finish found on most premium headphones. Soft fabric like velour or alcantara is another option – it breathes better and feels softer but absorbs sweat more.
- Step 1: Cut the faux leather into a strip that is wide enough to wrap fully around the foam-covered headband with about 1cm of overlap on each side
- Step 2: Apply a thin line of fabric glue along one long edge of the strip
- Step 3: Press that edge along the outer edge of the headband and hold until the glue sets
- Step 4: Pull the leather snugly over the foam, keeping it smooth and wrinkle-free
- Step 5: Fold the opposite edge under the headband and secure with glue or a thin strip of double-sided tape
- Step 6: Fold and tuck the ends neatly, similar to wrapping a gift, and secure with a small dab of glue
- Step 7: Let the entire assembly dry for at least three hours before handling
Pro-Tip: Use a hair dryer on a low heat setting to gently warm the faux leather before wrapping. Warm material stretches and conforms more easily, which reduces the chance of creasing or puckering at curved sections of the headband.
Fix 5: Use a Third-Party Replacement Headband Kit
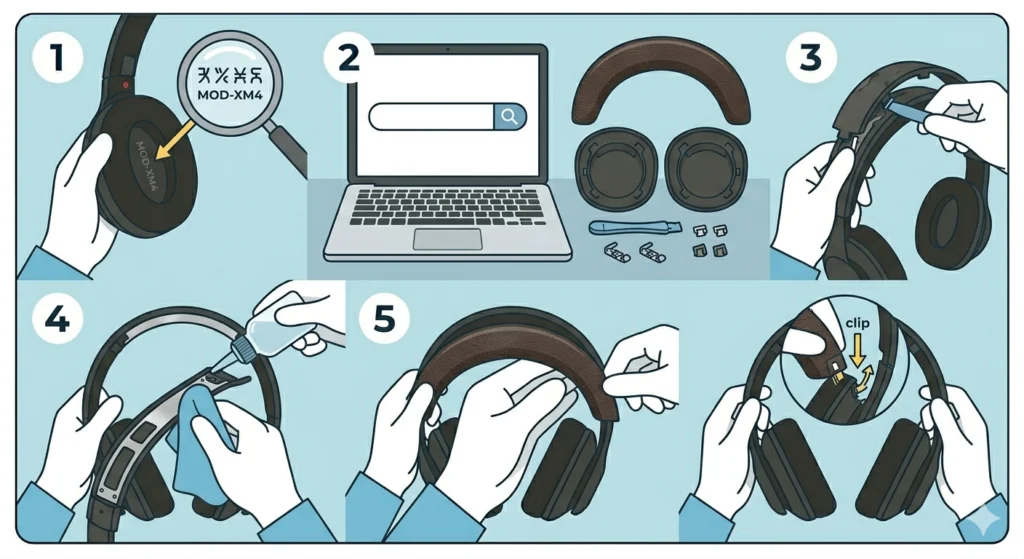
For popular headphone models like the Sony WH-1000XM series, Bose QuietComfort, Sennheiser HD 600, or Beyerdynamic DT 990, dedicated aftermarket replacement headbands are available. These kits include everything needed – a pre-shaped foam piece and a pre-cut leather or leatherette cover designed specifically for that model.
This is the most reliable method for anyone who values a factory-quality result without sourcing raw materials separately. Just search for the headphone model name followed by ‘headband replacement kit’ on Amazon, eBay, or specialty audio forums.
- Step 1: Identify the exact model number of the headphones – this is usually printed on the inside of the earcup or headband
- Step 2: Search for a replacement kit compatible with that model from a reputable seller with verified reviews
- Step 3: Remove the original worn padding according to the instructions included in the kit – most kits also include a removal tool
- Step 4: Clean the headband shell as described in the foam replacement method above
- Step 5: Follow the kit-specific installation steps, as each brand has slightly different attachment points or clip mechanisms
Tips for a Better and Longer-Lasting Repair
- Always clean the headband surface before applying any adhesive – oils and dust prevent proper bonding
- Use contact cement rather than super glue for foam bonding – super glue can make foam brittle over time
- Store headphones on a stand rather than flat on a desk to prevent compression of the new padding
- Wipe the headband with a dry microfiber cloth after each use to remove sweat and skin oils that degrade padding materials
- If using self-adhesive tape, press firmly along every centimeter and do not rush the process
- Allow any adhesive to fully cure before stretching the headband over the head – premature stress on the bond can cause peeling
Common Problems When Fixing Headband Padding
Foam Not Sticking Properly
This usually happens when the surface was not cleaned thoroughly before applying adhesive. Residual oils or old glue prevent a good bond. Strip everything back, wipe the surface with isopropyl alcohol, let it fully dry, and try again. Contact cement works far better than regular craft glue for this application.
Padding Feels Lumpy or Uneven
Uneven padding is almost always caused by cutting the foam at inconsistent thickness or wrapping foam tape without maintaining steady tension. Trim the foam on a flat surface, use a ruler as a guide, and apply light even pressure when wrapping tape. If lumps form under a leather cover, smooth them out before the glue fully sets.
Faux Leather Wrinkling at the Ends
Curved sections of the headband cause most wrinkling issues. The fix is to make small relief cuts – tiny slits along the edge of the leather strip at the curved sections – so the material folds flat without bunching. This is the same technique used in upholstery work.
New Padding Feels Too Thick
If the repaired headband feels too tall and the headphones no longer rest comfortably, the foam density or thickness chosen was too high. Standard headband foam is typically 4mm to 8mm thick. Swap to a thinner foam sheet or sand the foam lightly with coarse sandpaper to reduce the profile.
Adhesive Smell After Repair
Contact cement has a strong smell that can linger for a day or two. Leave the headphones in a well-ventilated area for 24 to 48 hours after the repair. Placing them near an open window or outside (away from dust) speeds up off-gassing significantly. The smell is temporary and disappears completely once the adhesive fully cures.
If audio issues come up separately – like if only one side is producing sound after the repair process accidentally pulled on a cable – checking how to re-pair Bluetooth earbuds for stereo sound on Windows can help diagnose and fix that quickly.
Frequently Asked Questions
Can worn headband padding be fixed without buying new materials?
Yes, in some cases. If the padding has simply flattened but the cover is still intact, placing the headphones in a warm room for a few hours can partially restore foam memory. Alternatively, wrapping the headband in a clean cloth or bandana is a short-term comfort fix. For a proper long-term solution, replacement materials are recommended.
How long does a DIY headband repair typically last?
A well-done foam and leather repair using quality contact cement and faux leather can last one to three years depending on usage frequency and how well the headphones are maintained. Headband covers tend to last six to eighteen months before showing wear. Proper cleaning and careful handling extend the lifespan of any repair significantly.
What type of foam is best for headband padding replacement?
Memory foam provides the most comfortable fit for extended listening sessions because it conforms to the shape of the head and distributes pressure evenly. Standard open-cell foam is lighter and less expensive. Neoprene is best for active use since it resists sweat and moisture better than both alternatives. Foam thickness between 4mm and 8mm suits most headband applications.
Is it safe to use super glue to attach headband foam?
Super glue is not recommended for foam padding. Cyanoacrylate adhesives (the active ingredient in super glue) can cause foam to harden, shrink, or become brittle over time. Contact cement or specialty foam adhesive provides a flexible bond that moves with the foam instead of locking it rigid, which is critical for padding that flexes with head movement.
How do you fix cracking or peeling faux leather on a headband?
Cracking and peeling faux leather on a headband cannot be repaired to look new – the material has broken down at a structural level. The correct fix is to remove all the old leather covering, clean the surface underneath, and apply a fresh piece of faux leather or a headband cover as described in the steps above. Attempting to glue down peeling edges only delays the inevitable.
Can headband padding repairs affect sound quality?
Headband padding does not directly affect the acoustic output of headphones since the drivers are in the earcups, not the headband. However, if the headband repair changes how tightly the earcups seal against the ears, it can subtly affect bass response and passive noise isolation. A properly fitted headband that holds the earcups in the correct position actually preserves the intended sound signature better than a worn-out one that lets the cups sit loosely.
Where can replacement foam and faux leather be purchased?
Craft stores like Joann and Michaels carry foam sheets and faux leather fabric in various thicknesses. Hardware stores stock self-adhesive foam tape in the weatherstripping aisle. Amazon and AliExpress offer pre-cut headphone foam kits and faux leather rolls. For model-specific replacement kits, eBay and dedicated audio accessory shops like Geekria or Brainwavz are reliable sources.
How do you prevent headband padding from wearing out quickly again?
The main causes of padding degradation are sweat, skin oils, and UV exposure. Wiping the headband with a dry microfiber cloth after every use removes the moisture and oils that break down foam and leather over time. Storing headphones in a case or on a stand away from direct sunlight also slows material breakdown. Some users apply a thin layer of leather conditioner to faux leather headbands every few months to keep the material supple and crack-resistant.
Is it worth repairing headband padding or just buying new headphones?
For headphones that cost $100 or more, repair is almost always worth it. The padding repair itself rarely costs more than $10 to $20 in materials, and the audio hardware inside remains perfectly functional. Replacing a pair of quality headphones because the headband padding wore out would be an unnecessary expense. Budget headphones under $30 may be a different calculation, but even then, a simple wrap cover can extend usability for another year or two.
Can the same repair methods be used for gaming headsets?
Yes. Gaming headsets use the same types of headband foam and covering materials as standard audio headphones. The repair steps are identical. One thing to be careful about with gaming headsets is the cable routing – many pass a cable through or along the headband, so taking note of the cable path before removing old padding prevents accidentally pulling or kinking internal wiring during the repair. If any microphone detection issues arise after the repair, checking a guide on resolving microphone detection problems on Windows 11 can help sort that out separately.