
A loose headphone headband or hinge is one of the most common wear-and-tear issues headphone owners run into, especially after months of daily use, folding, and stretching. This guide walks through the exact steps needed to fix a loose headphone headband or hinge, using tools and materials that are easy to find at home or at a local hardware store.
Quick Summary: Key Takeaways
- A loose headband usually comes from stretched metal or plastic sliders, worn-out tension springs, or cracked hinge joints.
- Most fixes require basic tools like a small screwdriver, super glue, or heat-shrink tubing.
- Tightening hinge screws solves the problem in a majority of cases within minutes.
- Padding or foam inserts help when the headband slider has lost its natural grip.
- Severe hinge cracks may need a replacement part rather than a patch fix.
Step-by-Step Guide to Fix a Loose Headphone Headband
Before grabbing any tools, it helps to identify exactly where the looseness is coming from. Some headbands slip because of worn sliding tracks, while others feel loose because the hinge connecting the ear cup to the band has become wobbly. The steps below cover both situations, starting with the most common fix first.
Method 1: Tighten the Headband Sliding Mechanism
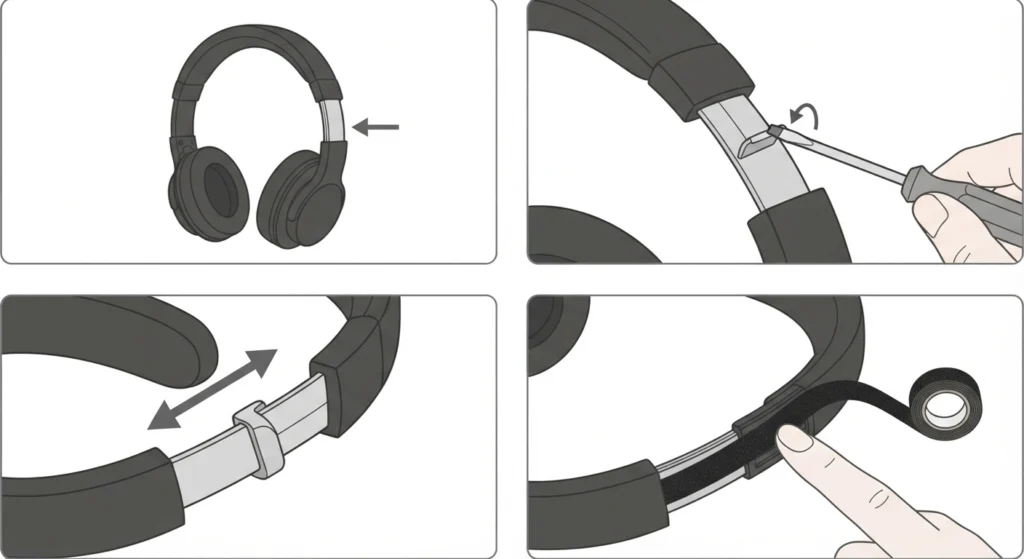
- Step 1: Extend the headband fully and check both sliders for visible wear marks or looseness where they connect to the arch.
- Step 2: Use a small flathead screwdriver to gently bend the metal tabs inward on each slider track, just enough to add resistance without cracking the plastic.
- Step 3: Slide the band back and forth a few times to test the new tension. It should hold its position without sagging under the weight of the ear cups.
- Step 4: If the slider is plastic rather than metal, apply a thin strip of textured tape or a rubber grip pad along the inside track to increase friction.
This works best when the looseness is mild to moderate. Most people find that a slight adjustment to the metal tabs restores enough grip to keep the fit stable through normal daily use.
Method 2: Fix a Loose Hinge Connecting the Ear Cup
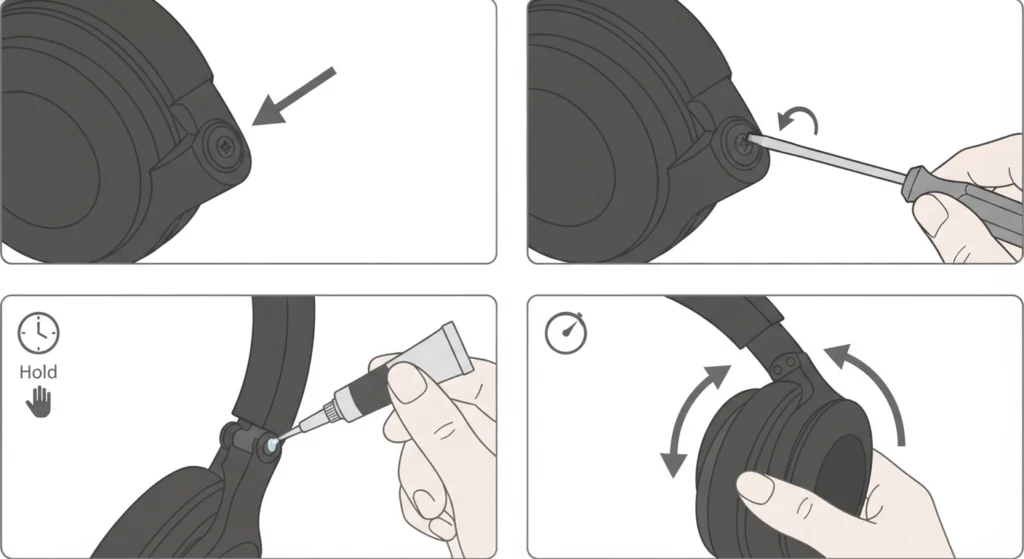
- Step 1: Locate the small screw or pin at the hinge joint where the ear cup swivels or tilts.
- Step 2: Using a precision screwdriver, tighten the screw in small turns, checking movement after each turn so the hinge does not get overtightened and crack.
- Step 3: If the hinge has no visible screw and relies on a snap-fit plastic pin, apply a small drop of super glue or plastic epoxy to the joint, holding it in the correct position for the recommended curing time.
- Step 4: Once set, gently rotate the ear cup to confirm the hinge holds tension evenly on both sides.
Pro-Tip: Avoid using excessive glue on a hinge joint. A thin, even layer bonds just as strongly as a thick blob, and it prevents the glue from seeping into the moving parts, which can lock the hinge in place permanently.
Method 3: Rebuild Tension with Heat-Shrink Tubing
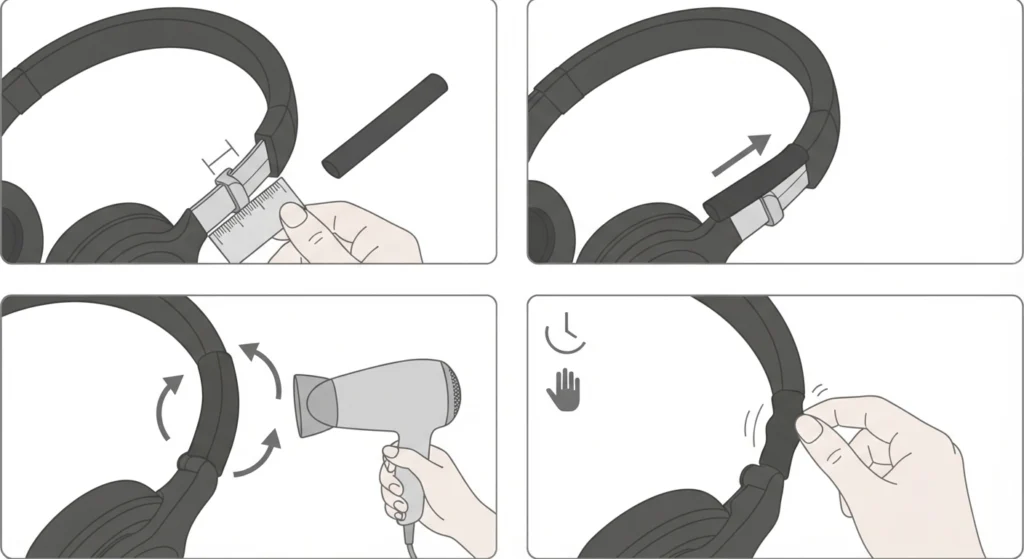
- Step 1: Measure the loose section of the headband arch or hinge post and cut a piece of heat-shrink tubing slightly longer than that section.
- Step 2: Slide the tubing over the loose area of the frame.
- Step 3: Apply heat from a hair dryer or heat gun on a low setting, rotating evenly until the tubing shrinks and grips the frame tightly.
- Step 4: Let the tubing cool completely before testing the fit again.
This method works particularly well on headbands where the plastic has thinned out from years of flexing. It adds a fresh layer of material exactly where support is needed most.
Method 4: Add Padding for a Snug, Stable Fit
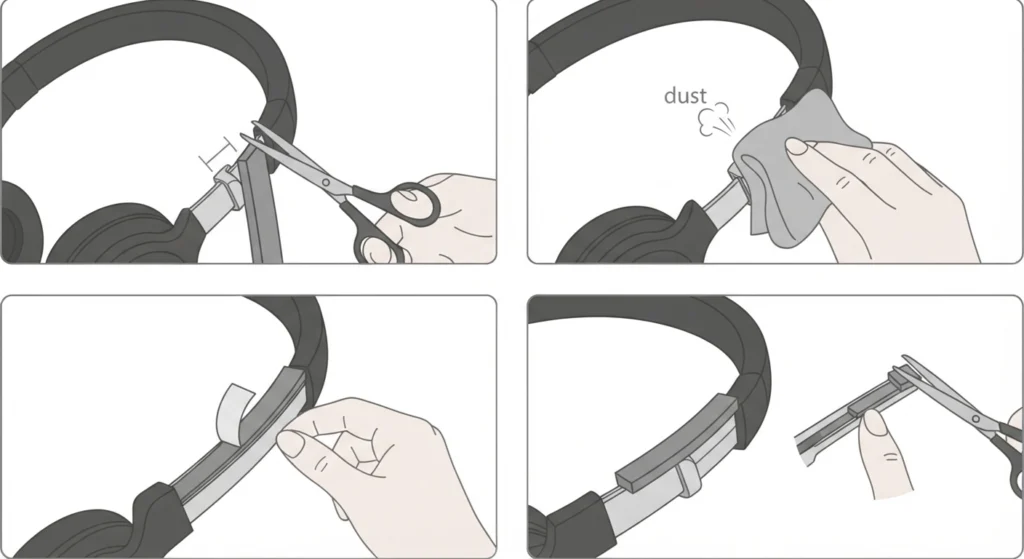
- Step 1: Cut a strip of self-adhesive foam padding, sized to match the width of the inner headband slider track.
- Step 2: Clean the surface with a dry cloth to remove dust or oil before applying the adhesive backing.
- Step 3: Press the foam firmly into place, then slide the headband several times to seat it evenly.
- Step 4: Trim any excess foam so it does not interfere with the smooth adjustment of the band.
The key is to build up just enough thickness to restore friction without making the band feel stiff or hard to adjust. A small piece often makes a noticeable difference in stability.
Tips for Keeping the Headband and Hinge Secure Long-Term
- Store headphones on a stand or in a case rather than tossing them flat, since resting weight on the hinge over time speeds up wear.
- Avoid folding the headband tighter than its natural range, as this puts repeated stress on the same hinge point.
- Wipe down metal sliders occasionally, since dust buildup reduces grip and accelerates slipping.
- After any repair, test the fit for a few days of normal use before considering the fix permanent, since some adhesives need a short curing period to reach full strength.
Common Problems When Fixing a Loose Headband or Hinge
The Headband Still Slips After Tightening
This usually means the metal slider has been bent too many times and has lost its shape. Adding a foam or rubber grip strip, as covered in Method 4, is a more permanent fix than repeatedly bending the metal.
The Hinge Feels Stiff or Squeaks After Repair
A small amount of silicone-based lubricant applied to the hinge pin usually resolves squeaking without loosening the fit again. Avoid oil-based lubricants, since they can degrade certain plastics over time.
Glue Did Not Hold the Hinge in Place
Standard super glue does not always bond well with the type of plastic used in many headphone frames. Switching to a plastic-specific epoxy or a flexible rubber-based adhesive usually creates a stronger, longer-lasting bond.
Sound Feels Off After Adjusting the Fit
A shifted ear cup position can sometimes change how sound is perceived, even though nothing is wrong with the drivers themselves. Once the physical fit feels secure again, checking and adjusting audio output settings on the connected device can help confirm the sound quality matches expectations. If audio still sounds unusual after the repair, resetting audio settings on the device is a quick way to rule out a software-related cause before assuming the hardware fix failed.
Frequently Asked Questions
Why does a headphone headband become loose over time?
Repeated flexing, folding, and adjusting gradually wears down the metal sliders or plastic joints, reducing the friction that originally held the band in place.
Can a loose headphone hinge be fixed without buying new headphones?
Yes. In most cases, tightening a screw, applying a small amount of adhesive, or adding padding restores enough tension to make the headphones fully usable again.
What tools are needed to fix a loose headband or hinge?
A precision screwdriver, super glue or plastic epoxy, foam padding with adhesive backing, and optionally heat-shrink tubing cover most common repairs.
Is it safe to use super glue on headphone plastic?
It is safe in small, controlled amounts. Applying too much glue can seep into moving parts and cause the hinge to stiffen or lock.
How long does it take for the hinge glue to fully cure?
Most super glue and epoxy products reach a workable bond within a few minutes, but full curing strength typically takes several hours, so the headphones should rest undisturbed during that time.
Why does the headband still feel loose after tightening the metal sliders?
If the metal has been bent multiple times, it may have lost its original shape and elasticity. Adding a grip strip or foam padding usually solves this when bending alone no longer works.
Can heat-shrink tubing damage the headphone frame?
No, as long as low heat is used and the tubing is rotated evenly during shrinking. Excess heat applied directly to one spot can warp thin plastic frames.
Does fixing the headband affect sound quality?
No, headband and hinge repairs are purely structural and do not affect the internal drivers or audio components responsible for sound quality.
How often should the headband fit be checked?
Checking the fit every few months, or whenever slipping is noticed, helps catch wear early before it turns into a larger repair.
When is it better to replace the headphones instead of repairing them?
If the plastic frame is cracked in multiple places or the hinge has broken entirely rather than just loosened, replacement parts or a new pair become the more practical option.