Headphone ear pads falling off is one of the most common problems users run into after months of regular use. Whether the adhesive gave out, the foam deteriorated, or the cushion simply popped loose, the good news is that fixing headphone ear pads that are falling off is something almost anyone can do at home – no technical background needed. This guide walks through every reliable method, from quick reattachment fixes to full pad replacements.
Key Takeaways
- Most ear pad issues are caused by dried-out adhesive, worn-out foam, or cracked plastic retaining clips
- A strong contact adhesive or double-sided tape can reattach ear pads in under 10 minutes
- Replacement ear pads are available for most major headphone brands and are affordable
- Clip-on ear pads require no glue – just align and snap back into place
- Regular cleaning extends the life of ear pads significantly
How to Fix Headphone Ear Pads That Are Falling Off
Fix 1: Reattach Ear Pads Using Contact Adhesive

This is the most common fix and works well when the pad itself is still in good condition but the adhesive bond has failed. The key is using the right type of glue – something flexible and heat-resistant, not a rigid super glue that will crack again quickly.
- Step 1: Remove the ear pad completely from the headphone cup. If it is partially attached, peel it away carefully to avoid tearing the foam or fabric.
- Step 2: Clean both surfaces – the back of the ear pad and the rim of the headphone cup. Use a cotton swab with isopropyl alcohol to remove old adhesive residue, dust, and skin oils. Let both surfaces dry completely before moving on.
- Step 3: Apply a thin, even layer of contact adhesive (such as Barge cement or similar flexible contact cement) to the rim of the headphone cup. Apply a matching thin layer to the back edge of the ear pad.
- Step 4: Wait 2 to 3 minutes for both surfaces to become tacky. This is important – pressing them together too early results in a weak bond.
- Step 5: Carefully align the ear pad with the headphone cup. Press firmly around the entire edge, working in sections. Hold each section for 10 to 15 seconds before moving to the next.
- Step 6: Let the headphones rest undisturbed for at least 1 hour before wearing them. Full cure typically takes 24 hours for maximum bond strength.
Pro-Tip: Always use a flexible adhesive, never cyanoacrylate (super glue) or epoxy. Rigid glues crack under the repeated flexing that happens when you put on and remove headphones. Contact cement stays pliable and holds up far longer in this application.
Fix 2: Reattach Ear Pads Using Double-Sided Tape
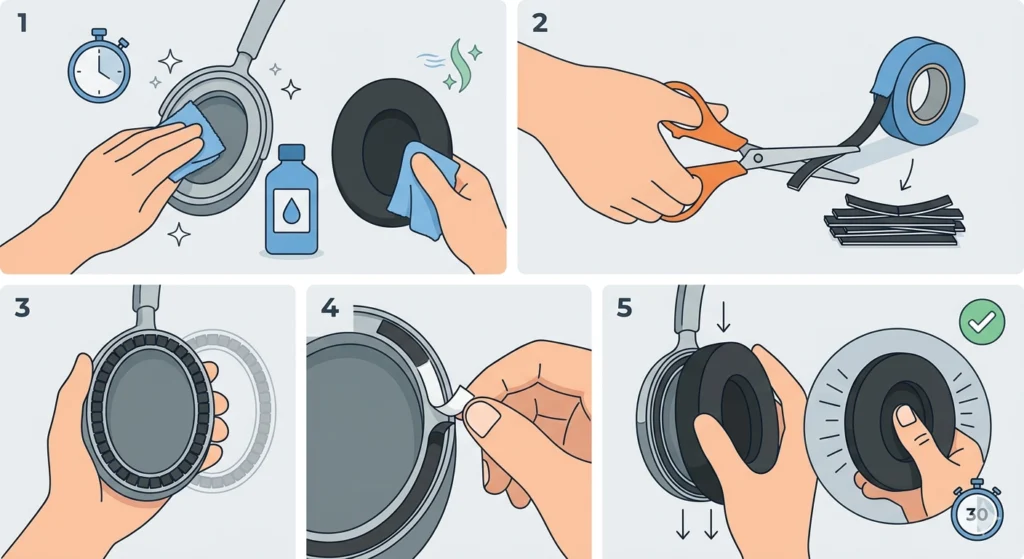
Double-sided tape is a cleaner, easier alternative to liquid glue – especially useful when the ear pads need to be removable for cleaning or future replacement. Foam mounting tape works particularly well here because it adds a slight cushion while bonding the surfaces together.
- Step 1: Clean the rim of the headphone cup and the back of the ear pad with isopropyl alcohol. Remove all old adhesive residue completely.
- Step 2: Cut thin strips of double-sided foam tape (3M mounting tape is a reliable choice). The strips should be narrow enough to fit within the rim without overlapping the speaker mesh or inner cup area.
- Step 3: Apply the tape strips around the full circumference of the headphone cup rim. Overlap slightly at the ends to ensure full coverage with no gaps.
- Step 4: Peel the backing paper from the tape to expose the second adhesive side.
- Step 5: Align the ear pad carefully over the cup and press down firmly, working your way around the entire edge. Apply steady pressure for 30 seconds.
Fix 3: Snap Back Clip-On or Twist-Lock Ear Pads
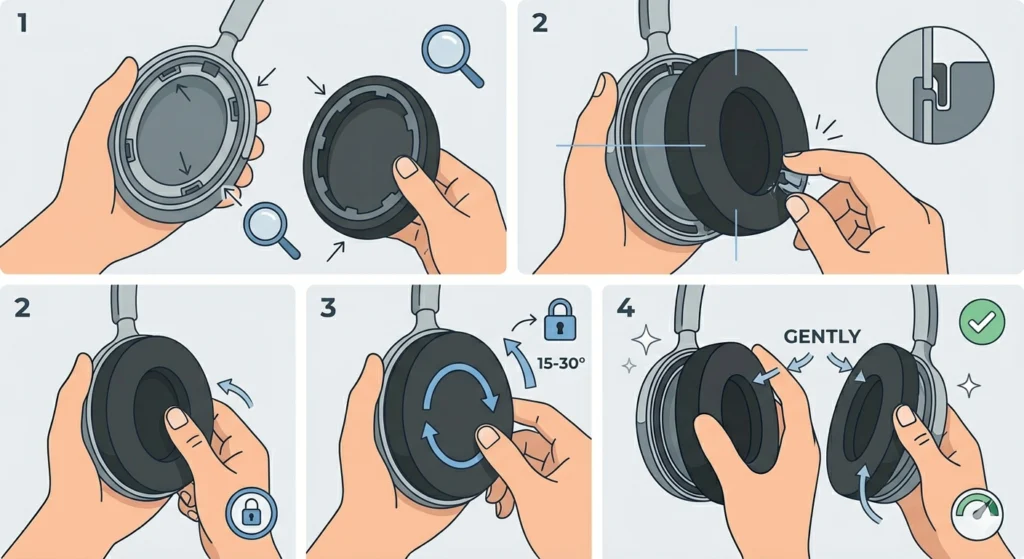
Many higher-end headphones – particularly from brands like Beyerdynamic, Sennheiser, and Audio-Technica – use a clip or twist-lock mechanism instead of glue. These pads can come loose after extended use but are very easy to reattach with no tools or adhesive required.
- Step 1: Inspect the ear pad and the headphone cup to identify the attachment method. Look for small plastic tabs, notches around the rim, or a ring that twists into place.
- Step 2: For clip-on pads, align the pad so the plastic tabs or inner lip lines up with the groove on the headphone cup. Press firmly and evenly around the entire perimeter until each tab clicks into place. Start at one side and work around gradually.
- Step 3: For twist-lock pads, seat the pad against the cup, align any alignment markers, then rotate the pad clockwise (usually around 15 to 30 degrees) until it locks. A subtle click or resistance indicates it is fully seated.
- Step 4: Gently tug on the pad from different angles to confirm it is secure. If one section feels loose, press that area again more firmly.
Fix 4: Replace the Ear Pads Entirely
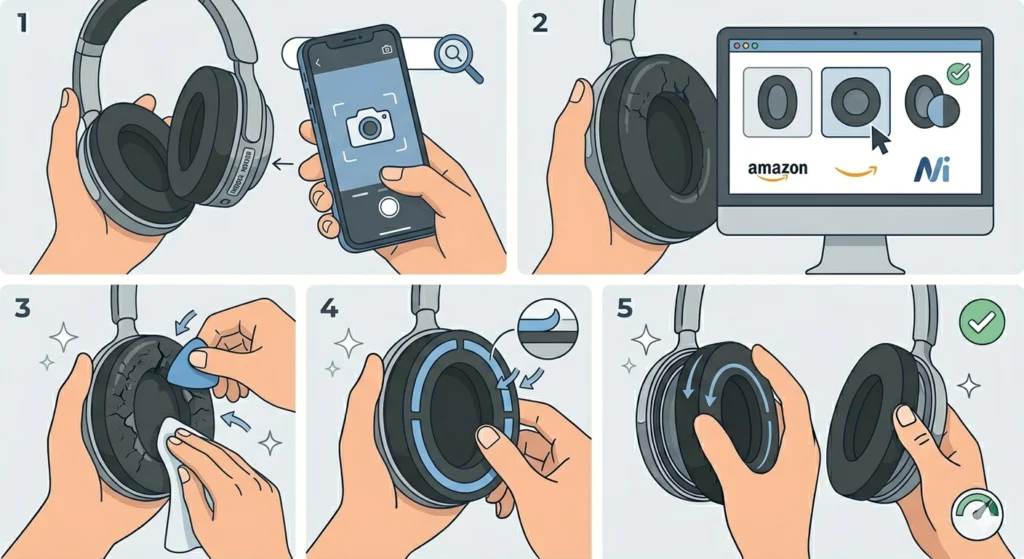
When the foam has crumbled, the pleather has cracked and is peeling everywhere, or the existing pad is too damaged to reattach, replacement is the most reliable long-term solution. Replacement ear pads are widely available and often inexpensive.
- Step 1: Identify the exact model of the headphones. Check the headband, the cup, or the original packaging. This matters because ear pad sizing and attachment types vary significantly between models.
- Step 2: Search for replacement ear pads using the headphone model name. Start with the manufacturer’s official accessories, then check retailers like Amazon for compatible third-party options. Look for pads that match the original in size, shape (oval vs. circular), and attachment method.
- Step 3: Remove the old damaged ear pad completely. For adhesive pads, peel slowly and clean off all residue. For clip-on styles, pry gently with a flat plastic tool (a guitar pick works well) to avoid scratching the headphone cup.
- Step 4: Attach the new ear pad following the same method as the original – glue for adhesive-style cups, or snap/twist for mechanical attachment types. Many aftermarket pads include adhesive rings already applied to the back, making installation straightforward.
- Step 5: Test the fit by pressing gently around the full edge and checking for any gaps or loose sections. Proper seating improves both comfort and sound quality.
Pro-Tip: When buying replacement ear pads, measure the inner diameter of the headphone cup before ordering. Even pads marketed as ‘compatible’ for a specific headphone line can vary by generation or revision. A pad that is 2mm too small will not seal properly and will affect bass response noticeably.
Tips for Keeping Ear Pads in Good Condition Longer
- Wipe down ear pads after each use with a dry microfiber cloth to remove sweat and skin oils, which degrade adhesive and foam over time
- Store headphones in a case or on a stand rather than tossing them in a bag where pressure can weaken the bond between pad and cup
- Avoid exposing headphones to extreme heat – leaving them in a hot car accelerates adhesive breakdown and causes foam to harden and crumble faster
- If the ear pads are made of pleather or protein leather, applying a small amount of leather conditioner every few months keeps the material pliable and prevents cracking
- Rotate between two pairs of headphones if possible – constant daily use wears pads down much faster than alternating use
Common Problems When Fixing Ear Pads
The Ear Pad Keeps Falling Off Even After Gluing
This usually means the surface was not clean enough before applying adhesive. Skin oils and old glue residue both prevent new adhesive from bonding properly. Strip the pad off again, clean both surfaces thoroughly with isopropyl alcohol, let them dry fully, and reapply. Make sure to wait for the glue to become tacky before pressing the surfaces together – pressing too early is the second most common reason for a weak bond.
The Foam Inside the Ear Pad Is Crumbling
Crumbling foam inside the ear pad is a sign of foam hydrolysis – essentially the foam breaking down due to humidity and age. Reattaching a pad with degraded foam is a temporary fix at best. The more effective solution is replacing the ear pads entirely. This type of deterioration tends to happen regardless of brand, typically after 3 to 5 years of regular use.
The Ear Pad Does Not Sit Flat Against the Cup
A pad that sits unevenly or leaves a visible gap on one side usually means the alignment was off during reattachment. If using adhesive, reattaching within the first few minutes while the glue is still workable allows for readjustment. If the glue has already cured, peeling the pad off and starting fresh with proper alignment is the cleanest solution. Starting the alignment at the top of the cup and working downward in small sections helps maintain even placement.
The Replacement Pads Feel Too Stiff or Uncomfortable
New foam ear pads are often firmer than the originals, especially if switching from memory foam to standard polyurethane foam. Most new ear pads soften noticeably after 1 to 2 weeks of regular use as the foam breaks in. If the fit feels noticeably smaller or the clamping pressure has increased, the pad dimensions may be slightly off – check the measurements against the original specifications. Some users also find that audio quality, particularly when adjusting audio output settings, improves after the new pads fully seat and seal against the ears properly.
Adhesive Is Leaving Residue on the Headphone Cup
Old adhesive residue can be stubborn. For plastic and metal headphone cups, isopropyl alcohol (90% or higher) applied with a cotton swab and rubbed gently dissolves most contact cement and tape adhesives. For more stubborn residue, a small amount of Goo Gone or a similar adhesive remover works well. Avoid acetone – it is effective but can damage plastic finishes and paint on the headphone cups.
Frequently Asked Questions
What is the best glue to use for reattaching headphone ear pads?
The best option is a flexible contact adhesive such as Barge cement, Loctite Vinyl Fabric and Plastic Flexible Adhesive, or similar products designed for bonding foam and fabric to plastic. These remain pliable after curing, which is essential for an application that involves repeated flexing every time the headphones are used. Avoid rigid glues like super glue or two-part epoxy, as they crack quickly under normal headphone use and may damage the ear pad material.
Can double-sided tape really hold ear pads securely?
Yes, particularly foam mounting tape with strong adhesive on both sides. 3M double-sided foam tape is a popular and reliable choice. It works especially well for lighter ear pads and provides a bond strong enough for daily use. The added benefit is that it makes future pad removal and replacement much easier compared to contact cement.
How often do headphone ear pads need to be replaced?
This varies depending on the material and how heavily the headphones are used. Genuine leather pads tend to last the longest – often 5 or more years with care. Protein leather (pleather) and synthetic materials typically last 2 to 4 years before cracking or peeling. Velour pads are durable but flatten over time and may need replacement after 3 to 5 years. Heavy daily use, sweat exposure, and storage conditions all affect lifespan.
Will replacing ear pads affect the sound quality of the headphones?
It can, depending on the material and thickness of the replacement pads. Thicker pads increase the distance between the ear and the driver, which can reduce perceived bass and treble presence. Velour pads are more breathable but acoustically different from pleather, often producing a slightly more open sound. After replacing pads, spending time adjusting audio output settings can help compensate for any changes in sound character.
How do you remove ear pads without damaging them?
For adhesive-attached pads, warm the pad gently with a hairdryer on low heat for 20 to 30 seconds. This softens the adhesive and makes the pad much easier to peel away without tearing. Slide a flat plastic tool or guitar pick under the edge and work slowly around the perimeter. For clip-on pads, insert the plastic tool into the seam between the pad and cup and pop each clip gently rather than pulling the entire pad at once.
Are there universal ear pad replacements, or do they need to match the headphone model?
There are universal-fit ear pads designed to work with a range of headphones, typically sold by the internal and external diameter (for example, 60mm inner by 90mm outer). These work reasonably well in many cases, but a model-specific replacement will almost always fit better, seal more reliably, and maintain the original sound signature more closely. For popular headphones like Sony, Sennheiser, Bose, or Audio-Technica, model-specific options are readily available from both the manufacturer and third-party brands.
Can ear pad adhesive be reused after it dries?
No – once contact adhesive has cured and bonded, it cannot simply be reactivated. If the pad has detached, the old adhesive needs to be removed from both surfaces before applying fresh adhesive. Attempting to glue over old, failed adhesive results in an unreliable bond. A thorough cleaning with isopropyl alcohol before reapplying fresh adhesive is the correct approach.
Is it worth repairing ear pads on cheap headphones?
It depends on the cost of the repair versus the cost of replacement headphones. If the repair only requires a few dollars worth of tape or glue and the headphones otherwise work well, it is almost always worth doing. If the pad material is heavily deteriorated, replacement pads for budget headphones may not be readily available, and the cost of third-party pads could approach the cost of a new entry-level pair. In that case, evaluating the overall condition of the headphones first makes sense.
Why do ear pads made of pleather or protein leather peel so quickly?
Pleather and protein leather are synthetic materials that degrade through a process of hydrolysis – moisture from sweat and air humidity breaks down the polyurethane coating over time, causing it to peel and crack. The rate of degradation is accelerated by heat, frequent contact with skin oils and sweat, and exposure to direct sunlight. Genuine leather resists this process much better. For longer-lasting replacements, genuine leather or high-quality velour pads are worth considering.
Can the ear pad adhesive cause skin irritation?
It is unlikely once the adhesive has fully cured, as most contact adhesives become inert after drying. However, during application, solvent-based adhesives produce fumes that can be irritating – always work in a well-ventilated area. If the adhesive is not fully cured and comes into contact with skin, mild irritation is possible. Allowing a full 24-hour cure before wearing the headphones eliminates this risk entirely.