
Quick Answer
- Press Windows key + I to open Settings.
- Go to Bluetooth & devices, then Printers & scanners.
- Scroll to Printer preferences and turn off ‘Allow Windows to manage my default printer’.
- Scroll back up and click the printer to use.
- Click Set as default.
That one setting is the reason most default printers keep changing back.
Before You Begin: Make Sure the Printer Is On and Connected
Windows will happily set a printer as the default even when that printer is switched off, unplugged, or off the network. Nothing fails at the time, but every job sent afterwards sits in the queue and never prints. Run through these checks first so the printer works straight away after being set as default.
- Switch the printer on and wait for it to finish starting up. Check the display for any error message, and confirm there is paper in the tray and enough ink or toner.
- Check the connection. For USB printers, make sure the cable is firmly seated at both ends and plugged directly into the PC rather than an unpowered hub. For wireless printers, confirm the printer is joined to the same network as the PC, not a separate guest network or a different band the PC cannot reach.
- Confirm the printer appears in Windows. Go to Settings, Bluetooth & devices, then Printers & scanners. If it is not listed, click Add a printer or scanner. For a network printer that does not appear automatically, click ‘The printer that I want isn’t listed’ and enter its IP address.
- Check that the printer does not show as Offline. If it does, open Windows key + R, type shell:PrintersFolder, press Enter, right-click the printer, choose See what’s printing, then open the Printer menu and uncheck Use Printer Offline.
- Make sure the queue is clear. In the same window, uncheck Pause Printing and cancel any old stuck job. One jammed job blocks everything sent after it.
- Print a test page before setting the default. Right-click the printer in the Printers folder, choose Printer properties, and click Print Test Page. If the test page comes out, the printer is genuinely ready and the default setting will work.
Doing this first separates two different problems. If the test page prints but jobs still go elsewhere afterwards, the issue is the default printer setting. If the test page does not print at all, the default setting is not the cause and changing it will not help.
Method 1: Set the Default Printer in Settings
This is the permanent fix. It is also the only method that stops Windows from overriding the choice later.
- Press Windows key + I to open Settings.
- Click Bluetooth & devices in the left sidebar, then click Printers & scanners.
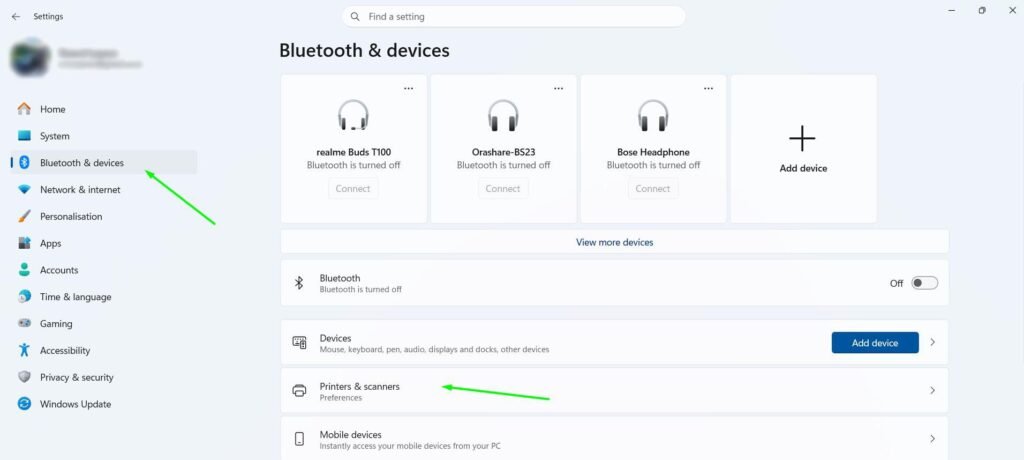
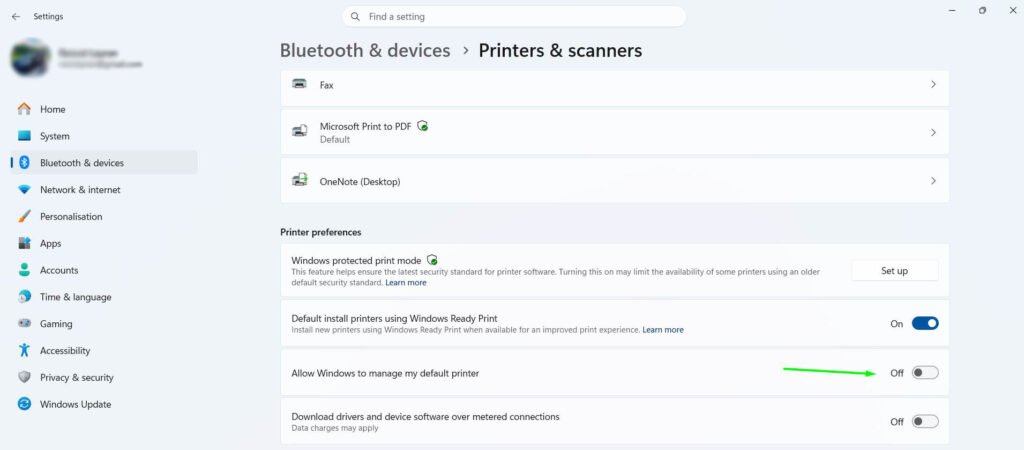
- Scroll down to Printer preferences and toggle off ‘Allow Windows to manage my default printer’. If this stays on, the Set as default button remains greyed out.
- Scroll back up and select the printer you want to set as the default. Avoid the virtual printers – Microsoft Print to PDF, Microsoft XPS Document Writer, and OneNote look like printers but only save files.
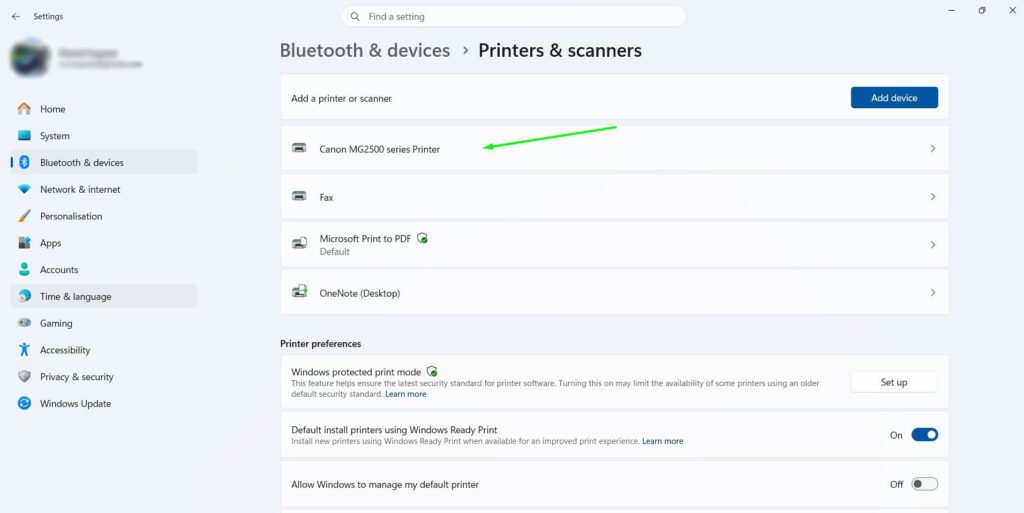
- Click Set as default.

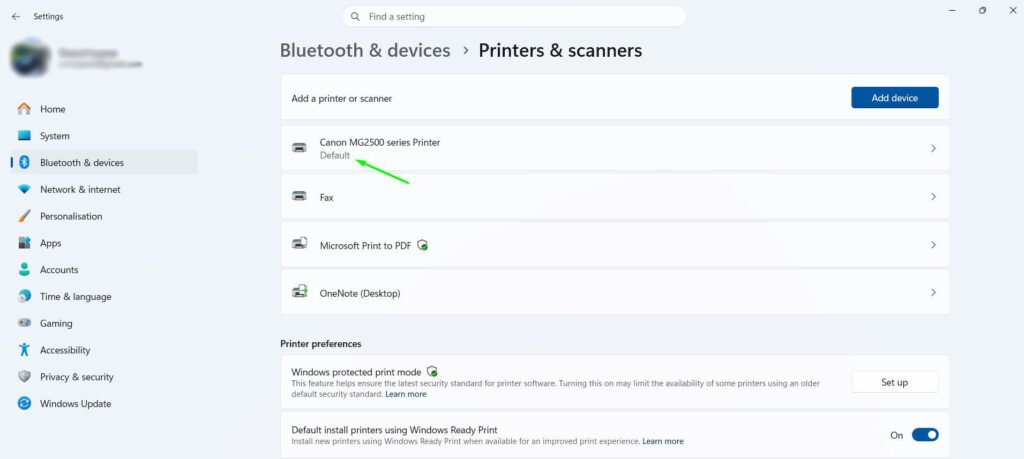
- Return to the printer list and confirm the word Default now appears under the printer name. No restart is needed.
- Confirm it actually prints. Open Notepad, type anything, and press Ctrl + P. The printer just set should already be selected. Print the page to verify the whole path works end to end.
Method 2: Set the Default Printer from the Printers Folder
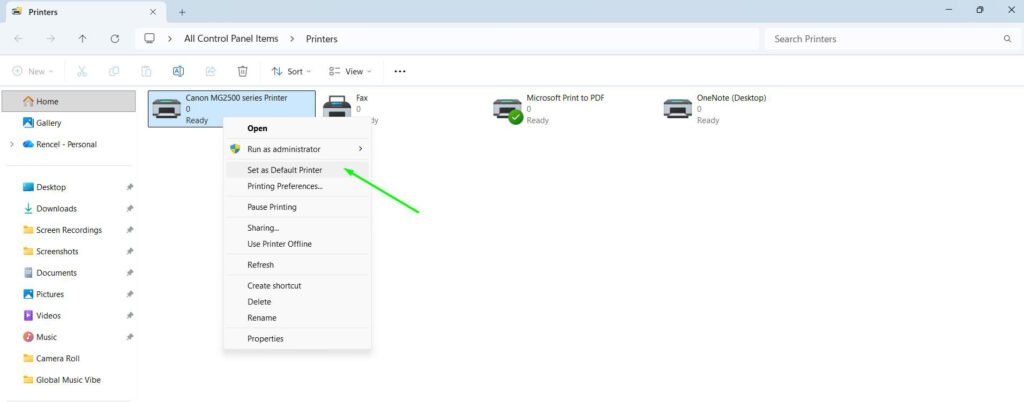
The classic Control Panel window still works in Windows 11 and takes one right-click.
- Press Windows key + R, type shell:PrintersFolder, and press Enter. Typing ‘control printers’ opens the same window.
- Look for the green check badge, which marks the current default.
- Right-click the printer to use and select Set as default printer.
- If Windows warns that this stops automatic printer management, click OK. That is the intended result.
This method works even while ‘Allow Windows to manage my default printer’ is still switched on, which makes it the quickest workaround when the Set as default button in Settings is greyed out.
Method 3: Set the Default While Already Printing
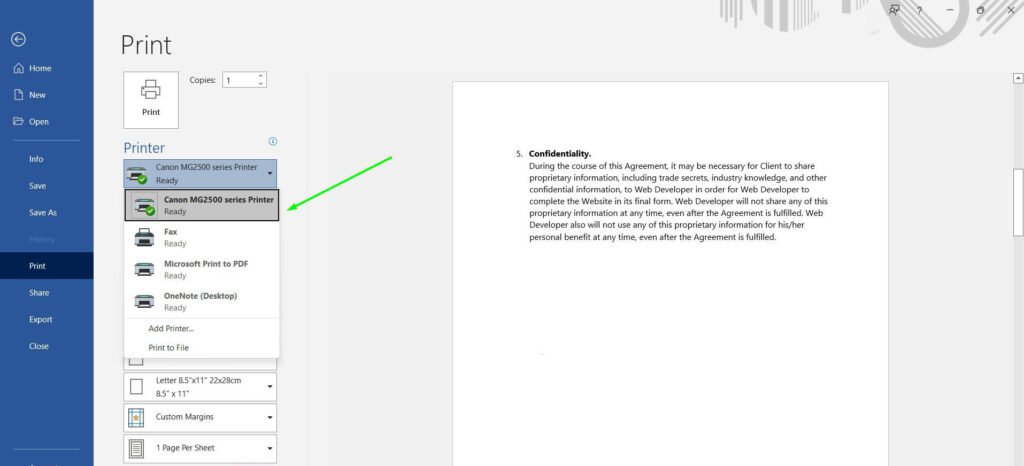
Useful when a document is already open and the wrong printer is selected.
- Press Ctrl + P in an app that uses the classic Windows print dialog. Word, Excel, and Adobe Acrobat Reader are reliable.
- Right-click the printer to use.
- Select Set as Default Printer. The change applies system-wide, not just to that job.
Chrome and Edge show their own simplified print screen with no right-click option. Press Ctrl + Shift + P in those browsers to open the full Windows print dialog instead.
Method 4: Set the Default Printer from the Command Line
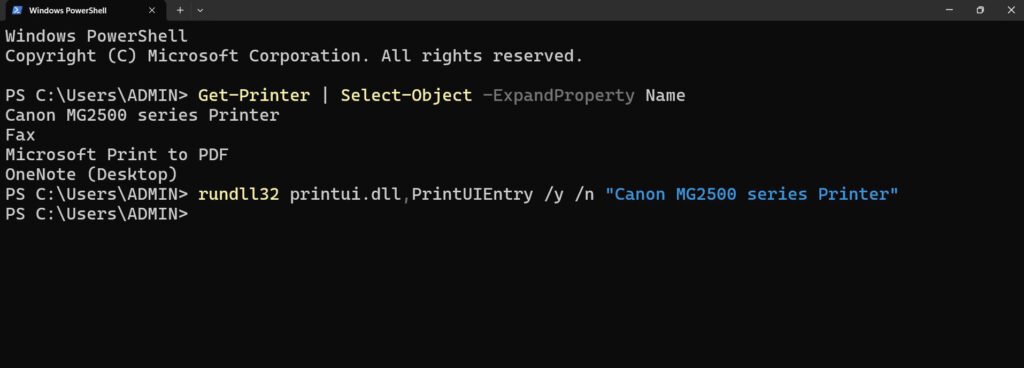
Faster for anyone comfortable typing a command, and useful for scripting.
- Open PowerShell and run this to get the exact printer name: Get-Printer | Select-Object -ExpandProperty Name
- Copy the name exactly. Spacing and capitalisation both matter.
- Run this command, replacing the placeholder with the copied name: rundll32 printui.dll,PrintUIEntry /y /n “Your Printer Name”
- No error message means it worked. Press Ctrl + P in any app to confirm.
Do not run these elevated. Windows stores the default printer per user account, so an administrator window sets the default for the administrator account rather than the signed-in one. A command that runs without error but changes nothing is almost always this.
How to Check the Current Default Printer
Three ways to confirm what Windows is actually using:
- Open Settings, then Bluetooth & devices, then Printers & scanners. The word Default appears under the current default printer.
- Press Windows key + R, type shell:PrintersFolder, and look for the green check badge. This is the more reliable read, because the Settings app does not always refresh.
- Run this in PowerShell: Get-CimInstance -ClassName Win32_Printer | Where-Object { $_.Default -eq $true } | Select-Object Name
Older guides suggest the wmic command for this. Microsoft has deprecated WMIC and it is no longer installed by default on current Windows 11 builds, so it returns a ‘not recognized’ error. The Get-CimInstance command above returns the same information.
Why Windows 11 Changes the Default Printer on Its Own
Windows 11 has two modes for handling the default printer.
With ‘Allow Windows to manage my default printer’ switched on, Windows automatically promotes whichever printer was used most recently. This is the factory setting, and it is why a default that was set last week is suddenly something else today.
With that setting switched off, the chosen printer stays the default until it is changed manually. This is the setting most people actually want.
Two details matter here. The default printer is stored per user account, so each account on the same PC keeps its own. And a major Windows feature update can quietly switch automatic management back on, so it is worth re-checking after any large update.
The Set as Default Button Is Greyed Out
Windows is still managing the default automatically. Turn off ‘Allow Windows to manage my default printer’ under Printer preferences and the button becomes available straight away. Method 2 also works regardless of that setting.
If the message ‘Some settings are managed by your organization’ appears, an administrator has locked the default printer through group policy on a work or school PC. Nothing changed locally will hold. Contact the IT department.
The Default Printer Keeps Reverting After a Restart
Work through these in order. Most cases stop at the first two.
- Confirm ‘Allow Windows to manage my default printer’ is actually off. Re-check it after every large Windows update.
- Remove printers no longer in use. Every extra entry gives Windows another candidate to promote. Watch for virtual printers added by Adobe Acrobat, PDF writers, and fax software, which often make themselves the default during installation.
- Restart the Print Spooler. Press Windows key + R, type services.msc, find Print Spooler, right-click it, and select Restart. A stuck spooler can fail to save the default across reboots.
- Run the printer troubleshooter. Go to Settings, System, Troubleshoot, Other troubleshooters, then run the Printer troubleshooter.
Registry Fix for Persistent Resets
Use this only if the default still reverts after the steps above. Editing the registry incorrectly can cause system problems, so back it up first: press Windows key + R, type regedit, then use File and Export to save a copy.
- Press Windows key + R, type regedit, and press Enter.
- Navigate to HKEY_CURRENT_USER\Software\Microsoft\Windows NT\CurrentVersion\Windows
- Find LegacyDefaultPrinterMode in the right pane and double-click it. If it does not exist, right-click an empty area and choose New, then DWORD (32-bit) Value, and name it LegacyDefaultPrinterMode.
- Set the value to 1 and click OK.
- Restart the PC, then set the default printer again using Method 1.
This key sits under HKEY_CURRENT_USER, so it applies only to the signed-in account. On a shared PC, each user must repeat the edit while signed in to their own account.
The Default Is Set but Jobs Print Somewhere Else
This is usually the application, not Windows. Word, Chrome, Edge, and Acrobat each remember their own last-used printer separately from the system default.
To isolate it, print the same document from Notepad. Notepad has no saved printer preference of its own and always uses the Windows default. If Notepad prints to the right printer and Word does not, the problem is inside Word. Change the printer once in that app and it will remember the new choice.
In Chrome and Edge, press Ctrl + Shift + P rather than Ctrl + P to open the full Windows print dialog, which respects the system default.
Other Common Problems
The printer shows as Offline
Windows allows an offline printer to be set as default, but jobs queue without printing. Open shell:PrintersFolder, right-click the printer, and choose See what’s printing. In the Printer menu, uncheck Use Printer Offline. Wireless printers that pick up a new IP address after a router restart cause this repeatedly – assigning a reserved IP address prevents it.
Nothing prints even though the default is correct
Check the print queue. Open Printers & scanners, click the printer, and select Open print queue. Uncheck Pause Printing and Use Printer Offline, then cancel any stuck job at the top. One jammed job blocks everything behind it.
The same printer appears twice
Windows sometimes lists one physical printer as two entries, such as a USB version and a network version. Setting the wrong one as default sends every job to a queue that never prints. Open Printer properties on each entry and print a test page, keep the entry that works, and remove the rest.
The printer is missing from the list entirely
It has not been installed yet. Go to Printers & scanners and click Add a printer or scanner. For network printers that do not appear automatically, click ‘The printer that I want isn’t listed’ and enter the IP address manually. If Windows Protected Print Mode is enabled, older printers without IPP support will not appear at all.
Frequently Asked Questions
Does the printer need to be turned on before setting it as default?
Windows does not require it, but it should be. A printer that is off, unplugged, or off the network can still be set as the default without any warning, and every job sent to it afterwards sits in the queue instead of printing. Switch the printer on, confirm the connection, and print a test page first so the default that gets set is a printer that actually works.
Why does the default printer keep changing on its own in Windows 11?
‘Allow Windows to manage my default printer’ is switched on, so Windows promotes whichever printer was used most recently. Turn it off in Printers & scanners under Printer preferences. If it still reverts after restarts, apply the registry fix above.
Can Windows 11 have more than one default printer?
No. Windows allows one default printer per user account at a time. Each account on the same PC keeps its own separate default, but a single account cannot hold two.
Does setting a default printer need administrator rights?
No. Every method here works with a standard user account. The command-line methods should specifically not be run elevated, because the default printer is stored per user and an administrator window changes the administrator account’s default instead.
Does changing the default printer affect other users on the same PC?
No. The default printer is a per-user setting, so each person signed in to the same computer keeps a different default.
Is a restart needed after changing the default printer?
No. The change applies immediately. A restart is only required after applying the registry fix.
How do I make Microsoft Print to PDF the default printer?
Turn off ‘Allow Windows to manage my default printer’ first, otherwise Windows will switch back to the last physical printer used. Then select Microsoft Print to PDF in Printers & scanners and click Set as default. If it is not listed, press Windows key + R, type optionalfeatures, press Enter, tick Microsoft Print to PDF, and click OK.
Does this work the same on HP, Canon, Epson, and Brother printers?
Yes. The default printer is a Windows setting rather than a hardware one, so the steps are identical for any make and model. The only brand-specific issue is manufacturer software such as HP Smart or Canon IJ utilities, which sometimes add extra printer entries – check that the working entry is the one set as default.
Why is the wmic command no longer working?
Microsoft deprecated WMIC and it is no longer installed by default on current Windows 11 builds, so it returns a ‘not recognized as an internal or external command’ error. Use the Get-CimInstance command shown above instead.