
Key Takeaways
- Charge the earbuds for about an hour before pairing them for the first time.
- Bluetooth pairing mode activates automatically once both earbuds come out of the case.
- Selecting ‘JLab GO Air Pop’ from the Bluetooth menu completes the connection.
- A voice prompt and steady white lights confirm a successful pairing.
- Touch controls handle volume, calls, playback, and EQ switching without needing a phone.
- Only one Bluetooth device can stay connected at a time, so switching devices takes a quick reset of Bluetooth settings.
Setting up JLab Go Air Pop earbuds for the first time takes only a few minutes once the steps are done in the right order. These earbuds are built for simplicity, and most people find that the whole process, from unboxing to hearing that first confirmation chime, feels almost effortless once the pairing sequence is understood. This guide walks through the exact setup process, the touch controls, and a few details that make the experience smoother from day one.
Step-by-Step Guide to Setting Up JLab Go Air Pop Earbuds
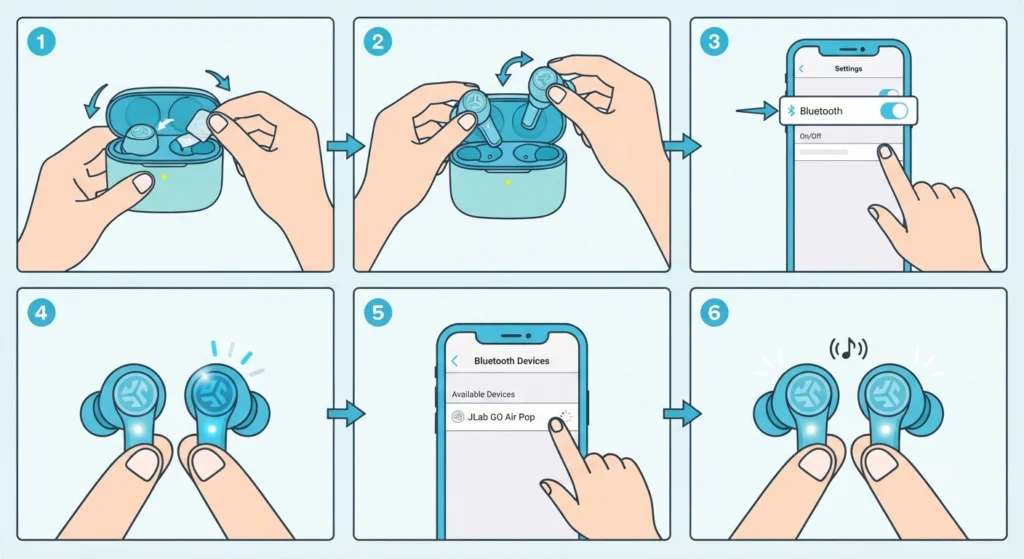
This section covers the exact sequence needed to get the earbuds paired and ready for daily use. Following these steps in order avoids the most common first-time pairing mix-ups.
- Step 1: Remove the protective stickers from both earbuds and the charging contacts, then close the case lid. Let the earbuds charge for roughly one hour before the first use, since a low charge can interfere with the initial pairing sequence.
- Step 2: Open the case and take both earbuds out at the same time. They power on automatically and connect to each other within a second or two.
- Step 3: On the phone, tablet, or laptop being used, open Bluetooth settings and make sure Bluetooth is turned on.
- Step 4: Watch the earbuds closely. One earbud shows a solid white light while the other blinks blue and white, which is the signal that it is ready to pair.
- Step 5: From the list of available Bluetooth devices, select ‘JLab GO Air Pop’.
- Step 6: Wait for the voice prompt that says ‘You’re connected’, followed by both earbuds showing steady white lights. That confirms the pairing is complete and audio is ready to play.
Pro-Tip: If the pairing prompt does not appear in the Bluetooth list within about 30 seconds, place both earbuds back in the case, close the lid for five seconds, then repeat Step 2. This resets the pairing window without needing a full factory reset.
Getting the Right Fit with Ear Tips
JLab includes multiple sizes of gel ear tips in the box, and fit affects both comfort and sound quality more than most people expect. A loose seal lets bass leak out and makes the earbuds prone to slipping during movement.
- Try each included ear tip size before settling on one, since ear canal size varies quite a bit from person to person.
- Insert the earbud gently into the ear canal and twist slightly to lock in a snug seal.
- A properly fitted earbud should feel secure without needing constant readjustment, even during light activity like walking or a workout.
Understanding the Touch Controls
Once paired, the Go Air Pop earbuds rely entirely on touch controls for playback, calls, and voice assistant access. Learning these early saves a lot of fumbling for a phone mid-call or mid-run.
- Single tap on either earbud: adjusts volume up or down depending on which side is tapped.
- Double tap: plays or pauses music, or answers an incoming call.
- Tap and hold for one second or longer: skips forward or back a track, or rejects an incoming call.
- Double tap: activates Siri on iOS devices or Google Assistant on Android devices.
- Triple tap: cycles through the three built-in EQ modes, covering JLab Signature sound, Balanced sound, and Bass Boost.
Pro-Tip: Only one earbud houses the microphone for calls. If a caller mentions muffled audio, positioning that earbud slightly closer to the mouth usually clears it up right away.
Connecting to a New or Additional Device
The Go Air Pop earbuds can only stay actively connected to one Bluetooth device at a time, so switching from a phone to a laptop, for example, requires a short manual step rather than automatic switching.
- Turn Bluetooth off on the previously connected device.
- Turn Bluetooth on for the new device.
- Remove the earbuds from the case, or place them back in and take them out again if they were already out. They automatically enter pairing mode.
- Select ‘JLab GO Air Pop’ from the new device’s Bluetooth list to connect.
For anyone regularly switching earbuds between a phone and a Windows laptop, this guide on re-pairing Bluetooth earbuds for proper stereo sound on Windows covers a few extra settings that keep audio balanced across both channels after switching devices.
Tips for a Smoother Setup Experience
- Charge the case fully before the very first pairing attempt, since a case running low on power can shorten the time the earbuds stay in pairing mode.
- Keep the earbuds within about three feet of the connecting device during the initial pairing, since obstacles or distance can delay the connection.
- Dry the earbuds off completely before placing them back in the case if they have been exposed to sweat or rain. The case itself is not water resistant even though the earbuds carry an IPX4 rating.
- Clean the ear tips periodically with a cotton swab, since built-up earwax gradually reduces sound clarity even when the connection itself is fine.
Common Setup Problems and How to Fix Them
Fix 1: Earbuds Not Appearing in the Bluetooth List
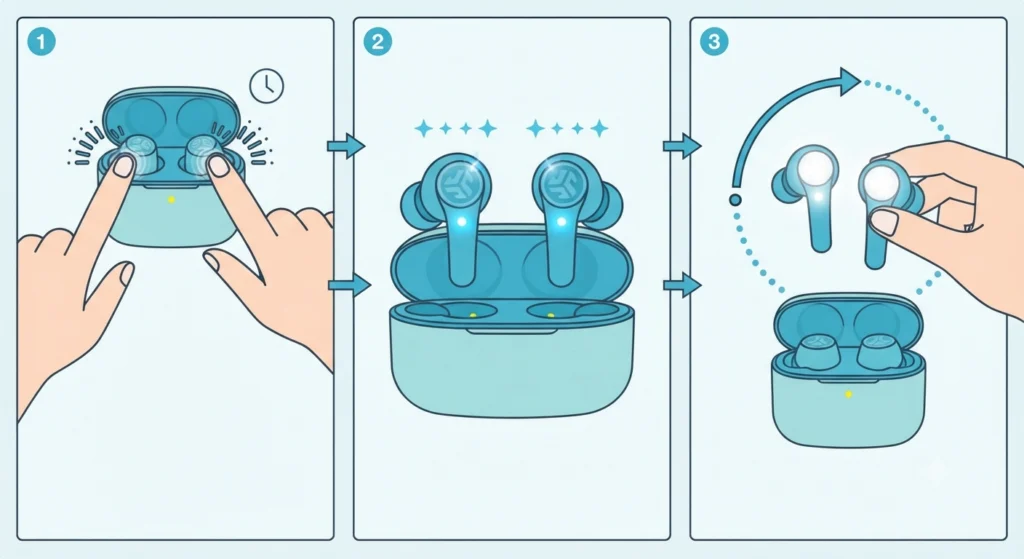
This usually happens when the earbuds are still holding a memory of a previous pairing. Place both earbuds in the case, forget ‘JLab GO Air Pop’ from the device’s Bluetooth settings, then quick tap each earbud seven times while it sits in the case. Each earbud blinks blue four times to confirm the reset, after which taking them out of the case restarts the pairing sequence from scratch.
Fix 2: Only One Earbud Connects
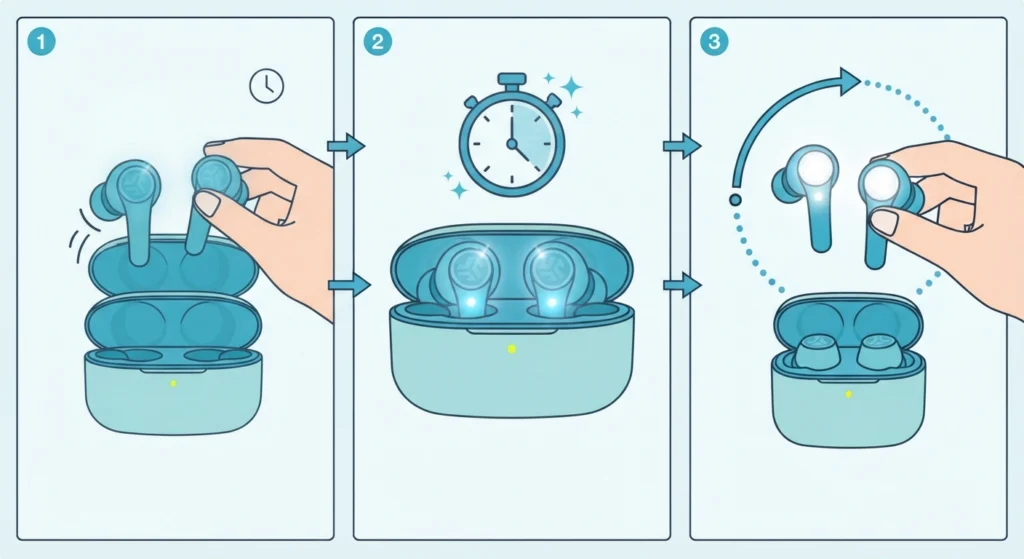
When just one earbud connects, the pair has likely lost their connection to each other. Place both back in the case for about ten seconds, then remove them together so they can resync before attempting to pair with the device again.
Fix 3: Audio Plays Through Only One Side
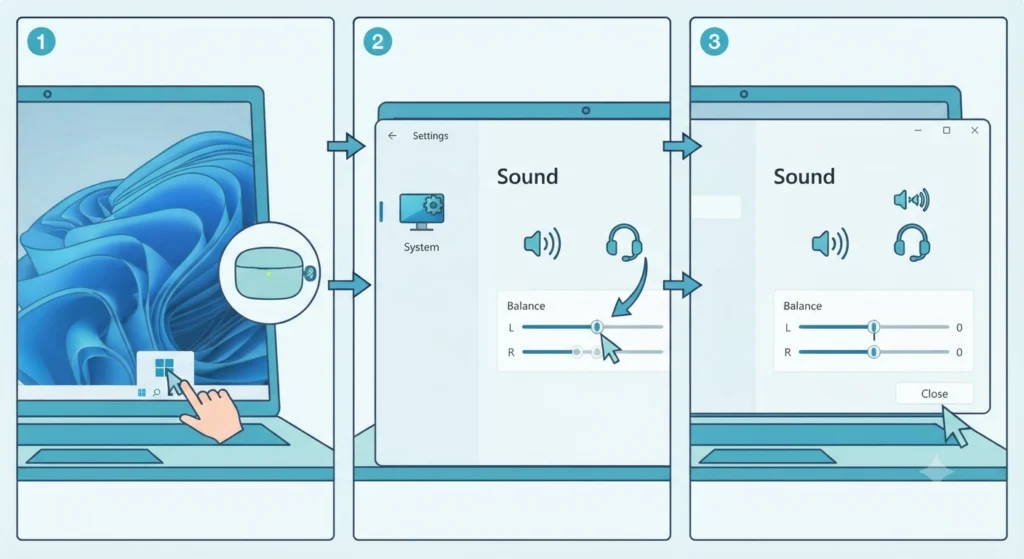
This is often a device-side output setting rather than an earbud issue. On a Windows 11 laptop, this guide on adjusting audio output settings walks through checking that stereo output is enabled correctly for the connected earbuds.
Fix 4: Microphone Not Picking Up Voice During Calls
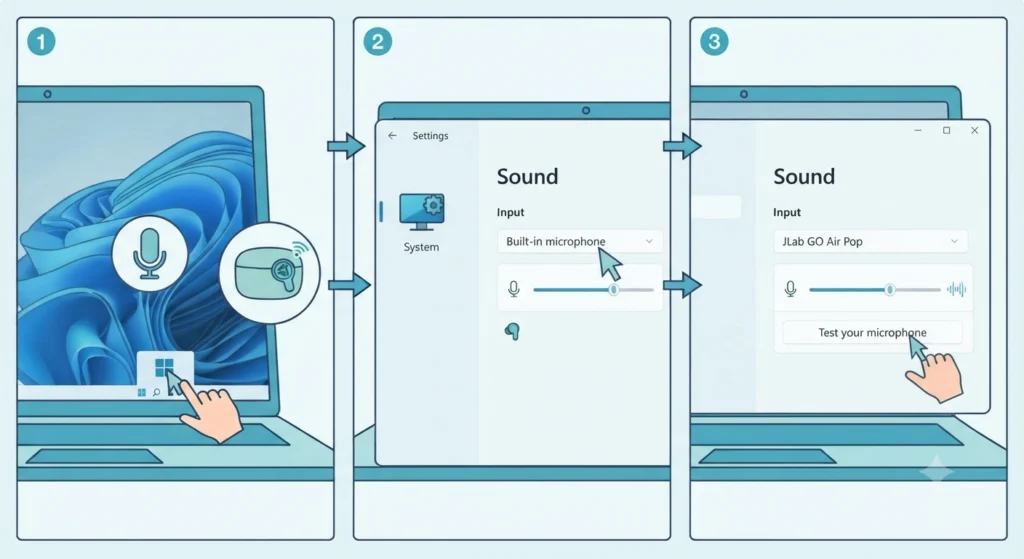
If calls connect but the other party cannot hear clearly, the issue is sometimes on the device side rather than the earbuds themselves. This walkthrough on resolving microphone detection problems on Windows 11 covers checking default input device settings, which is a common culprit.
Frequently Asked Questions
How long does it take to pair JLab Go Air Pop earbuds for the first time?
The full pairing process usually takes under a minute once the earbuds are charged and removed from the case together.
Do the earbuds need to be fully charged before the first pairing?
A full charge is not strictly required, but JLab recommends charging for about an hour before first use to avoid a low-battery interruption during setup.
Why does only one earbud show a blinking light during pairing?
That is normal behavior. One earbud shows a solid white light while the other blinks blue and white, and either one can be selected to complete the pairing.
Can the left and right earbuds be used separately?
Yes. After the initial pairing, either earbud can be used on its own for calls or music by simply removing that one earbud from the case.
How many devices can connect to the Go Air Pop earbuds at once?
Only one Bluetooth device can stay actively connected at a time. Switching to a different device requires turning off Bluetooth on the previous one first.
What does the voice prompt during setup mean?
The prompt saying ‘You’re connected’ confirms that pairing succeeded and the earbuds are ready to stream audio.
Are JLab Go Air Pop earbuds waterproof?
The earbuds carry an IPX4 sweat and water resistance rating, which covers light moisture exposure, but the charging case itself is not water resistant.
How does switching sound modes work?
Tapping either earbud three times cycles through three EQ modes: JLab Signature, Balanced, and Bass Boost.
What should be done if the earbuds will not reconnect after a reset?
Forget the device from Bluetooth settings, quick tap each earbud seven times while in the case to trigger a reset, then remove both earbuds together to restart pairing. Reviewing this guide on resetting audio settings on Windows 11 can help if the device side needs a refresh too.
Why would Bluetooth audio still fail even after successful pairing?
This sometimes points to the wrong playback or input device being selected on the computer rather than an earbud problem. Checking through managing audio input devices on Windows 11 usually resolves it.