Headphones not showing up on Windows 10 and Windows 11 is one of the most common audio issues users run into. Whether it is a wired pair plugged into the wrong jack or Bluetooth buds that just will not pair, the good news is that most of these problems have straightforward fixes. Before diving into complex software solutions, simple steps like cleaning the jack or restarting the computer resolve the issue in more cases than most people expect. This guide walks through every working solution to get headphones detected and working again.
Quick Answer — Headphones Not Detected in Windows
- Set headphones as the default output device in Settings → System → Sound
- In Control Panel → Sound → Playback tab, right-click → Show Disabled Devices and enable your headphones
- Update or reinstall your audio driver via Device Manager — especially after any Windows Update
- Run the built-in Playing Audio Troubleshooter in Settings → System → Troubleshoot
- Bluetooth headphones? Remove the device, put it back in pairing mode, re-pair, and confirm the Bluetooth Support Service is running
- Press Win + R → type
mmsys.cpl→ Enter as a shortcut to open the Sound Control Panel directly
Quick Summary Table
| Issue Type | Most Common Cause | Quick Fix | Difficulty |
|---|---|---|---|
| Wired headphones not detected | Wrong jack, disabled device | Check port, enable in Sound settings | Easy |
| Headphones not set as default | Windows defaulting to speakers | Set as default playback device | Easy |
| Driver issues | Outdated or corrupted drivers | Update or reinstall audio drivers | Medium |
| Driver broken after Windows Update | Update overwrote manufacturer driver | Roll back or reinstall OEM audio driver | Medium |
| Bluetooth not pairing | Already connected to another device | Disconnect from other devices, re-pair | Easy |
| Bluetooth Support Service stopped | Service disabled or crashed | Start Bluetooth Support Service in services.msc | Easy |
| Audio enhancements conflict | Windows audio effects interfering | Disable audio enhancements | Easy |
| Dirty or blocked jack | Dust and debris blocking contact | Clean jack with compressed air | Easy |
| Windows Audio service crashed | Service stopped after update or crash | Restart Windows Audio in services.msc | Easy |
| TRRS plug in TRS port | Wrong port for 4-pole headset plug | Use correct port or combo jack | Easy |
Why Windows Fails to Detect Headphones — The Real Reasons
The headphones work perfectly on a phone, but Windows refuses to detect them. Or they briefly appear and then vanish. Or they show up in Device Manager but not in Sound Settings. This is one of the most reported audio problems across both Windows 10 and Windows 11 — and it catches people off guard because the headphones themselves are almost always perfectly fine. The problem almost always lives inside Windows, not inside the hardware.
Here are the real reasons Windows fails to detect headphones:
- The headphones are not set as the default audio output — Windows keeps routing sound to speakers instead, even though the headphones are physically connected
- The headphone playback device is disabled — Windows hides it completely so it never appears in the output list
- A corrupted or outdated audio driver — especially common after Windows 10 and Windows 11 feature updates, including 24H2, which are known to silently overwrite manufacturer drivers with generic ones that lose headphone jack detection capability
- Realtek HD Audio Manager blocking auto-switching — common on laptops with combo audio jacks where the jack detection pop-up is disabled
- Bluetooth pairing or service issues — the headphones may still be connected to another device, or the Bluetooth Support Service has stopped
- The Windows Audio service has crashed — less common but happens silently after updates or system crashes, leaving no audio devices detectable at all
- Physical issues — a dirty jack, a damaged plug, or using the wrong port type all cause detection failures that look identical to software problems
Quick Diagnosis: Identify Your Headphone Type First
The right fix depends on how the headphones connect to the PC. Identifying the connection type before troubleshooting saves time and leads to the correct solution faster.
- 3.5mm wired headphones — Most common type. Affected by jack detection, plug compatibility, driver issues, and Realtek settings. Follow the wired troubleshooting steps below.
- USB headphones or headset — These appear as a separate audio device in Windows. Affected by USB port choice, driver problems, and disabled device states. Avoid USB hubs — plug directly into a motherboard port.
- Bluetooth headphones — Wireless connection affected by pairing issues, the Bluetooth Support Service, and audio profile selection. See the Bluetooth section below.
- USB-C or adapter headphones — Treated the same as USB devices by Windows. May require a specific adapter driver if the generic one does not include audio support.
Quick hardware check before any software fix: Plug the headphones into a phone or another device. If they produce sound normally there, the problem is 100% a Windows software or settings issue and every fix in this guide applies. If they produce no sound on any device, the headphones themselves are likely damaged.
Troubleshooting Wired Headphone Detection on Windows 10 and 11
Wired headphones not showing up is usually a physical or settings issue. Work through these steps in order and the problem will likely be resolved before reaching the end.
Step 1: Restart the Computer First
Before anything else, restart the computer. System glitches cause temporary audio detection failures, and a full restart clears the audio stack and resets all hardware connections. This single step resolves the issue more often than most users expect — particularly after Windows updates that silently reset audio driver states.
- Click the Start button and select the Power icon.
- Choose Restart — not Shut down, as fast startup can preserve the faulty audio state.
- Wait for the computer to fully boot before plugging in or testing the headphones.
Step 2: Check Physical Connections and Plug Type
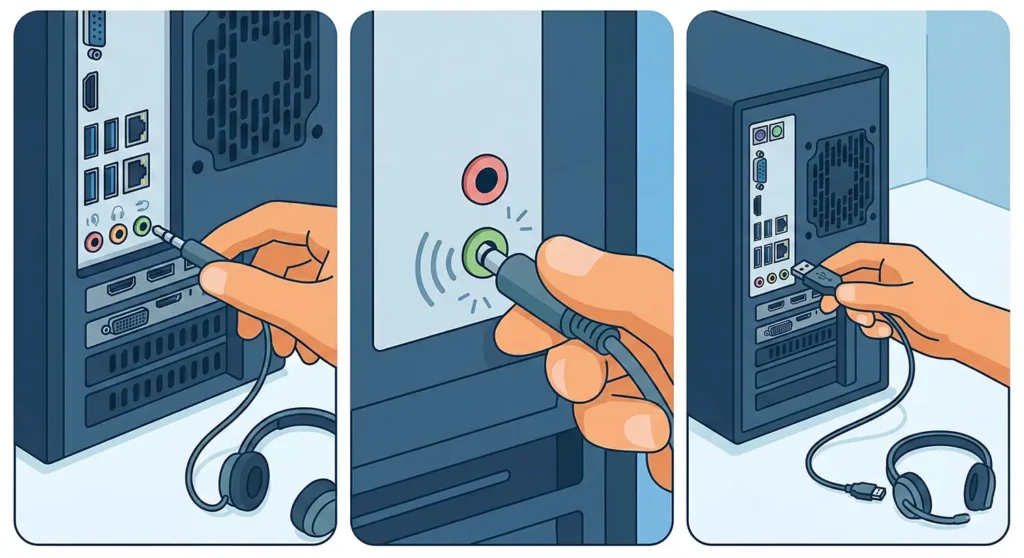
- Plug headphones into the correct jack — most PCs have separate mic and headphone ports, with the headphone port typically color-coded green.
- Push the plug in firmly until it clicks or seats fully.
- Try a different USB port if using a USB headset — preferably one directly on the motherboard rear panel rather than a front panel or USB hub.
- Use the rear-panel audio jack first on desktops. Front panel ports are routed through additional wiring that can cause weaker or intermittent signals.
- Check the plug type — a TRRS (4-pole) plug has four bands on the connector and includes a built-in microphone. If the PC only has a standard TRS (3-pole) headphone port, a TRRS plug may not fully seat or be fully recognised. Some PCs have a combo jack that handles both — if separate mic and headphone ports are available, plug into the headphone port only.
Desktop audio note: Some older desktop motherboards have a BIOS or audio manager setting that switches between HD Audio and AC97 modes. If the front panel jack is completely unresponsive, check the motherboard BIOS audio settings or the Realtek HD Audio Manager and ensure HD Audio mode is selected.
Step 3: Clean the Headphone Jack
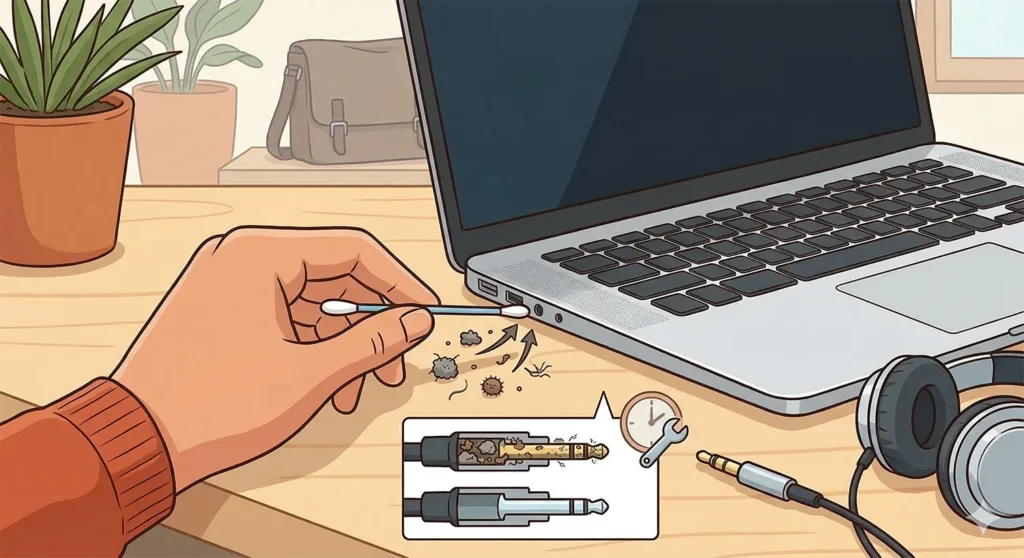
Lint, dust, and pocket debris accumulate inside headphone jacks over time and prevent proper electrical contact between the plug and the port. This is one of the most overlooked causes of detection failures, particularly on laptops that are carried in bags daily.
- Use compressed air to blow short bursts directly into the jack opening — hold the can upright to avoid moisture.
- Use a dry toothpick carefully along the inside edge to dislodge compacted lint if debris is visible — never use metal tools.
- Plug the headphones in again and test for detection.
Pro Tip: A dirty jack can also cause “phantom headphone detection” — where Windows permanently thinks headphones are connected even when nothing is plugged in, causing audio to stay silent through speakers. If the speaker icon in the taskbar shows headphones are active but nothing is plugged in, cleaning the jack with compressed air usually resolves this immediately.
Step 4: Test with a Different Pair of Headphones
Before spending time on software fixes, it is worth confirming whether the headphones themselves are the problem. Plug a different working pair into the same jack. If the second pair is detected immediately, the original headphones have a damaged plug or internal wiring issue — not a Windows problem. This single test eliminates the most common hardware cause before any driver work begins.
Step 5: Inspect the Headphone Plug for Damage
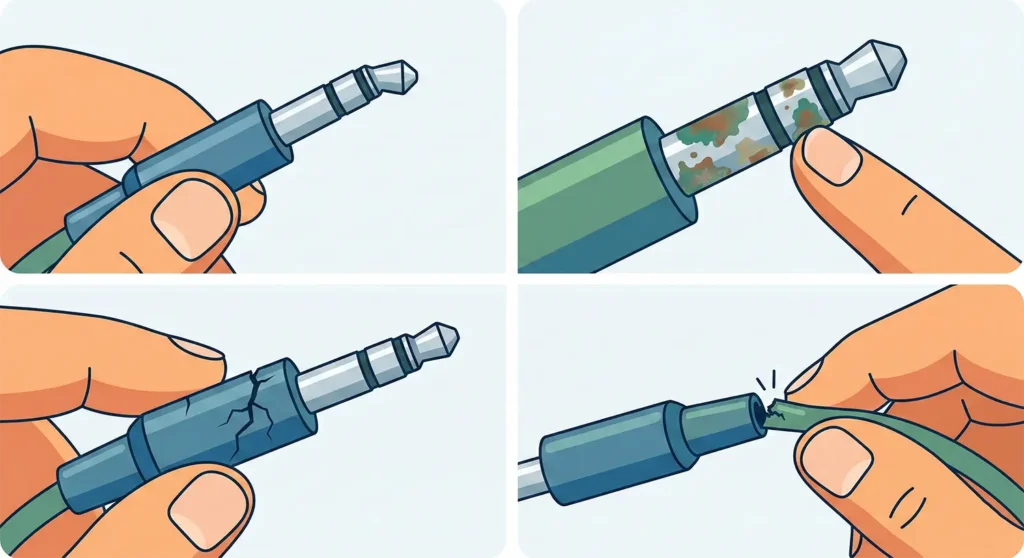
If the second pair worked but the original did not, examine the plug closely for these signs of damage:
- Bent or snapped metal tips
- Corrosion or discolored spots on the connector
- Cracked plastic casing near the plug
- A wobbly connection where the cable meets the plug
A simple test: insert the plug and wiggle it slightly while audio is playing. If sound cuts in and out, the cable is faulty and needs replacing rather than any software troubleshooting.
Step 6: Run the Audio Troubleshooter
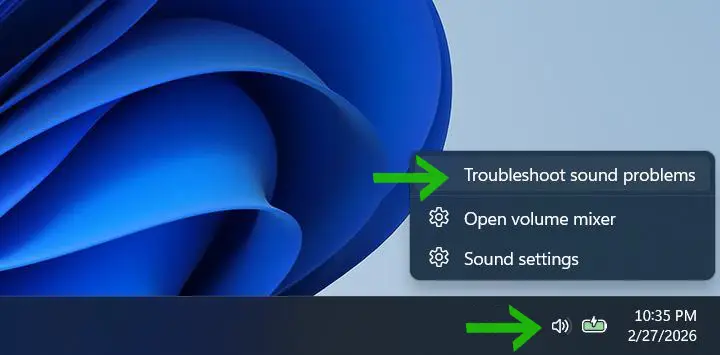
- Right-click the speaker icon in the system tray and select Troubleshoot sound problems.
- Allow Windows to scan for issues — it will attempt automatic repairs.
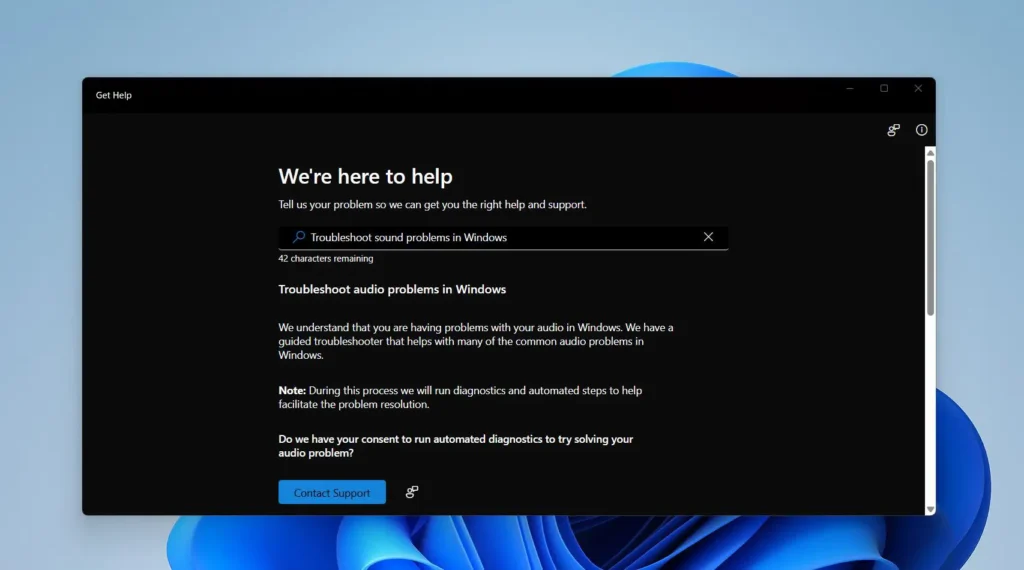
- Follow any on-screen instructions provided.
- Test the headphones once complete to see if detection is working.
Windows 11 alternative path: Go to Settings → System → Troubleshoot → Other troubleshooters → Playing Audio → Run. When prompted to select a device, choose the headphones. The troubleshooter can automatically fix misconfigured default devices, reset crashed audio services, and re-enable disabled playback devices.
Windows 10 path: Go to Settings → Update & Security → Troubleshoot → Additional troubleshooters → Playing Audio → Run the troubleshooter. Follow the prompts and apply any suggested fixes.
Step 7: Set Headphones as Default Audio Output
Sometimes Windows just defaults to the wrong output. Knowing how to manage audio input devices properly saves a lot of headache here.
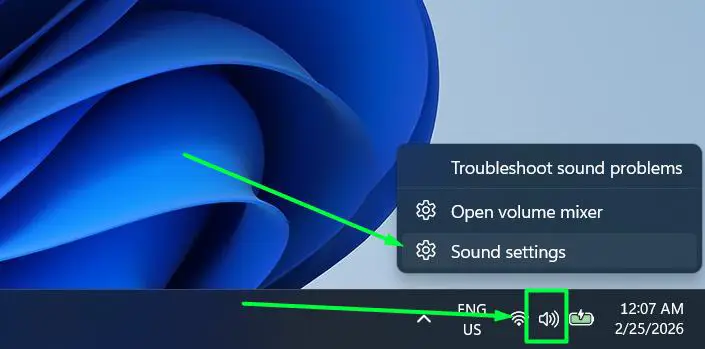
- Right-click the speaker icon in the system tray and select Sound Settings.
- Click Choose where to play sound under Output to expand the device list.
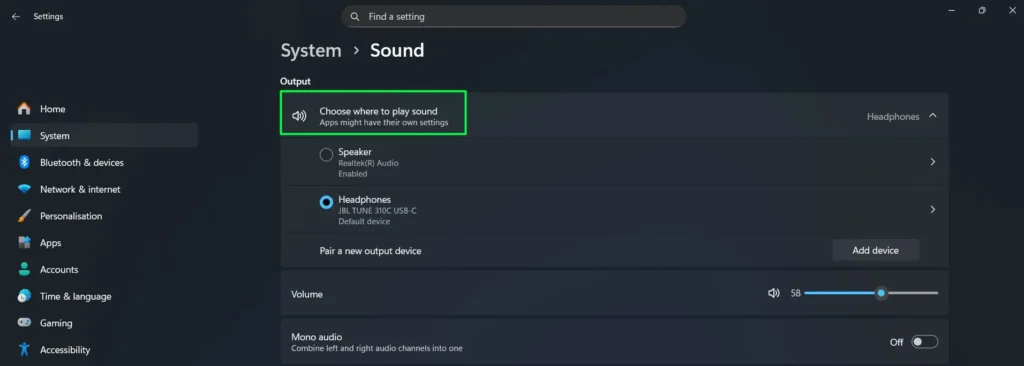
- Select the headphones from the list — a blue radio button will confirm it is now the active output device.
- Click Pair a new output device if headphones do not appear in the list, or check that the headphones are properly connected and powered on.
Pro Tip: If headphones are not showing up in the list, scroll down in Sound Settings and click More sound settings. Right-click any empty space, enable Show Disabled Devices, then right-click the greyed-out headphones and select Enable — it is likely disabled rather than broken. A quick keyboard shortcut to open the Sound Control Panel directly is Win + R, then type mmsys.cpl and press Enter.
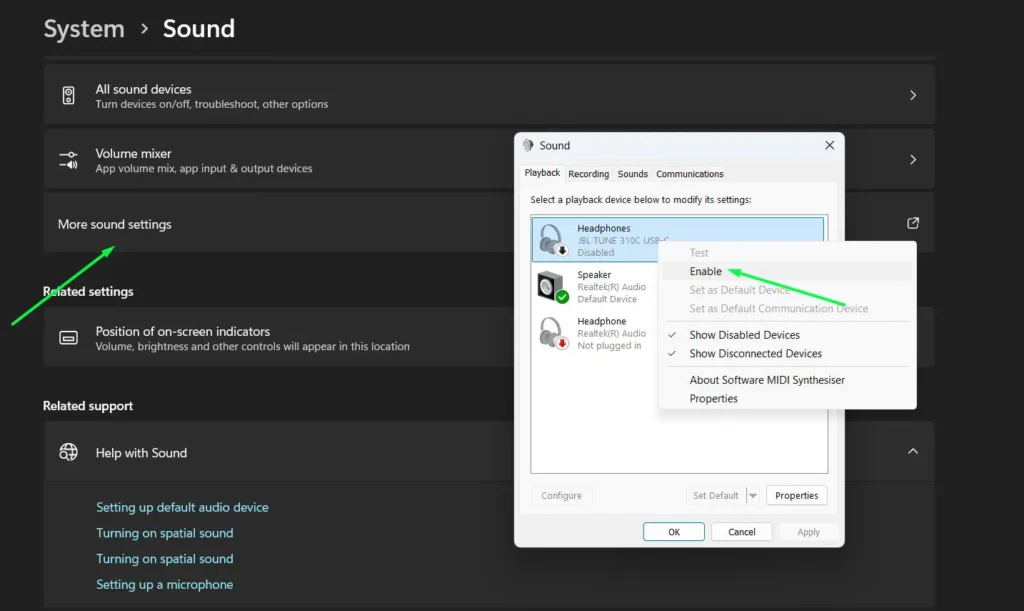
Why does Windows disable audio devices? Windows automatically disables playback devices when it cannot detect a signal, or when a Windows Update resets audio configuration. It is an aggressive power-saving behaviour that silences headphones without any warning — enabling Show Disabled Devices is one of the most commonly overlooked fixes for headphones that simply vanish from the output list.
Step 8: Update Audio Drivers
Outdated drivers are one of the top reasons for headphone detection failures. Proper audio output settings only work correctly when the underlying drivers are current. This is especially important after major Windows 10 or Windows 11 feature updates — including 24H2 — which are known to silently overwrite manufacturer audio drivers with generic versions that lose headphone jack detection capability.
- Right-click the Start button and select Device Manager.

- Expand Sound, video and game controllers to see all audio devices.
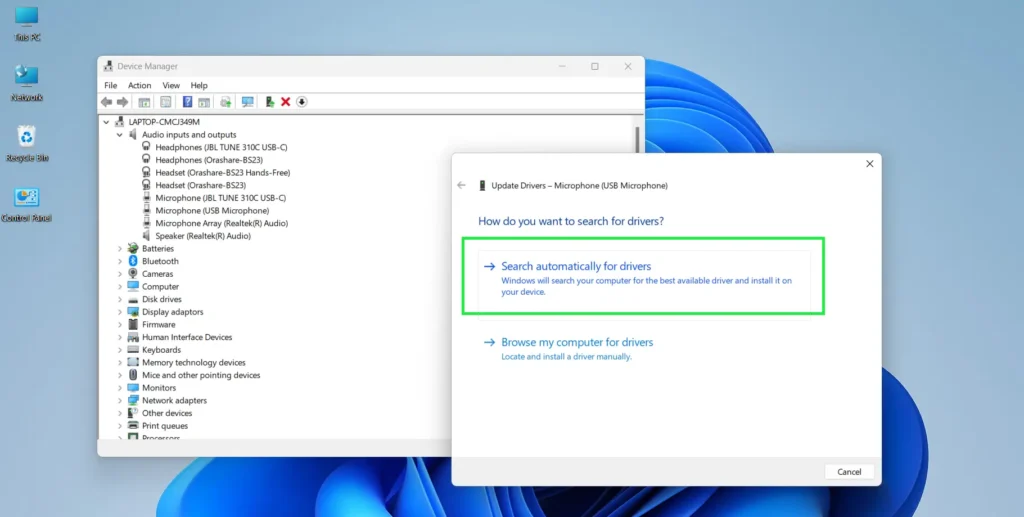
- Right-click the audio device and select Update driver.
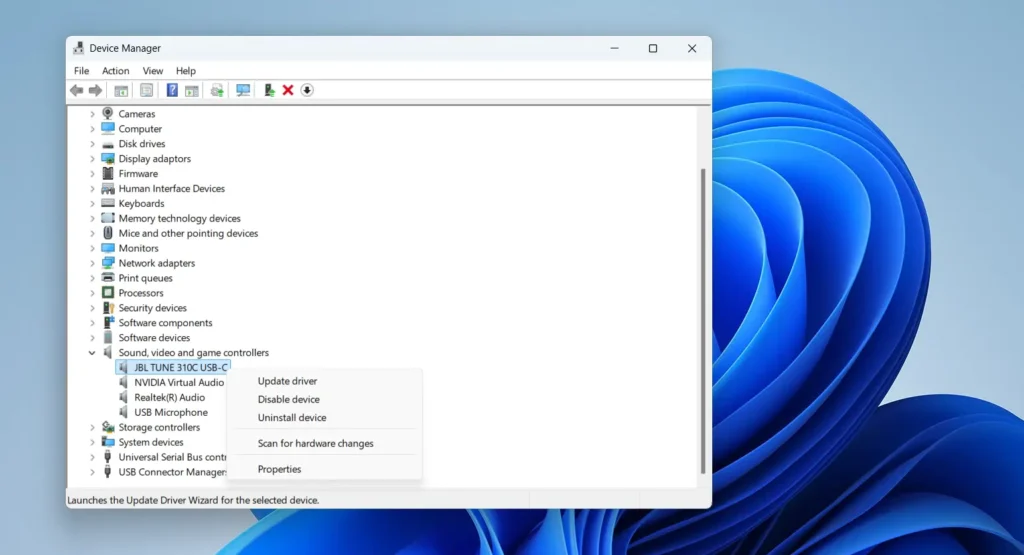
- Choose Search automatically for updated driver software and let Windows install the latest version.
- Visit the manufacturer’s website as an alternative — OEM drivers from Dell, HP, Lenovo, ASUS, or Acer include headphone jack detection software that Microsoft’s generic drivers often lack.
If the problem started after a recent Windows Update: The update may have replaced a working driver. In Device Manager, right-click the audio device, select Properties → Driver tab → Roll Back Driver to restore the previous version. This is one of the most reliable fixes when headphones worked before an update and stopped working immediately after.
Step 9: Reinstall Audio Drivers
If updating does not work, a clean reinstall often resolves what a simple update cannot — because it removes corrupted files rather than just patching over them.
- Open Device Manager and expand Sound, video and game controllers.
- Right-click the audio device and select Uninstall device.
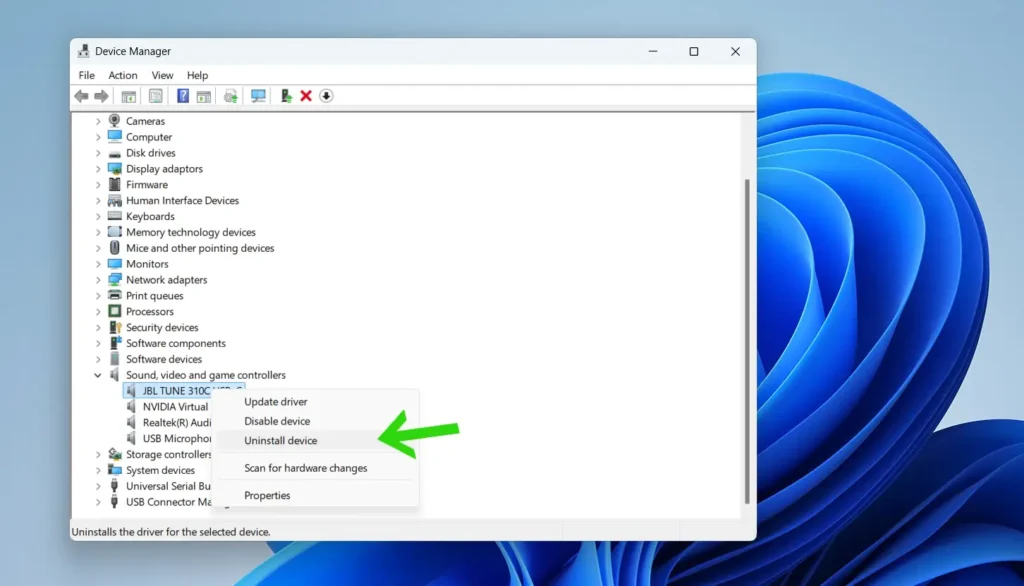
- Check Delete the driver software for this device if the option is available, then click Uninstall.
- Restart the computer — Windows will automatically reinstall the audio drivers on startup.
- Test the headphones once the computer has restarted.
Step 10: Disable Audio Enhancements
Windows audio enhancements can sometimes conflict with headphone detection, especially on older or budget hardware. Disabling them is a quick test that costs nothing and often resolves intermittent detection problems.
- Right-click the speaker icon and select Sound Settings.
- Click Choose where to play sound under Output and select the headphones.
- Click on the headphones to open their Properties.
- Scroll down to Advanced settings and click the Audio enhancements dropdown.
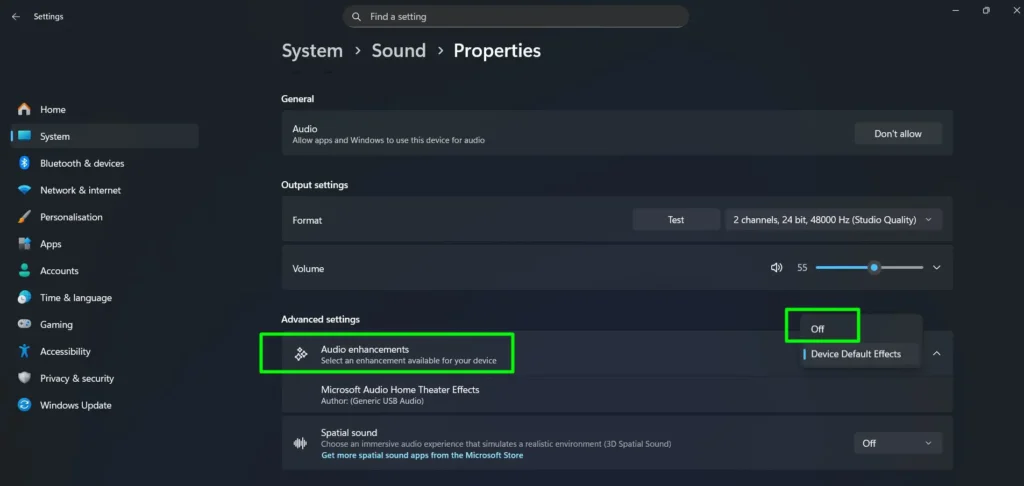
- Change it from Device Default Effects to Off, then test the headphones.
Step 11: Adjust Realtek HD Audio Manager Settings
For PCs using Realtek audio hardware, the Realtek HD Audio Manager includes jack detection settings that sometimes need manual adjustment — particularly after Windows updates reset them. When the headphones are inserted into a Realtek-equipped machine, a small pop-up dialog should appear asking what was just plugged in. If this pop-up never appears, Windows will not route audio to the headphones.
- Open Realtek HD Audio Manager from the system tray or Control Panel.
- Look for Connector Settings or jack detection options.
- Enable Auto popup dialog when device has been plugged in or Disable front panel jack detection depending on the setup.
- Unplug and re-insert the headphones — the pop-up dialog should now appear. Select Headphones and confirm.
- Download and install Realtek HD Audio Manager from the official Realtek website or the PC manufacturer’s support page if it is not installed, then restart and try again.
Step 12: Restart Windows Audio Services
The Windows Audio service manages all sound routing on the PC. If it has crashed or stopped — which can happen silently after Windows updates or system crashes — no headphones will be detected regardless of the settings or drivers in place. Restarting these services takes under a minute and resolves detection failures that survive driver reinstalls and troubleshooters.
- Press Win + R, type
services.msc, and press Enter to open the Services window. - Find Windows Audio, right-click it, and select Restart.
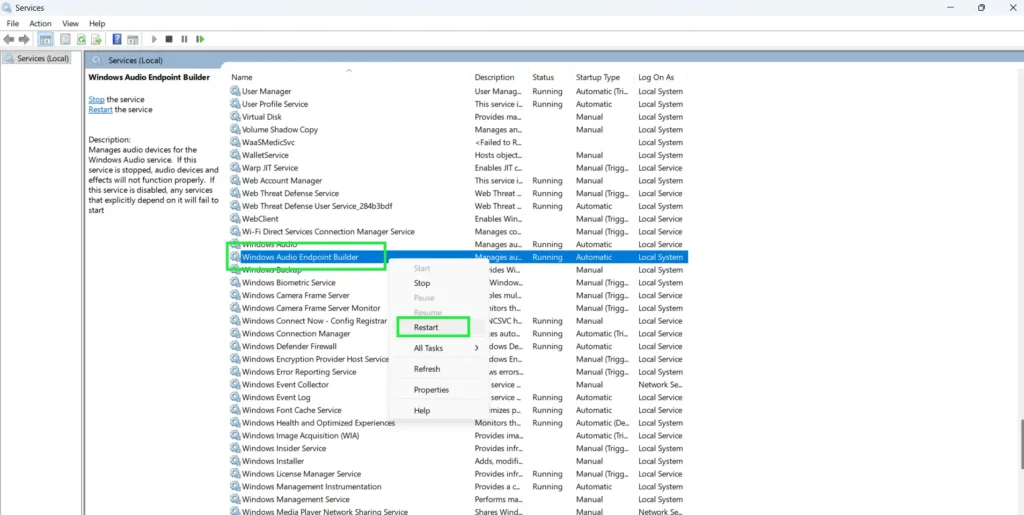
- Find Windows Audio Endpoint Builder and restart it as well.
- Set both services to Automatic — right-click each, go to Properties, and change the Startup type to Automatic to prevent them from stopping after a reboot or crash.
- Plug in the headphones again and check Sound Settings to confirm detection.
Fix: USB Headphones Not Detected on Windows
USB headphones behave differently from 3.5mm headphones — Windows treats them as a completely separate audio device rather than a jack-based output. Most USB headphone detection failures come down to port choice or a missing driver rather than the audio settings fixes above.
- Try a different USB port — always plug directly into the motherboard rear-panel ports. Avoid front-panel ports and USB hubs, as both can deliver unstable connections for audio devices.
- Open Device Manager and look under Sound, video and game controllers for any yellow warning triangles next to the headphone entry. A warning triangle means Windows detected the device but could not load its driver correctly.
- Right-click the device with the warning and select Update driver → Search automatically. If that fails, uninstall the device and reconnect it — Windows will reinstall the driver on re-plug.
- Set the USB headphones as default after the driver loads — go to Sound Settings → Output and manually select them. Windows does not always do this automatically.
- Run the Playing Audio Troubleshooter via Settings → System → Troubleshoot → Other troubleshooters and select the USB headphones when prompted to diagnose device-specific issues.
Troubleshooting Bluetooth Headphone Detection on Windows 10 and 11
Bluetooth headphones have their own set of quirks. The most common issue is that the headphones are already connected to another device — a phone, tablet, or laptop — which prevents Windows from seeing them. In addition, low battery causes unstable connections that can look identical to a driver or settings problem. Here is how to pair and fix Bluetooth headphone detection properly.
Step 1: Power On Headphones and Enter Pairing Mode
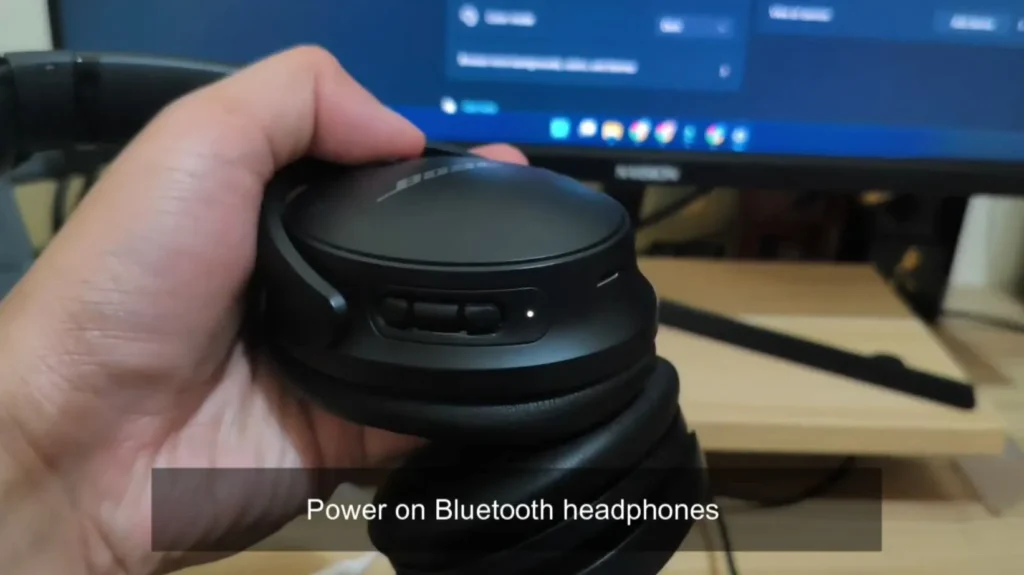
- Turn on the Bluetooth headphones.
- Enter pairing mode — this is usually done by holding the power or Bluetooth button until an LED flashes or a voice prompt says pairing mode. Check the headphone manual for the specific method.
Step 2: Disconnect Headphones from Other Devices
This step is critical and is skipped more often than it should be. Most Bluetooth headphones only maintain one active connection at a time unless they support multipoint. As a result, if the headphones are still connected to a phone nearby, Windows will never detect them — even when they appear to be in pairing mode.
- Go to Bluetooth settings on any phone, tablet, or other device the headphones were previously connected to.
- Disconnect or forget the headphones from those devices before trying to connect to Windows.
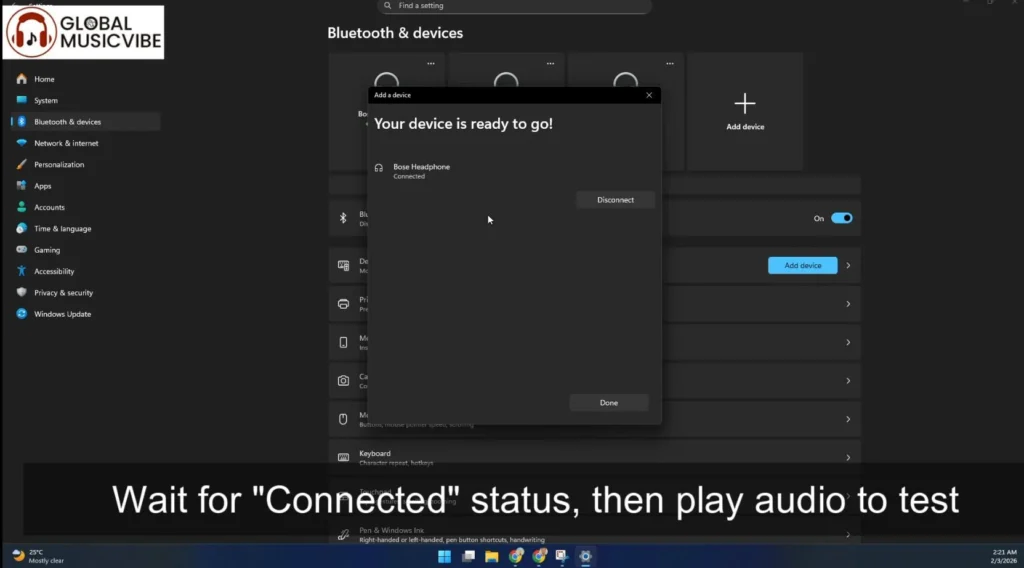
Step 3: Add the Device in Windows Bluetooth Settings
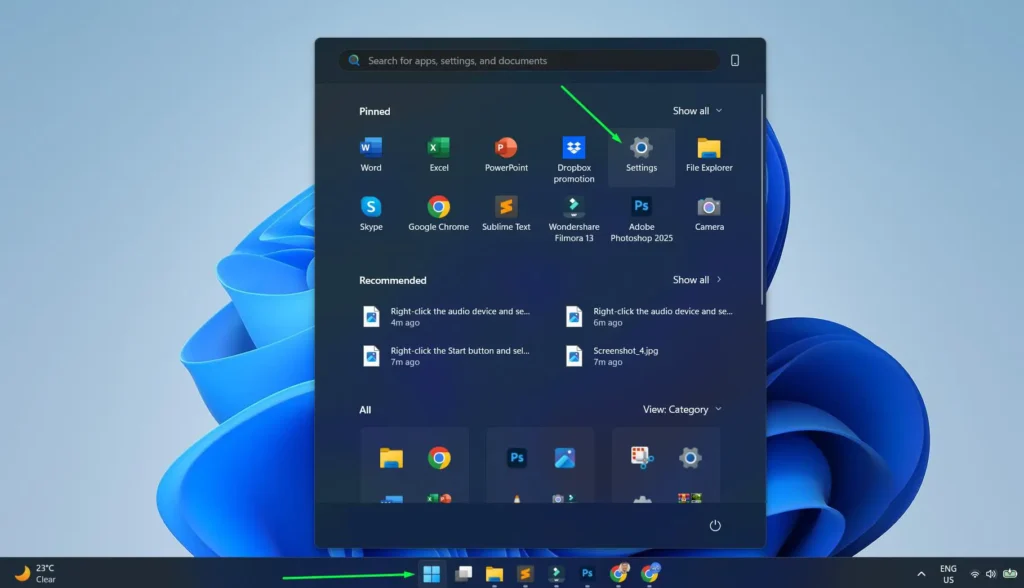
- Open Settings from the Start menu.
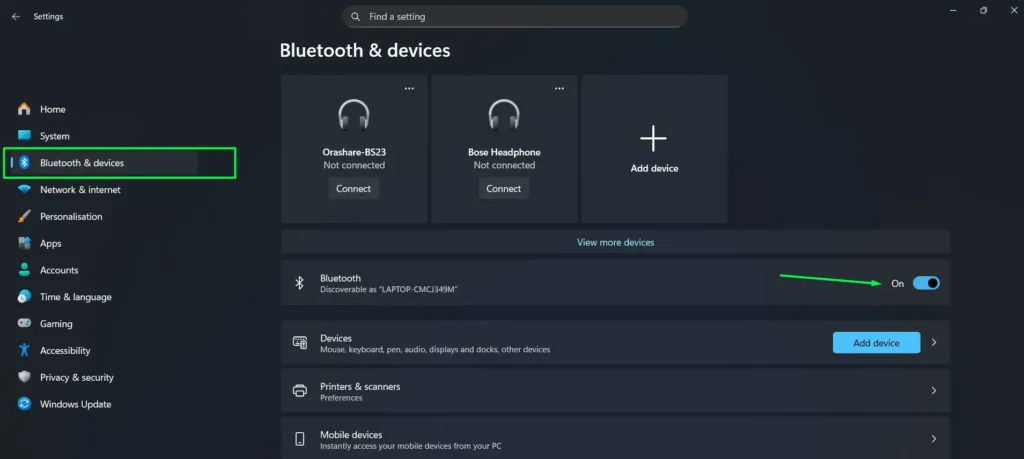
- Select Bluetooth and devices and toggle the Bluetooth switch to On if it is off.
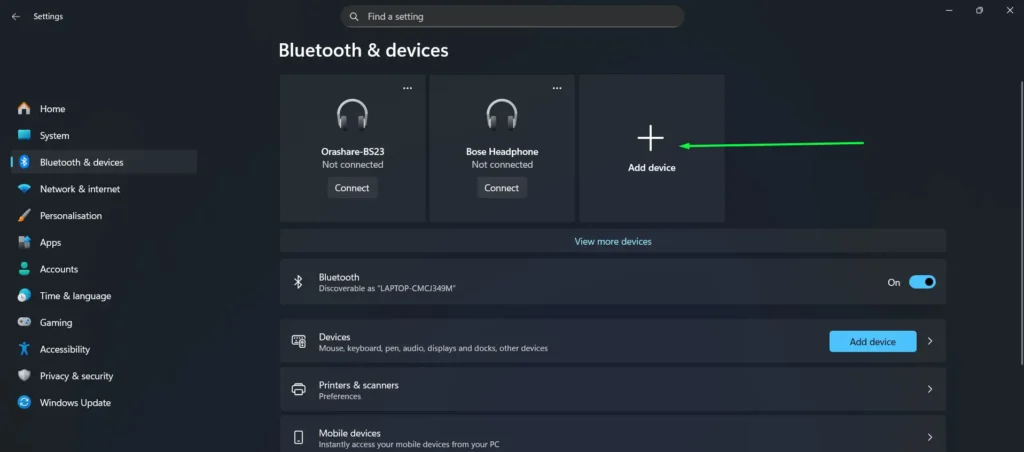
- Click Add device.
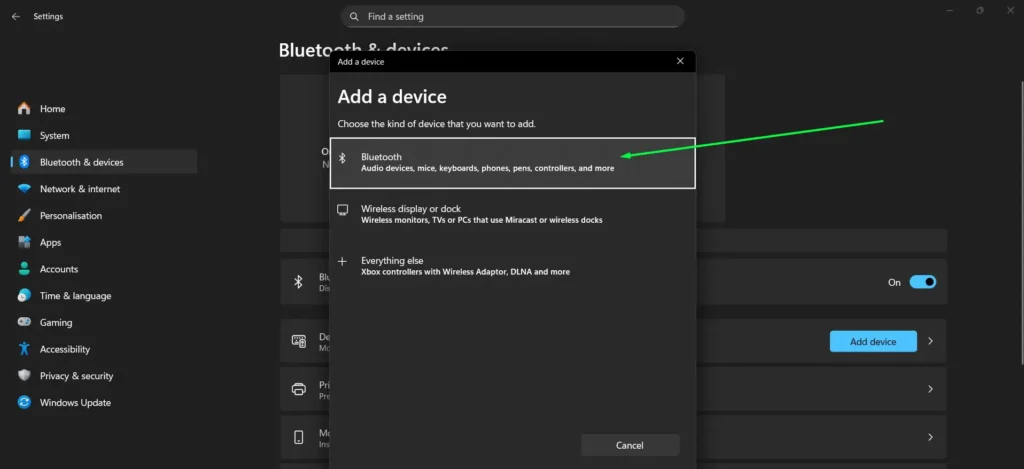
- Select Bluetooth from the device type options.
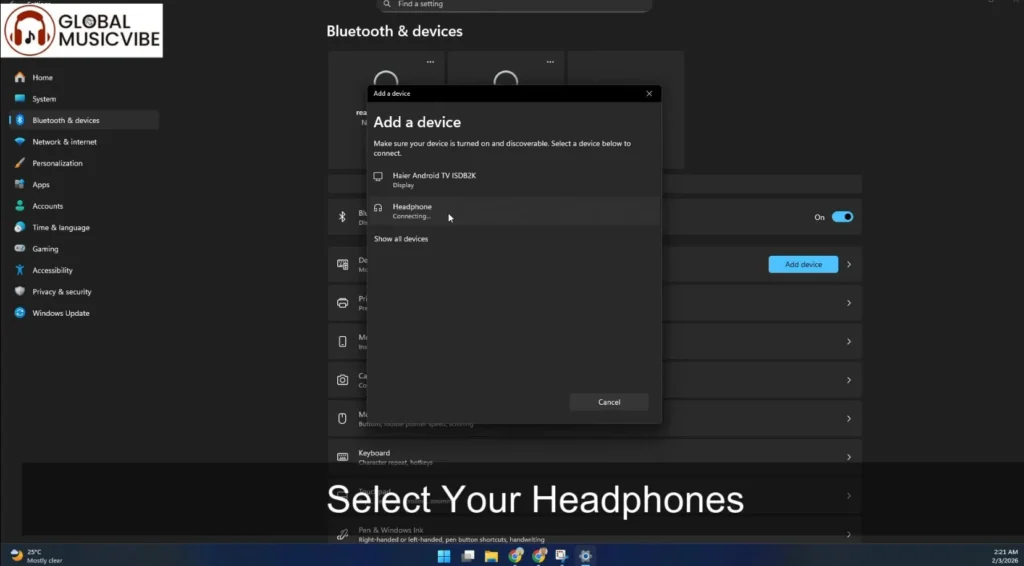
- Wait for the headphones to appear in the list, then click on them to pair.
- Confirm the Connected status appears, then play audio to verify it is working.
Bluetooth audio profile tip: After pairing, the headphones may appear twice in Sound Settings — once as Headphones (high quality stereo) and once as Hands-Free (lower quality, includes mic). For the best audio quality, always select the Headphones entry, not Hands-Free.
If Already Paired but Not Connecting
- Click the headphones in the Bluetooth devices list and click Connect.
- Check app volume settings on Windows if they connect but produce no audio — confirm the correct output device is selected per app.
- Open Sound Settings and set the Bluetooth headphones as the default output device.
If Still Not Working — Re-Pair the Device
Sometimes the cleanest fix is to start the pairing process fresh. A full guide on how to re-pair Bluetooth earbuds for stereo sound on Windows covers this in detail, but here is the short version:
- Remove the headphones from the Bluetooth devices list in Windows.
- Turn Bluetooth off, wait 5 seconds, then turn it back on.
- Put headphones back into pairing mode and add them again from scratch.
- Update Bluetooth drivers through Device Manager under the Bluetooth section if problems persist.
- Restart the computer as a last resort and attempt pairing again.
Check the Bluetooth Support Service
If Bluetooth headphones fail to appear in Windows even after re-pairing, the Bluetooth Support Service may be stopped or disabled. This service must be running for Windows to detect and connect any Bluetooth device.
- Press Win + R, type
services.msc, and press Enter. - Scroll to Bluetooth Support Service. If the status shows Stopped, right-click it and select Start.
- Open Properties, set the Startup type to Automatic, then click Apply → OK.
- Try pairing again from Settings → Bluetooth and devices → Add device.
Test Your Headphones After Fixing
Once a fix has been applied, always verify that both headphone channels are working correctly before closing everything down. This confirms the problem is fully resolved — not just partially.
- Use the Windows built-in test — go to Settings → System → Sound, click on the headphones under Output, and click Test. A tone will play in each ear separately to confirm both channels are active.
- Check volume balance — if only one side is producing sound after fixing detection, the issue may have shifted to an audio balance problem. Check audio output settings and confirm the left-right balance is centered.
- Verify app-level audio — open the specific app where audio was failing and confirm it is set to output through the headphones rather than the system default speakers. Some apps remember their own audio output independently of Windows Sound Settings.
Still not working after all fixes? The most likely remaining cause is a physically damaged headphone jack on the PC. On laptops, this requires hardware repair. As a practical workaround, a USB-to-3.5mm audio adapter — typically available for under $10 — bypasses the built-in jack entirely and creates a brand-new audio device that Windows detects cleanly, with no driver reinstalls required.
Tips for Better Headphone Detection on Windows 10 and 11
- Always use rear panel USB or audio ports on desktops for more reliable connections — front panel ports are more prone to signal issues.
- Keep audio drivers updated regularly, especially after major Windows updates, which sometimes reset or replace driver settings silently.
- For Bluetooth headphones, keep them charged above 20% — low battery causes unstable connections and failed detection that mimics a software problem.
- If using an audio splitter or adapter, test the headphones directly without it first to rule out the accessory as the problem.
- Disabling Fast Startup in Windows Power Settings can help with audio devices that fail to initialize correctly after startup — go to Control Panel > Power Options > Choose what the power buttons do > Turn off fast startup.
- Clean the headphone jack every few months with compressed air — even a small amount of debris is enough to cause intermittent detection failures.
- When buying a headphone adapter or splitter for a PC with separate mic and headphone ports, make sure the adapter is designed to split a single TRRS plug into two TRS jacks — a standard headphone splitter will not work correctly for this purpose.
- For USB headphones, avoid USB hubs entirely — always connect directly to the motherboard ports for stable audio device recognition.
Common Problems and Fixes
- Headphones show in Device Manager but not Sound Settings: Right-click in the Playback tab, enable Show Disabled Devices, and manually enable the headphones from there.
- Audio plays through speakers even when headphones are plugged in: The headphones are not set as default. Right-click and select Set as Default Device in the Sound Control Panel.
- Bluetooth headphones keep disconnecting: Go to Device Manager, find the Bluetooth adapter, open Properties, and under Power Management uncheck Allow the computer to turn off this device to save power.
- Headphones detected but no sound: Check that the volume is not muted or too low directly on the device, and confirm the app being used is set to output to the headphones.
- Realtek not detecting jack insertion: Open Realtek HD Audio Manager and enable the auto popup dialog for device detection. If Realtek is missing, reinstall its drivers from the manufacturer website.
- Windows always shows headphones as connected even when unplugged: This is phantom headphone detection caused by debris or moisture in the jack triggering the internal detection switch. Clean the jack thoroughly with compressed air. If the issue persists after cleaning, the jack switch may be physically stuck and needs professional repair.
- Headphones stopped working after a Windows Update: The update likely replaced the OEM audio driver with a generic one. Open Device Manager, right-click the audio device, go to Properties → Driver → Roll Back Driver to restore the previous working version.
- No sound from either Windows Audio Troubleshooter or manual fixes: Press Win + R, type services.msc, and restart both Windows Audio and Windows Audio Endpoint Builder services. This fixes cases where the audio stack has crashed completely at the service level.
- USB headphones not recognized after plugging in: Switch to a rear motherboard USB port, open Device Manager to check for driver warning triangles, and reinstall the driver if needed. USB hubs are a common cause of intermittent USB headphone detection failures.
Frequently Asked Questions
Why are headphones not showing up in Windows 10 or 11 Sound Settings?
The most common reasons are that the headphones are disabled in the Sound Control Panel, plugged into the wrong port, or the audio drivers need updating. Right-click in the Playback tab and enable Show Disabled Devices to check if the device is hidden rather than missing entirely. A quick way to open the Playback tab is to press Win + R and type mmsys.cpl.
How do you set headphones as the default audio device in Windows 10 and 11?
Right-click the speaker icon in the system tray, select Sound Settings, navigate to the Playback tab in Sound Control Panel, right-click the headphones, and choose Set as Default Device.
Why will Windows 10 or 11 not detect Bluetooth headphones?
The headphones are likely still connected to another device like a phone or tablet. Disconnect them from other devices first, put them back into pairing mode, then add them through Windows Bluetooth settings. If they still do not appear, check that the Bluetooth Support Service is running by opening services.msc and starting it manually.
Do audio driver updates fix headphone detection issues?
Yes — outdated or corrupted drivers are a frequent cause of headphone detection problems. Updating through Device Manager or reinstalling from the manufacturer website resolves this in most cases. If the issue appeared right after a Windows Update, use the Roll Back Driver option in Device Manager to restore the previous working driver.
What should be done if headphones are detected but produce no sound?
Make sure the headphones are set as the default playback device. Also check that volume is not muted in the app being used, and verify there are no active audio enhancements causing conflicts in Sound Settings.
Can audio enhancements cause headphone detection issues?
Yes. Windows audio enhancements can interfere with playback on certain devices. Turning them off through the headphone audio properties under Sound Settings is a reliable fix for intermittent detection and audio problems.
Why does Windows think headphones are plugged in when they are not?
This is called phantom headphone detection and happens when debris or moisture inside the jack triggers the detection switch. As a result, Windows permanently routes audio to a non-existent headphone output. Clean the jack thoroughly with compressed air. If the problem persists, the internal switch is likely stuck or damaged and needs professional repair.
How do I know if the headphones are broken or if Windows is the problem?
Plug a different working pair of headphones into the same port. If the second pair is detected immediately, the original headphones have a hardware fault. If the second pair also fails to detect, the issue lies with Windows settings or drivers rather than the headphones themselves.
Does cleaning the headphone jack actually help with detection problems?
Yes — lint and dust inside the jack prevent proper electrical contact and are one of the most overlooked causes of detection failures. A short burst of compressed air into the jack opening is often enough to restore reliable detection, especially on laptops carried in bags daily.
What is the difference between TRRS and TRS headphone plugs, and does it affect detection?
A TRS plug has three sections — tip, ring, sleeve — and handles stereo audio only. A TRRS plug has four sections and includes a microphone channel. If a TRRS headset is plugged into a TRS-only headphone jack, Windows may not fully detect it or the microphone will not work. Some PCs combine both into a single combo jack that handles TRRS correctly. If the PC has two separate ports for headphones and mic, plug only into the headphone port for audio output.
How do I restart the Windows Audio service to fix headphone detection?
Press Win + R, type services.msc, and press Enter. Find Windows Audio in the list, right-click it, and select Restart. Do the same for Windows Audio Endpoint Builder. Both services must be running for Windows to detect and route audio to any headphones. Right-click each service and set the Startup type to Automatic to prevent them from stopping again after a reboot.
Why did my headphones stop working after a Windows Update?
Major Windows 10 and 11 feature updates — including 24H2 — regularly overwrite manufacturer audio drivers with generic Microsoft versions that lack headphone jack detection and auto-switching features. Open Device Manager, right-click the audio device, select Properties, go to the Driver tab, and click Roll Back Driver to restore the version that was working before the update. If Roll Back Driver is unavailable, download the OEM audio driver from the PC manufacturer’s support page and install it manually.
How do I fix USB headphones not detected in Windows?
Unplug the USB headphones and try a different USB port — plug directly into the rear motherboard ports rather than front-panel ports or USB hubs. Open Device Manager and look for any yellow warning triangles under Sound, video and game controllers. Right-click and update or reinstall the driver. After the driver loads, go to Sound Settings and manually set the USB headphones as the default output device.
What if nothing fixes headphone detection on my laptop?
If all software fixes have been exhausted, the headphone jack on the laptop may be physically damaged. As a reliable workaround that avoids hardware repair, a USB-to-3.5mm audio adapter — available for under $10 — bypasses the built-in jack entirely. Windows detects it as a brand-new audio device, and headphones plug in and work through it without any driver reinstall needed.