Knowing how to access the Sound Control Panel in Windows 10 and Windows 11 is one of those things that saves a lot of time. Whether the audio suddenly stopped working, an output device needs switching, or volume levels need adjusting per app — the Sound Control Panel is the go-to place. Windows 11 changed the layout compared to older versions, so finding it is not as obvious as before. This guide covers every reliable method to get there fast, including how to create a permanent shortcut for one-click access.
Quick Summary
- Windows 10 and Windows 11 both include the classic Sound Control Panel alongside the newer Settings audio page
- The classic panel gives access to advanced playback, recording, and communications settings not available in Settings
- There are 5 reliable ways to open it — including keyboard shortcuts, Run commands, and File Explorer
- The fastest method is the Run dialog using the command mmsys.cpl
- A permanent desktop shortcut or taskbar pin can be created for one-click access anytime
- All methods below work on Windows 10 and Windows 11 Home, Pro, and Enterprise editions
How to Access the Sound Control Panel in Windows 10 and 11
There are several ways to reach the Sound Control Panel on both Windows 10 and Windows 11. Each method below works on all editions. Choose the one that fits your situation best.
Method 1: Through Windows Settings
Step 1: Press Windows + I to open the Settings app.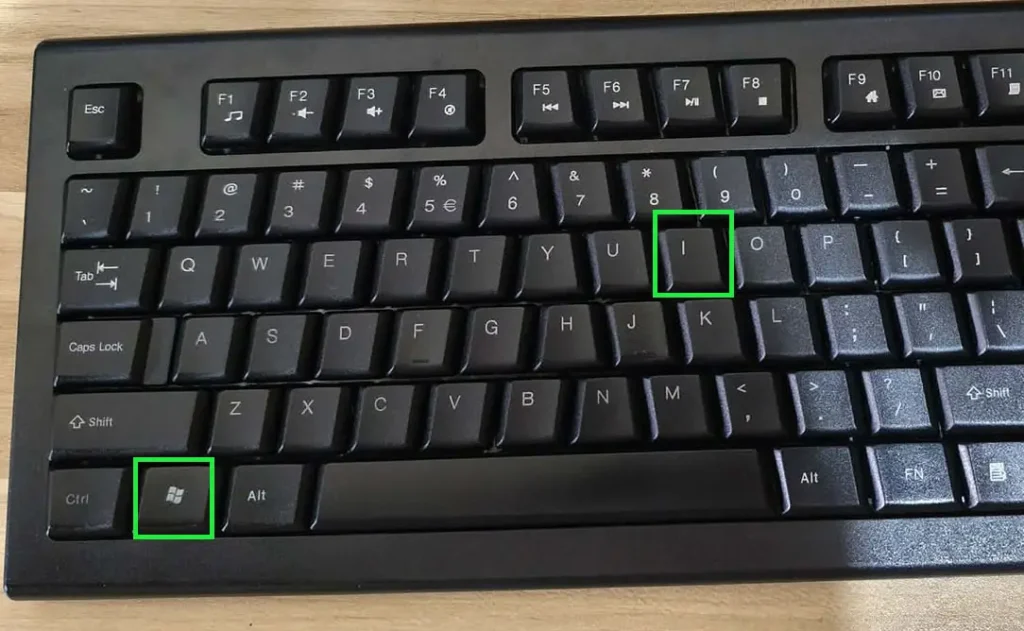
Step 2: Click on System from the left sidebar.
Step 3: Select Sound from the list on the right.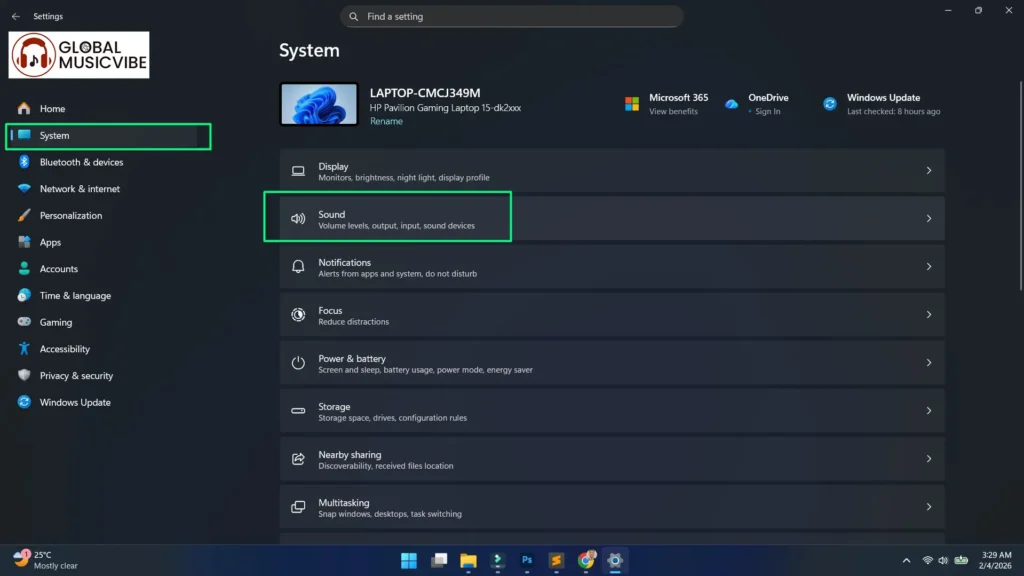
Step 4: Scroll down to the bottom of the Sound settings page.
Step 5: Click on More sound settings under the Advanced section.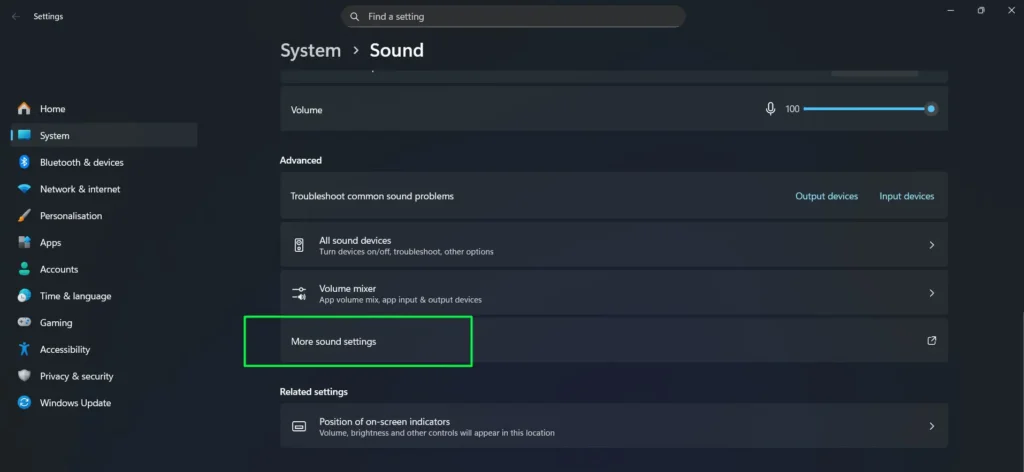
Step 6: The classic Sound Control Panel will open.
This method is useful when you are already inside Settings for other audio adjustments. For those who regularly manage audio output settings, the Settings path keeps everything in one place.
Method 2: Using the Run Dialog (Fastest Method)
Step 1: Press Windows + R on the keyboard to open the Run dialog box.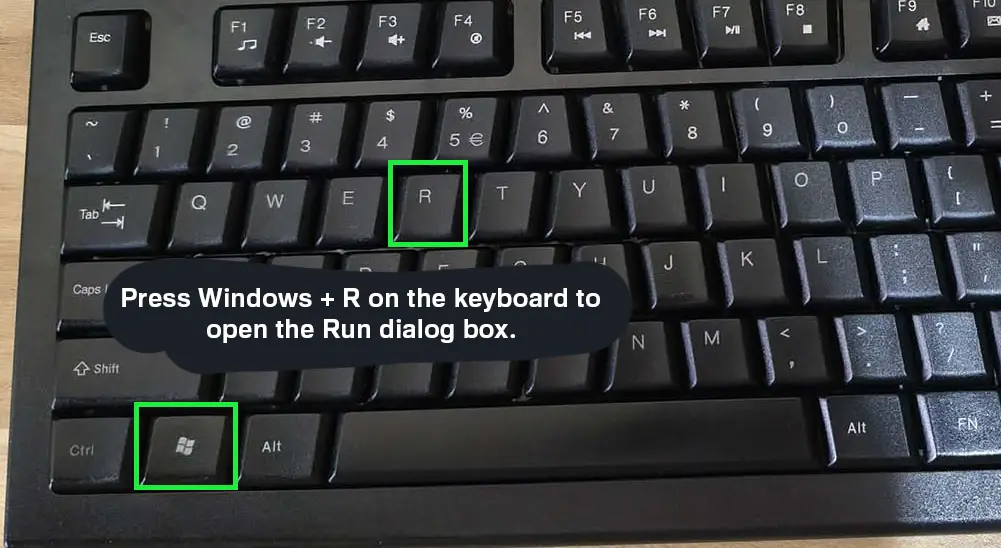
Step 2: Type mmsys.cpl into the text field.
Step 3: Press Enter or click OK.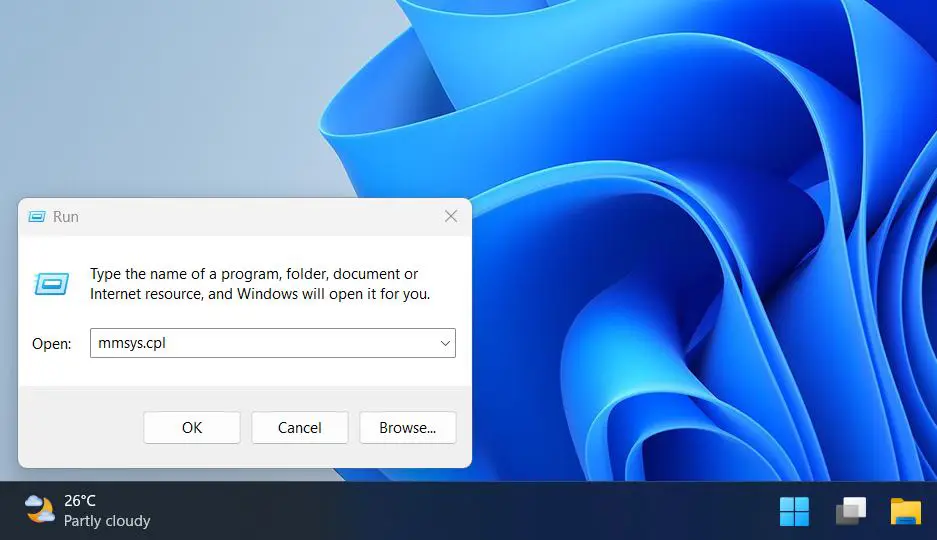
Step 4: The classic Sound Control Panel will open instantly.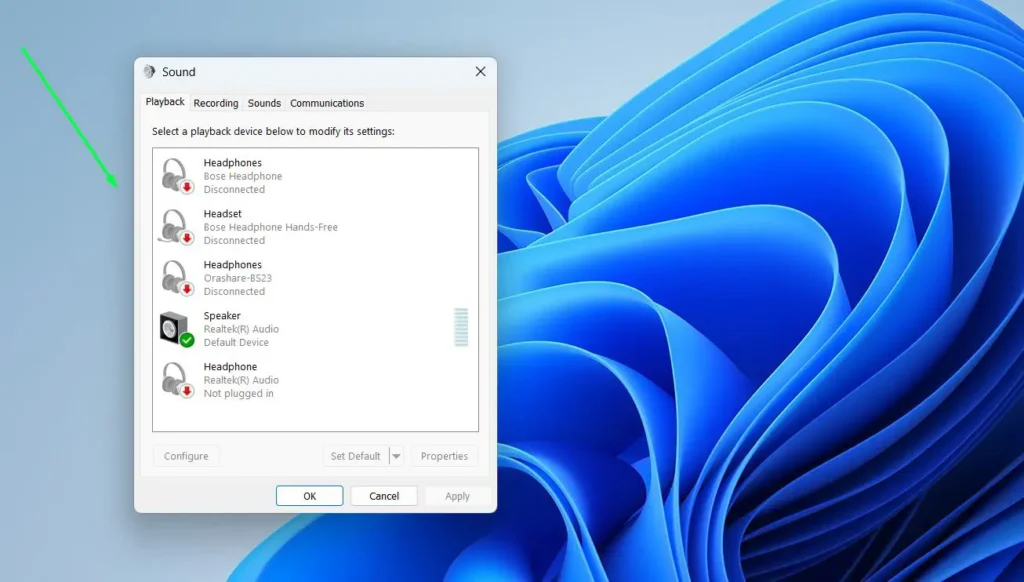
Pro Tip: This is the quickest method by far. Memorizing mmsys.cpl means getting to the Sound Control Panel in under five seconds, no matter which window is currently open. Windows also remembers recent Run commands — so after the first use, pressing Windows + R and hitting the down arrow key often brings it up automatically.
Method 3: Via the Control Panel
Step 1: Click the Start button and type Control Panel in the search bar.
Step 2: Open Control Panel from the results.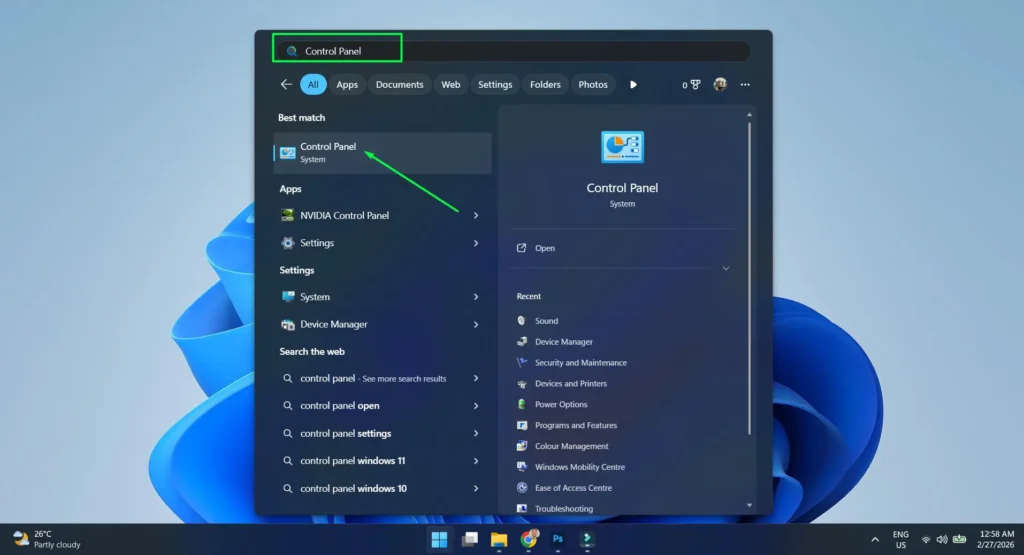
Step 3: Set the view to Large icons or Small icons using the View by dropdown in the top-right corner.![]()
Step 4: Click on Sound.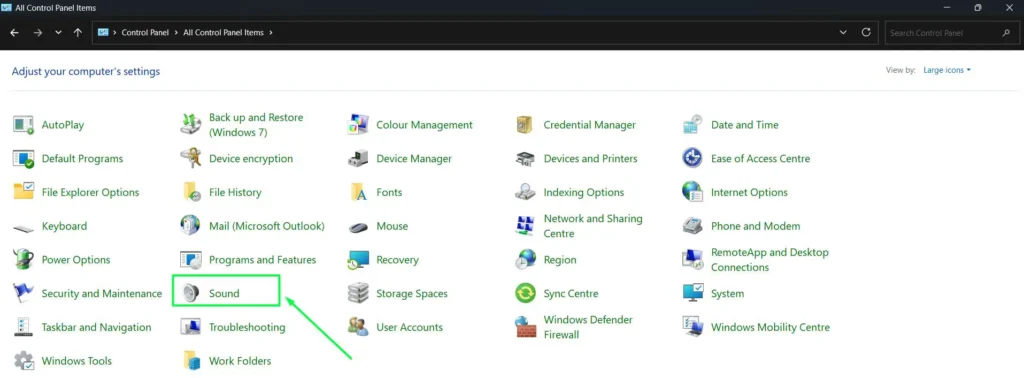
Step 5: The Sound Control Panel opens immediately.
Pro Tip: The Control Panel path doubles as a troubleshooting shortcut. If Windows Settings is crashing or unresponsive, the Control Panel remains accessible independently — making it a reliable backup route when the Settings app itself is the problem.
Method 4: From the Taskbar System Tray
Step 1: Right-click on the speaker icon in the bottom-right corner of the taskbar.
Step 2: Click on Sound settings from the context menu.![]()
Step 3: Scroll down inside Sound settings and click More sound settings.
Step 4: The classic Sound Control Panel will open.
This is a great option when the taskbar is already visible and a quick detour into sound settings is needed. Managing audio input devices like microphones is also easily done from here.
Method 5: Through File Explorer
- Step 1: Press Windows + E to open File Explorer.
- Step 2: Click inside the address bar at the top of the File Explorer window.
- Step 3: Type or paste the following path exactly as shown and press Enter:
Control Panel\Hardware and Sound - Step 4: Click Sound from the list of items that appears.
- Step 5: The classic Sound Control Panel will open immediately.
Pro Tip: This method is especially useful on shared or managed computers where the Run dialog is disabled by group policy. File Explorer’s address bar accepts system paths the same way and bypasses that restriction entirely.
What the Sound Control Panel Includes
Once inside the Sound Control Panel, there are four main tabs to know about. Each one serves a different purpose and gives access to settings that the newer Windows Settings page does not expose.
Playback Tab
This tab lists all connected output devices — speakers, headphones, HDMI audio, and more. Right-clicking any device here allows setting it as the default, configuring properties, or disabling it. This is the most commonly used tab for switching between audio output devices.
Pro Tip: If a newly connected audio device is not appearing in the Playback tab, right-click anywhere in the empty space and select Show Disabled Devices. Then right-click the missing device and choose Enable — Windows often hides devices automatically when it detects no signal, even if they are physically connected.
Recording Tab
The Recording tab shows all input devices, including microphones and line-in ports. This is where default recording devices get assigned. Anyone managing multiple microphones or audio input devices will use this tab frequently.
Sounds Tab
This tab controls the system sound scheme — the sounds Windows plays for notifications, errors, logins, and other events. Custom sound schemes can be created here, or the default scheme can be restored with a single click.
Communications Tab
Windows can automatically lower the volume of other sounds when a phone call or voice chat is detected. This tab controls that behavior. Most people set it to Do nothing to prevent unexpected volume changes during calls.
Tips for Using the Sound Control Panel Effectively
- Always right-click a device before opening its properties — the context menu gives quick access to Set as Default Device and Set as Default Communication Device separately.
- If multiple output devices are connected, check the green checkmark to confirm which one is currently active.
- Disabling unused audio devices from the Playback tab keeps the list clean and avoids accidental audio routing issues.
- For per-app volume control, Windows 11 has a separate mixer. Check out how to manage volume for individual apps on Windows for a full guide on that.
- Bluetooth headsets sometimes appear twice in the Playback tab — once as Stereo and once as Hands-Free. For the best audio quality, always select the Stereo option. If there are pairing issues, the guide on how to re-pair Bluetooth earbuds for stereo sound on Windows is worth checking out.
How to Create a Sound Control Panel Desktop Shortcut
Creating a desktop shortcut means the Sound Control Panel is always one double-click away — no need to remember commands or navigate through menus. There are two ways to do this on Windows 10 and Windows 11.
Method A: Create a Shortcut via Right-Click on Desktop
- Step 1: Right-click on an empty area of the desktop.
- Step 2: Select New then click Shortcut.
- Step 3: In the location field, type exactly: mmsys.cpl
- Step 4: Click Next, then name the shortcut something like Sound Control Panel.
- Step 5: Click Finish. The shortcut will appear on your desktop and opens the Sound Control Panel with a single double-click.
Method B: Pin to Taskbar or Start Menu via Search
- Step 1: Click the Start button and type mmsys.cpl in the search bar.
- Step 2: When the result appears, right-click it.
- Step 3: Select Pin to taskbar for one-click access from the taskbar, or Pin to Start to add it to the Start menu.
Note: Desktop shortcuts created via the right-click method cannot be pinned to Start directly from the shortcut file. Instead, use the Start search method above to pin to Start or the taskbar separately.
Common Problems When Accessing the Sound Control Panel
The Speaker Icon Is Missing from the Taskbar
If the speaker icon is not visible in the system tray, right-click the taskbar and select Taskbar settings. Scroll to the System tray icons section and make sure the Volume toggle is turned on. Once enabled, the speaker icon returns and can be right-clicked to reach Sound settings.
More Sound Settings Option Is Not Showing
This link appears at the very bottom of the Sound settings page in Windows Settings. If it is not visible, try scrolling further down or making the window larger. It should appear under the Advanced heading at the bottom of the page.
Sound Control Panel Opens But Shows No Devices
If the Playback or Recording tab appears empty, right-click anywhere inside the blank area and make sure both Show Disabled Devices and Show Disconnected Devices are checked. Hidden devices will then reappear in the list.
Run Command Does Not Open the Panel
Double-check the spelling of the command. The correct command is mmsys.cpl with no spaces. If it still does not work, try searching mmsys.cpl from the Start search bar as an alternative.
Frequently Asked Questions
What is the Sound Control Panel in Windows 11?
The Sound Control Panel is the classic audio management window in Windows 10 and Windows 11. It includes tabs for Playback, Recording, Sounds, and Communications, allowing detailed control over audio devices and system sounds that the newer Settings page does not provide.
Is the Sound Control Panel different from the Sound settings in Windows 11 Settings?
Yes. The Sound page in Windows 11 Settings is a newer, simplified interface. The classic Sound Control Panel — accessed via More sound settings — offers more advanced options like per-device properties, exclusive mode settings, and system sound schemes.
How do you open the Sound Control Panel without using Settings?
The fastest way is pressing Windows + R, typing mmsys.cpl, and pressing Enter. This skips Settings entirely and opens the Sound Control Panel directly in under five seconds.
Why can some settings only be changed in the classic Sound Control Panel?
Microsoft has not fully migrated all legacy audio options to the new Settings interface. Things like spatial sound configuration, device format settings, and exclusive mode options still live exclusively in the classic panel and are not accessible from the Settings app.
Does the Sound Control Panel work the same on all Windows 11 editions?
Yes. The Sound Control Panel is available and works identically on Windows 10 and Windows 11 Home, Pro, and Enterprise. All five methods described in this guide apply to every edition.
Can the Sound Control Panel be pinned for quick access?
Yes. Type mmsys.cpl in the Start search bar, right-click the result, and select Pin to Start or Pin to taskbar for one-click access anytime. Alternatively, create a desktop shortcut by right-clicking the desktop, selecting New, then Shortcut, and entering mmsys.cpl as the location.
Has the Sound Control Panel been removed from Windows 10 or 11?
No. The Sound Control Panel has not been removed from Windows 10 or Windows 11. Microsoft moved it deeper into the Settings menu, but all five methods in this guide still open it reliably on both operating systems.
What is the quickest keyboard shortcut to open the Sound Control Panel?
There is no dedicated single keyboard shortcut, but the fastest route is pressing Windows + R to open the Run dialog, then typing mmsys.cpl and pressing Enter. The entire process takes under five seconds and works on both Windows 10 and Windows 11.