Setting up the default audio device in Windows 11 is the fastest way to control where sound plays and which microphone Windows uses across all apps. Whether you just plugged in a new headset, switched to Bluetooth headphones, or audio is suddenly coming from the wrong device — this step-by-step guide covers exactly what to do. No extra steps, no fluff.
Quick Summary
- The default audio device controls where system sound plays and which microphone captures audio.
- Windows 11 lets you set separate defaults for output (speakers or headphones) and input (microphone).
- The quickest path is: Settings > System > Sound.
- Changes apply system-wide instantly — no restart needed.
- Individual apps can use a different audio device than the system default.
How to Set Up the Default Audio Device in Windows 11
Windows 11 manages both output and input defaults from the same Sound Settings page. The sections below walk through setting the default output device first, then the default input device — all from a single screen. Each section has its own numbered steps so you can jump directly to what you need.
Set the Default Output Device (Speakers or Headphones)
The default output device is where Windows sends all sound — music, videos, system notifications, and app audio. Follow these steps to set it to the speaker or headphones of your choice.
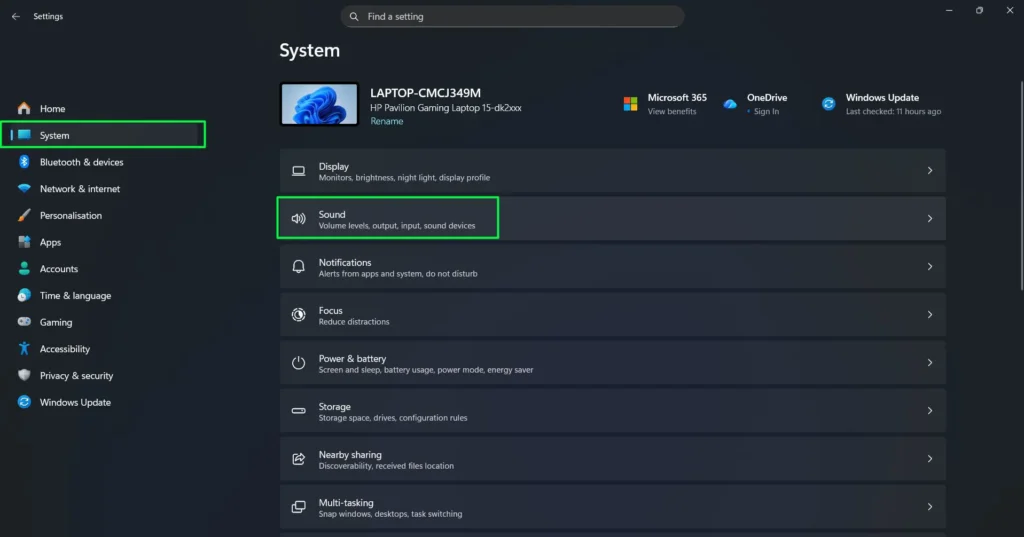
Step 1: Open Sound Settings. Right-click the speaker icon in the taskbar (bottom-right corner) and select Sound settings from the context menu.
![]()
Alternatively, press Windows + I to open Settings, click System in the left sidebar, then click Sound.
Step 2: Under the Output section, find the dropdown labeled “Choose where to play sound.” Click the dropdown to expand all available output devices.
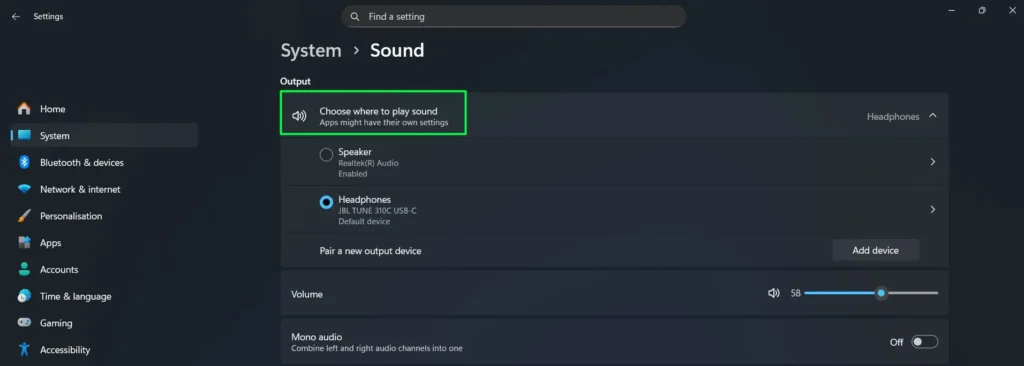
Step 3: Select your preferred device — for example, Headphones, Speakers, or a USB audio device. The selection takes effect immediately.

Step 4: Play any audio to confirm the correct device is now active. If the device does not appear in the list, check the physical connection or confirm Windows has it enabled.
Pro Tip: After selecting a new output device, a small volume slider appears directly beneath it in Sound Settings. Adjusting this slider independently from the main system volume is useful when switching between a monitor speaker and a headset that have different default volume levels.
For every available method of setting the output device, the full guide on configuring the default playback device covers each option in detail.
Set the Default Input Device (Microphone)
The default input device is the microphone Windows uses for calls, recordings, and voice commands. Follow these steps to set it and verify it is working correctly.
Step 1: On the same Sound Settings page, scroll down to the Input section.
Step 2: Click the dropdown labeled “Choose a device for speaking or recording.”
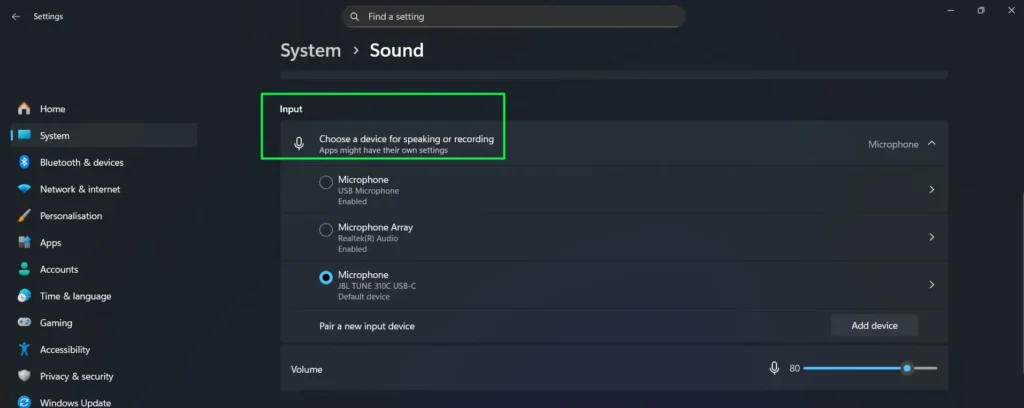
Step 3: Select your preferred microphone or audio input — such as a USB headset mic, built-in microphone, or an external audio interface.
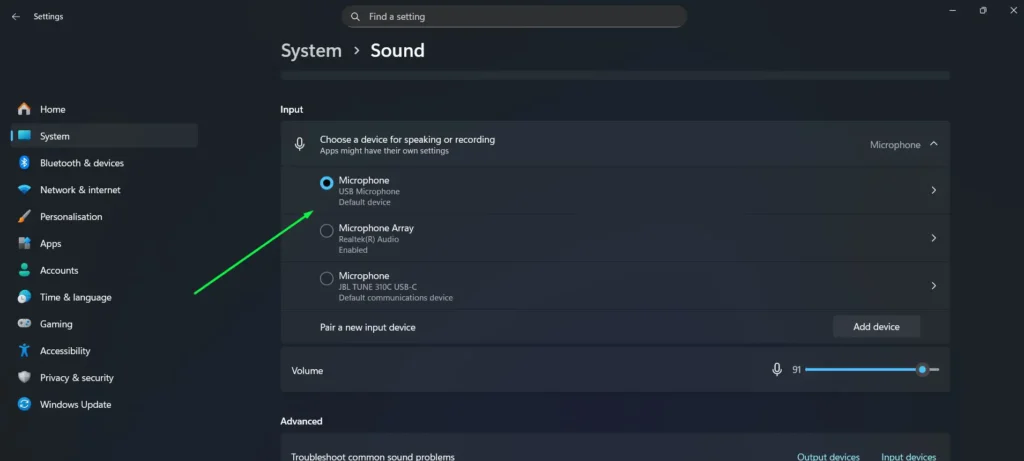
Step 4: Click on the selected microphone device to open its Properties page.
Step 5: Scroll down to the Microphone test section and click “Start test.”
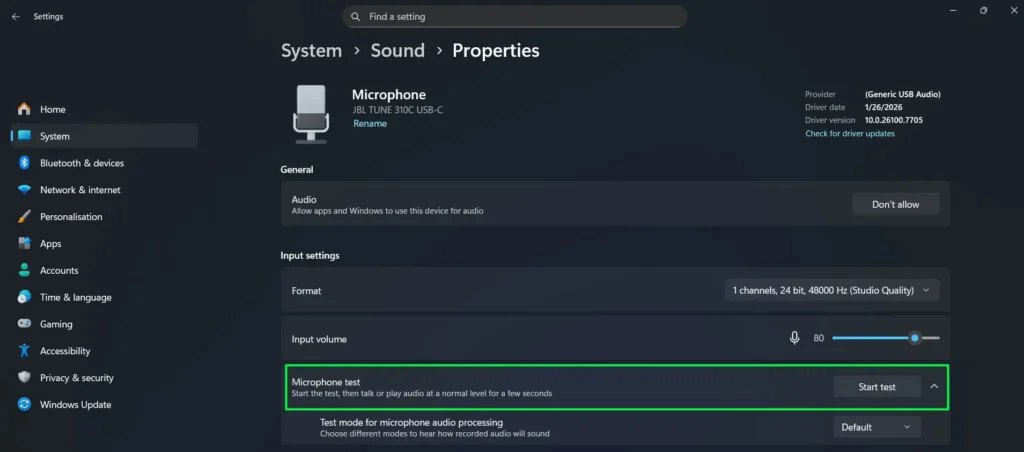
Step 6: Speak or play audio at a normal level for a few seconds. A working device will return a volume result confirming it is picking up sound.
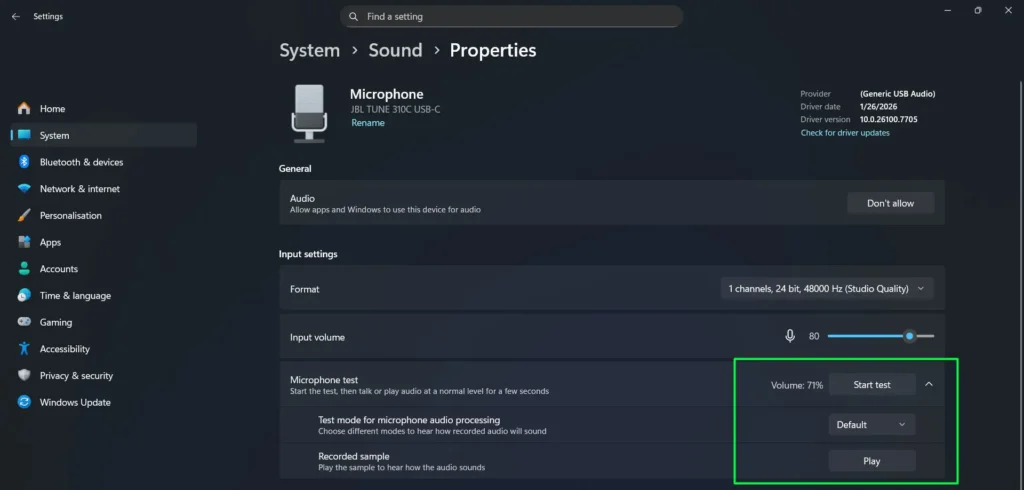
Step 7: Once the test completes, a volume percentage (for example, Volume: 71%) appears next to the Start test button. A Recorded sample section also appears with a Play button — click it to hear the audio back and confirm your microphone sounds as expected.
For users who need to go further — adjusting input volume, enabling audio enhancements, or managing multiple recording devices — the complete guide on managing audio input devices on Windows 11 has everything you need.
Verify Both Defaults Are Correctly Set
Step 1: Play a sound — such as a YouTube video or a system notification — to confirm audio comes from the selected output device.
Step 2: Open a voice app like Teams, Zoom, or the built-in Voice Recorder and verify it detects the selected input device.
Step 3: If a specific app still uses the wrong device, open that app’s own audio settings. Many apps store their own device preference independently from the Windows system default and require a separate update inside the app itself.
Pro Tip: Windows 11 includes a feature called App volume and device preferences under Advanced sound options at the bottom of Sound Settings. This screen shows every open app and lets you assign a unique output and input device per app — without changing the system-wide default. It is the most useful setting to know when one app needs a different audio setup than everything else on your PC.
Tips for Setting Up Your Default Audio Device
- Always plug in a new audio device before opening Sound Settings. Windows 11 needs to detect it first before it shows up in the dropdown list.
- Bluetooth headphones must be paired and connected via Bluetooth Settings before they appear as an audio option. The pairing step happens separately from Sound Settings.
- When working with a USB audio interface or professional microphone, confirm the device drivers installed correctly. A device without proper drivers may show a warning icon or not appear in the list at all.
- Right-click the speaker icon and select Open volume mixer to balance audio levels between apps without changing the default device.
- Switching frequently between devices — such as desktop speakers and a headset — is faster through the Quick Settings panel (Win + A) without opening full Settings each time.
- When a microphone is connected but shows no input signal, Windows may have disabled microphone access. Go to Settings > Privacy & Security > Microphone to check app permissions. For a full walkthrough, see the guide on resolving microphone detection problems.
Common Problems When Setting Up the Default Audio Device
The Device Does Not Appear in the Dropdown List
This usually means Windows has not detected the device yet. Confirm it is firmly plugged in, then click Add device or scroll to More sound settings to see all connected devices — including any that may have been disabled. Right-clicking a device in the classic Sound Control Panel brings up the option to re-enable it.
Sound Still Plays from the Wrong Device After Changing the Default
Some apps — particularly browsers, video conferencing tools, and media players — store their own audio output setting. After changing the system default, restart the app. If the issue persists, go into that app’s internal audio settings and manually select the correct output device there.
The Selected Input Device Shows No Signal in the Level Bar
First, confirm the microphone is not physically muted — some headsets have a hardware mute button. Then go to Settings > Privacy & Security > Microphone and confirm microphone access is turned on. If the level bar still does not respond, the device likely needs a driver update. Check Device Manager or the manufacturer’s website for the latest driver.
The Default Device Resets After Restarting Windows
A Bluetooth device reconnecting at startup often triggers Windows to reassign it as the default. Open the device’s advanced properties in the classic Sound Control Panel and turn off Exclusive mode. Unchecking the option that allows applications to take exclusive control of the device also helps prevent automatic resets after every restart.
Frequently Asked Questions
What is a default audio device in Windows 11?
The default audio device is the one Windows uses automatically for all sound output and input unless a specific app overrides it. For output, it controls where music, videos, and notifications play. For input, it determines which microphone Windows uses for calls, recordings, and voice commands.
Can the default output and default input be set to different devices?
Yes. Windows 11 manages output and input defaults completely independently. Speakers can serve as the default output while a USB microphone handles the default input — both settings are found on the same Sound Settings page under System.
How do you set a default audio device using the classic Sound Control Panel?
Open Sound Settings, scroll to the bottom, and click More sound settings. A window opens showing the Playback and Recording tabs. Right-click any device and select Set as Default Device. This method works for both output and input devices and is especially useful for devices that only appear in the classic panel and not the modern Settings page.
Does changing the default audio device affect all apps?
It affects all apps that rely on the Windows system default. However, apps like Zoom, Teams, Discord, and most browsers store their own audio device preference. Each of those apps needs a manual update inside their own audio settings after the system default changes.
Why does the default audio device keep switching on its own?
This typically happens when a Bluetooth device connects or disconnects, or when an HDMI display with built-in speakers comes online. Windows 11 sometimes automatically reassigns the default in these cases. Turning off Exclusive mode in the device’s advanced properties — or using a third-party audio switcher tool — prevents automatic switching from occurring.
How do you set a default audio device for just one app in Windows 11?
Go to Settings > System > Sound, scroll down, and click Volume mixer or App volume and device preferences. Every active app appears on this screen, and each one accepts a unique output and input device assignment without touching the system-wide default.