You’ve just plugged in your headset for a call, only to realize Windows is still blasting audio through your monitor’s tinny internal speakers. This usually happens because the OS fails to hand off priority automatically, or worse, it splits your audio streams between two different outputs. Configuring the default playback device correctly is the only way to ensure your system stops guessing which hardware you actually want to use.
The biggest headache often stems from the “Default Communication Device” setting — a hidden sub-category that frequently keeps voice chat pinned to the wrong output even after you’ve changed your main system sounds. Whether you are navigating the redesigned Windows 11 Sound menu, the legacy Control Panel, the Game Bar audio widget, or a PowerShell command, here is how to force your PC to respect your audio preferences — six methods in total.
What Is a Default Playback Device?
A default playback device is the audio output that Windows 11 automatically uses when playing sound from apps, browsers, music players, and system notifications. If you have multiple audio devices connected — such as built-in speakers, USB headphones, or a Bluetooth device — Windows needs to know which one to route sound through. Setting the correct default ensures your audio always plays through the right device without having to manually switch each time.
Method 1: Set Default Playback Device from the Quick Settings Panel (Fastest)
This is the fastest method in Windows 11 and requires no deep settings navigation. Press Win + A to open Quick Settings instantly, or click the speaker icon on the taskbar. You can switch your default audio output in under five seconds.
Step 1: Press Win + A on your keyboard, or click the speaker icon on the taskbar in the bottom-right corner of your screen. This opens the Quick Settings panel showing your volume slider, brightness, and network status.
Step 2: On the far right of the volume slider, you will see a small chevron arrow pointing right — this is the Select a sound output button. Click that arrow icon.
Step 3: A panel labeled Sound output will appear. Under Output device, all your connected audio devices are listed — for example, Speaker (Realtek Audio) and Headphones (JBL TUNE 310C USB-C).
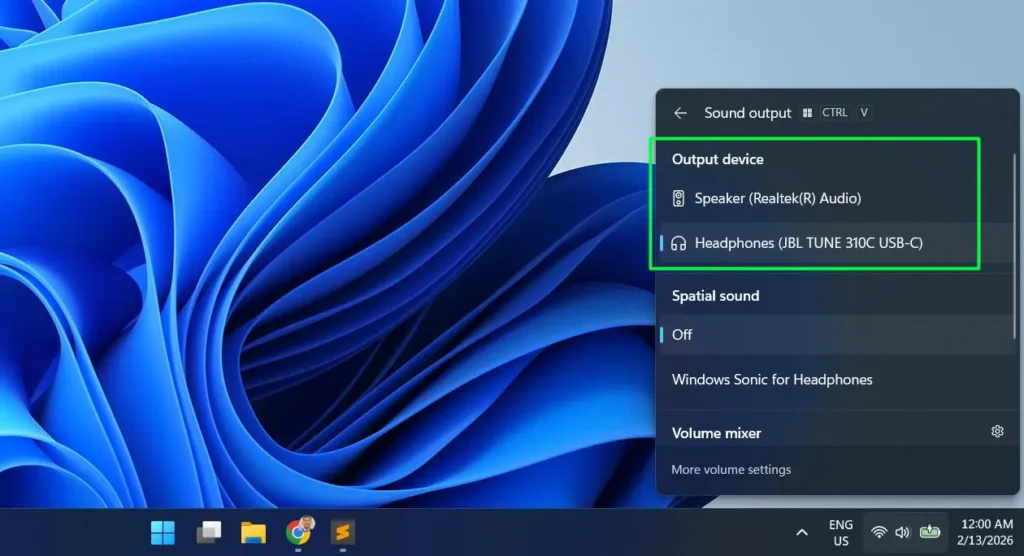
Step 4: Click on the device you want to use. A blue highlight bar will appear on the left side of the selected device confirming it is now active. Windows 11 switches the audio output instantly — no restart required.
This same panel also shows a Spatial sound section where you can enable Windows Sonic for Headphones, plus a Volume mixer shortcut at the bottom for per-app audio control.
Method 2: Configure Default Playback Device via Windows Settings
The Settings app gives you a clean, organized view of all output devices and lets you set any device as the system default with a single click.
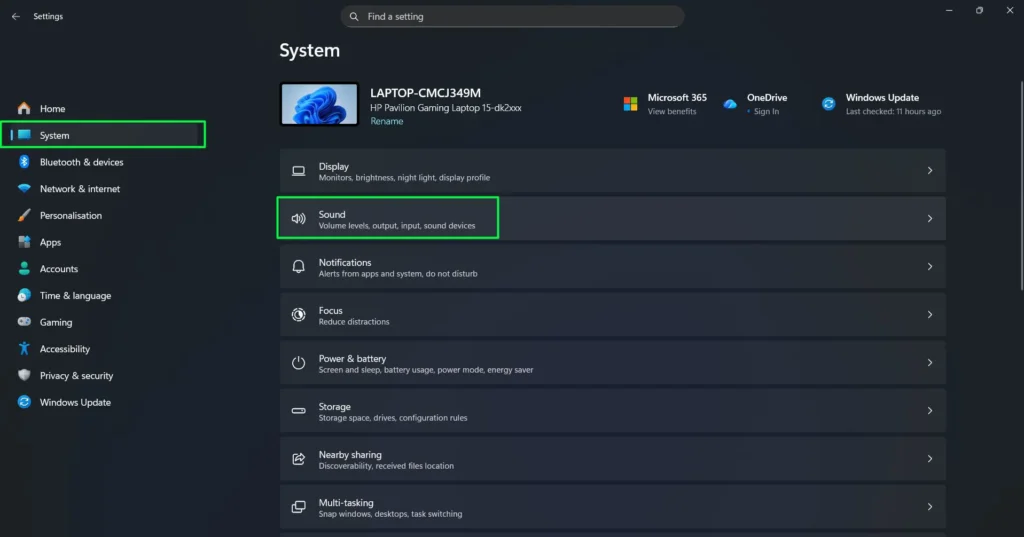
Step 1: Press Windows + I to open Settings.
Step 2: Click System in the left sidebar, then select Sound.
Step 3: Under the Output section, you will see “Choose where to play sound” with a note that says “Apps might have their own settings.” Click the dropdown or expand arrow to reveal all available output devices.
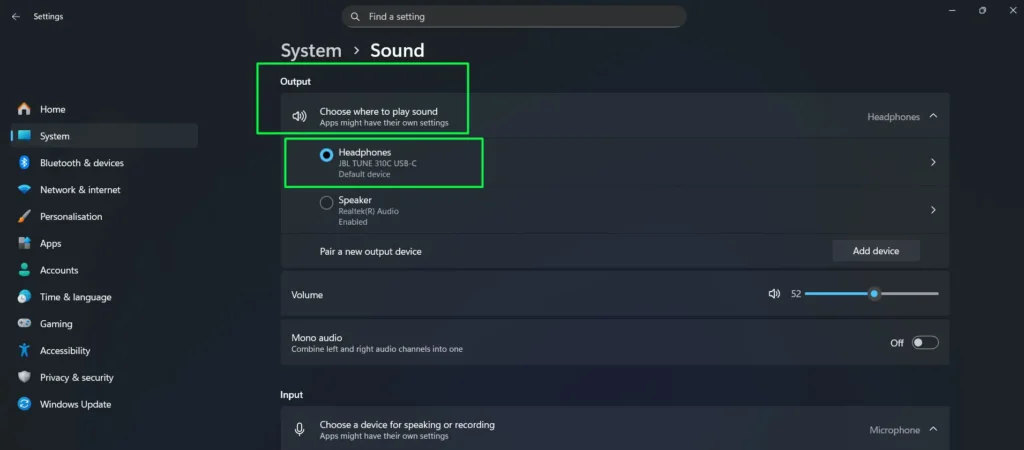
Step 4: Your devices are listed with radio buttons. Devices already set as default show the label Default device directly beneath the device name. Devices that are active but not default will show Enabled instead.
Step 5: Click the radio button next to the device you want to set as default. It will immediately display Default device beneath it, confirming the change has been applied.
You can also click the arrow on the right of any device to access deeper settings including volume normalization, audio enhancements, and format configuration for that specific device.
Method 3: Set Default Playback Device Using the Classic Sound Control Panel
The classic Sound Control Panel is still fully available in Windows 11 and gives you separate control over the default audio device and the default communications device — something the modern Settings app does not offer.
Step 1: Right-click the speaker icon in the system tray on the taskbar.
Step 2: Click “Sound settings”.
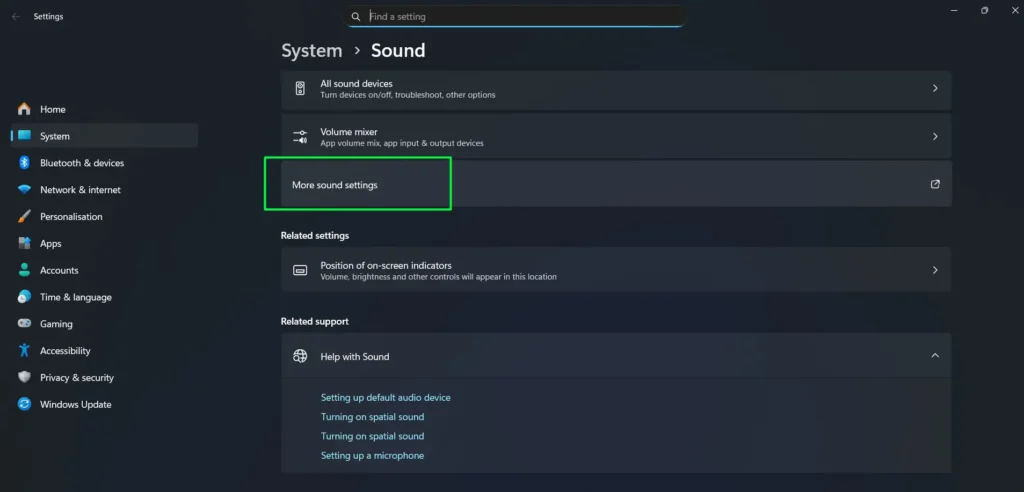
Step 3: Scroll to the bottom of the Sound settings page and click “More sound settings”. This opens the classic Sound Control Panel window.
Step 4: In the Playback tab, all connected audio output devices are listed with their current status icons.
Step 5: Right-click the device you want to use as your default.
Step 6: Click “Set as Default Device” for general system audio. If you also want the same device used for calls and voice apps like Microsoft Teams or Zoom, click “Set as Default Communication Device” as well.

Step 7: Click Apply then OK to confirm and close the window.
Method 4: Set Default Playback Device Using Xbox Game Bar (Win + G)
The Xbox Game Bar includes a built-in Audio widget that lets you switch your default audio output without leaving a fullscreen app or game. This is especially useful for gamers or anyone who needs to change audio output without minimizing their current window.
Step 1: Press Win + G on your keyboard to open the Xbox Game Bar overlay.

Step 2: If the Audio widget isn’t visible, click the Audio icon in the top widget bar to open it.
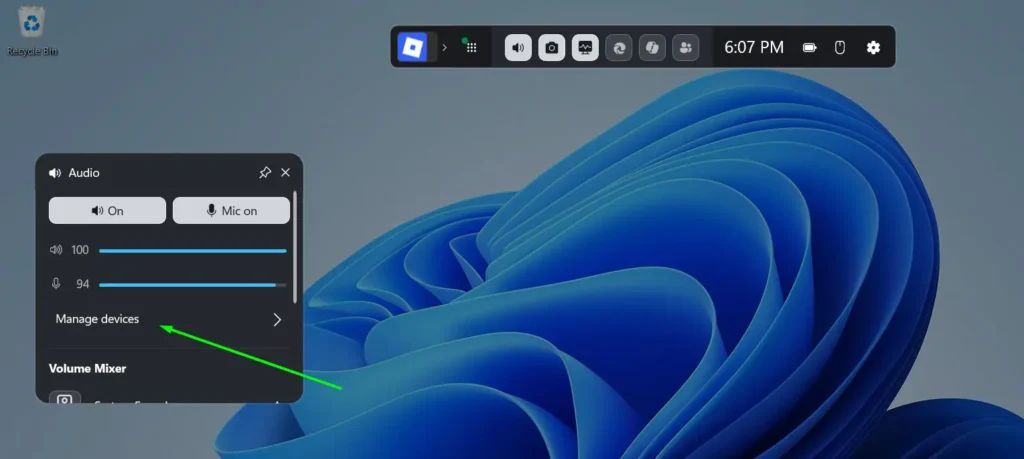
Step 3: Click Manage devices on the right side of the Audio widget. This opens the device management panel directly inside the Game Bar overlay.
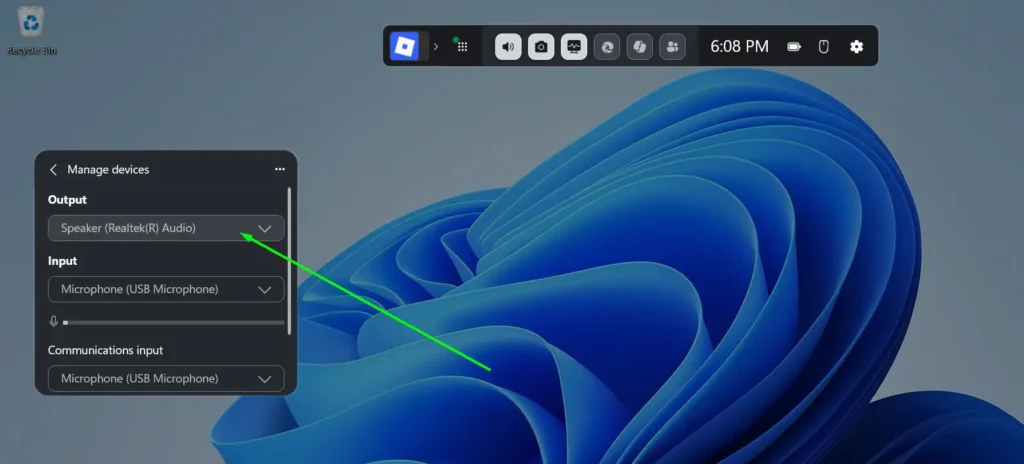
Step 4: In the Manage devices panel, you will see three sections — Output, Input, and Communications input. Each has its own dropdown menu showing the currently active device.
Step 5: Click the Output dropdown and select the playback device you want to use as the new default.
Step 6: The change takes effect immediately. Press Win + G again or press Escape to close the Game Bar and return to your app or game.
You can also use the Communications input dropdown in the same panel to set the microphone used by voice apps like Teams and Zoom — all without leaving fullscreen.
Method 5: Set App-Specific Default Playback Device in Windows 11
Windows 11 lets you assign a different audio output to individual apps. This means Spotify can play through your speakers while a video call simultaneously uses your headphones — all without changing your system default.
Step 1: Press Windows + I to open Settings.
Step 2: Go to System, then Sound.
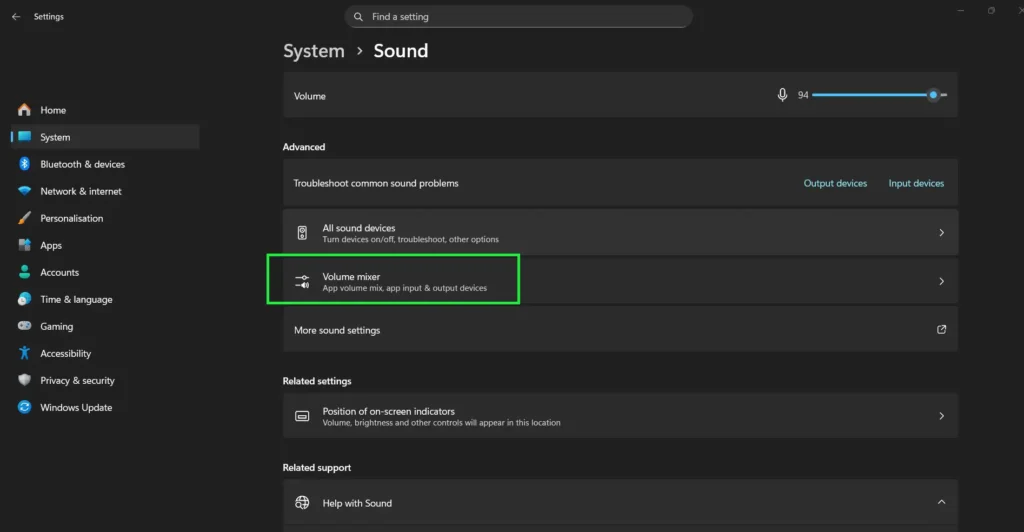
Step 3: Scroll down and click “Volume mixer”. You can also access this directly from the Sound output panel in Quick Settings by clicking the Volume mixer link at the bottom.
Step 4: Under the Apps section, find the app you want to configure. Only apps that are currently open and producing or ready to produce audio will appear here.
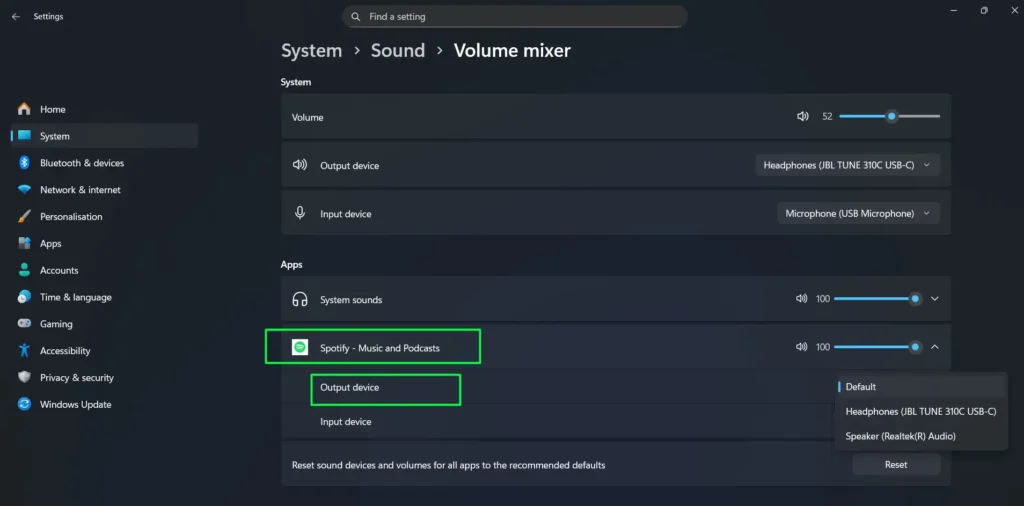
Step 5: Click the output device dropdown next to the app and select the playback device you want assigned to that specific app only. The change takes effect immediately.
Method 6: Change Default Playback Device Using PowerShell
PowerShell gives system administrators and advanced users a way to change the default audio output settings without touching the Windows UI — useful for scripting, remote sessions, or batch configuration across multiple machines.
Step 1: Click the Start menu, type PowerShell, right-click Windows PowerShell, and select “Run as administrator.”
Step 2: Install the AudioDeviceCmdlets module by running the following command and pressing Enter:
Install-Module -Name AudioDeviceCmdlets -ForceIf prompted to install from an untrusted repository, type Y and press Enter to confirm.
Step 3: List all available audio output devices on your system by running:
Get-AudioDevice -ListEach device will show an Index number, its Name, and its current Default status. Note the index number of the device you want to set as default.
Step 4: Set your chosen device as the default playback device by running the following command, replacing 2 with the actual index number of your device:
Set-AudioDevice -Index 2Step 5: Confirm the change by running Get-AudioDevice -Playback and verifying your device now shows Default: True.
This method works on Windows 10 and Windows 11 and does not require a restart. The change applies system-wide immediately after the command executes.
How to Set Bluetooth Headphones as Default Playback Device
If you use Bluetooth headphones, Windows 11 may not automatically switch to them when you connect. Here is how to set them as default manually.
Step 1: Make sure your Bluetooth headphones are paired and connected. You can verify this under Settings > Bluetooth & devices.
Step 2: Press Win + A or click the speaker icon in the taskbar to open Quick Settings.
Step 3: Click the arrow icon (Select a sound output button) next to the volume slider to open the Sound output panel.
Step 4: Your Bluetooth headphones will appear in the Output device list. Click on them to make them the active default. The blue bar on the left confirms the selection is active.
For more audio device guidance, check out our audio guides section for additional walkthroughs.
Pro Tip: Use Keyboard Shortcuts to Switch Audio Output Faster
Windows 11 includes two keyboard shortcuts that eliminate the need to navigate menus when switching audio output:
- Win + A — Opens Quick Settings directly. Click the arrow next to the volume slider to reach the Sound output panel in two clicks.
- Win + G — Opens the Xbox Game Bar. Use the Audio widget Mix tab to switch output without leaving fullscreen.
- CTRL + V — When the Sound output panel from Quick Settings is already open, this shortcut re-opens the Sound output flyout directly.
If you switch between headphones and speakers multiple times a day, these shortcuts save meaningful time and effort.
How to Check Which Device Is Currently Set as Default
You can confirm your current default playback device without changing any settings using either of these two methods.
Option 1 — Windows Settings: Open Settings > System > Sound. Under Output, expand “Choose where to play sound.” The device labeled Default device beneath its name is your active default.
Option 2 — Sound Control Panel: Open More sound settings to access the classic Sound Control Panel. In the Playback tab, the default device displays a green checkmark on its icon, making it immediately identifiable.
Option 3 — PowerShell: Open PowerShell and run Get-AudioDevice -Playback. The device shown is your current default playback output, with Default: True confirming its status.
Troubleshooting: Default Playback Device Not Showing or Not Working
Device Not Appearing in the Output List
If your audio device is missing from the output list, open the classic Sound Control Panel, right-click anywhere inside the Playback tab, and enable “Show Disabled Devices” and “Show Disconnected Devices.” Your device may be hidden rather than missing entirely. Right-click it and select Enable to bring it back.
No Sound After Setting the Default Device
Step 1: Right-click the speaker icon and click “Troubleshoot sound problems.”
Step 2: Follow the automated troubleshooter. Windows 11 will scan for audio conflicts and suggest fixes automatically.
Step 3: If the issue continues, open Device Manager, expand Sound, video and game controllers, right-click your audio driver, and select Update driver.
Windows Keeps Changing the Default Device Automatically
This is a common issue when frequently connecting or disconnecting devices. To stop it, open the Sound Control Panel, right-click on devices you do not want Windows to auto-prioritize, and set them to Disabled when not in use. This prevents Windows from treating them as candidates for automatic switching.
Default Communication Device Still Using the Wrong Output
If voice apps like Teams, Zoom, or Discord continue routing audio to the wrong device even after you’ve changed the system default, you need to set the Default Communication Device separately. Open the classic Sound Control Panel via More sound settings, go to the Playback tab, right-click your preferred device, and select “Set as Default Communication Device.” The system default and communication default are two independent settings in Windows 11.
Bluetooth Headphones Not Appearing as a Playback Device
If your Bluetooth headphones are connected but not appearing in the output list, go to Settings > Bluetooth & devices and confirm the device shows as Connected. Then open the classic Sound Control Panel, right-click in the Playback tab, and enable “Show Disconnected Devices.” If the headphones appear grayed out, right-click them and select Enable. If they still do not appear, remove the device from Bluetooth settings and re-pair it.
Tips for Managing Multiple Audio Devices in Windows 11
If you regularly switch between audio outputs — for example, between studio monitors and regular speakers — the Quick Settings Sound output panel in Method 1 remains the fastest option. It lists all connected devices in one click and switches instantly with no confirmation dialog. For power users managing audio across multiple apps at once, the Volume mixer in Method 5 is the most precise tool available. For scripting or remote management scenarios, the PowerShell method in Method 6 gives you full programmatic control without touching the UI.
If you are also working with audio files, our MP3 converter tool can help you prepare audio in the right format for any playback device or platform.
Frequently Asked Questions
How do I change the default playback device in Windows 11?
Press Win + A to open Quick Settings, then click the arrow next to the volume slider to open the Sound output panel. Click any listed device under Output device to make it the active default immediately — no restart needed.
Why is my default playback device not saving in Windows 11?
This usually happens when Windows automatically switches to newly connected devices. Open the classic Sound Control Panel, right-click devices you do not regularly use, and disable them to prevent automatic switching.
Can I set different default audio devices for different apps in Windows 11?
Yes. Go to Settings, then System, then Sound, and open Volume mixer. Each open app has its own output device dropdown that you can set independently from the system default.
How do I set Bluetooth headphones as the default playback device?
Connect your Bluetooth headphones via Settings and Bluetooth and devices, then press Win + A to open Quick Settings, click the arrow next to the volume slider, and click on your headphones under Output device to select them as the default.
What is the difference between default device and default communication device?
The default device handles all general audio including music, videos, and system sounds. The default communication device is used exclusively by voice and call apps like Microsoft Teams, Zoom, and Skype. Both can be configured separately in the classic Sound Control Panel.
How do I open the Sound Control Panel in Windows 11?
Right-click the speaker icon in the taskbar, click Sound settings, scroll to the bottom of the page, and click More sound settings to open the classic Sound Control Panel.
What does the blue bar next to a device name mean in the Sound output panel?
The blue bar on the left side of a device name in the Quick Settings Sound output panel confirms that device is currently selected and active as your default audio output in Windows 11.
Can I change the default playback device using PowerShell?
Yes. Install the AudioDeviceCmdlets module from PowerShell Gallery, run Get-AudioDevice -List to find your device index, then run Set-AudioDevice -Index followed by the index number of your preferred device. The change applies immediately without a restart.
How do I change the default audio output without minimizing my game?
Press Win + G to open the Xbox Game Bar, then click Manage devices in the Audio widget. In the Manage devices panel, click the Output dropdown and select your preferred audio device — all without leaving fullscreen.