Learning how to turn on spatial sound in Windows can dramatically transform your audio experience, whether you’re gaming, watching movies, or enjoying your favorite music. Spatial audio technology creates an immersive three-dimensional soundscape that makes you feel like you’re right in the middle of the action. This comprehensive guide will walk you through everything you need to know about enabling and optimizing spatial sound on your Windows 10 and Windows 11 device.
Quick Takeaways
- Spatial sound creates a 3D audio experience through any standard headphones on Windows 10 and Windows 11.
- Enable it via Windows Settings, Control Panel, or the taskbar Quick Settings panel.
- Windows Sonic is free and built-in. Dolby Atmos and DTS Sound Unbound offer better quality but require paid apps from the Microsoft Store.
- Gamers benefit most — spatial audio helps pinpoint exact sound directions in-game.
- Works with any headphones, but better quality headphones deliver stronger results.
- If it is not working, update audio drivers or disable any conflicting in-app audio settings.
How to Turn On Spatial Sound in Windows 11
Method 1: Using Windows Settings
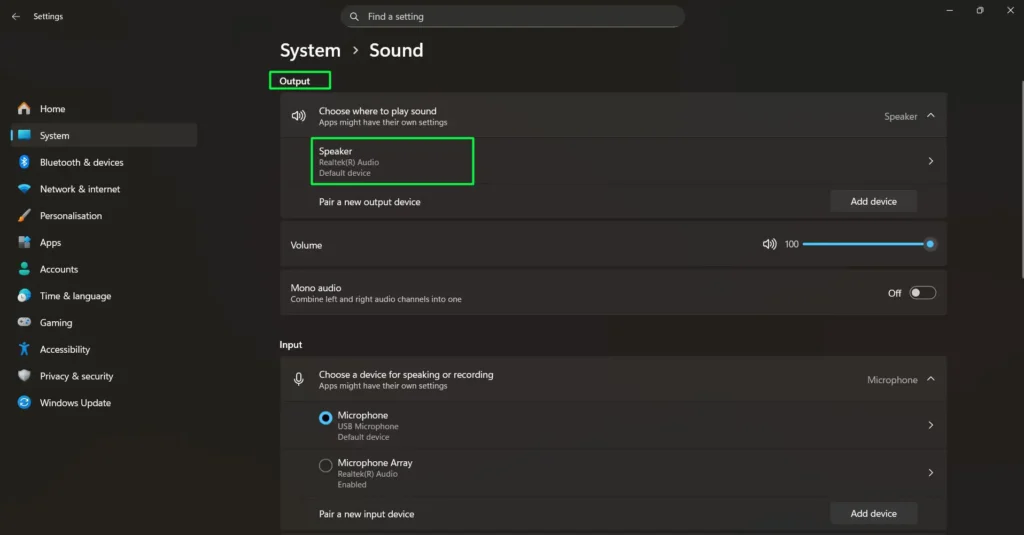
Step 1: Right-click on the speaker icon in your system tray (bottom-right corner of your screen)
Step 2: Select “Open Sound settings” from the context menu
Step 3: In the Sound settings window, find the “Output” section
Step 4: Click on “Speaker – Default Device”
Step 5: Look for the “Spatial sound” section in the device properties panel
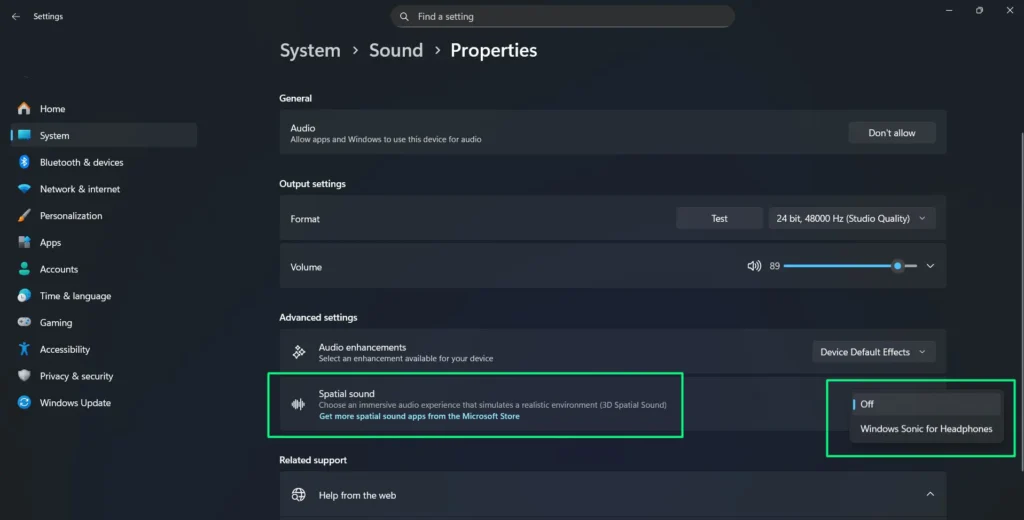
Step 6: Click on the dropdown menu (typically shows “Off” by default)
Step 7: Select your preferred option — “Windows Sonic for Headphones” (free built-in), “Dolby Atmos for Headphones” (requires Dolby Access app), or “DTS Sound Unbound” (requires DTS app from Microsoft Store)
Step 8: The settings apply automatically — you should immediately notice the enhanced audio experience
Method 2: Through Control Panel
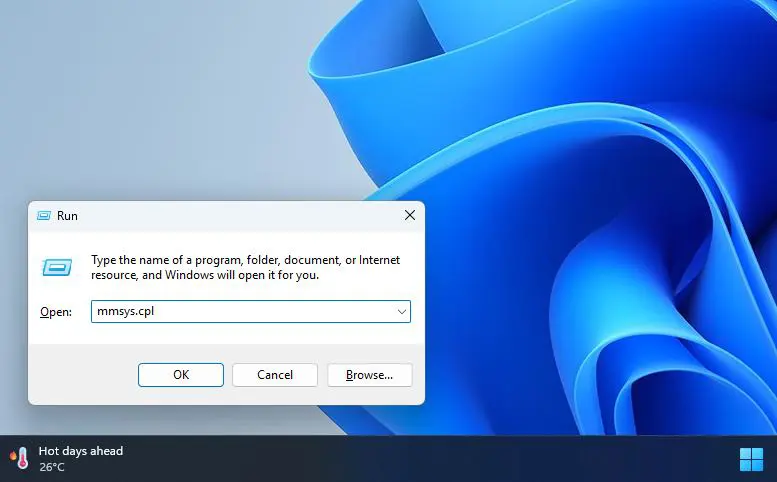
Step 1: Press Windows key + R to open the Run dialog
Step 2: Type “mmsys.cpl” and press Enter
Step 3: In the Sound window, select the “Playback” tab
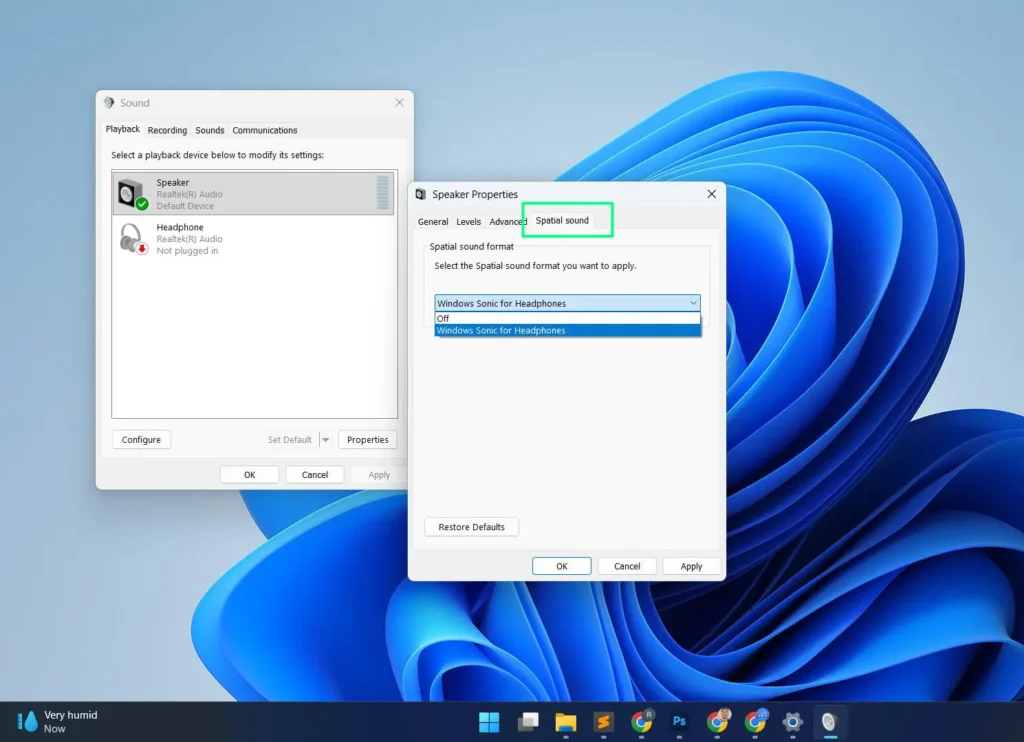
Step 4: Double-click on your active audio device
Step 5: Navigate to the “Spatial sound” tab in the properties window
Step 6: Select your preferred spatial sound option from the dropdown — “Windows Sonic for Headphones”, “Dolby Atmos for Headphones”, or “DTS Sound Unbound”
Step 7: Click “Apply” then “OK” to save your settings
Method 3: Using Quick Settings Panel
Step 1: Click on the speaker icon in the system tray (bottom-right corner of your screen)
Step 2: In the Quick Settings panel that appears, locate the volume slider with the speaker icon
Step 3: Click on the arrow button (>) next to the volume slider to expand audio options
Step 4: This will open the Sound output settings showing your current output device
Step 5: Under the “Spatial sound” section, click on the current setting (which shows “Off” by default)
Step 6: Select “Windows Sonic for Headphones” from the available options
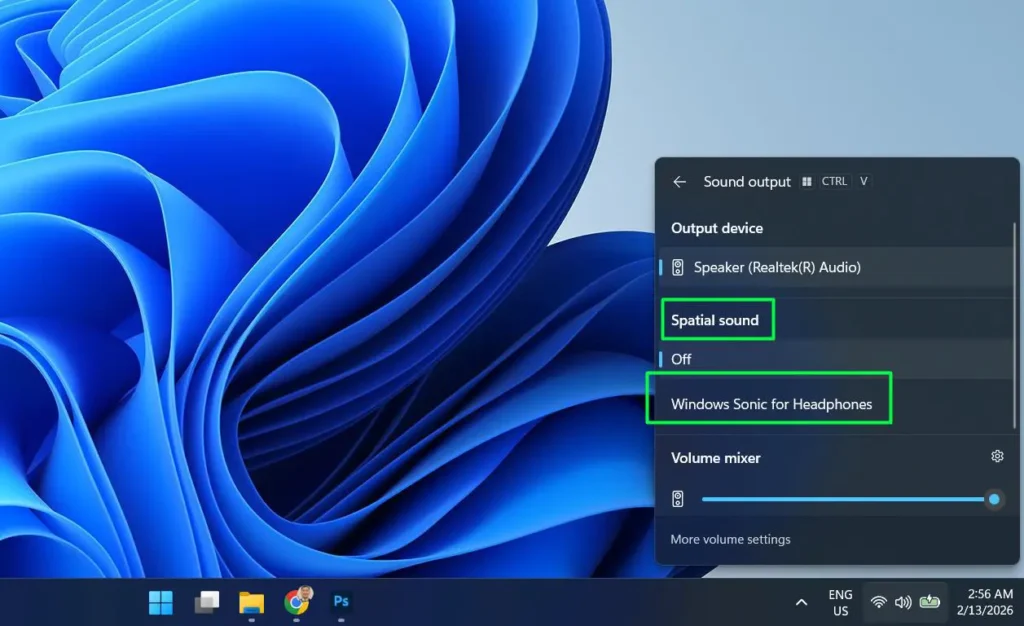
Step 7: Spatial sound will be enabled immediately without needing to close any windows
How to Turn On Spatial Sound in Windows 10
Windows 10 supports spatial sound through a slightly different path. Here is how to enable it on Windows 10 devices.
Method 1: Via Windows 10 Sound Settings
Step 1: Right-click on the speaker icon in the taskbar (bottom-right corner)
Step 2: Select “Open Sound settings” from the menu that appears
Step 3: Under the “Output” section, click “Device properties”
Step 4: Click “Additional device properties” in the device properties page
Step 5: In the Speaker Properties window, click on the “Spatial sound” tab
Step 6: Click the dropdown under “Spatial sound format” and select “Windows Sonic for Headphones”
Step 7: Click “Apply” then “OK” to confirm
Method 2: Via Windows 10 Control Panel
Step 1: Press Windows key + R, type mmsys.cpl, and press Enter
Step 2: In the Sound window, right-click your active playback device and select “Properties”
Step 3: Click the “Spatial sound” tab in the properties window
Step 4: Select “Windows Sonic for Headphones” from the dropdown list
Step 5: Click “Apply” then “OK” to save
How to Turn Off Spatial Sound in Windows
If you want to disable spatial sound and return to standard stereo audio, the process is just as quick as turning it on.
Step 1: Right-click the speaker icon in the system tray and select “Open Sound settings”
Step 2: Click on your active output device under the “Output” section
Step 3: Scroll down to find the “Spatial sound” dropdown
Step 4: Click the dropdown and select “Off”
Step 5: The change applies immediately — your audio will revert to standard stereo output
Alternatively, you can turn spatial sound off quickly through the Quick Settings panel (click the speaker icon in the taskbar → click the arrow next to the volume slider → set Spatial sound to “Off”).
What is Spatial Sound Technology?
Spatial sound is an advanced audio technology that creates a three-dimensional audio environment around the listener. Unlike traditional stereo sound that comes from left and right channels, spatial audio simulates sound coming from above, below, and all around you. This technology uses sophisticated algorithms to process audio signals and create the illusion that sounds are originating from specific locations in three-dimensional space.
Windows includes built-in spatial sound platforms like Windows Sonic for Headphones, as well as support for premium third-party options like Dolby Atmos for Headphones and DTS Sound Unbound. These technologies work by taking standard stereo or surround sound content and processing it to create a more immersive audio experience through regular headphones or speakers.
Available Spatial Sound Formats in Windows
Windows supports three spatial sound formats. Here is a quick comparison to help you choose the right one for your needs.
| Feature | Windows Sonic | Dolby Atmos | DTS Sound Unbound |
|---|---|---|---|
| Cost | Free (built-in) | Paid (free trial via Dolby Access app) | Paid (free trial via DTS app) |
| Installation | No install needed | Dolby Access from Microsoft Store | DTS Sound Unbound from Microsoft Store |
| Best For | Everyday use, gaming, movies | Dolby Atmos content, movies, music | Gaming, DTS:X content |
| Height Channels | No | Yes | Yes |
| Content Support | Stereo & surround | Stereo, surround & Atmos tracks | Stereo, surround & DTS:X tracks |
| Works on Windows 10 | Yes | Yes | Yes |
| Works on Windows 11 | Yes | Yes | Yes |
Windows Sonic for Headphones
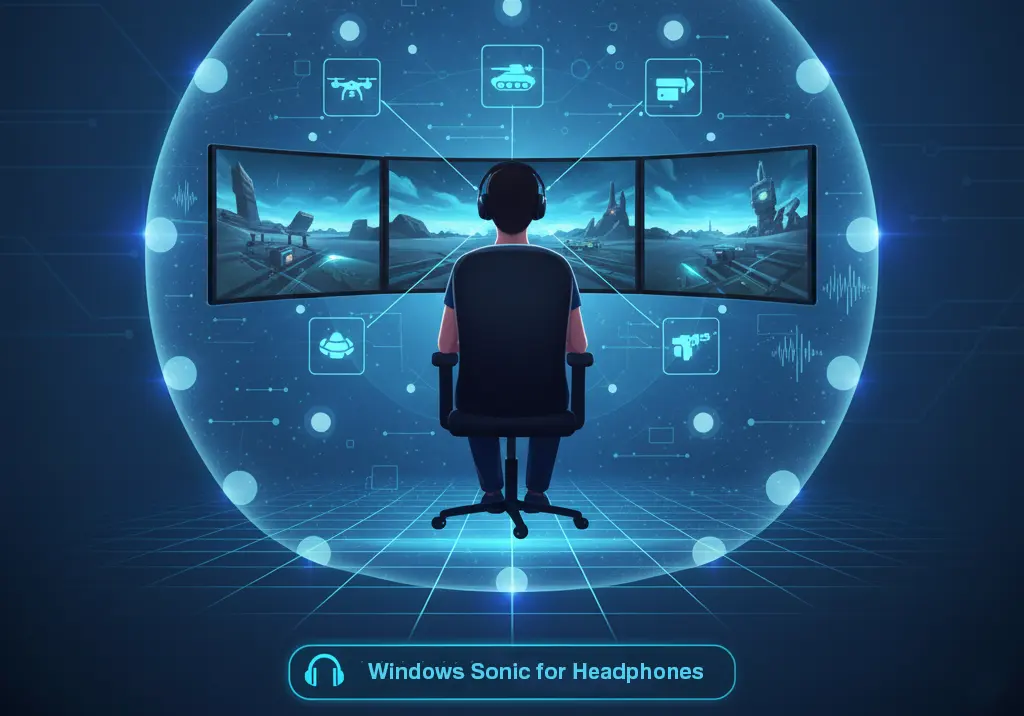
Windows Sonic for Headphones is Microsoft’s free spatial audio solution built directly into Windows 10 and Windows 11. This platform-agnostic technology works with any headphones and provides a solid introduction to spatial audio. Windows Sonic uses object-based audio processing to create virtual surround sound from stereo headphones.
The technology is particularly effective for gaming and movie content, offering clear directional audio cues without requiring additional software or subscriptions. Windows Sonic automatically processes both stereo and surround sound content, making it versatile for various audio sources.
Dolby Atmos for Headphones
Dolby Atmos for Headphones represents a premium spatial audio solution that requires the Dolby Access app from the Microsoft Store. While it offers a free trial period, full access requires a one-time purchase or subscription. Dolby Atmos provides more sophisticated audio processing and supports height channels for truly three-dimensional audio.
This format excels with content specifically mixed for Dolby Atmos, including many modern movies, games, and streaming services. The enhanced audio processing often delivers more precise positional accuracy and a wider soundstage compared to Windows Sonic.
DTS Sound Unbound
DTS Sound Unbound is another premium spatial sound option available through the Microsoft Store. It uses DTS:X technology to create an object-based 3D audio experience optimized especially for gaming. DTS Sound Unbound supports height audio channels and delivers strong positional accuracy when playing content encoded with DTS:X.
Like Dolby Atmos, DTS Sound Unbound requires downloading the DTS Sound Unbound app from the Microsoft Store and purchasing a license after the free trial period ends. It is a strong alternative to Dolby Atmos for gamers who prefer DTS audio processing.
Benefits of Enabling Spatial Sound
Activating spatial sound on your Windows device offers numerous advantages that enhance your overall audio experience. For gaming enthusiasts, spatial audio provides a significant competitive advantage by allowing you to pinpoint the exact location of footsteps, gunshots, and other audio cues. This enhanced directional awareness can improve your gameplay performance and immersion.
Movie and music lovers will appreciate how spatial sound creates a more cinematic experience. When watching films, you’ll notice how dialogue, sound effects, and background music seem to come from their appropriate locations on screen. For music listening, spatial audio can reveal new details in your favorite tracks, making instruments and vocals appear to occupy specific positions in the soundstage.
The technology also reduces listening fatigue during extended audio sessions. By creating a more natural sound environment, spatial audio feels less artificial than traditional headphone audio, making it more comfortable for long periods of use.
Key Benefits of Enabling Spatial Sound
- 🎮 Improved gaming awareness – Hear footsteps and actions with precise direction.
- 🎬 More immersive movies – Sounds match on-screen movement for a cinematic feel.
- 🎵 Richer music experience – Instruments and vocals feel more separated and detailed.
- 👂 Reduced listening fatigue – More natural sound for long listening sessions.
- 🎧 Better headphone performance – Creates surround sound without extra hardware.
The Productivity Hack: Spatial Audio for Video Calls
While spatial sound is a game-changer for gaming, it’s also a powerful tool for professional productivity. In the era of endless video meetings, “listener fatigue” is a real phenomenon caused by multiple voices being flattened into a single mono or stereo track. By enabling spatial sound, Windows helps your brain “place” different participants in a virtual space.
This subtle separation makes it significantly easier to distinguish between voices during cross-talk, reducing the cognitive load required to follow a conversation and helping you stay focused during long Microsoft Teams or Zoom sessions.
Content That Benefits from Spatial Audio
Gaming represents one of the most impactful applications for spatial sound technology. First-person shooters, battle royale games, and adventure titles with rich environmental audio all benefit significantly from spatial processing. The ability to accurately locate enemies, environmental hazards, and interactive elements through audio cues can transform your gaming experience.
Streaming services like Netflix, Disney+, and Amazon Prime Video offer increasing amounts of content with Dolby Atmos soundtracks that take full advantage of spatial audio capabilities. Many recent blockbuster movies and premium television series include spatial audio tracks designed to work with home theater systems and headphones alike.
Music streaming platforms are also embracing spatial audio formats. Services like Apple Music, Amazon Music HD, and Tidal offer growing catalogs of songs mixed specifically for spatial audio playback. These tracks can reveal new details and provide a more immersive listening experience when combined with proper spatial sound settings.
For music enthusiasts looking to discover new tracks that showcase spatial audio capabilities, exploring curated song collections can help you find content that truly demonstrates the technology’s potential.
Optimizing Your Spatial Sound Experience
To maximize the benefits of spatial sound, ensure you’re using quality headphones that complement the technology. While spatial audio works with any headphones, models with good frequency response and clear separation between drivers will provide better results. Open-back headphones often deliver superior spatial audio experiences due to their natural soundstage characteristics.
Consider exploring high-quality headphone options that are specifically designed to work well with spatial audio technologies. The right headphones can make a significant difference in how effectively you perceive the three-dimensional audio effects.
Room acoustics also play a role when using speakers instead of headphones. Minimize echo and reflection by positioning speakers appropriately and considering acoustic treatment for optimal spatial sound performance.
Troubleshooting Common Issues
If spatial sound doesn’t seem to be working after enabling it, first verify that your audio drivers are up to date. Outdated or incompatible drivers can prevent spatial audio from functioning correctly. Visit your computer manufacturer’s website or audio device manufacturer’s support page to download the latest drivers.
Some applications may override system spatial sound settings with their own audio processing. Check individual application audio settings to ensure they’re not conflicting with your Windows spatial sound configuration. Games often include their own spatial audio options that may need to be disabled to use Windows spatial sound effectively.
Audio enhancement software from third parties can also interfere with spatial sound processing. If you have audio enhancement utilities installed, try temporarily disabling them to see if spatial sound begins working correctly.
If the spatial sound option is greyed out or missing entirely, check that your audio device is set as the default playback device. Go to Sound settings → select your device → set it as default, then check if the spatial sound dropdown becomes available.
Hardware Considerations for Best Results
While spatial sound works with any audio output device, certain hardware configurations provide superior results. USB headphones with dedicated drivers often offer better spatial audio performance than analog connections through standard audio jacks. Gaming headsets with built-in spatial audio processing can complement Windows spatial sound features.
For users interested in upgrading their audio setup, researching advanced earbud options can provide insights into modern audio technology that pairs well with spatial sound features. High-quality audio equipment enhances the effectiveness of spatial audio processing.
Sound cards and external audio interfaces can also impact spatial sound quality. Devices with low latency and high-quality digital-to-analog converters ensure that spatial audio processing isn’t degraded during playback.
Frequently Asked Questions
How do I turn on spatial sound in Windows 11?
To turn on spatial sound in Windows 11, right-click the speaker icon in the taskbar and select “Open Sound settings.” Under Output, click on your active audio device, then scroll to the “Spatial sound” dropdown and select “Windows Sonic for Headphones.” The change applies immediately. You can also enable it via Start > Settings > System > Sound > select your output device > Device Properties > Spatial sound.
How do I enable spatial sound in Windows 10?
In Windows 10, right-click the speaker icon in the taskbar, go to Sound settings, click Device properties, then Additional device properties. In the Speaker Properties window, click the “Spatial sound” tab and choose “Windows Sonic for Headphones” from the dropdown. Click Apply and OK to save.
Does spatial sound work with all headphones?
Yes, spatial sound technology works with any headphones, including budget models and premium options. However, headphones with better frequency response and driver separation will provide more noticeable spatial audio effects.
Is Windows Sonic as good as Dolby Atmos for Headphones?
Windows Sonic provides excellent spatial audio for most users and is completely free. Dolby Atmos offers more advanced processing, height channel support, and better results with content specifically mixed for Atmos, but requires a purchase after the trial period. Both deliver significant improvements over standard stereo audio.
What is DTS Sound Unbound and how is it different from Dolby Atmos?
DTS Sound Unbound is a premium spatial audio format for Windows that uses DTS:X object-based audio processing, similar to how Dolby Atmos works. Both support height channels and require a paid app from the Microsoft Store. DTS Sound Unbound tends to be preferred by gamers familiar with the DTS ecosystem, while Dolby Atmos has wider support across streaming services like Netflix and Disney+.
Can I use spatial sound with speakers instead of headphones?
While spatial sound is primarily designed for headphones, it can work with speakers. However, the effects are less pronounced due to room acoustics and speaker positioning. Headphones provide the most noticeable spatial audio experience.
Why is the spatial sound option greyed out in Windows?
The spatial sound option may appear greyed out if your audio device is not set as the default playback device, if audio drivers are outdated, or if you are connected via Bluetooth with a codec that doesn’t support spatial audio processing. Try setting the device as default, updating your audio drivers, and reconnecting the device to resolve this.
Will spatial sound drain my laptop battery faster?
Spatial sound processing requires minimal additional system resources, so battery impact is negligible. The audio processing is handled efficiently by modern processors without significant power consumption increases.
Why doesn’t spatial sound work with some applications?
Some applications bypass Windows audio processing or include their own spatial audio features that conflict with system settings. Check individual application audio settings and disable any built-in spatial audio options to use Windows spatial sound instead. This is particularly common with games like Call of Duty, Fortnite, and other titles that ship with proprietary audio engines.