
Adjusting volume balance settings on Windows 10 and Windows 11 lets you fix uneven audio between the left and right channels — no third-party software needed. Whether one ear sounds louder than the other, your speakers are mismatched, or you have a hearing difference, both Windows 10 and Windows 11 give you built-in ways to correct the left and right audio balance. To adjust it quickly on Windows 11, press Windows + I to open Settings, go to System > Sound, click your output device, then expand the Volume row to reveal the Left and Right channel sliders — both set to 100% by default. Here is every method for both operating systems, step by step — including what to do when the Balance button is missing or greyed out on Bluetooth devices.
Understanding Volume Balance Settings in Windows 10 and 11
Volume balance settings in Windows 10 and Windows 11 let you control how sound splits between the left and right audio channels, helping you fine-tune stereo output for a better listening experience. These built-in controls let you shift audio to one side to correct imbalances and improve clarity. By default, both the Left channel and Right channel are set to 100%, which means equal volume output from both sides.
Common problems volume balance can fix:
- Sound louder in the left or right ear
- Audio not centered when using headphones or earbuds
- Uneven volume caused by faulty speakers or cables
- Stereo imbalance during music playback or video calls
- Hearing differences between ears
- Balance button missing or greyed out on Bluetooth headphones
Adjusting the balance ensures audio sounds clear, centered, and comfortable across all devices.
⚠ Bluetooth Note: If the Absolute Volume feature is enabled on your Windows 10 or Windows 11 PC, it may prevent you from separately changing a Bluetooth device’s left and right volume levels using the Control Panel Balance button. If that happens, use the Settings app method instead — or follow the Registry fix in the troubleshooting section below.
How to Adjust Audio Balance on Windows 11
Windows 11 offers three methods to adjust audio balance. The Settings app method is the most up-to-date and the fastest for most users. Use the Control Panel methods when you need precise numeric control or when working on older Windows 11 builds.
Method 1: Via Windows 11 Settings App (Latest Method)
This is the most up-to-date way to adjust left and right audio balance on Windows 11 — no Control Panel needed. The steps below reflect the current Windows 11 interface as of 2026. This method also works reliably for Bluetooth headphones where the Control Panel Balance button may be blocked by Absolute Volume.
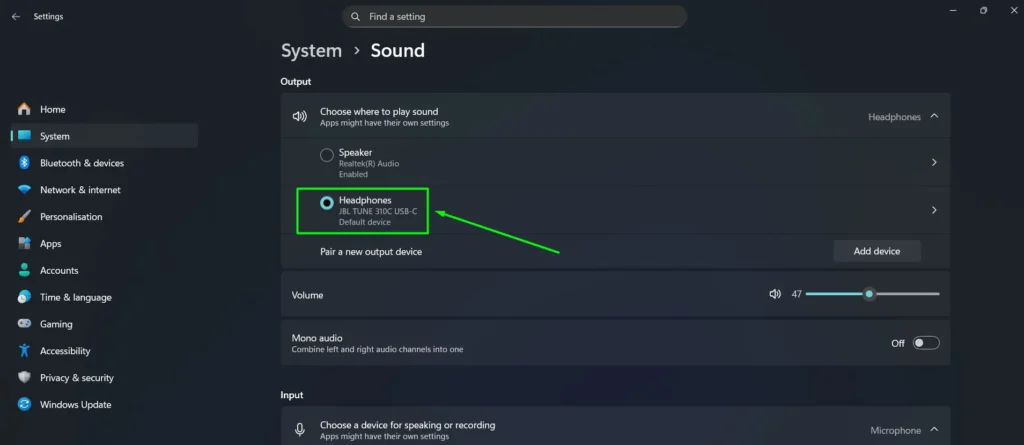
Step 1: Press Windows + I on the keyboard to open Settings. Click System on the left sidebar, then click Sound.

Step 2: Under the Output section, find the active output device — such as Speakers or Headphones. Click the device name to open its Properties page.
Alternative path: On some Windows 11 builds, scroll down to Advanced and click All sound devices, then select your output device from the list. Both paths lead to the same device Properties page.
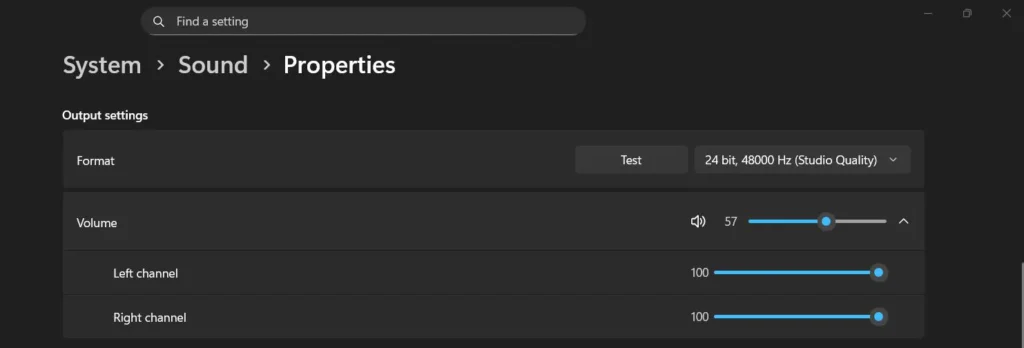
Step 3: Click the arrow on the Volume row to expand it. This reveals two separate sliders underneath — Left channel and Right channel.
Step 4: Drag the Left channel or Right channel slider to adjust the balance. Both sliders default to 100%. Lowering one side shifts audio toward the other. Changes apply instantly — no need to click OK or restart.
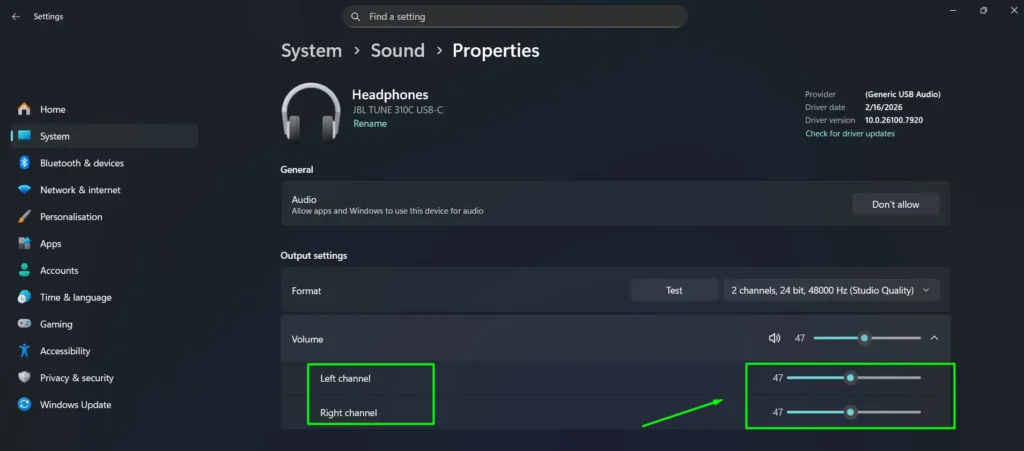
Pro-Tip: The Left and Right channel sliders only appear after clicking the dropdown arrow on the Volume row. If the sliders are not visible, make sure the Volume row is expanded. This is the most common reason users cannot find the balance controls in Windows 11 Settings. Once a slider is selected, use the left and right arrow keys on your keyboard for precise 1% adjustments.
Method 2: Via System Tray
Step 1: Right-click the speaker icon in the system tray at the bottom-right corner of the screen.
Step 2: Click Sound settings.
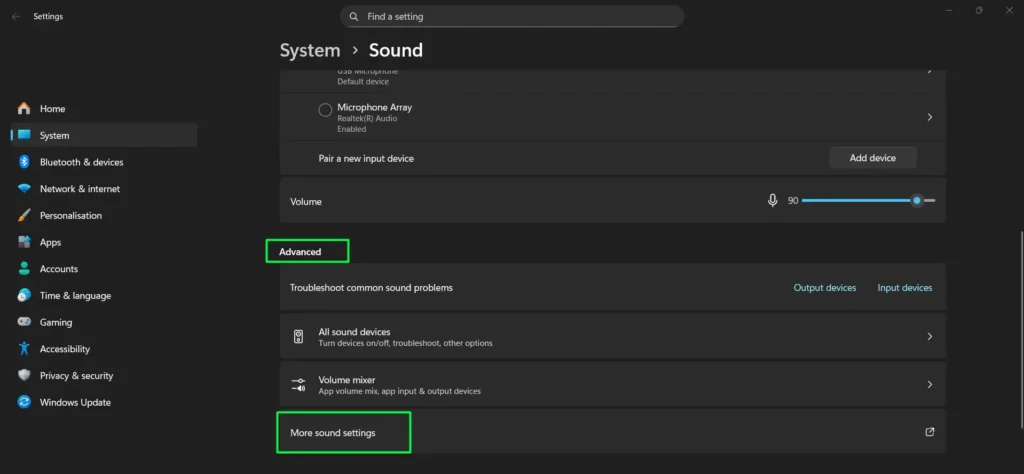
Step 3: Scroll down the Sound settings page and select More Sound settings under the Advanced section.
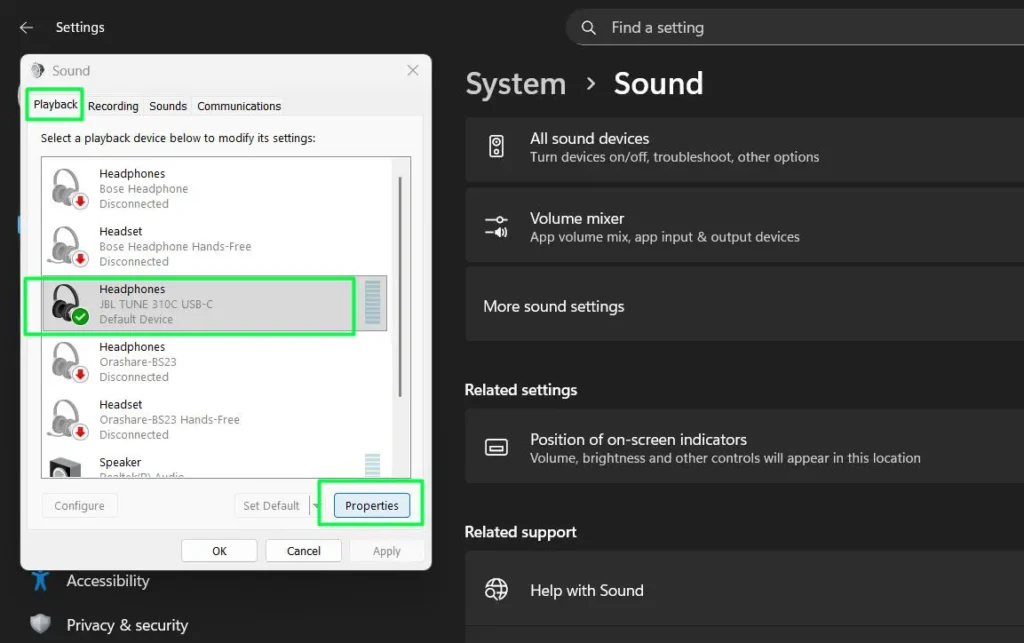
Step 4: Click the Playback tab, then click the playback device (such as Speakers or Headphones) to select it.
Step 5: Click Properties.
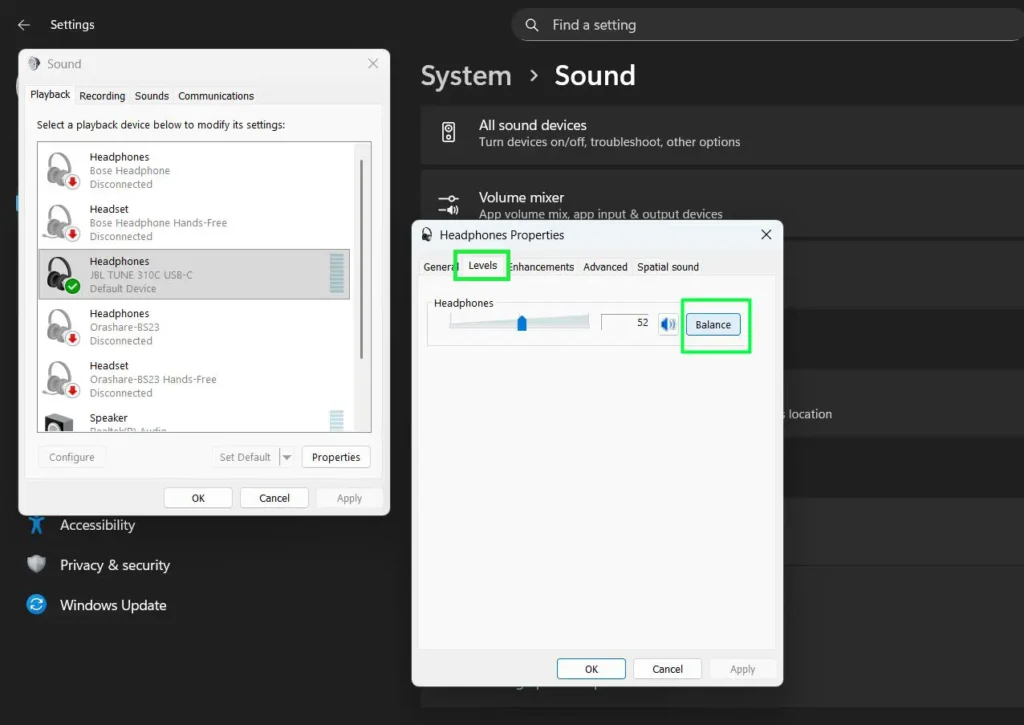
Step 6: Go to the Levels tab.
Step 7: Click the Balance button.
Step 8: Adjust the Left (L) and Right (R) sliders to set the preferred audio balance. Both default to 100. Lowering one side shifts audio toward the other.
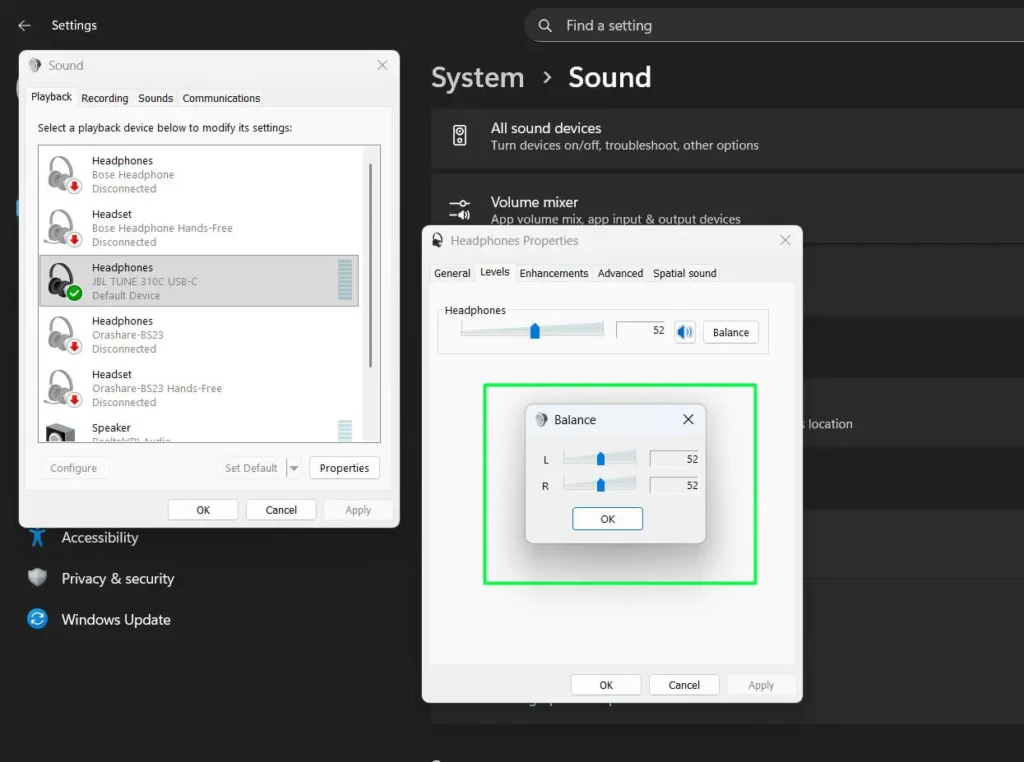
Step 9: Click OK to save, then click OK again on the Properties window to close it.
Method 3: Via the Run Dialog
This is the fastest way to reach the Sound Control Panel directly — skipping all menu navigation. This method works on both Windows 11 and Windows 10.
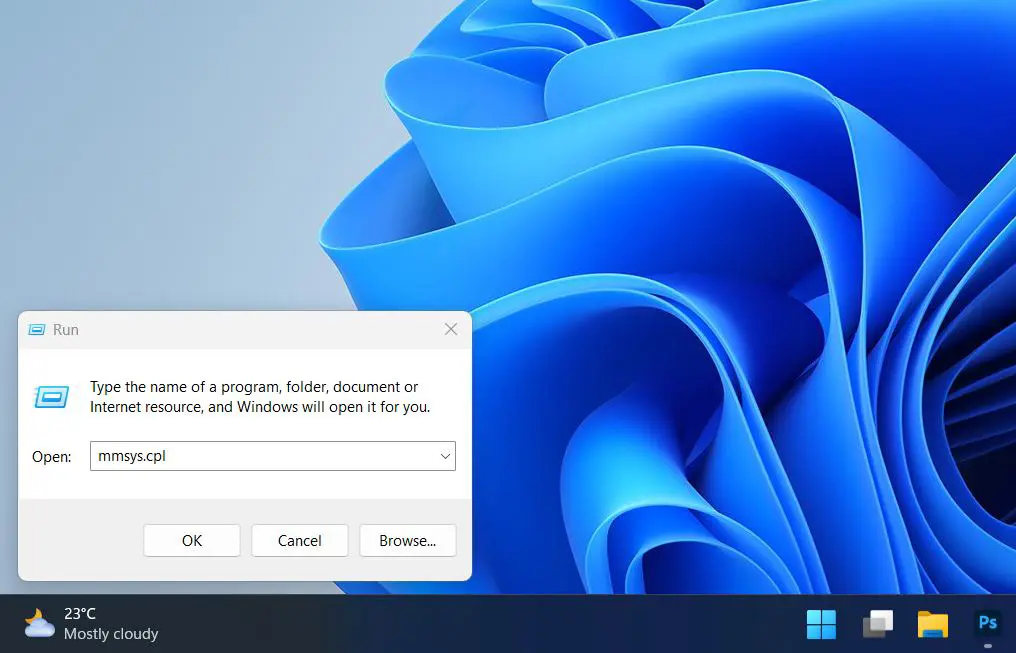
Step 1: Press Windows + R to open the Run dialog box.
Step 2: Type mmsys.cpl and press Enter to open the Sound Control Panel directly.
Step 3: Click the Playback tab, select your playback device, then click Properties.
Step 4: Open the Levels tab and click Balance.
Step 5: Adjust the left and right audio levels as needed. Both default to 100. Click OK to save, then click OK again to close Properties.
How to Adjust Audio Balance on Windows 10
The steps below apply specifically to Windows 10. Both the Settings app and Control Panel methods are available — the interface differs slightly from Windows 11 but the process is the same. The mmsys.cpl Run dialog method shown above in Method 3 also works identically on Windows 10.
Method 1: Via Windows 10 Settings App
Step 1: Press Windows + I to open Settings. Click System, then click Sound on the left sidebar.
Step 2: Under the Output section, select your playback device from the Choose your output device drop-down menu, then click Device properties.
Step 3: Adjust the Left and Right audio balance sliders until the audio sounds even. Both are set to 100 by default.
Step 4: Close Settings. Changes apply immediately — no restart needed.
Method 2: Via Windows 10 Control Panel
Step 1: Open the Control Panel. Set the view to Large icons and click Sound. Alternatively, press Windows + R, type mmsys.cpl, and press Enter to open the Sound window directly.
Step 2: Click the Playback tab. Double-click the output device you want to adjust — such as Speakers or Headphones — to open its Properties.
Step 3: Go to the Levels tab and click the Balance button.
Step 4: Adjust the Left (L) and Right (R) sliders. Both default to 100. Click OK to confirm.
Step 5: Click OK on the device Properties window, then click OK again on the Sound window to close it.
Why You Might Need to Adjust Volume Balance
Several situations make adjusting volume balance necessary. Knowing which applies helps pinpoint the right fix faster.
Hearing Differences Between Ears
Many people experience some degree of hearing variation between their left and right ears. Age, loud sound exposure, or medical conditions can all cause this. When one ear hears at a lower volume, shifting the balance compensates for the difference and creates a more symmetrical listening experience.
Headphone or Speaker Imbalances
Audio equipment does not always produce perfectly matched sound from both channels. Manufacturing variations, wear, or damage can make one side play louder than the other. Before replacing the equipment, try adjusting the balance settings. This often resolves the issue and extends the life of the audio gear.
Professional Audio Work
Audio engineers and music producers regularly adjust balance settings as part of their workflow. Panning to different positions in the stereo field helps identify masking issues and ensures proper mixing. The balance control in Windows 10 and Windows 11 provides a quick system-level way to check how audio translates across the stereo image.
Accessibility Needs
For users with partial hearing loss or deafness in one ear, balance controls serve as a key accessibility feature. Shifting all audio to the stronger ear means stereo content remains fully audible. Windows 11 also includes a dedicated Mono Audio toggle under Settings > Accessibility > Audio for users who prefer a single combined channel.
Related Guides
Optimizing audio on Windows goes beyond balance settings. These guides cover other common audio issues:
- Troubleshooting Headphone Detection — Fix common headphone detection problems on Windows 11.
- Re-pair Bluetooth Earbuds for Stereo Sound on Windows — Restore stereo sound after Bluetooth pairing issues.
- Toggle Bluetooth Settings Easily on Windows — Quick methods to manage Bluetooth audio connections.
Best Practices for Adjusting Volume Balance Settings
Getting the best results from balance adjustments takes more than just moving a slider. These tips make the process faster and more accurate.
Start with Centered Balance
Always begin with both channels at the default of 100%. This gives equal volume from both sides and a reliable baseline for adjustments. Listen to familiar audio at this setting first. Many perceived imbalances come from the audio source itself, not the system settings.
Make Small Incremental Adjustments
Move the balance slider slightly in one direction, then listen for a moment before moving again. When using the Settings app on Windows 11, click the slider first, then use the arrow keys for precise 1% adjustments. Small changes are easier to fine-tune than large shifts that overshoot the target.
Use Familiar Audio Content for Testing
Test balance adjustments using music or videos you already know well. Known content makes it easier to detect whether the balance sounds correct. Choose material with clear stereo separation — distinct left and right channel information gives the most accurate assessment.
Consider the Listening Environment
Room acoustics, speaker placement, and head position can all create the impression of imbalanced sound. Before changing any settings, try repositioning speakers or adjusting your sitting position. Environmental factors often explain perceived imbalances that do not actually exist in the audio output.
Test Both Channels Individually
Shift the balance completely to one side, then the other, to verify both channels produce sound. If one channel sounds distorted or silent even at full balance, a hardware issue is more likely than a settings problem. Test with a different device to confirm.
Common Volume Balance Issues and Solutions
One Side Completely Silent
First check whether the balance slider has accidentally shifted all the way to one side. If the balance is centered but one channel still produces no sound, the issue likely involves damaged cables, faulty drivers, or speaker connections. Try a different audio source and a different playback device to isolate the problem.
Balance Button Missing or Greyed Out on Bluetooth Devices
This is the most common Bluetooth-specific issue with balance controls in Windows 10 and Windows 11. When Absolute Volume is enabled, Windows treats the Bluetooth device as a single unified volume source, which disables the separate Left and Right channel sliders in the Control Panel Balance dialog.
Fix 1 — Use the Settings app instead: The Left and Right channel sliders in Settings > System > Sound > [Device] > Volume are not affected by Absolute Volume and remain fully accessible. This is the recommended approach for all Bluetooth headphones and speakers on both Windows 10 and Windows 11.
Fix 2 — Disable Absolute Volume via Registry Editor: If you specifically need the Control Panel Balance button to work for a Bluetooth device, Absolute Volume can be turned off through the Registry.
- Press Windows + R, type regedit, and press Enter.
- Navigate to:
HKEY_LOCAL_MACHINE\SYSTEM\ControlSet001\Control\Bluetooth\Audio\AVRCP\CT - In the right pane, double-click DisableAbsoluteVolume.
- Change the value from 0 to 1 and click OK.
- Restart your PC and reconnect the Bluetooth device.
- The Balance button in Control Panel should now be accessible. To revert, set the value back to 0.
Important: Always back up the Registry before editing it. In Registry Editor, go to File > Export and save a copy before making any changes.
Inconsistent Balance Across Different Apps
Some applications include their own internal balance or pan controls that work independently of Windows system settings. Media players, DAWs, and streaming services may override system-level balance. Check audio settings within specific apps when balance shifts between programs.
Balance Settings Not Saving
Settings that revert after a restart usually indicate a software bug or permissions issue. Make sure Windows is fully updated. Some users find that using the Settings app method saves balance changes more reliably than the Control Panel route on both Windows 10 and Windows 11.
Balance Sounds Different with Different Audio Sources
Some recordings place instruments or vocals predominantly in one channel. This becomes more apparent with adjusted balance settings. That reflects the original mix rather than a problem with Windows. No settings change will fix a mono or heavily panned audio source — the issue exists in the file itself.
Advanced Balance Adjustment Techniques
Using Audio Software for Precise Control
Programs like Audacity, VLC Media Player, and Foobar2000 offer precise balance controls with numerical values and preset saving. These tools suit audio professionals and enthusiasts who need repeatable, exact adjustments beyond what Windows 10 and Windows 11 system settings provide.
Creating Balance Profiles for Different Situations
Different activities often benefit from different balance settings. Music listening may need a centered balance. Video calls may need slight adjustment to compensate for microphone placement. Third-party audio apps on Windows let users save multiple profiles, making it easy to switch configurations quickly.
Combining Balance with Other Audio Settings
Balance adjustments work alongside other Windows audio settings like equalizer controls and sound enhancements. Combining a slight balance shift with EQ modifications can compensate for both volume and frequency response differences between channels. Experiment with combinations to find the best overall result.
Accessibility Features Related to Volume Balance
Mono Audio Option
Windows 11 includes a Mono Audio mode that combines left and right channels into a single signal sent to both ears. Go to Settings > Accessibility > Audio and toggle on Mono audio. This benefits users who are deaf or have significant hearing loss in one ear. Mono audio works independently or alongside balance adjustments for maximum flexibility.
Audio Ducking and Sound Recognition
Windows includes accessibility features that automatically adjust volume levels based on context. Audio ducking reduces background audio when notifications play. These features work alongside balance settings to create a more complete accessible audio experience.
Hearing Aid Compatibility
Windows 11 offers enhanced compatibility with hearing aids and assistive listening devices. Check Settings > Accessibility > Audio for hearing aid-specific options that complement standard balance controls.
Maintaining Optimal Balance Over Time
Regular Hearing Checks
Hearing changes naturally with age and noise exposure. If audio balance starts feeling off after previously feeling correct, it may reflect a change in hearing rather than a settings issue. Professional audiologists can provide specific balance recommendations based on a current hearing profile.
Equipment Maintenance and Replacement
Audio equipment degrades over time. Clean headphones and speakers regularly, check connections for corrosion or damage, and replace gear when needed. Sometimes an apparent balance problem is actually a sign that audio hardware needs attention.
Windows Updates and Settings Verification
Windows 10 and Windows 11 updates can occasionally reset audio settings including balance controls. After any major update, verify that balance settings remain correctly configured. New updates may also introduce improved balance controls worth exploring.
Frequently Asked Questions
What is the fastest way to adjust audio balance on Windows 11?
The fastest method uses the Settings app. Press Windows + I to open Settings, go to System, then Sound, and click the output device. Click the arrow on the Volume row to expand it, then adjust the Left channel and Right channel sliders. Both sliders default to 100%. No Control Panel navigation needed.
How do I adjust audio balance on Windows 10?
On Windows 10, press Windows + I to open Settings, go to System then Sound, select your output device from the Choose your output device drop-down, and click Device properties. Adjust the Left and Right sliders — both default to 100. Alternatively, press Windows + R, type mmsys.cpl, and press Enter. Select your device on the Playback tab, click Properties, go to the Levels tab, and click Balance to adjust the left and right channels independently.
Does the balance setting work the same on Windows 10 and Windows 11?
The Control Panel Balance button works identically on both Windows 10 and Windows 11. The Settings app method differs slightly — Windows 10 shows Left and Right sliders directly on the Device properties page, while Windows 11 requires expanding the Volume row to reveal the sliders. The end result and default values are the same on both operating systems.
Where are the Left and Right channel sliders in Windows 11?
The Left and Right channel sliders are inside the device Properties page under Output settings. After clicking the output device in Settings > System > Sound, click the dropdown arrow on the Volume row — the Left channel and Right channel sliders appear underneath once expanded. They are hidden by default and only show after clicking that arrow.
What is the default volume balance level in Windows 10 and 11?
The default volume balance level for both the Left channel and Right channel is 100% on both Windows 10 and Windows 11. This means equal audio output from both sides. If your balance has drifted from center, drag both sliders back to 100% to restore the default setting.
Why is the Balance button missing or greyed out on my Bluetooth headphones?
The Balance button in Control Panel is blocked when the Absolute Volume feature is active on Windows 10 or Windows 11. Absolute Volume treats Bluetooth devices as a unified volume source, disabling separate L/R controls. The fix is to use the Settings app instead — the Left and Right channel sliders there work regardless of Absolute Volume. Alternatively, Absolute Volume can be disabled through the Registry Editor as described in the troubleshooting section above.
What is the difference between volume balance and pan controls?
Volume balance adjusts the relative loudness between left and right channels while maintaining the original stereo image. Pan controls move a mono signal to different positions in the stereo field. Balance is a system-level playback control in Windows. Panning typically happens during audio mixing and production.
Can adjusting volume balance damage my headphones or speakers?
No. Balance controls only change the distribution of audio between channels without increasing total power output. Listening at very high volume at any balance setting can damage hearing and equipment — so keep overall volume at a safe level regardless of balance configuration.
Why does my balance setting keep resetting to center?
Balance settings in Windows 10 and Windows 11 may reset due to system updates, app-specific overrides, or OS bugs. Keep Windows fully updated. Try saving the balance using the Settings app method, as it tends to retain changes more reliably than the Control Panel route.
Should I adjust balance in Windows settings or in individual apps?
System-level balance adjustment affects all audio output consistently and is the best starting point on both Windows 10 and Windows 11. App-specific controls work better when only one program needs adjustment without affecting others. Many users set a system baseline and fine-tune within individual apps as needed.
How do I know if I need to adjust my volume balance?
Listen to familiar, well-produced stereo content with both channels at the default 100%. If audio sounds louder on one side, instruments seem too far left or right, or one ear consistently sounds quieter, a balance adjustment is likely needed. Start with a small shift and evaluate before making further changes.
Does adjusting volume balance affect audio quality?
Properly adjusted balance does not degrade audio quality. The adjustment changes relative volume between channels without introducing distortion or compression. For users with hearing differences or equipment imbalances, a corrected balance often improves perceived audio quality by creating a more natural listening experience.
Can I adjust balance on Bluetooth headphones connected to Windows?
Yes, on both Windows 10 and Windows 11. Use the Settings app method for Bluetooth headphones — the Left and Right channel sliders there are not affected by Absolute Volume. The balance adjustment happens at the system level before audio transmits via Bluetooth. Some Bluetooth headphones also include companion apps with their own balance controls for an additional layer of adjustment.
What should I do if one headphone is much quieter than the other?
Start by cleaning the headphones — earwax and debris often cause apparent volume imbalances. Test them on a different device to determine whether the problem follows the headphones or stays on your Windows PC. If one side is quieter across all devices, the driver may need professional repair. If the issue only appears on your Windows device, check and adjust the balance settings and verify the headphone connection is clean and secure.