Your mic was working fine — then suddenly it wasn’t. Maybe it stopped after a Windows update, maybe an app started throwing “access denied” errors out of nowhere. Either way, you’re in the right place.
This guide skips the basics and goes straight into diagnosing what’s actually broken — permission conflicts, registry mismatches, antivirus interference, driver issues, and exclusive mode blocks. Work through each section in order and you’ll find the culprit fast.
Understanding Microphone Privacy Conflicts in Windows 11 and 10
Windows has multiple independent permission layers controlling microphone access. One layer can be completely broken while everything else looks fine — which is exactly why this is so frustrating to diagnose.
Here’s what can go wrong at each layer: the master system toggle can get disabled by a Windows update. Individual app permissions can reset. Registry values can conflict with what the Settings panel shows. Group Policy can lock the whole thing down. Antivirus suites can intercept mic access before Windows even gets involved. And a single app can grab exclusive control of the device, locking everyone else out.
Most failures fall into three buckets: permissions that got disabled without you touching anything, settings that won’t save, or apps that claim they’re blocked even though Windows shows access as allowed. Knowing which bucket applies cuts the diagnosis time in half.
Method 1: Run the Windows Audio Troubleshooter First
Before going manual, run the built-in troubleshooter. It catches the most common permission and driver issues automatically and takes under two minutes. Skip it if you’ve already done this.
- Step 1: Press Windows + I to open Settings.
- Step 2: Go to System > Troubleshoot > Other troubleshooters.
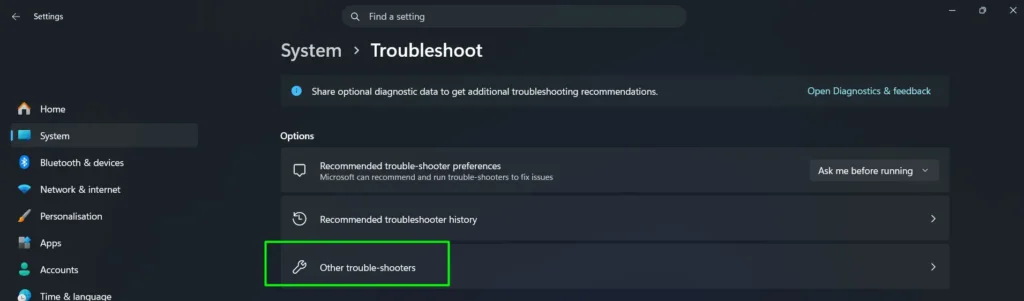
- Step 3: Find Audio and click Run.
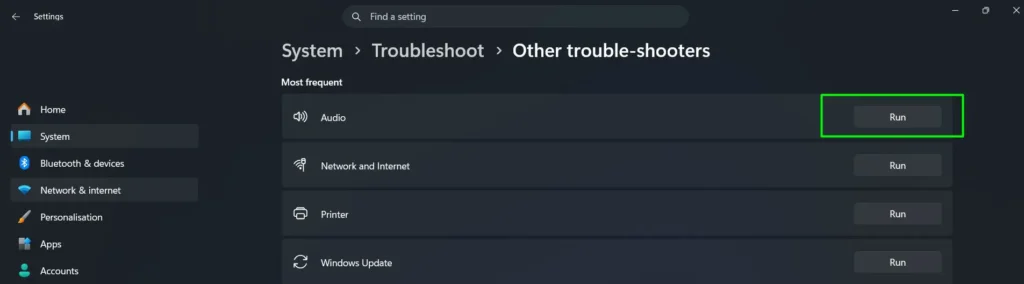
- Step 4: Follow the on-screen prompts. Apply any fixes it suggests.
- Step 5: Restart your PC after the troubleshooter finishes, then test your microphone.
If the troubleshooter finds nothing or the problem comes back, move to the sections below. The built-in tool doesn’t catch registry conflicts, Group Policy blocks, or antivirus interference — those need manual diagnosis.
Method 2: Diagnosing System-Wide Privacy Blocks
This is the master switch. If it’s off, nothing works — no matter what individual app permissions say. Check this first.
- Step 1: Press Windows + I to open Settings.
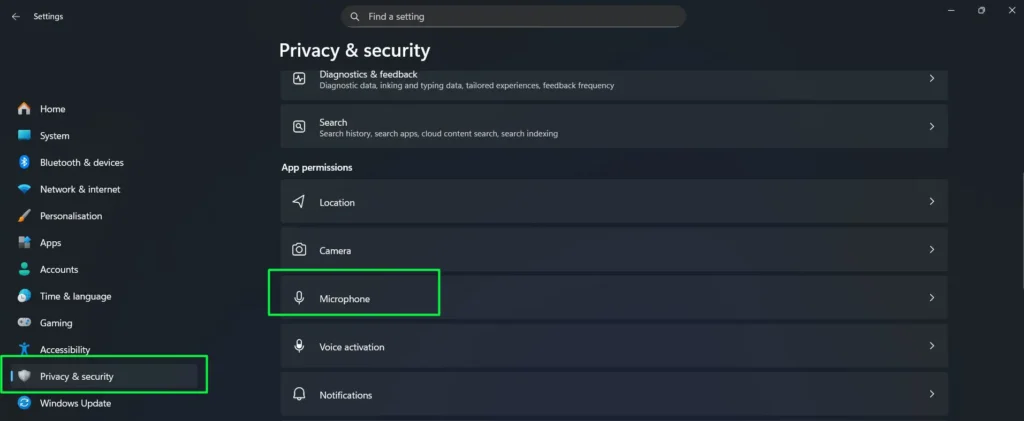
- Step 2: Click Privacy & security from the left sidebar.
- Step 3: Under the App permissions section, click Microphone.
- Step 4: Check the Microphone access toggle at the top. It must be On.
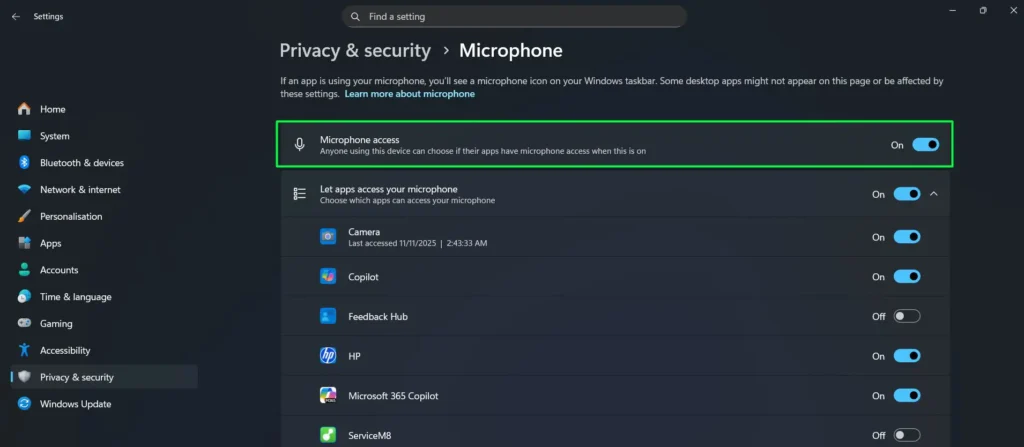
- Step 5: Toggle it on if it’s off. If it throws an error message, write down the exact wording — that tells you whether it’s a policy block or a registry issue.
- Step 6: Close Settings, reopen it, and go back to this page. Confirm the toggle is still on.
A toggle that snaps back off immediately means Group Policy is overriding it. A grayed-out toggle means administrator restrictions are in play. Both scenarios are covered further below.
Pro Tip: If the toggle looks enabled but apps still get denied, the registry value may be conflicting with what the GUI shows. That’s the “Allow vs Deny” mismatch — jump to the registry section below.
Method 3: Investigating App-Specific Permission Failures
If the system toggle is on but only certain apps are failing, the problem is at the per-app permission level. Here’s how to check.
- Step 1: Open Settings and go to Privacy & security > Microphone.
- Step 2: Scroll down to “Let apps access your microphone” and confirm it’s toggled on. This is a separate toggle from the master one above it.
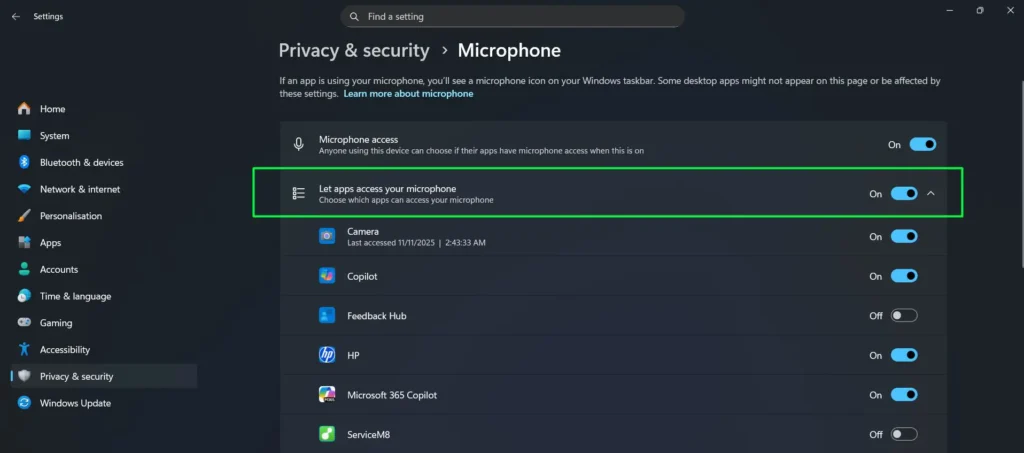
- Step 3: Look through the app list below it for the app that’s failing.
- Step 4: Check if the app even appears in the list. If it doesn’t, it either hasn’t requested access yet or it’s a desktop app — not a Store app.
- Step 5: If the app is listed, check whether its individual toggle is on or off. Turn it on if it’s off.
- Step 6: Launch the app and try using the mic again. This triggers a fresh permission check.
Apps like Zoom, Discord, and Teams are frequent offenders after major Windows updates — the update resets their Store permissions to off. Re-enabling the individual toggle almost always fixes it for these apps. For a full walkthrough on setting permissions per app, see this guide on enabling microphone for specific apps.
Method 4: Troubleshooting Desktop Application Access Conflicts
Desktop apps like OBS, Adobe Audition, and the Discord desktop client don’t appear in the individual app list — they share one single toggle. If that toggle is off, all of them lose access at once.
- Step 1: Go to Settings > Privacy & security > Microphone.
- Step 2: Scroll down to “Let desktop apps access your microphone.”
- Step 3: Make sure this toggle is on.
- Step 4: Toggle it off, wait 5 seconds, then toggle it back on to force a reset.
- Step 5: Watch for any error messages during the toggle — they indicate policy or registry interference.
- Step 6: Close all desktop apps that use the mic.
- Step 7: Relaunch them and test.
If one desktop app fails but others are fine, the problem is inside that specific app rather than Windows. Check its internal audio settings for its own device selection and permission controls.
Method 5: Check Exclusive Mode and Clear App Permission Cache
This is a commonly missed culprit. If one app grabs exclusive control of the microphone, every other app gets blocked — even though Windows privacy settings look perfectly fine. Also, apps like Teams and Zoom cache their own permission state independently of Windows, so even after you fix Windows settings, the app might still think it’s blocked until you clear that cache.
To fix exclusive mode:
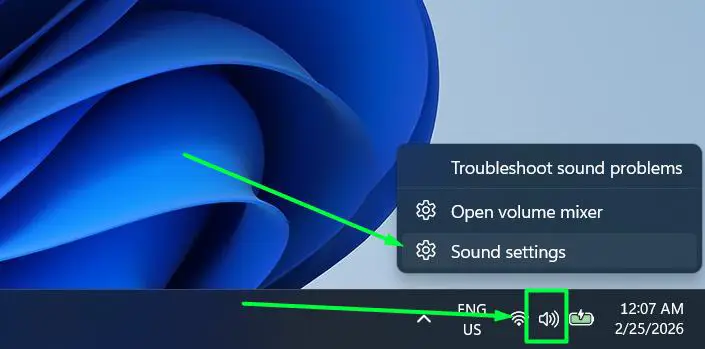
- Step 1: Right-click the speaker icon in the system tray and select Sound settings.
- Step 2: Scroll down to Input and click on your microphone to open its properties.
- Step 3: Scroll to the bottom and click More sound settings.
- Step 4: In the Sound window, go to the Recording tab, right-click your mic, and select Properties.
- Step 5: Click the Advanced tab.
- Step 6: Uncheck “Allow applications to take exclusive control of this device.”
- Step 7: Click Apply then OK.
To clear app permission cache for Store apps:
- Step 1: Go to Settings > Apps > Installed apps.
- Step 2: Find the problematic app, click the three-dot menu, and select Advanced options.
- Step 3: Click Reset. This clears all cached permissions and forces a fresh permission request on next launch.
For desktop apps that cache permissions in AppData folders (some do even after a standard uninstall), do a clean uninstall, manually delete the app’s folder from C:\Users\[YourName]\AppData\Roaming, then reinstall.
Method 6: Verifying Microphone Device Settings
Privacy settings can all be correct but the mic still fails if the wrong input device is selected, or if the device is disabled at the hardware level. This section rules that out.
- Step 1: Right-click the speaker icon in the system tray.
- Step 2: Select Sound settings.
- Step 3: Scroll down to the Input section.
- Step 4: Click the dropdown under “Choose your input device” and confirm the right mic is selected.
- Step 5: Select the correct microphone.
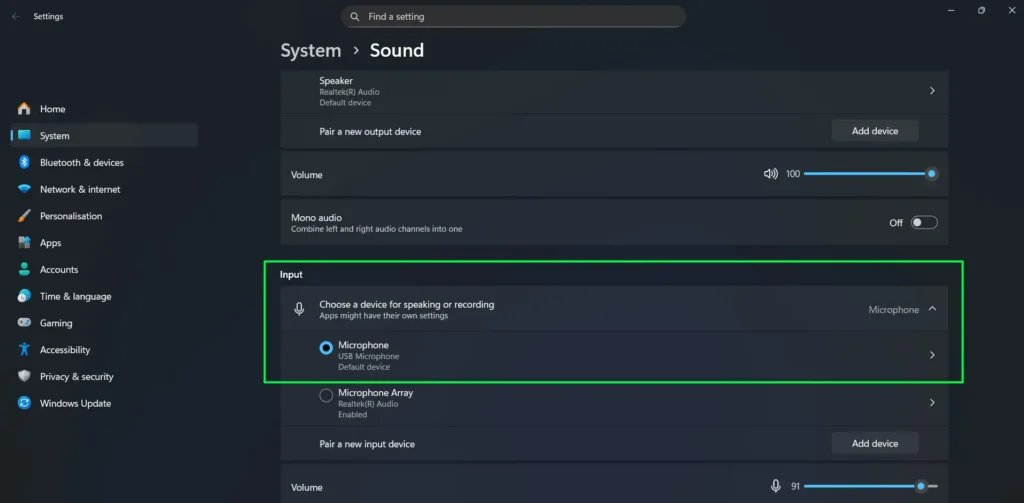
- Step 6: Click on the selected microphone to open its properties.
- Step 7: Find the Microphone test section and click “Start test.”
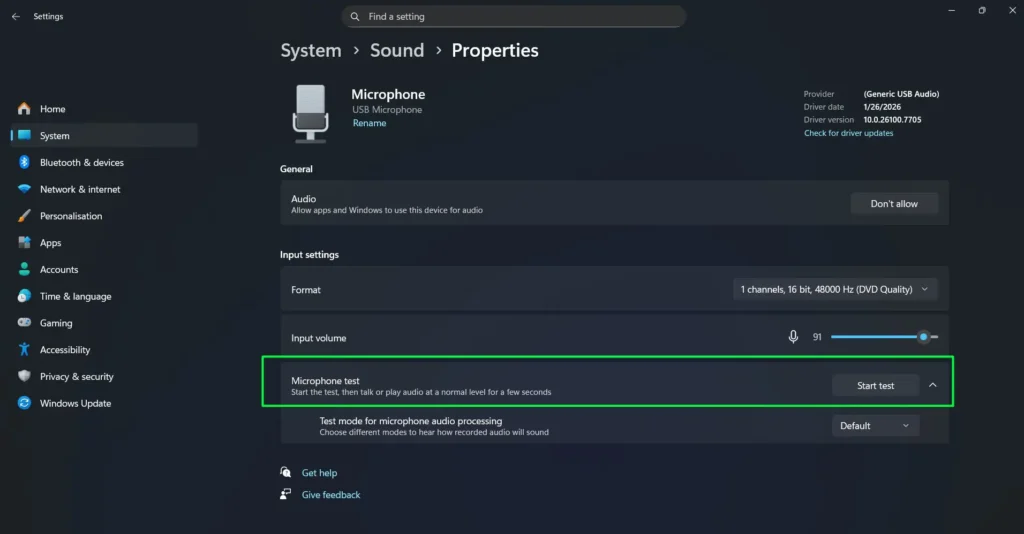
- Step 8: Speak at normal volume for a few seconds. The input bar should move.
Pro Tip: USB headsets, built-in mics, and external mics all show as separate devices. If you have multiple listed, test each one while speaking to find which is actually active.
Method 7: Check Microphone Driver in Device Manager
A corrupt or missing driver can mimic privacy block symptoms perfectly — the mic just doesn’t respond, and no error explains why. This is especially common after Windows feature updates, which sometimes replace working audio drivers with generic ones.
- Step 1: Press Windows + X and select Device Manager.
- Step 2: Expand Audio inputs and outputs.
- Step 3: Look for your microphone in the list. If you see a yellow warning triangle on it, the driver is broken.
- Step 4: Right-click the microphone and select Update driver.
- Step 5: Choose “Search automatically for drivers” and let Windows find an update.
- Step 6: If that finds nothing, right-click again and select Uninstall device. Check the box to delete the driver if that option appears.
- Step 7: Click Action > Scan for hardware changes at the top of Device Manager. Windows will reinstall the driver fresh.
- Step 8: Restart your PC and test the mic again.
If Windows keeps installing a generic driver and your mic still doesn’t work properly, go to your PC manufacturer’s website (or your sound card manufacturer’s site) and download the latest audio driver directly. Manufacturer drivers are almost always more stable than what Windows Update pulls in.
Method 8: Resolving Registry-Based Permission Conflicts
This is for when the Settings toggle looks fine but apps are still getting denied. A registry value conflict means Windows is showing you one thing but enforcing another at the system level. This takes a few extra steps but it’s a reliable fix.
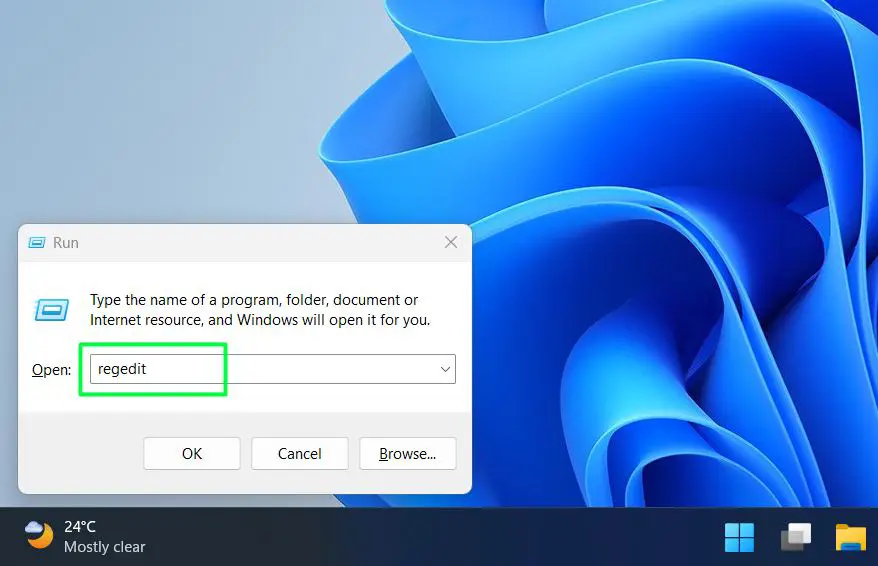
- Step 1: Press Windows + R, type regedit, and press Enter.
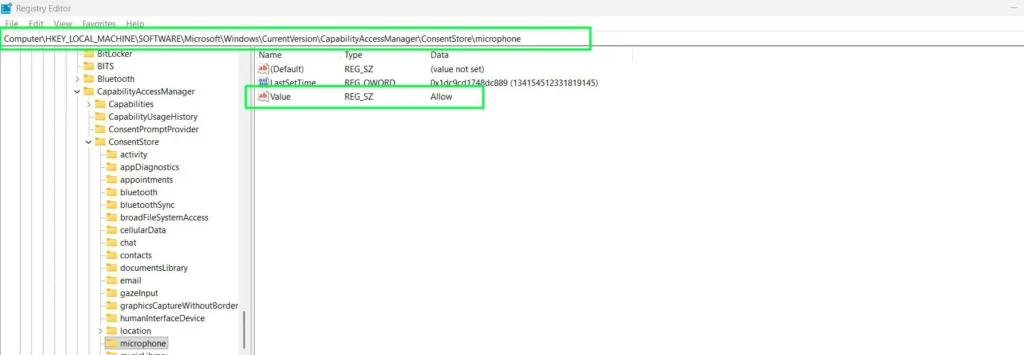
- Step 2: Navigate to: HKEY_LOCAL_MACHINE\SOFTWARE\Microsoft\Windows\CurrentVersion\CapabilityAccessManager\ConsentStore\microphone
- Step 3: Look at the Value entry on the right side.
- Step 4: It must say Allow. If it shows Deny or anything else, that’s your problem.
- Step 5: Right-click the Value entry and select Modify.
- Step 6: Type Allow and click OK.
- Step 7: Restart your PC to apply the change.
Create a system restore point before touching the registry. If you’re on a managed work computer, you may not have permission to edit this key — that requires IT support. After the restart, go back to Settings and confirm the toggle now matches the registry value.
Method 9: Check Group Policy If Toggles Are Locked
If your privacy toggles are grayed out and won’t budge, Group Policy is almost certainly the cause — especially on Windows 11 Pro or Enterprise. This setting overrides everything else in the privacy panel.
- Step 1: Press Windows + R, type gpedit.msc, and press Enter. (This is only available on Windows Pro, Enterprise, and Education — not Home.)
- Step 2: Navigate to: Computer Configuration > Administrative Templates > Windows Components > App Privacy.
- Step 3: Find the setting named “Let Windows apps access the microphone.”
- Step 4: Double-click it to open it.
- Step 5: Check its current state. If it’s set to Enabled with the option “Force Deny,” that’s blocking all mic access system-wide.
- Step 6: Change it to Not Configured to hand control back to the user.
- Step 7: Click Apply, then OK, and restart.
On work computers, IT administrators set these policies through MDM or Active Directory. You won’t be able to change them yourself — contact IT. On a personal PC showing this lockdown, a third-party privacy tool like O&O ShutUp10 may have applied these policies. Open that tool and reverse the microphone restriction.
Validating Fixes After Troubleshooting
After making any change, confirm it actually worked — don’t just check Settings, test in the real app.
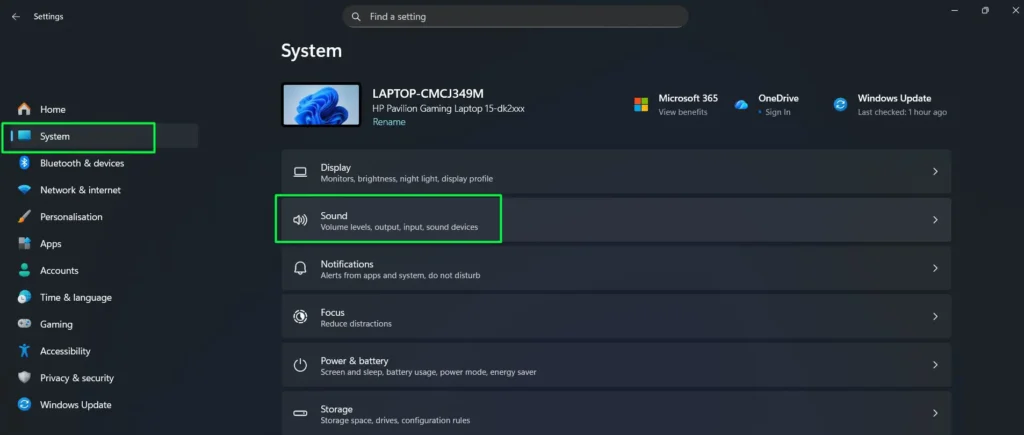
- Step 1: Open Settings and go to System > Sound.
- Step 2: Under Input, select your microphone.
- Step 3: Click the microphone to open its properties.
- Step 4: Click “Start test” under Microphone test.
- Step 5: Speak for 10 to 15 seconds. The input bar should move consistently.
- Step 6: Open the actual app that was failing and test the mic inside it.
- Step 7: Confirm the microphone icon appears in the system tray while the app is using it.
The Windows test passing but the app still failing means the app has its own cached permission state. Reset the app as described in the exclusive mode section. If the Windows test also fails, there’s still a hardware or driver issue — see this guide on resolving microphone detection problems.
Troubleshooting Best Practices and Prevention Tips
Most microphone issues are avoidable. These habits keep you from chasing the same problem twice.
- Screenshot your working privacy settings now — you’ll thank yourself after the next Windows update resets them.
- Create a system restore point before editing the registry or making major changes.
- Export your registry microphone key as a .reg backup file so you can restore it in one double-click.
- Check the system tray mic indicator when something breaks — it shows which app currently has the device, which exposes exclusive mode conflicts instantly.
- Add audio device drivers to your antivirus exclusion list. Security software scanning driver processes can cause access interruptions.
- After any Windows update, run a 30-second mic test before your next call or recording session.
- Check Windows Update history when permissions suddenly break — it almost always correlates with a recent patch.
Pro Tip: Patch Tuesday (the second Tuesday of every month) is when Microsoft pushes updates that most commonly reset privacy settings. A quick mic check after those updates catches resets before they ruin an important meeting.
Common Problems and Advanced Troubleshooting
Settings Keep Reverting After Reboot
This is almost always security software or a third-party privacy tool overriding Windows on every boot. Tools like O&O ShutUp10 apply registry and policy changes that survive your manual edits. Open Event Viewer (Windows + X > Event Viewer > Windows Logs > System) and look for startup errors mentioning privacy or microphone components. Temporarily disable your privacy tool, fix the settings, then whitelist the microphone components before re-enabling it.
Antivirus Blocks Microphone Despite Windows Permissions
Kaspersky, Bitdefender, and Norton all include microphone protection modules that operate independently of Windows. They maintain their own allow/deny lists that override Windows settings. Open your antivirus dashboard, find webcam or privacy protection settings, and add the affected app to the trusted list. Some suites require a restart before the change takes effect.
Microphone Access Shows “No Apps Have Requested Access”
This just means no Store app has triggered a mic permission request yet. Desktop apps won’t appear here by design. Open the Windows Camera app — it immediately requests mic access and populates the list. Not a problem, just an empty state.
Browser-Based Apps Fail Despite System Permissions
Browsers have their own permission layer on top of Windows. Chrome, Edge, and Firefox each track mic permissions per website. Go to your browser’s Site settings > Microphone and make sure the site is allowed. If it was previously blocked, clear the site’s data, reload the page, and grant permission again when prompted. Also worth checking: the website must be HTTPS — browsers block mic access on HTTP sites automatically.
Frequently Asked Questions
Why do my microphone privacy settings reset after Windows updates?
Feature updates treat certain privacy settings as user preferences and reset them to default. Check your mic permissions right after any major update. Screenshot your settings beforehand so restoring them takes under a minute.
What causes microphone privacy toggles to be grayed out?
Grayed-out toggles mean Group Policy or MDM is enforcing the setting. On a work PC, IT controls this remotely — you can’t change it yourself. On a personal PC, a third-party privacy tool likely applied a Group Policy restriction. Check gpedit.msc or your privacy tool’s settings to reverse it.
Why does my microphone work in Windows but not in specific apps?
The app is likely using a cached permission state that doesn’t reflect the current Windows settings. Reset the app through Settings > Apps > Advanced options > Reset. Also check whether exclusive mode is on — another app may be holding the mic device open and blocking access.
How do I diagnose which setting is blocking my microphone?
Work through layers in order: system-wide toggle, then per-app toggle or desktop apps toggle, then Sound settings device selection, then registry value, then antivirus modules, then Group Policy. Each layer is independent — one can be broken while others look fine.
Can antivirus software override Windows microphone permissions?
Yes, and it does this silently. Security suites maintain their own mic allow/deny lists that take precedence over Windows settings. Check your antivirus dashboard for webcam or privacy protection features and add the affected app to the trusted list.
Why don’t desktop apps appear in the microphone permissions list?
Desktop apps use a different permission architecture and don’t get individual toggles — they all share one “Let desktop apps access your microphone” switch. Store apps get per-app control; desktop apps get all-or-nothing.
What does “Some settings are managed by your organization” mean?
It means Group Policy or MDM is controlling microphone access and overriding your manual changes. On a work machine, contact IT. On a personal machine, a privacy tool or misconfigured policy is the cause — check gpedit.msc and reverse the microphone policy restriction.