Your mic was working fine yesterday. Now Zoom can’t hear you, your recording app is blocked, or a new install refuses to pick up any audio — and you have no idea why. Nine times out of ten, the fix is sitting inside Windows 11’s Privacy and security settings. This guide walks through every method to enable microphone access per app, from the standard Settings route to the Registry and Group Policy — so no matter what’s blocking the mic, you’ll clear it fast.
Windows 11 doesn’t just have one microphone toggle. It uses a layered permission system — one master switch, a second switch for app groups, and then individual controls per app. Miss any layer and the mic stays silent. Once you understand how it’s structured, the whole thing takes under a minute to sort out.
Why Windows 11 Controls Microphone Access Per App
Windows 11 was designed so that apps can’t quietly tap into the microphone without permission. Every app has to be approved before it gets access — you’re in control of who listens and when. This matters more than people realize. A work laptop might need Zoom approved while keeping browser games restricted. A home setup might want Chrome and a recording app both enabled at the same time. The system gives you that flexibility through microphone permission settings inside Privacy and security.
How to Enable Microphone for Specific Apps in Windows 11
Follow these steps in order. There are three layers to check — skip one and the mic stays blocked.
Step 1: Click the Start button on the taskbar.
Step 2: Click the Settings icon (the gear icon).
Step 3: Select Privacy & security from the left sidebar.
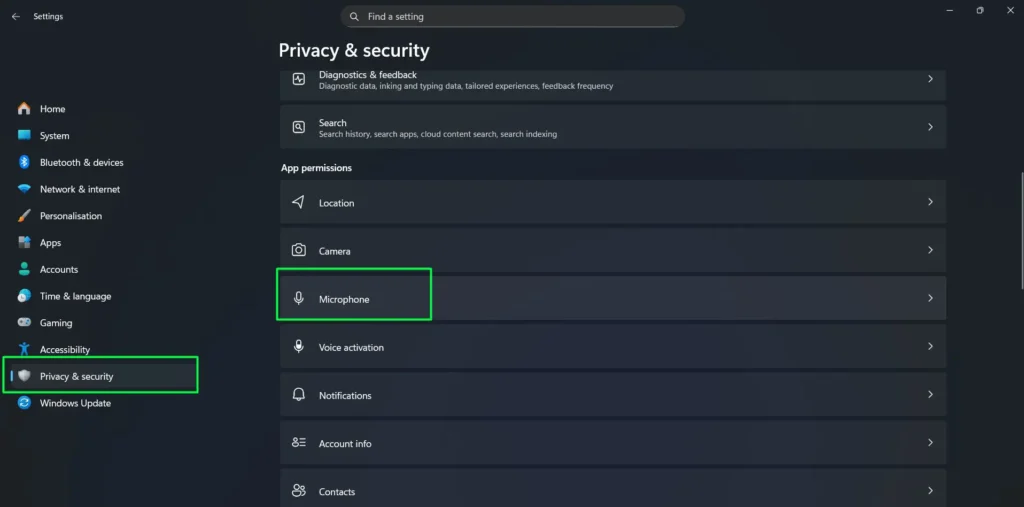
Step 4: Scroll down and click Microphone under the App permissions section.
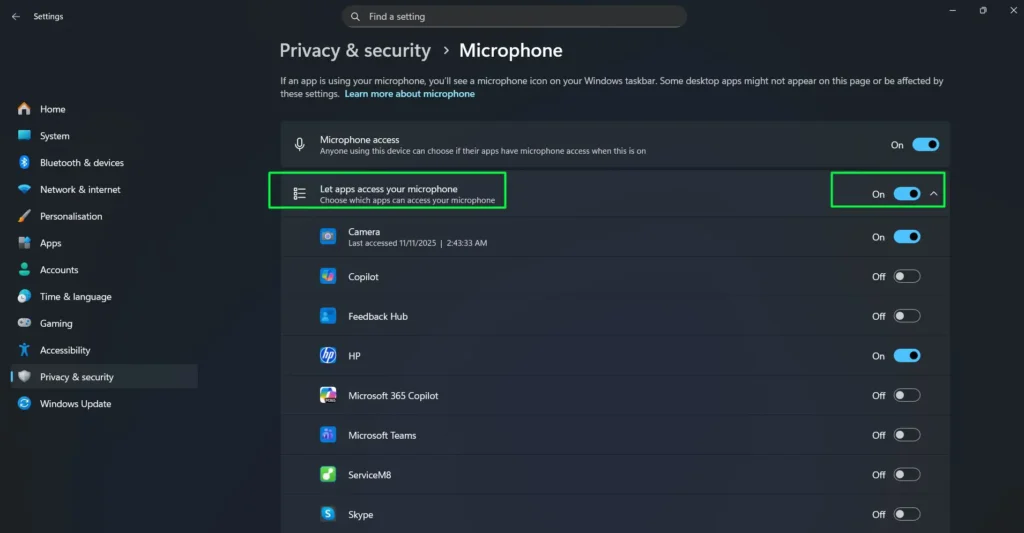
Step 5: Make sure Microphone access is turned On. This is the master switch — if it’s off, nothing works.
Step 6: Turn Let apps access your microphone On.
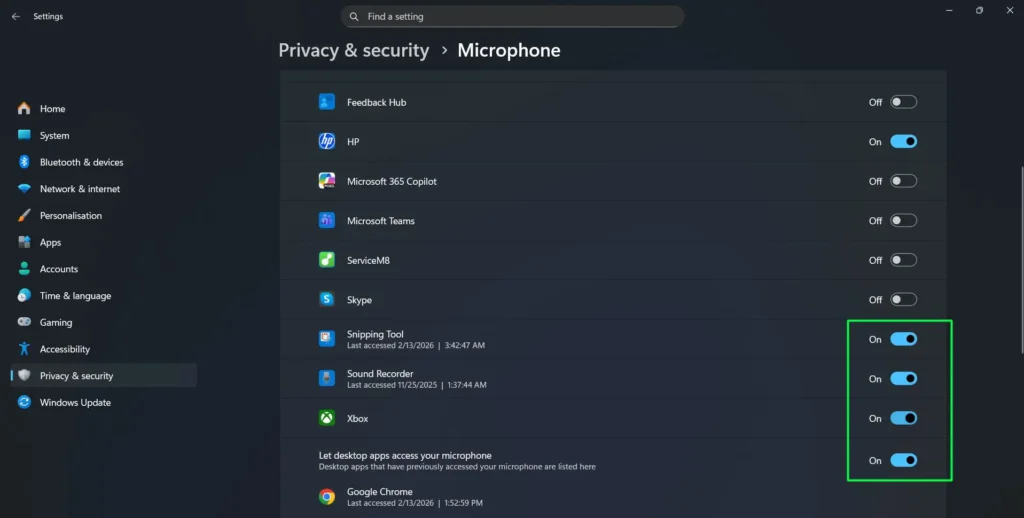
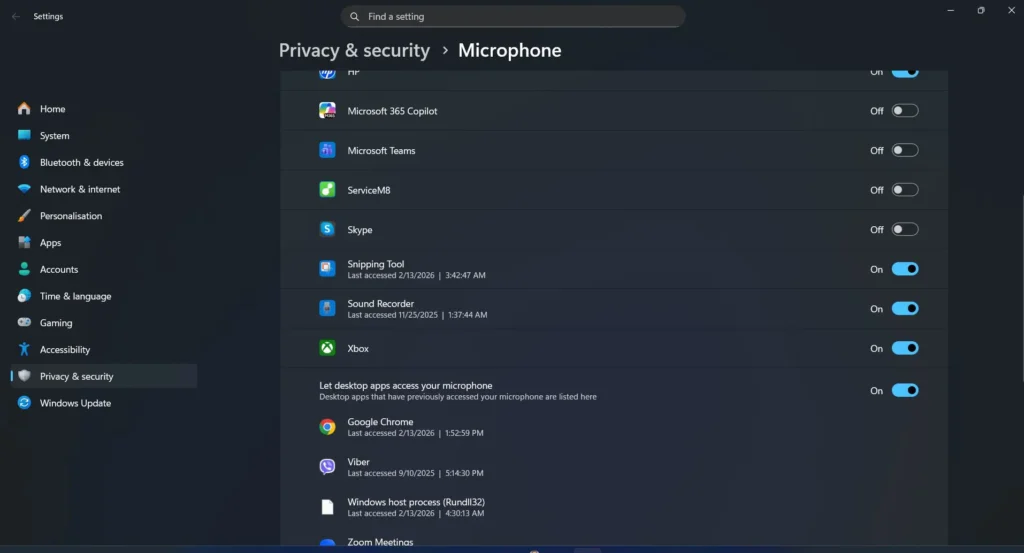
Step 7: Scroll down to Let desktop apps access your microphone and confirm it is On.

Step 8: Find the specific app in the list and toggle its microphone access On.
The most common cause of a blocked mic is the master toggle being accidentally switched off. Always check that first before touching anything else.
Pro-Tip: After enabling microphone permission for an app, close it completely and reopen it. Some apps only check permissions at launch — a fresh start makes the new setting register properly.
Understanding the Two App Categories in Microphone Settings
Windows 11 splits apps into two separate groups in the microphone settings. They work differently. Knowing which group your app belongs to saves a lot of confusion.
Microsoft Store Apps
Apps downloaded from the Microsoft Store appear under “Let apps access your microphone.” This includes Microsoft Teams, Skype, Camera, Copilot, Xbox, Feedback Hub, Snipping Tool, and Sound Recorder. Each one has its own individual toggle. Turning one off doesn’t affect any other app.
Desktop Apps
Traditional programs installed outside the Microsoft Store — things like Google Chrome, Zoom, Viber, OBS Studio, and Audacity — sit in a separate section at the bottom: “Let desktop apps access your microphone.” These don’t have individual toggles. One master switch covers all of them. Windows 11 does list which desktop apps have previously used the mic, along with the exact date and time of the last access. That log is genuinely useful for diagnosing which apps have been active.
Pro-Tip: If a desktop app like Zoom or Chrome isn’t showing in the list, it just hasn’t asked for mic access yet. Open the app, start a call or recording, and then come back — it will appear automatically after the first access attempt.
Fastest Way to Open Microphone Settings in Windows 11
Skip the menu navigation entirely. Press Windows key + I to open Settings, then type Microphone in the search bar at the top. Click Microphone privacy settings and land directly on the page in seconds.
Alternatively, press Windows key + S, type microphone privacy settings, and press Enter. Same destination, same speed.
How to Quickly Find a Specific App in the Microphone List
When there are a lot of apps installed, scrolling through the list takes time. Here’s the faster route.
Step 1: Press Windows key + S to open the search bar.
Step 2: Type Microphone privacy settings and press Enter.
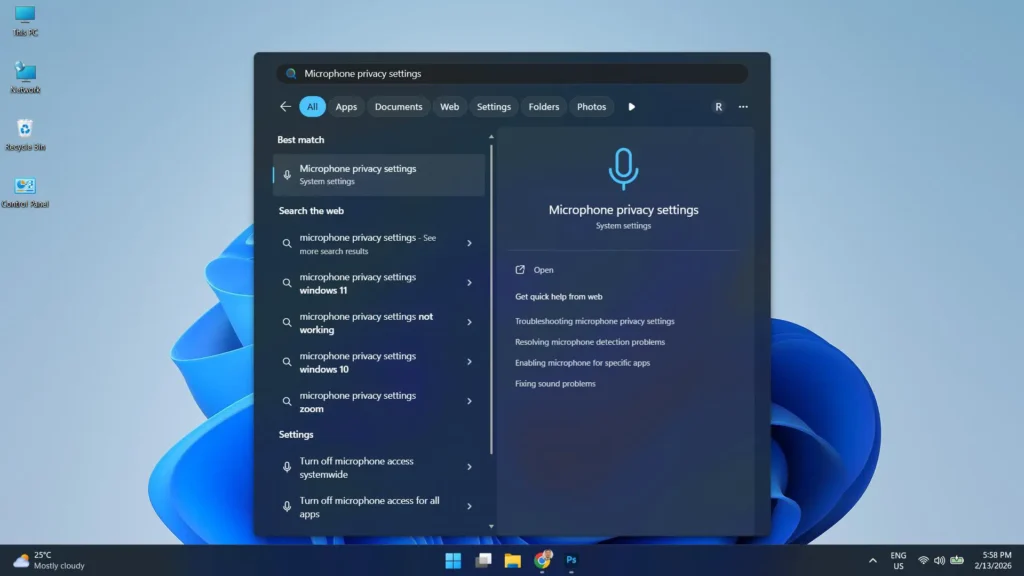
Step 3: The Microphone settings page opens directly — no manual navigation needed.
Step 4: Find the app and toggle microphone access On or Off.
How to Enable Microphone Access via Windows Registry
This method is for situations where the Settings UI isn’t responding, you’re managing permissions across multiple accounts, or you’re configuring a managed device. Always back up the registry before making changes.
Step 1: Press Windows key + R, type regedit, and press Enter. Click Yes if prompted by User Account Control.
Step 2: In the Registry Editor address bar, navigate to:
HKEY_CURRENT_USER\Software\Microsoft\Windows\CurrentVersion\CapabilityAccessManager\ConsentStore\microphoneStep 3: In the right pane, double-click the Value entry.
Step 4: Set the value data to Allow to enable microphone access, or Deny to block it. Capitalization matters — enter it exactly as shown.
Step 5: Click OK and close Registry Editor. The change takes effect immediately.
To control a specific Microsoft Store app individually, expand the microphone key in the left panel and open the subfolder named after the app. Double-click its Value entry and set it to Allow or Deny.
Note: The path above applies only to the current user account. To apply the setting to all users on the device, use the same path under HKEY_LOCAL_MACHINE instead. Administrator privileges are required.
How to Manage Microphone Access via Group Policy Editor
This method applies to Windows 11 Pro, Enterprise, and Education only. It’s the right tool when you need a consistent mic policy enforced across every user account on a device — overriding individual settings entirely.
Step 1: Press Windows key + R, type gpedit.msc, and press Enter.
Step 2: In the left panel, navigate to:
Computer Configuration > Administrative Templates > Windows Components > App PrivacyStep 3: Double-click Let Windows apps access the microphone.
Step 4: Choose one of the following:
- Not Configured — Default. Users manage their own mic permissions through Settings.
- Enabled > Force Allow — Enables microphone access for all apps system-wide, overriding individual settings.
- Enabled > Force Deny — Blocks microphone access for all apps across all user accounts.
- Disabled — Same as Not Configured. Users keep individual control.
Step 5: Click Apply, then OK. Close Group Policy Editor.
Important: When Force Allow or Force Deny is active, it overrides the Settings page entirely. The individual app toggles will appear grayed out and can’t be changed by any user until the policy is set back to Not Configured or Disabled. Windows 11 Home doesn’t have Group Policy — use Settings or the Registry method instead.
Troubleshooting Microphone Privacy Settings
If the mic is still not working after checking permissions, here are the targeted fixes that actually solve the problem:
- Update your audio drivers — Outdated drivers are one of the most overlooked causes of mic issues. Go to Device Manager, expand Audio inputs and outputs, right-click your microphone, and select Update driver.
- Check app-specific settings — Zoom, Discord, Teams, and most communication apps have their own microphone selection menus completely separate from Windows permissions. Make sure the correct mic is selected inside the app itself.
- Restart the app — Close it fully from the taskbar or Task Manager, then reopen. Some apps only check mic permissions at launch.
- Run the Windows audio troubleshooter — Go to Settings, then System, then Sound, and select Troubleshoot to let Windows detect and fix common mic problems automatically.
- Check Group Policy — On Pro or Enterprise editions, open gpedit.msc and verify the microphone policy under App Privacy is not set to Force Deny. If it is, that overrides every Settings toggle.
- Check the Registry value — Navigate to the microphone ConsentStore key in regedit and confirm the Value entry says Allow, not Deny.
- Set the correct default microphone — Go to Settings, then System, then Sound. Under Input, confirm the right microphone is selected as the default device. Windows sometimes switches to a different input automatically after a driver update or new device connection.
- Reset the permission state — Go to Settings, then Privacy and Security, then Microphone. Toggle the master microphone access switch off, wait a few seconds, and turn it back on. This resets the permission state without affecting individual app toggles.
Checking Recent Microphone Activity by App
At the bottom of the Microphone settings page is a Recent activity section. It shows a 7-day log of every microphone access request — including the app name, date, and exact time of each request.
This is the right place to start when you’re unsure whether an app is even trying to use the mic. If it shows up in Recent activity, Windows received a request from it and something in the permission chain is blocking it. If it doesn’t appear at all, the problem is likely inside the app’s own audio settings — not a Windows permission issue.
Tips for Better Microphone Performance
Getting permissions right is half the job. A few simple habits keep audio quality solid over time:
- Check the physical connection first — Make sure the mic is properly plugged in and recognized by Windows before opening any app that relies on it.
- Reduce background noise — Windows privacy settings control access, not audio quality. A quieter environment makes a bigger difference than any software setting.
- Avoid multiple active audio inputs — Running more than one audio input simultaneously can cause Windows to route audio unpredictably. Disconnect devices you’re not using.
- Keep Windows 11 updated — Microsoft regularly releases patches that fix mic-related bugs and improve how audio drivers interact with the permission system.
Suggestions for Managing Microphone Permissions Effectively
Only Enable Apps That Actually Need the Microphone
It’s tempting to toggle everything on and move on. Don’t. A photo editor or file manager has no reason to use a microphone — if those toggles are on, turn them off. Limiting access to apps that genuinely need it reduces privacy exposure and keeps the permission list clean.
Review Microphone Permissions After Installing New Apps
Every time a new app gets installed, it’s worth checking the Microphone settings page to see if it appeared and whether its toggle is set the way you want. Some apps request permissions automatically on first launch, and it’s easy to approve something without noticing.
Use the Last Accessed Timestamp to Spot Unexpected Activity
The timestamps next to each app in the microphone list are more useful than they look. If an app shows a recent “Last accessed” time but you weren’t actively using it at that moment, that’s worth investigating. It doesn’t automatically mean something suspicious is happening, but it’s a quick way to stay aware of what’s touching the mic and when.
Keep Windows 11 Updated
Microsoft updates how permissions and privacy settings work in Windows 11 regularly. Staying current means the Microphone settings page works exactly as described here. Updates also bring security improvements that affect how hardware like microphones is accessed at the system level.
For more step-by-step Windows guides, the guides section has a growing collection of tutorials built the same way — straightforward, verified, and easy to follow.
What the Microphone Settings Page Actually Shows
Here’s a quick breakdown of every element on the page so nothing looks unfamiliar when you land there:
- Microphone access — The top-level master toggle. Must be On for anything else to work.
- Let apps access your microphone — Enables the individual toggle list for Microsoft Store apps.
- Per-app toggles — Individual on/off switches for each Store app (Camera, Teams, Skype, Copilot, etc.).
- Let desktop apps access your microphone — Master toggle for all traditionally installed desktop apps.
- Desktop app list — Shows desktop apps that have previously accessed the mic, with last-accessed timestamps.
- Recent activity — A 7-day log of microphone access requests across all apps.
- Privacy resources — Links at the bottom for Microsoft privacy documentation.
Frequently Asked Questions
Why doesn’t a specific app appear in the microphone permissions list?
Desktop apps like Chrome, Zoom, or Audacity don’t appear in the main Store app list. They show up under “Let desktop apps access your microphone” further down the page. If an app hasn’t requested microphone access yet, it won’t appear in either section until it makes its first access attempt.
Do microphone permission changes take effect immediately in Windows 11?
Yes. Toggling microphone access on or off applies right away — no restart needed. That said, closing and reopening the affected app after changing permissions is recommended so the app can register the updated state on its next launch.
What does the master Microphone access toggle control?
It’s the device-wide switch. When it’s off, no app — Store or desktop — can access the microphone, regardless of any individual settings below it. This is always the first thing to check when troubleshooting mic access in Windows 11.
Why is Zoom or Chrome not listed under the individual app toggles?
Zoom and Chrome are traditional desktop applications installed outside the Microsoft Store. Windows 11 places them in the “Let desktop apps access your microphone” section at the bottom of the Microphone settings page, which is a separate section from the Store app toggle list.
Can I control microphone access using the Windows Registry?
Yes. Navigate to HKEY_CURRENT_USER\Software\Microsoft\Windows\CurrentVersion\CapabilityAccessManager\ConsentStore\microphone in Registry Editor and set the Value entry to Allow or Deny. To apply the change to all users on the device, use the same path under HKEY_LOCAL_MACHINE instead.
How do I block microphone access for all apps using Group Policy?
On Windows 11 Pro, Enterprise, or Education, press Windows key + R and type gpedit.msc. Navigate to Computer Configuration, then Administrative Templates, then Windows Components, then App Privacy. Double-click “Let Windows apps access the microphone,” set it to Enabled, and choose Force Deny to block microphone access for all apps across all user accounts.
Can Windows 11 Home users use Group Policy to manage microphone access?
No. The Local Group Policy Editor is only available on Windows 11 Pro, Enterprise, and Education editions. Windows 11 Home users can manage microphone access through the Settings app or by editing the Windows Registry directly using the path described above.
What is the fastest way to open microphone settings in Windows 11?
Press Windows key + I to open Settings, type Microphone in the search bar, and click Microphone privacy settings. Alternatively, press Windows key + S, type microphone privacy settings, and press Enter to go directly to the page without navigating through any menus.