Resolving microphone detection problems on Windows 10 and Windows 11 becomes straightforward when you follow the right steps. Most people experience this when the system fails to recognize the hardware, leaving applications unable to detect any audio input device. Typically, the issue stems from outdated drivers, incorrect sound settings, or disabled audio services. Before anything else, you can test your microphone online to confirm whether the hardware itself is working or if the problem is software-related.
Quick Summary: Key Steps to Fix Microphone Detection
| Issue Type | Primary Solution |
|---|---|
| Not Connected | Check cable, port, or power |
| Hardware Not Detected | Enable device in Sound Settings |
| App Access Blocked | Enable Microphone Privacy Settings |
| Driver Problems | Update or reinstall audio drivers |
| System Service Issues | Restart Windows Audio service |
| BIOS/UEFI Disabled | Enable audio in BIOS settings |
| Mic Not Working in Teams | Enable mic access in Privacy settings and select correct device in Teams Settings > Devices |
| Mic Not Working in Zoom | Enable desktop app mic access in Privacy settings and select correct mic in Zoom Settings > Audio |
🎙️ Not sure if your mic hardware is the problem? Use our free Online Mic Test Tool to check if your microphone is detected and working in your browser — no installation needed. Works on Windows 10 and Windows 11.
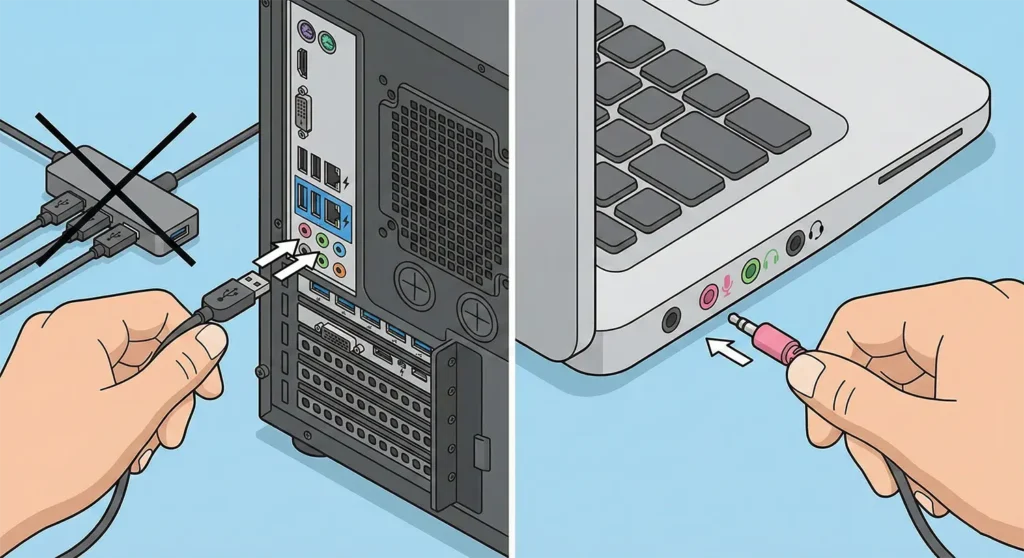
Verify the Microphone is Properly Connected
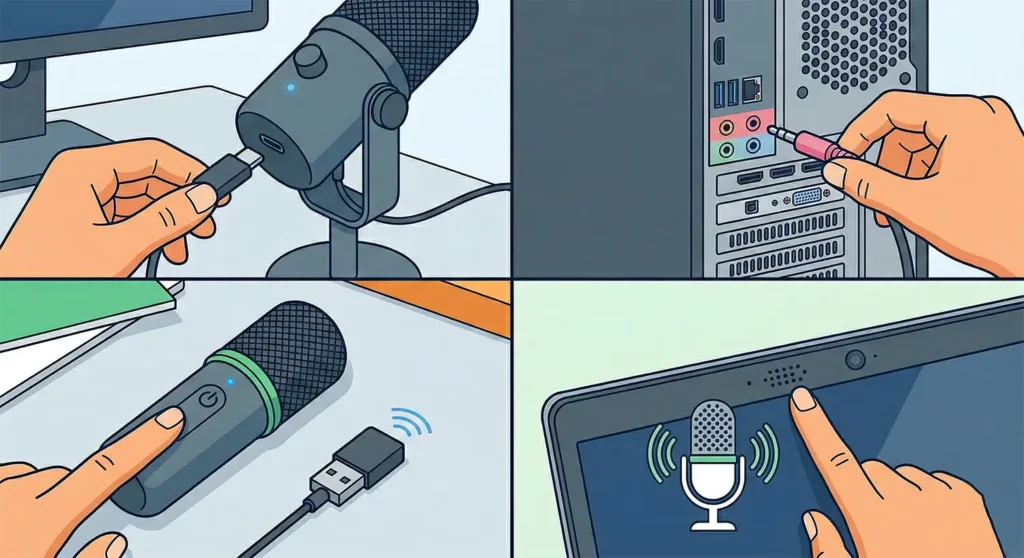
A loose or incorrect connection is the most overlooked cause of detection issues. Before anything else, make sure the microphone is firmly plugged in to rule out this simple fix.
- USB microphones – Ensure the cable is securely inserted and check for any indicator light confirming power
- 3.5mm microphones – Confirm it’s plugged into the correct port (usually pink, labeled “Mic In”)
- Wireless/Bluetooth – Make sure the device is powered on and any USB receiver dongle is connected
- Built-in laptop mic – No connection is needed, but check that nothing is blocking the mic pinhole
Once you confirm the connection, proceed with the diagnostic steps below.
Check If Windows Detects the Microphone Hardware
Before diving into fixes, verifying the detection status saves time. In some cases, the system might recognize the device but show it as disabled or disconnected, which is a different problem than a missing driver.
Step 1: Right-click the speaker icon in the system tray
Step 2: Select ‘Sound settings’ from the menu
Step 3: Scroll down to ‘Advanced’ and click ‘More sound settings’
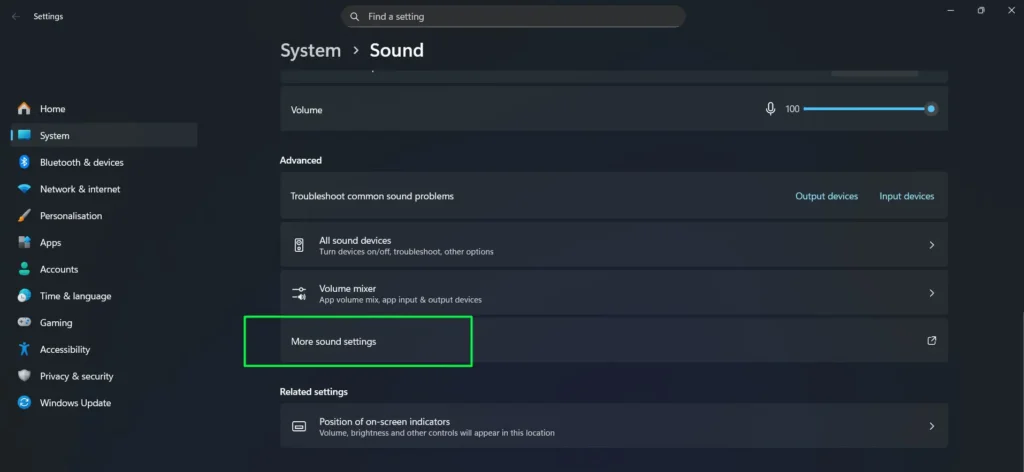
Step 4: Switch to the ‘Recording’ tab in the Sound window
Step 5: Right-click in the empty space and check both ‘Show Disabled Devices’ and ‘Show Disconnected Devices’
Your microphone should appear in the list. A grayed-out icon indicates the device exists but still needs activation — which the next section covers.
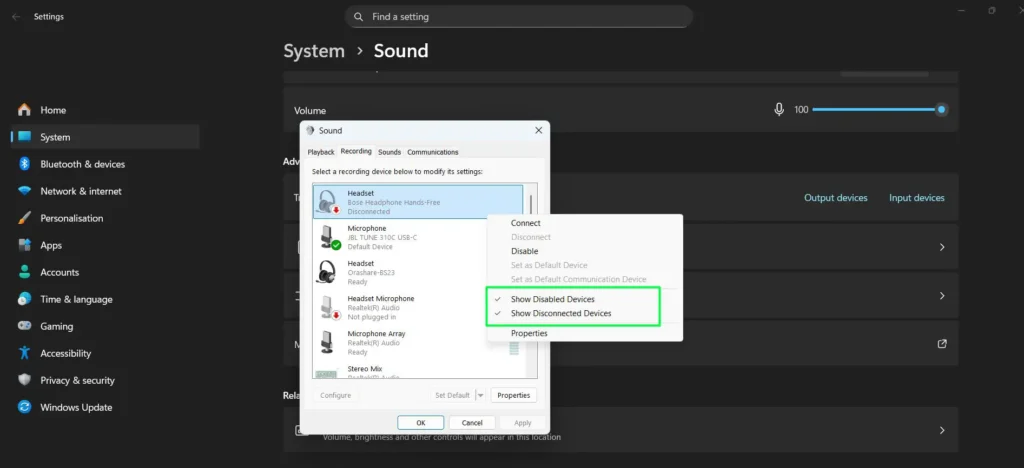
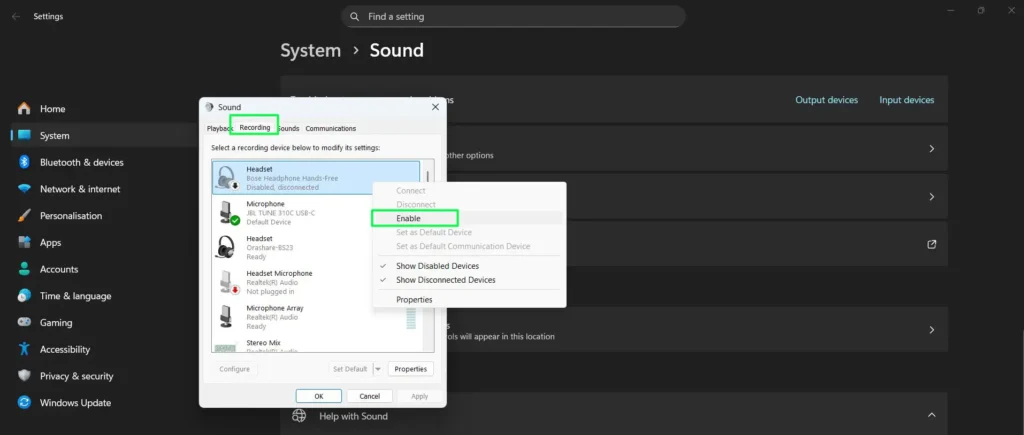
Enable the Microphone in Sound Settings
Windows sometimes disables recording devices automatically after updates or hardware changes. This fix works best when the hardware appears in Device Manager but applications cannot access it.
Step 1: Open Sound settings by right-clicking the speaker icon and select ‘Sound settings’ from the menu
Step 2: Navigate to ‘More sound settings’ under Advanced
Step 3: Go to the ‘Recording’ tab
Step 4: Right-click the disabled microphone
Step 5: Select ‘Enable’ from the context menu
Pro Tip: After enabling the device, test it immediately using the built-in sound recorder. Doing this confirms the hardware detection works before you troubleshoot application-specific microphone access.
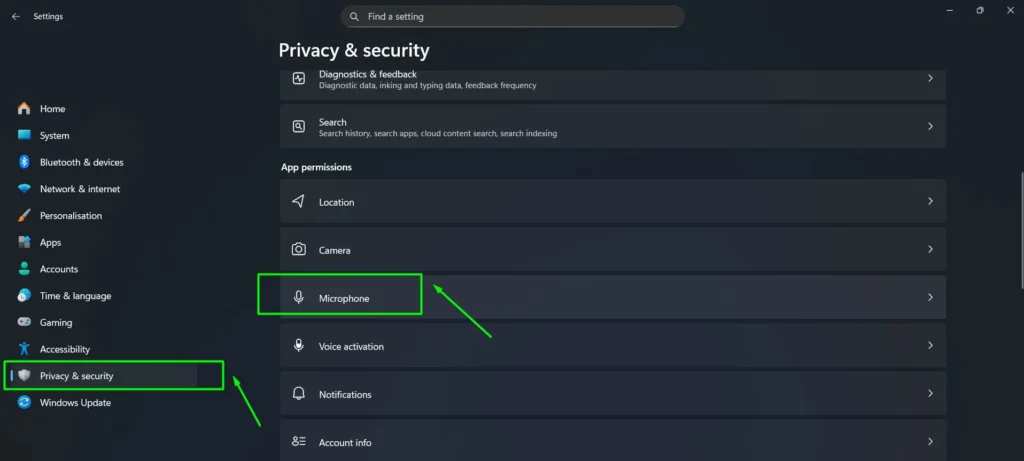
Adjust Windows Privacy Permissions
Even when Windows recognizes your hardware, it may still block applications from accessing it due to security settings. This is a common “silent” failure where the microphone appears functional in settings but produces no sound in apps like Zoom or Discord.
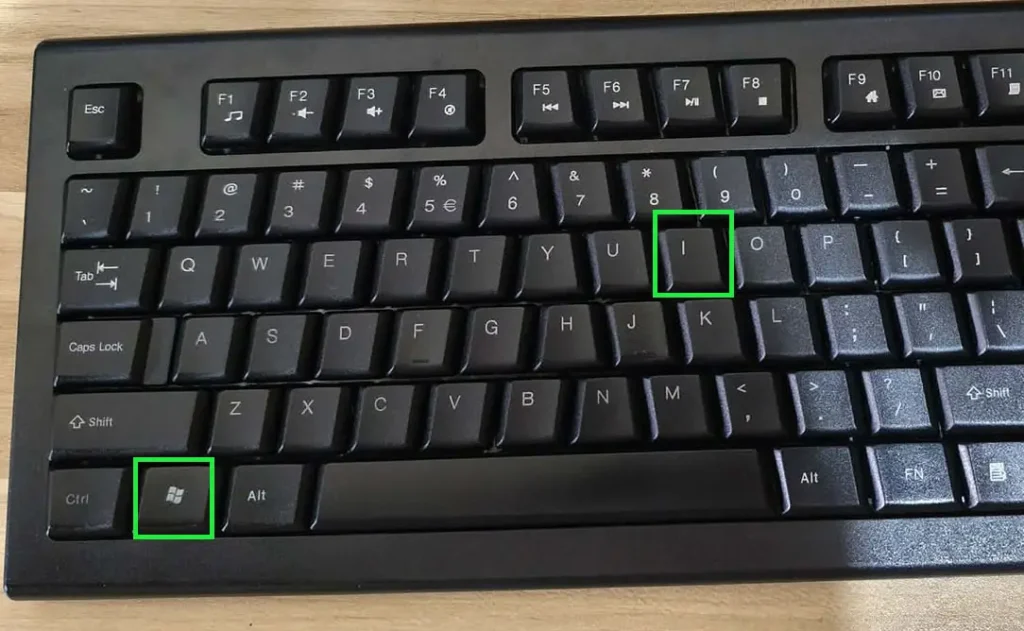
Step 1: Press Windows + I to open Settings.
Step 2: Navigate to Privacy & security on the left sidebar, then scroll down to Microphone under ‘App permissions.’
Step 3: Ensure Microphone access is toggled to On.
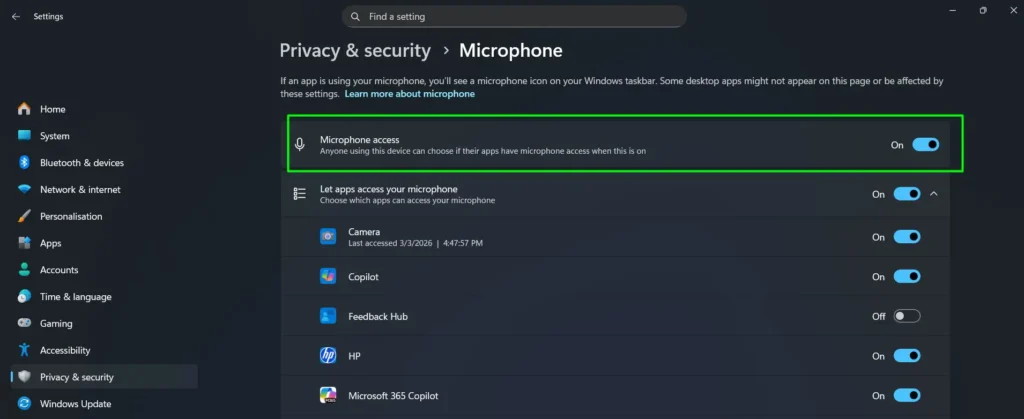
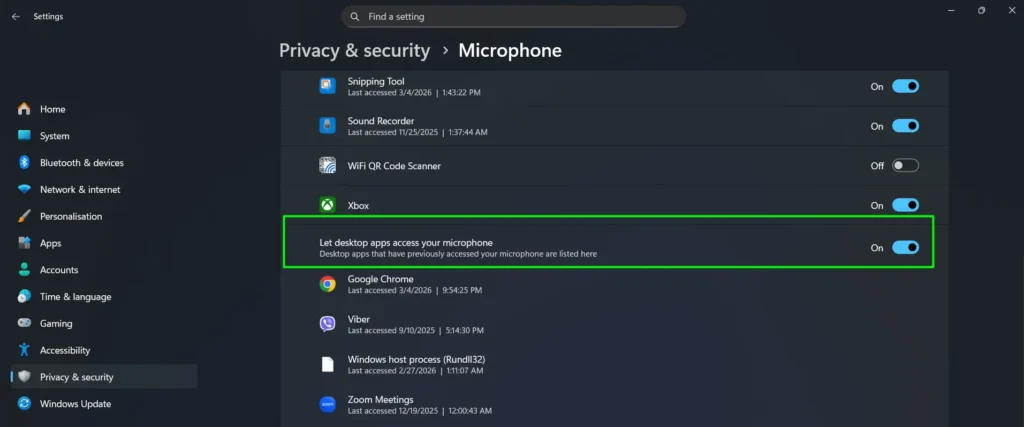
Step 4: Scroll down to Let desktop apps access your microphone and verify the toggle is On.
Note: If a specific app in the list (like Chrome or Teams) shows as toggled Off, that program will never detect audio until you flip that individual switch.
Update Audio Drivers Through Device Manager
Outdated or corrupted drivers remain the most common cause of detection failures. The key is to let Windows find the latest compatible version automatically rather than searching for drivers manually.
Step 1: Right-click the Start button (Windows icon), then select Device Manager from the menu.
Step 2: Expand the ‘Audio inputs and outputs’ section
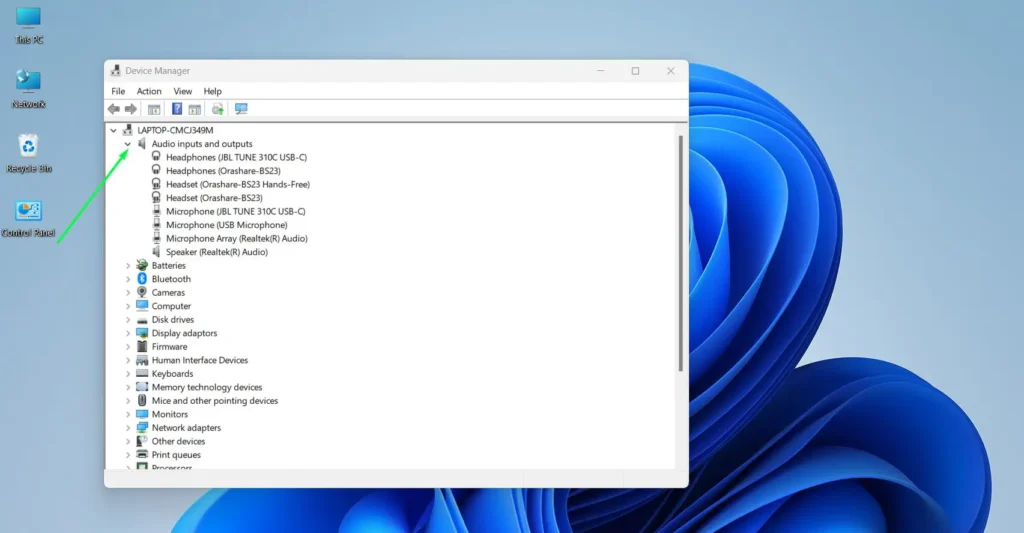
Step 3: Locate the microphone device in the list
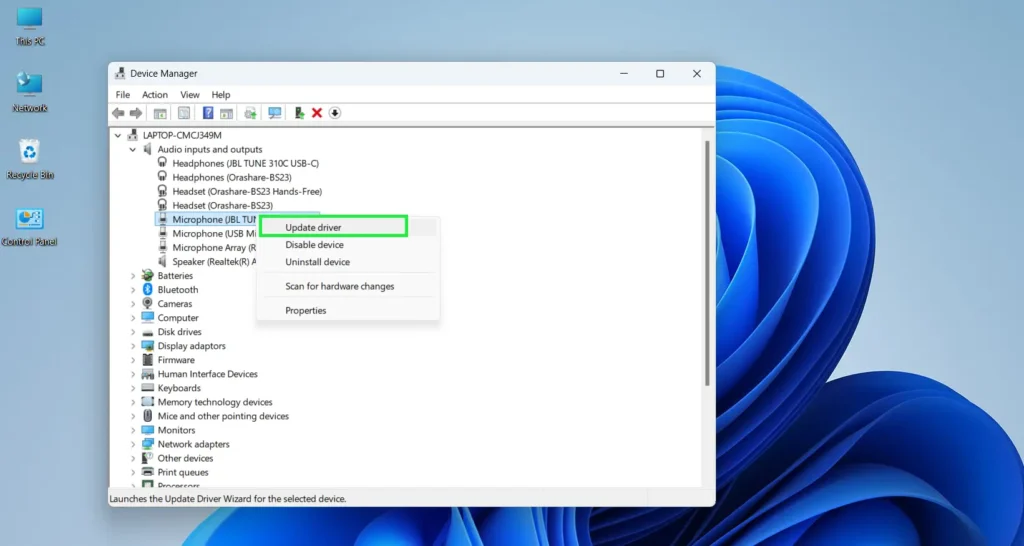
Step 4: Right-click the device and choose ‘Update driver’
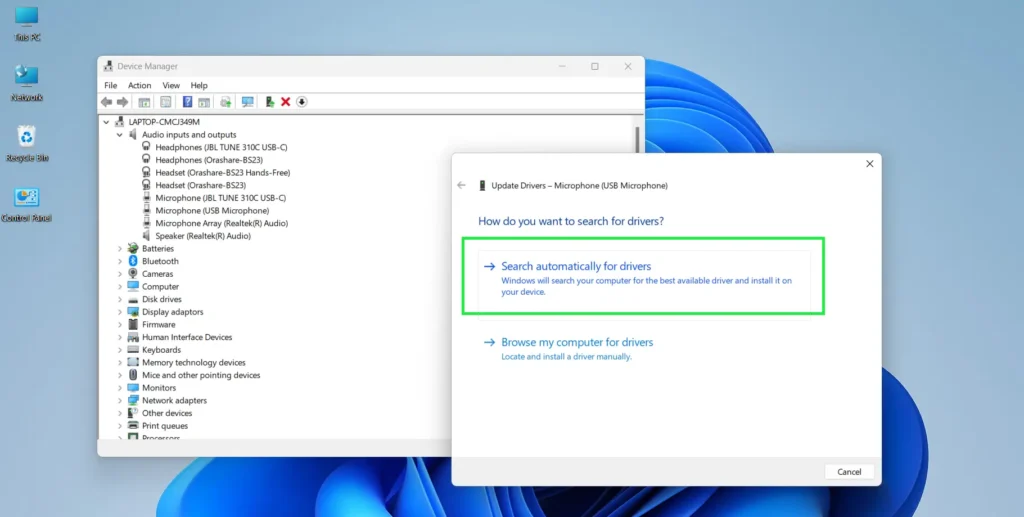
Step 5: Select ‘Search automatically for drivers’
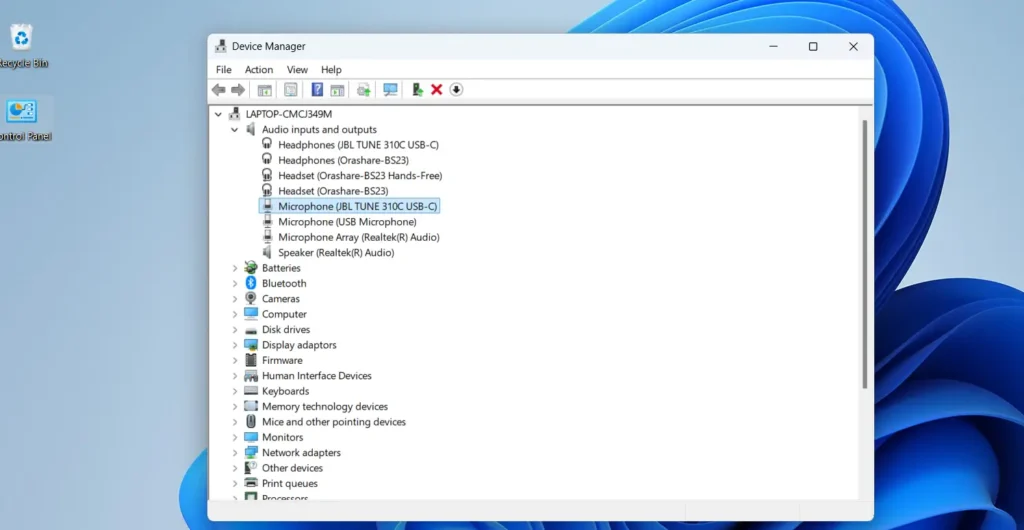
Step 6: Wait for Windows to download and install updates
Step 7: Restart the computer after installation completes
Sometimes Windows reports ‘The best drivers for your device are already installed’ even when problems persist. In that case, the next step addresses this scenario with a full reinstall.
Reinstall the Audio Driver Completely
A fresh installation removes corrupted files that updates alone cannot fix. Use this method when driver updates fail to resolve detection issues, as it gives Windows a clean slate to work from.
Step 1: Open Device Manager
Step 2: Find the microphone under ‘Audio inputs and outputs’
Step 3: Right-click the device and select ‘Uninstall device’
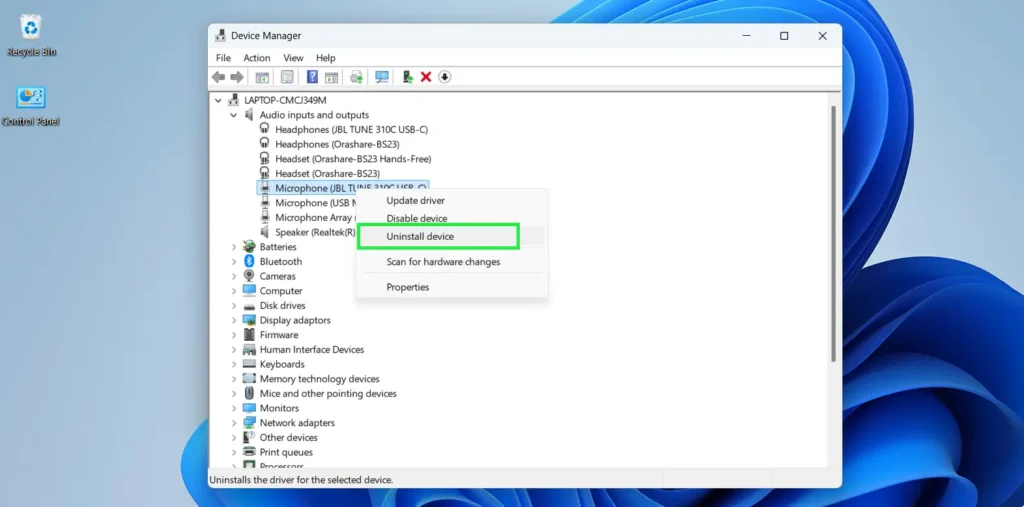
Step 4: Check ‘Attempt to remove the driver for this device’ if the option appears
Step 5: Click ‘Uninstall’
Step 6: Restart the computer
Step 7: Windows will automatically reinstall the driver on startup
After the restart, Windows should detect the microphone immediately. To confirm success, open Sound settings and verify the device appears under the Input section.
Restart Windows Audio Services
Background audio services sometimes crash or stop responding without any visible warning. Fortunately, restarting them takes only seconds and often resolves detection issues without any driver changes at all.
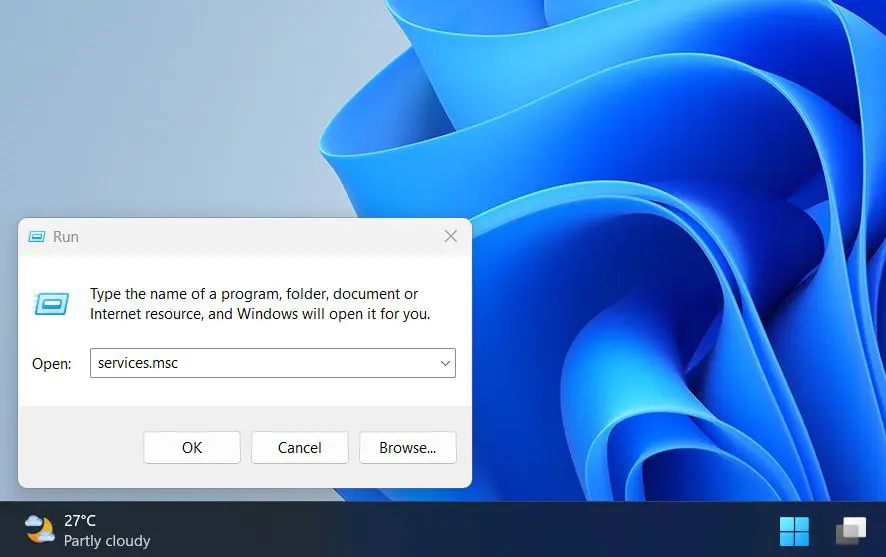
Step 1: Press Windows + R to open the Run dialog
Step 2: Type ‘services.msc’ and press Enter
Step 3: Scroll down to find ‘Windows Audio’
Step 4: Right-click ‘Windows Audio’ and select ‘Restart’
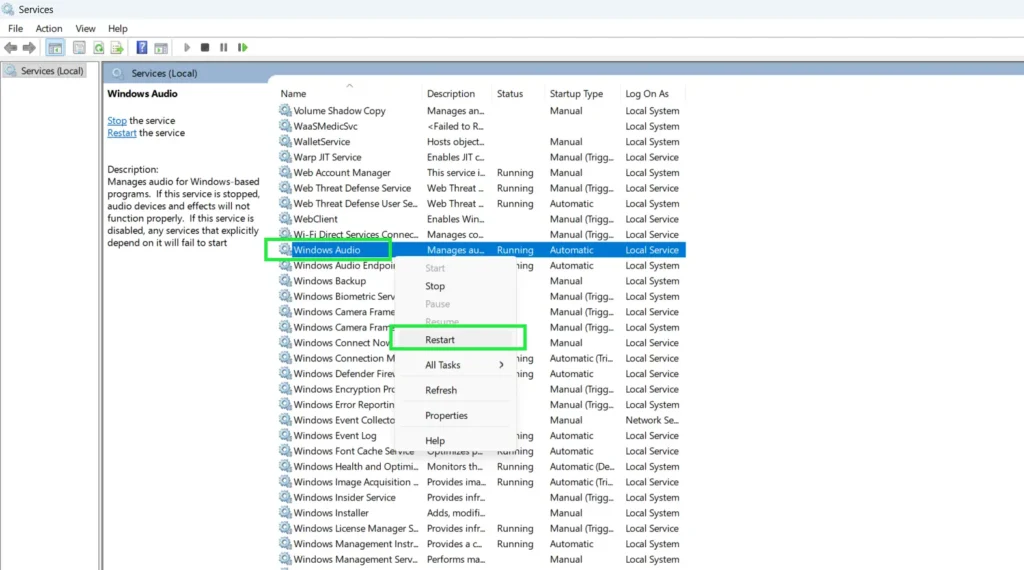
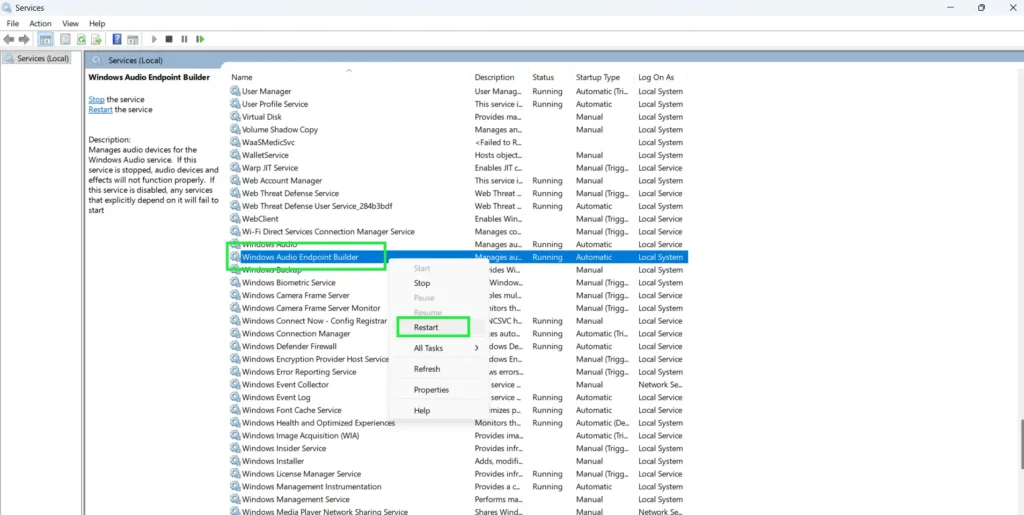
Step 5: Find ‘Windows Audio Endpoint Builder’
Step 6: Right-click and select ‘Restart’ for this service as well
Step 7: Close the Services window
Both services must run for proper microphone detection to work. If either shows a ‘Stopped’ status instead of ‘Running,’ right-click and choose ‘Start’ rather than Restart.
Run the Audio Troubleshooter
Windows includes a built-in diagnostic tool that automatically detects and fixes common problems. As an added benefit, the troubleshooter modifies settings that manual adjustments might miss, making it worth running before attempting more advanced fixes.
Step 1: Open Settings by pressing Windows + I
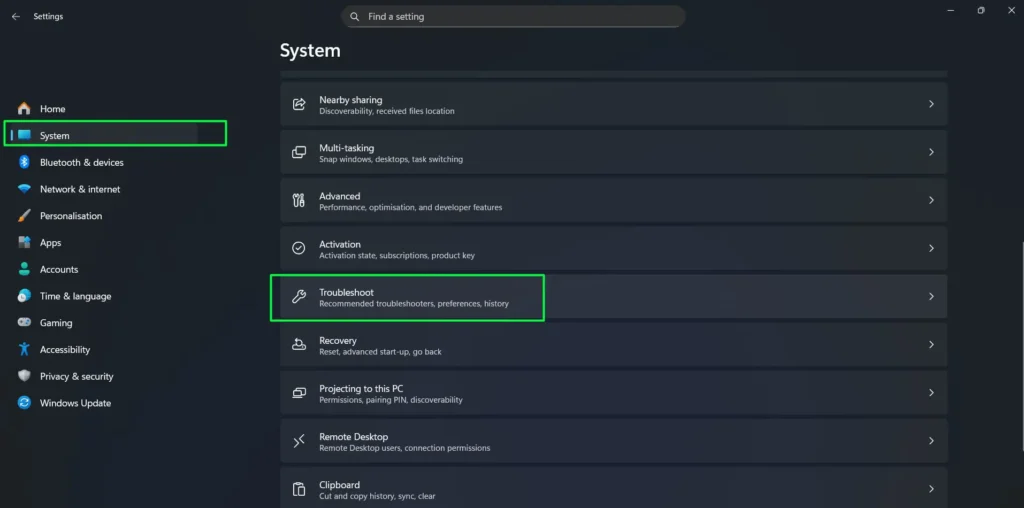
Step 2: Click ‘System’ in the left sidebar
Step 3: Scroll down and select ‘Troubleshoot’
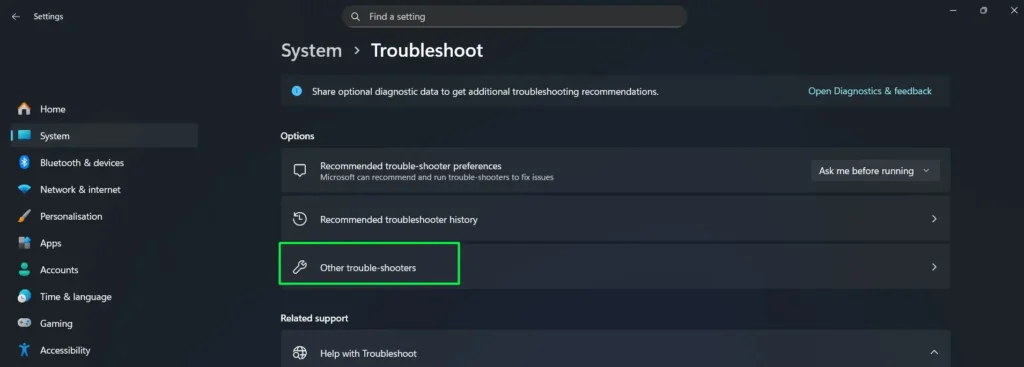
Step 4: Click ‘Other troubleshooters’
Step 5: Find ‘Audio’ and click ‘Run’

Step 6: Follow the on-screen prompts
Step 7: Apply any recommended fixes
The troubleshooter checks driver status, service configuration, and system permissions all at once. After it finishes, it provides a detailed report explaining every change it made.
Update Windows System Files
Microsoft regularly releases patches that fix hardware compatibility issues, and installing pending updates often resolves detection problems without any manual intervention. This step is especially important if your microphone stopped working after a recent Windows update.
Step 1: Open Settings (Windows + I)
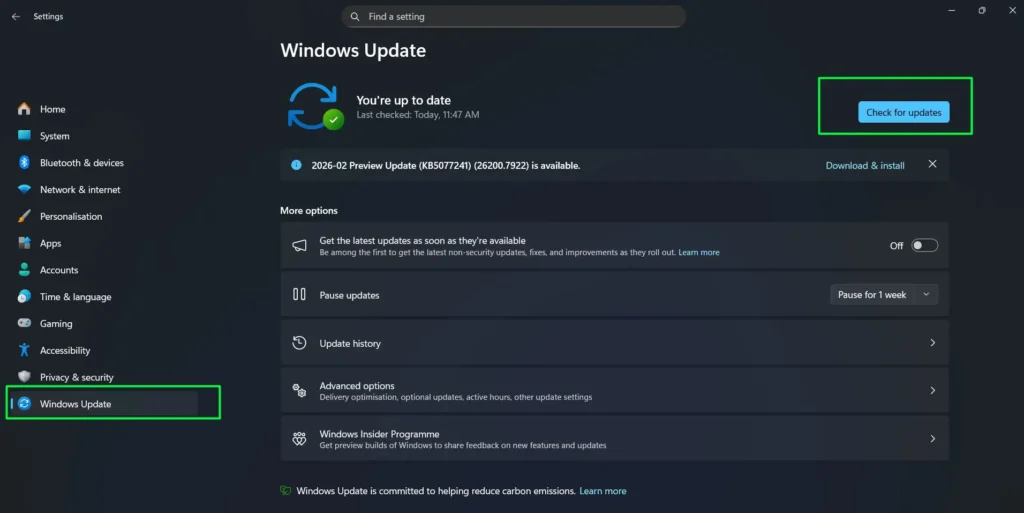
Step 2: Click ‘Windows Update’ in the left panel
Step 3: Click ‘Check for updates’
Step 4: Click ‘Download & install’ to download all available updates
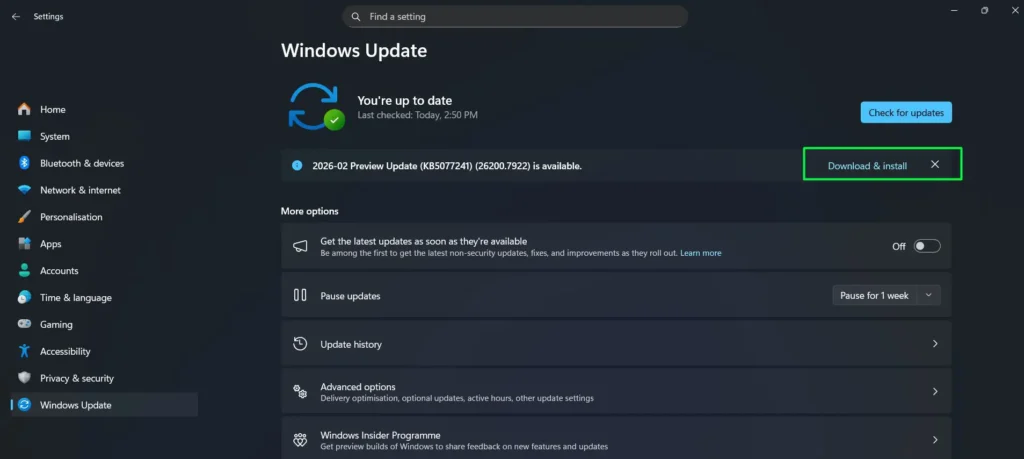
Step 5: Click ‘Restart now’ if required
Step 6: Wait for installation to complete during restart
Step 7: Test the microphone to verify the fix after restart
Optional updates sometimes contain audio-specific fixes as well. To find them, expand ‘Advanced options’ and check the ‘Optional updates’ section for additional driver packages.
Test with a Different USB Port or Audio Jack
Physical connection problems can easily mimic software detection failures. Testing alternative ports helps you isolate whether the issue stems from hardware or from Windows configuration.
Step 1: Disconnect the microphone completely
Step 2: Wait 10 seconds for Windows to clear the device cache
Step 3: Plug the microphone into a different USB port
Step 4: Wait for the device connection sound
Step 5: Open Sound settings to verify detection
Step 6: For 3.5mm jacks, try the front panel if you are using rear ports (or vice versa)
Step 7: Check Device Manager for the new entry
Front panel audio connectors sometimes require separate cable connections inside the computer case. By contrast, rear panel ports connect directly to the motherboard, which generally provides more reliable detection.
Check BIOS/UEFI Settings for Disabled Audio
On older computers or custom-built systems, audio hardware is sometimes disabled at the firmware level. When this happens, Windows cannot detect any devices because the motherboard itself has shut them off — making this a critical checkpoint for persistent issues.
Step 1: Restart the computer
Step 2: Press the BIOS key during startup (usually F2, F10, F12, or Delete)
Step 3: Navigate to ‘Advanced’ or ‘Integrated Peripherals’
Step 4: Look for ‘Onboard Audio’ or ‘Audio Controller’
Step 5: Change the setting to ‘Enabled’
Step 6: Press F10 and exit to save
Step 7: Let Windows boot normally
Pro Tip: Take a photo of your BIOS settings before making any changes. This gives you a reference to restore other settings in case you accidentally modify something during navigation.
Fix Microphone Not Working in Microsoft Teams
Microsoft Teams is one of the most common apps where microphone detection problems appear, even when Windows itself recognizes the hardware correctly. This happens because Teams manages its own audio device settings independently from the system. As a result, fixing the issue requires checking both Windows privacy settings and Teams-specific configuration.
Step 1: Allow Teams to Access Your Microphone
Step 1: Press Windows + I to open Settings
Step 2: Go to Privacy & security > Microphone
Step 3: Ensure Microphone access is toggled On
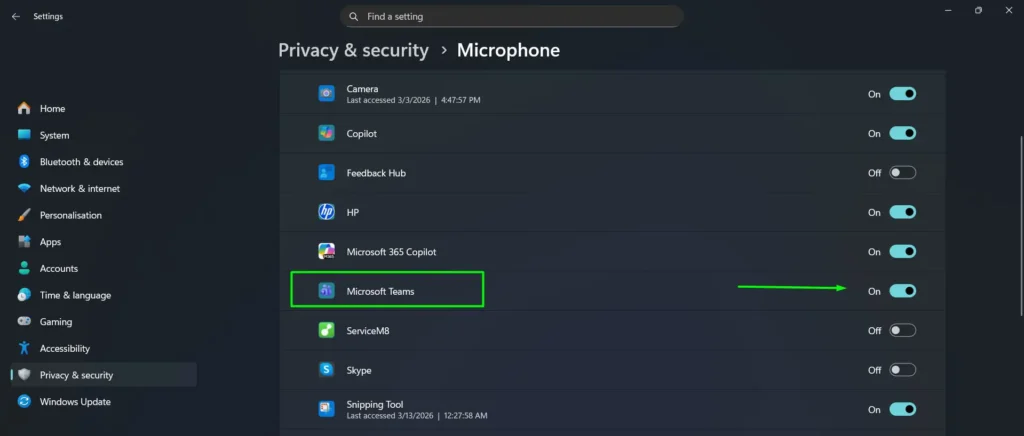
Step 4: Scroll down and find Microsoft Teams in the app list, then toggle it On
Step 5: Also enable Let desktop apps access your microphone if you use the desktop version of Teams
Step 2: Select the Correct Microphone Inside Teams
Step 1: Open Microsoft Teams
Step 2: Click the three-dot menu (···) at the top right, then select Settings

Step 3: Click Devices in the left sidebar
Step 4: Under Microphone, select your preferred microphone from the dropdown
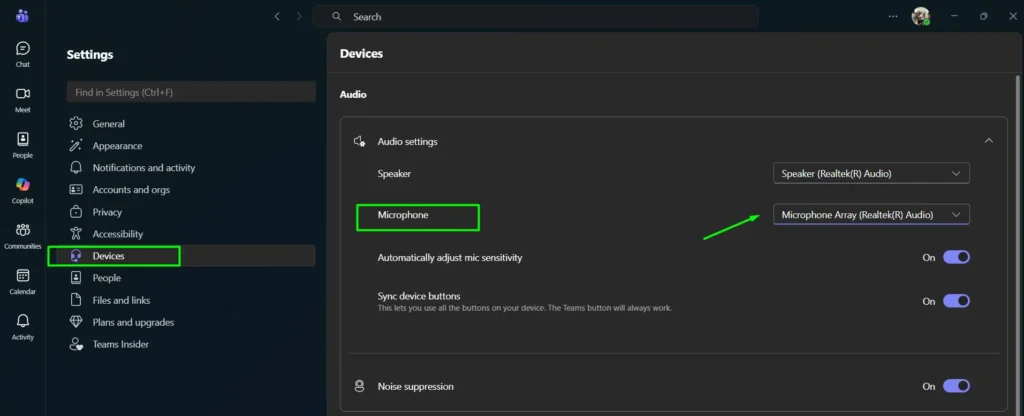
Step 5: Click Make a test call to confirm audio is working
Step 6: Restart Teams completely after making any changes
Pro Tip: When Teams selects the wrong microphone, it shows a green audio bar in meetings but transmits no sound. Always verify the microphone selection inside Teams settings rather than relying on the Windows system indicator alone.
Fix Microphone Not Working in Zoom
Zoom runs its own audio permissions system separately from Windows settings. Even when the microphone works correctly in Device Manager and Sound Settings, Zoom may still fail to detect it without the right configuration on both sides.
Step 1: Allow Zoom to Access Your Microphone in Windows Privacy Settings
Step 1: Press Windows + I to open Settings
Step 2: Go to Privacy & security > Microphone
Step 3: Ensure Microphone access is toggled On at the top
Step 4: Scroll down to Let desktop apps access your microphone and set the toggle to On
Step 5: Below that toggle, you will see a list of desktop apps that have previously accessed your microphone. Confirm that Zoom Meetings appears in this list. If Zoom does not appear yet, open Zoom and start or join a call to trigger the permission prompt.
Note: Unlike Store apps which show individual on/off toggles, desktop apps like Zoom fall under the single Let desktop apps access your microphone master toggle. As long as that switch is On, Zoom will have access.
Step 2: Select the Correct Microphone Inside Zoom
Step 1: Open Zoom and click your profile picture at the top right, then select Settings
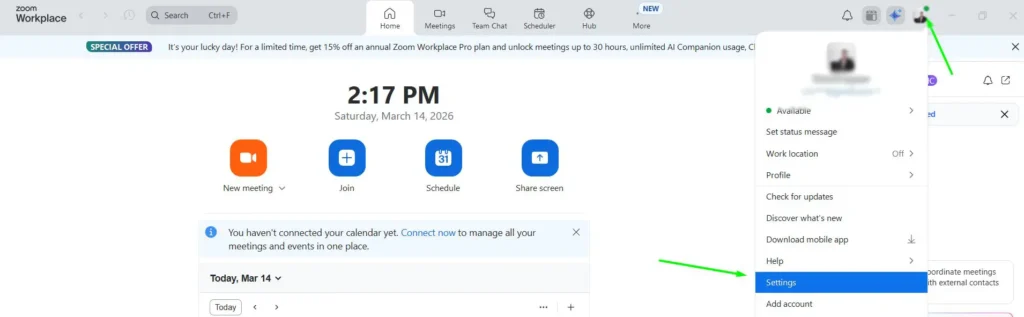
Step 2: Click Audio in the left panel
Step 3: Under Microphone, open the dropdown and select your correct input device
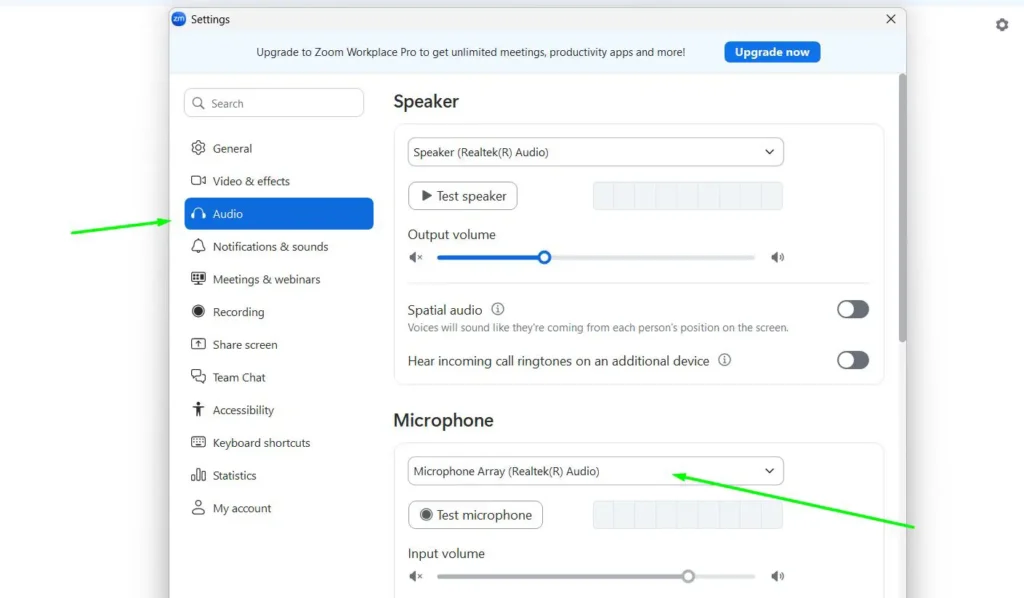
Step 4: Click Test Mic — speak and watch the input level bar to confirm it picks up sound
Step 5: If the input level bar shows no movement, click Advanced and check that Suppress background noise is not set to High, as this setting can suppress all audio including your voice
Step 6: Close Settings and restart Zoom completely after saving any changes
If Zoom still cannot detect your microphone after completing both steps above, uninstall and reinstall the application. File corruption during installation can prevent Zoom from accessing Windows audio devices even when all settings appear correct. You can also use our free mic test tool to confirm your microphone works before joining a Zoom call.
Tips for Preventing Future Microphone Detection Issues
Prevention saves far more time than repeated troubleshooting. Applying these habits keeps your microphone reliably detected across system updates and hardware changes.
- Keep Drivers Updated: Enable automatic driver updates in Device Manager. Right-click the audio device, select Properties, go to the Driver tab, and ensure Windows can install updates automatically.
- Avoid Force Shutdowns: Always shut down Windows properly. Force shutdowns corrupt audio service configurations, leading to detection failures on the next boot.
- Document Working Configurations: After getting the microphone working, note the driver version in Device Manager. This reference helps if future updates cause problems.
- Test After Major Updates: Windows feature updates sometimes reset audio settings. Testing immediately after updates allows quick fixes before important calls or recordings.
- Use Quality USB Hubs: Cheap USB hubs provide insufficient power for microphones. Investing in powered hubs prevents intermittent detection issues.
- Clean Audio Jacks Regularly: Dust buildup in 3.5mm jacks causes poor connections. Compressed air cleaning every few months maintains reliable detection.
Common Microphone Detection Problems and Solutions
Certain scenarios require specific approaches beyond the standard troubleshooting steps above. Understanding these situations speeds up resolution significantly.
Microphone Shows in Device Manager But Not Sound Settings
This combination indicates driver-level detection without proper system integration. Open Device Manager and look for yellow warning triangles, which reveal driver errors. In most cases, updating or reinstalling the driver fixes this mismatch quickly.
Multiple Microphones Confuse Windows Detection
Webcams, headsets, and standalone microphones all register as separate devices, and Windows might default to the wrong one. To fix this, set your preferred device as default in Sound settings and disable any unused devices to eliminate the confusion.
USB Microphone Works on Other Computers But Not This One
When a microphone works elsewhere but not on one specific machine, the problem usually lies with the USB controller rather than the microphone itself. Check Device Manager for ‘Unknown devices’ under Universal Serial Bus controllers, then download USB chipset drivers directly from the motherboard manufacturer’s website.
Detection Works Until Windows Update Installs
Feature updates sometimes replace working drivers with incompatible versions. To recover, open Device Manager, right-click the audio device, select Properties, go to the Driver tab, and click ‘Roll Back Driver’ if the option is available.
Built-in Laptop Microphone Not Detected After External Mic Removal
Windows sometimes fails to switch back to internal hardware automatically. Disabling and then re-enabling the device in Sound settings forces re-detection. Alternatively, restarting the Windows Audio service resets the device enumeration entirely.
Bluetooth Microphone Pairs But Does Not Detect
Bluetooth audio requires separate drivers from wired devices. To resolve this, go to Settings, open Bluetooth & devices, remove the pairing, and then re-pair the device to refresh the connection. Also verify that Bluetooth services are running in services.msc. Keep in mind that privacy settings can also affect microphone access across different connection types.
Frequently Asked Questions
Why isn’t my microphone detected in Windows 11?
Your microphone may not be detected due to outdated drivers, incorrect sound settings, disabled audio services, or hardware connection issues. Most commonly, the device is either disabled in Sound Settings or needs a driver update through Device Manager.
How do I turn on microphone access in Windows privacy settings?
Open Settings, go to Privacy & security, select Microphone, and toggle ‘Microphone access’ to On. Then scroll down to allow specific apps to access your microphone by toggling their individual switches.
Why does Windows say “No microphone found”?
This error appears when Windows cannot detect any audio input device. The microphone may be disconnected, disabled in Sound Settings, have missing drivers, or be disabled at the BIOS level. Check your physical connections first, then enable the device in Sound Settings.
Does my computer have a built-in microphone?
Most laptops include built-in microphones, typically located near the webcam. Desktop computers usually do not have built-in microphones. To check, open Sound Settings, go to Input, and look for “Internal Microphone” or similar device names in the list.
Why is my microphone muted in Windows settings?
Windows may automatically mute your microphone if it was manually muted previously or if privacy settings block microphone access. To fix it, open Sound Settings, select your microphone under Input, and ensure the volume slider is not at zero and the mute button is not activated.
How do I fix microphone settings when my mic isn’t working?
First, check if the microphone is enabled in Sound Settings. Then update or reinstall audio drivers in Device Manager. If issues persist, restart Windows Audio services, run the Windows Audio troubleshooter, and check that microphone privacy settings allow app access.
Why isn’t my microphone working in Microsoft Teams?
Teams requires microphone permissions in both Windows privacy settings and its own internal settings. Go to Settings > Privacy & security > Microphone, turn on microphone access, and ensure Microsoft Teams is allowed. Then open Teams > Settings > Devices and verify the correct microphone is selected there as well.
Why does my microphone work in one app but not in others?
This usually points to an app permission issue rather than hardware detection. Check Windows privacy settings to ensure the non-working apps have microphone access enabled. Some apps also have their own internal microphone settings that need separate configuration.
How do I update microphone drivers in Windows?
Right-click the Start button, select Device Manager, expand ‘Audio inputs and outputs,’ right-click your microphone, and choose ‘Update driver.’ Select ‘Search automatically for drivers’ and Windows will find and install the latest version. Restart your computer after installation completes.
How do I fix microphone detection issues on Dell laptops?
Dell laptops often require manufacturer-specific audio drivers. Visit Dell’s support website, enter your laptop’s service tag, and download the latest audio drivers (usually Realtek). After installation, restart the computer and check whether the microphone is now detected.
Why did my microphone stop working after a Windows update?
Windows updates sometimes install incompatible drivers or reset audio settings without warning. To recover, open Device Manager, right-click the audio device, select Properties, go to the Driver tab, and click ‘Roll Back Driver.’ If that option is unavailable, reinstall the driver completely instead.
How does the Windows troubleshooter fix microphone problems?
The Windows Audio troubleshooter automatically checks driver status, verifies audio services are running, examines system permissions, and tests microphone functionality. Based on what it finds, it applies fixes such as restarting services, enabling disabled devices, or resetting audio configurations to their default state.
Why is it important to fix microphone detection issues?
Microphone detection issues block communication across video calls, voice recording, gaming, and voice commands. Without proper detection, applications cannot access the microphone for essential tasks like remote work meetings, content creation, or accessibility features. Resolving detection problems ensures your computer can use all audio input functionality as intended.
How do I fix microphone detection problems on Windows 10?
The steps are nearly identical to Windows 11. Open Sound Settings via the system tray speaker icon, go to the Recording tab, and check if the microphone appears. Enable it if disabled, then check Privacy settings under Settings > Privacy > Microphone. Although Windows 10 uses a slightly different menu layout, the same toggle options apply. If the device still fails to detect, update your drivers through Device Manager.
How do I test my microphone online without installing anything?
You can test your microphone directly in your browser using our free Online Mic Test Tool. It works on both Windows 10 and Windows 11 without any software download. The tool checks whether your browser detects the microphone and displays a live audio level indicator to confirm it picks up sound.
Why does my microphone work in Sound Settings but not in Zoom or Teams?
This is an app-level permission issue rather than a hardware problem. Windows detects the microphone at the system level, but Zoom and Teams each require their own microphone access permission in Windows Privacy settings. Go to Settings > Privacy & security > Microphone, enable access for both apps individually, then check each app’s internal audio settings to confirm the correct microphone is selected.
What does “exclusive mode” do, and should I disable it?
Exclusive mode lets one application take full control of the microphone, blocking all other apps from accessing it at the same time. This often causes detection problems in secondary apps. To disable it, go to Control Panel > Sound > Recording, right-click your microphone, select Properties, open the Advanced tab, and uncheck “Allow applications to take exclusive control of this device.”
Can a Windows update break my microphone?
Yes — Windows feature updates can overwrite existing audio drivers with incompatible versions or silently reset microphone privacy permissions. If your microphone stopped working after an update, start by rechecking Privacy & security > Microphone settings. If those look correct, roll back the audio driver in Device Manager by right-clicking the device, selecting Properties, opening the Driver tab, and clicking Roll Back Driver.