Beats Studio Pro not turning on is one of the most frustrating issues headphone users run into – especially when everything seemed fine the day before. The good news is that most power issues come down to a handful of fixable causes: a drained battery, a faulty charge connection, or firmware that needs a reset. This step-by-step guide walks through every proven fix so the headphones get back up and running as quickly as possible.
Quick Summary – Key Takeaways
- A completely drained battery is the most common reason Beats Studio Pro will not turn on – charge for at least 30 minutes before testing.
- A dirty or damaged charging cable is often overlooked but causes most charging failures.
- Performing a hard reset clears firmware glitches that prevent the headphones from powering on.
- If the headphones charge but still will not power on, a factory reset is the next step.
- Persistent hardware faults after all software fixes point to a warranty or repair claim.
How to Fix Beats Studio Pro Not Turning On
Fix 1: Charge the Headphones Fully
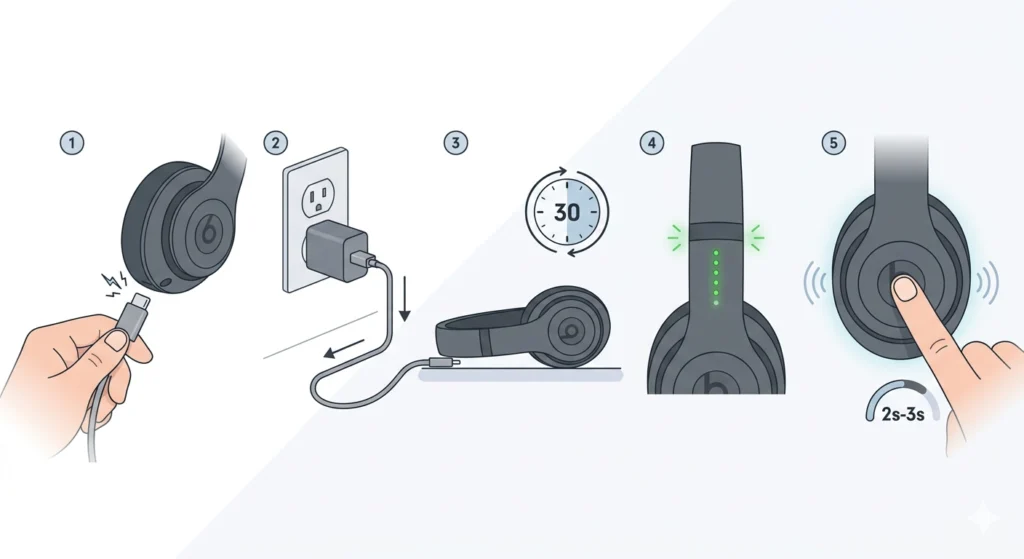
The most common culprit is a battery that has fully depleted. When the battery drops to zero, the headphones will not respond to the power button at all – it can look like a hardware failure when it is actually just an empty cell.
- Step 1: Connect the Beats Studio Pro to a power source using the included USB-C cable.
- Step 2: Use a wall adapter rather than a laptop USB port – wall adapters deliver more consistent power.
- Step 3: Leave the headphones to charge for at least 30 minutes without pressing any buttons.
- Step 4: Watch for the LED fuel gauge on the headband to light up – this confirms the battery is receiving a charge.
- Step 5: After 30 minutes, press and hold the power button for 2 to 3 seconds to attempt to power on.
If no LED lights appear after 30 minutes of charging, move on to Fix 2 to rule out a cable or port problem.
Fix 2: Inspect and Replace the Charging Cable
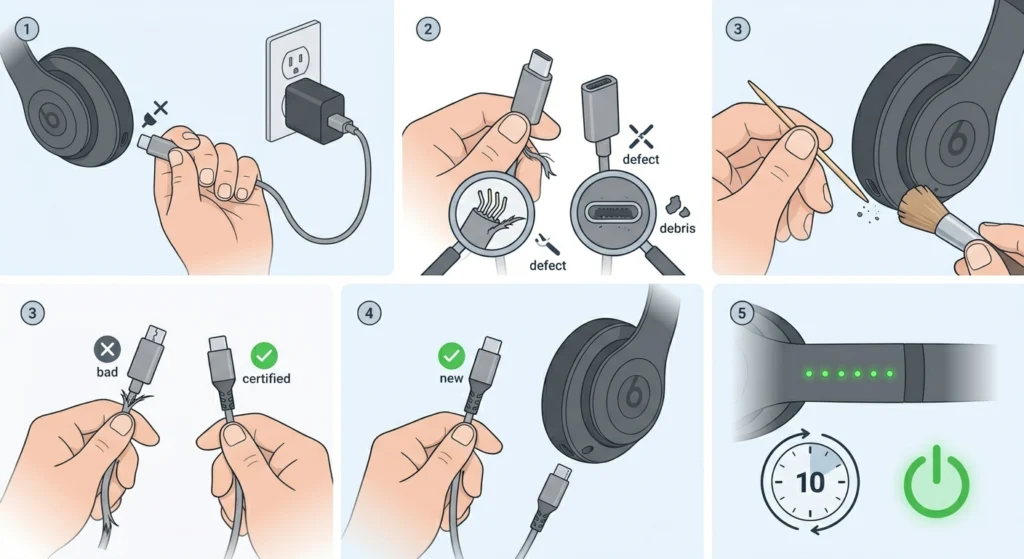
A frayed, bent, or dirty USB-C cable will not deliver power reliably even when plugged in. The headphones may show no response simply because they never actually received a charge.
- Step 1: Unplug the cable from both the headphones and the wall adapter.
- Step 2: Visually inspect both ends of the USB-C cable for bent pins, debris, or visible fraying.
- Step 3: Use a dry toothpick or soft brush to gently clean the USB-C port on the headphones if there is any visible lint or debris.
- Step 4: Swap in a different USB-C cable – ideally a certified one – and reconnect to power.
- Step 5: Wait 10 minutes and check the LED indicator again.
Pro-Tip: Always test with a USB-C cable that is known to work with another device. Many third-party cables carry data only and do not support charging, which means the headphones will sit connected but gain zero battery.
Fix 3: Try a Different Power Source
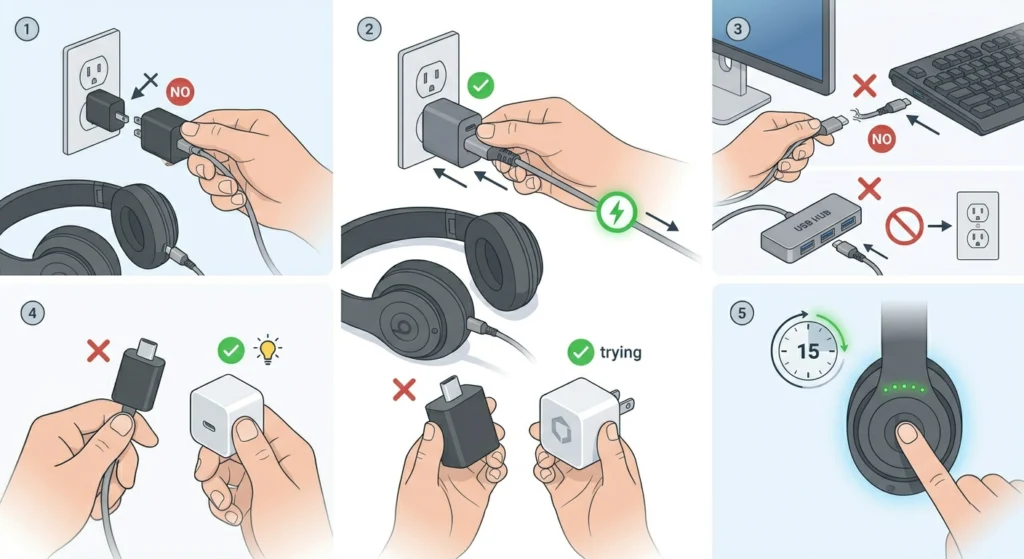
Wall adapters can fail too, and certain USB hubs do not supply enough current to charge Beats Studio Pro properly. Switching power sources takes about two minutes and immediately rules out the adapter as the problem.
- Step 1: Unplug from the current power source.
- Step 2: Connect directly to a wall outlet using a 5W or higher USB-C adapter.
- Step 3: Avoid USB ports on keyboards, monitors, or unpowered hubs.
- Step 4: If available, try charging from a different brand of wall adapter to eliminate adapter-specific faults.
- Step 5: Allow 15 minutes and check for the LED indicator.
Fix 4: Perform a Hard Reset
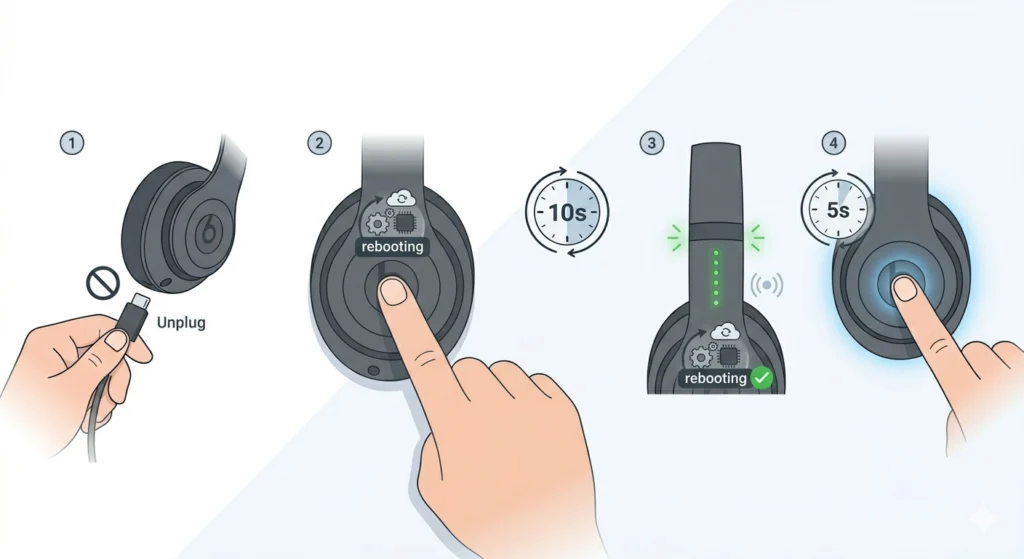
A hard reset forces the headphones to restart their firmware without erasing any pairing data. This fix works when the battery is fine but the headphones are stuck in an unresponsive state – sometimes caused by a software crash or incomplete firmware update.
- Step 1: Make sure the headphones are not connected to a charging cable during the reset.
- Step 2: Press and hold the power button for 10 seconds.
- Step 3: Release the button when the LED indicator flashes – this signals a successful hard reset.
- Step 4: Wait 5 seconds and then press the power button normally to turn the headphones on.
Most users find this single step resolves the issue when charging is confirmed but the headphones still will not respond. The key is to hold the button long enough – 10 full seconds, not a quick press.
Fix 5: Perform a Factory Reset

A factory reset wipes all saved device pairings and returns the headphones to their out-of-box firmware state. This is the right move when a hard reset does not work and the unit still will not power on normally after charging.
- Step 1: Press and hold the power button and the volume down button at the same time.
- Step 2: Hold both buttons for 15 seconds.
- Step 3: Release when the LED indicator flashes red, white, and then off – this confirms the factory reset is complete.
- Step 4: Allow the headphones to restart, then attempt to power on normally.
- Step 5: Re-pair the headphones to any previously connected devices since all Bluetooth pairings will have been cleared.
After pairing the headphones again, it is worth checking the Beats app to confirm the firmware is on the latest version. If audio output behaves strangely after the reset, the guide on re-pairing Bluetooth headphones for stereo sound on Windows can help restore the correct audio channel output.
Pro-Tip: Before starting a factory reset, charge the headphones to at least 20% if possible. Resetting on a critically low battery can occasionally cause the process to fail mid-cycle, which may leave the firmware in an incomplete state.
Fix 6: Update Firmware via the Beats App
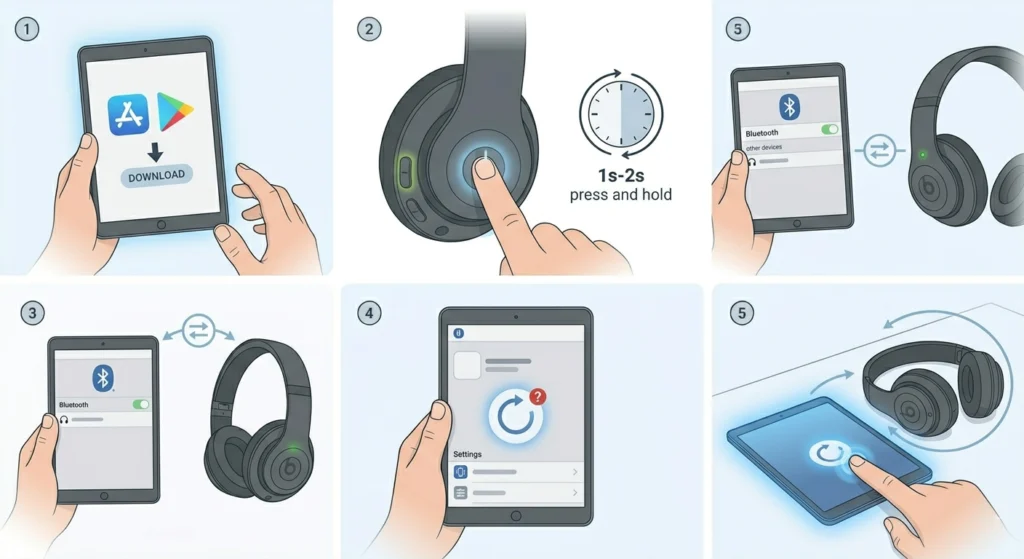
Outdated firmware can introduce power management bugs that stop the headphones from turning on reliably. If the headphones are turning on intermittently or power off immediately after startup, a firmware update is likely the fix.
- Step 1: Download or open the Beats app on an iOS or Android device.
- Step 2: Make sure the headphones are charged and powered on – they need to be on to update.
- Step 3: Pair the headphones to the device via Bluetooth.
- Step 4: Navigate to the headphone settings page in the app and check for a firmware update notification.
- Step 5: Tap ‘Update’ and keep the headphones near the phone until the update is fully installed – do not power them off during this process.
Fix 7: Contact Beats Support or Claim Warranty
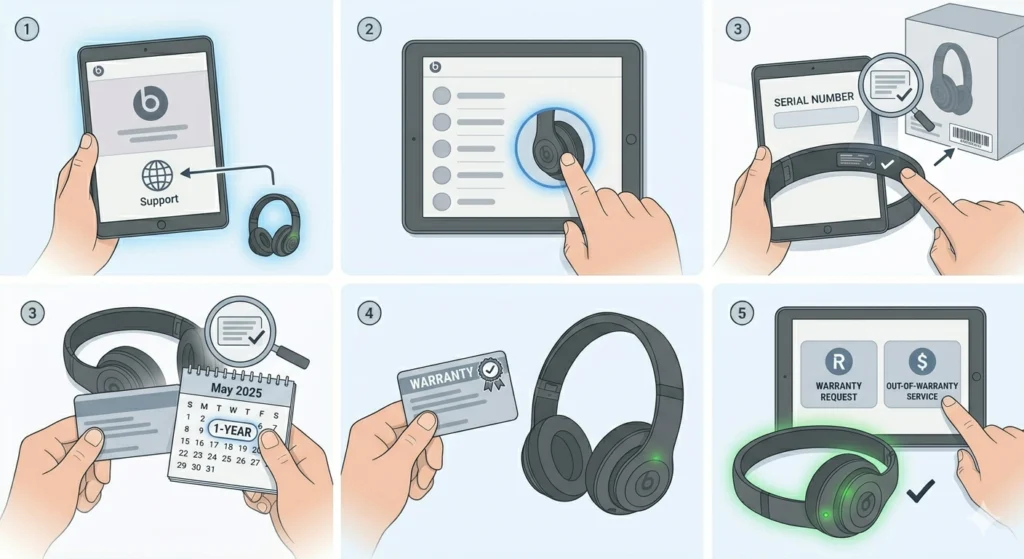
If every fix above has been attempted and the headphones still will not turn on, the issue is most likely a hardware fault – a failed battery cell, a damaged charging circuit, or an internal component failure. These are not user-serviceable repairs.
- Step 1: Visit beats.com and navigate to the Support section.
- Step 2: Select ‘Beats Studio Pro’ from the product list and choose ‘Get Support.’
- Step 3: Provide the serial number found inside the headband or on the original box.
- Step 4: Beats Studio Pro comes with a 1-year limited warranty – check if the purchase date is still within the coverage window.
- Step 5: If under warranty, request a replacement or repair. If out of warranty, ask about out-of-warranty service pricing.
Tips for Keeping Beats Studio Pro Powered and Healthy
- Store the headphones in the included case when not in use – physical protection prevents port damage that causes charging failures.
- Charge the battery before it drops below 10% regularly – deep discharge cycles over time degrade lithium battery capacity.
- Use only USB-C cables rated for charging, not data-only cables, to ensure full power delivery.
- Keep the Beats app installed and firmware updated – Beats pushes power management fixes through firmware regularly.
- Clean the USB-C port monthly with a soft dry brush to prevent debris buildup that blocks charging contacts.
- Avoid leaving the headphones in a car or direct sunlight – heat above 35C damages battery cells and can cause them to stop holding charge.
Common Problems and Troubleshooting
LED Light Does Not Turn On While Charging
If the LED fuel gauge does not illuminate after plugging in, the cable, adapter, or charging port is not making a proper connection. Start with Fix 2 and Fix 3 above – swap the cable first, then the adapter. If a known-good cable and adapter still produce no LED response, the charging port on the headphones may be physically damaged and requires a service repair.
Headphones Turn On But Immediately Power Off
This behavior usually means the battery health has degraded to the point where it cannot sustain a load. Charge the headphones for a full 2 hours and retry. If the problem persists, the battery likely needs replacement – contact Beats Support for a service assessment.
Power Button Feels Stuck or Unresponsive
Physical damage or debris under the button can cause it to feel stuck. Inspect the button for visible damage. If the button clicks normally but the headphones do not respond, perform the hard reset in Fix 4 before assuming hardware failure.
Headphones Work After Reset But Lose Power Quickly
A reset that temporarily fixes the issue followed by rapid battery drain suggests a firmware bug or aging battery. Update the firmware via the Beats app immediately. If battery life continues to drop significantly after an update, a battery replacement service call is the next step.
Windows PC Does Not Recognize the Headphones After Fixing Power
Once the headphones are powering on correctly but audio or microphone issues appear on a Windows 11 machine, the problem often sits in the audio input settings rather than the headphones themselves. The guide on resolving microphone detection problems on Windows 11 covers exactly how to get the headset recognized properly for both audio and microphone input.
Frequently Asked Questions
Why are Beats Studio Pro not turning on even when fully charged?
If the headphones are confirmed charged but will not power on, the most likely cause is a firmware crash or a stuck software state. Perform the hard reset described in Fix 4 by holding the power button for 10 seconds. If that does not work, move to the factory reset in Fix 5. In rare cases, a failed battery that shows charge on the indicator but cannot actually power the unit requires professional service.
How long does it take to charge Beats Studio Pro from completely dead?
A completely depleted Beats Studio Pro takes approximately 2 to 2.5 hours to reach a full charge using a standard USB-C wall adapter. The headphones also support Fast Fuel charging – just 10 minutes of charging provides up to 3 hours of playback when the battery is low but not completely dead.
Will a factory reset fix Beats Studio Pro that won’t turn on?
A factory reset resolves power-on problems that are caused by corrupted firmware or stuck software processes. It will not fix hardware faults such as a failed battery or damaged charging port. If the headphones power on briefly after the reset but fail again, a hardware issue is the likely root cause.
What does the LED indicator mean when charging Beats Studio Pro?
The LED fuel gauge on the Beats Studio Pro headband uses color to communicate battery status. A solid white light means the battery is charged. A flashing white light during charging shows active charging is occurring. A red light indicates a low battery. No light at all during charging typically means the cable, adapter, or port is not making a proper connection.
Can a bad USB-C cable stop Beats Studio Pro from turning on?
Yes – this is one of the most common causes. A cable that appears functional may be a data-only cable incapable of delivering charging current. The headphones will not power on if they never actually charged. Always test with a different certified USB-C cable before assuming there is a hardware problem with the headphones themselves.
Is there a warranty for Beats Studio Pro power issues?
Beats Studio Pro comes with a 1-year limited warranty that covers manufacturing defects, including hardware power failures. If the headphones are within the warranty period and all software fixes have failed, contact Beats Support at beats.com to initiate a warranty claim. AppleCare+ can also extend coverage if it was purchased at the time of the original order.
Can extreme temperatures cause Beats Studio Pro to not turn on?
Yes. Lithium-ion batteries in the Beats Studio Pro operate best between 0 and 35 degrees Celsius. Exposure to temperatures outside this range – like leaving headphones in a hot car – can temporarily disable the battery protection circuit, causing the headphones to appear completely dead. Allowing the unit to return to room temperature for 30 minutes before attempting to power on often resolves this.
How do you hard reset Beats Studio Pro?
To hard reset Beats Studio Pro, press and hold the power button for 10 full seconds until the LED indicator flashes. Release the button and wait 5 seconds before pressing the power button again to turn the headphones on. This process restarts the firmware without clearing Bluetooth pairings, making it a safe first step before attempting a full factory reset.
What is the difference between a hard reset and a factory reset on Beats Studio Pro?
A hard reset restarts the firmware and clears temporary software errors without removing any stored data or Bluetooth device pairings. A factory reset goes further – it erases all paired device data and returns the headphones to their original out-of-box configuration. Start with a hard reset and only move to a factory reset if the hard reset does not resolve the issue.
When should Beats Studio Pro be sent in for repair?
After completing all the fixes in this guide – confirming a full charge with a known-good cable and adapter, performing both a hard reset and factory reset, and checking firmware – if the headphones still will not power on, the issue is a hardware fault. At that point, contacting Beats Support for a warranty replacement or out-of-warranty service repair is the right course of action.