Looking to get help with Windows Media Player in Windows 11? This guide covers everything needed to get it running smoothly — from enabling it for the first time and playing video files, to organizing a music library and fixing the most common issues. Before jumping into the steps, it is worth understanding what changed in Windows 11 regarding media players, which the next section explains. This article is based on the latest Windows 11 experience, so everything here is accurate and genuinely useful for anyone working with Windows Media Player today.
Windows Media Player vs the New Media Player App in Windows 11
Before diving in, it helps to understand what changed in Windows 11. Microsoft has officially replaced Windows Media Player with a brand new app simply called ‘Media Player.’ This new app has a modern dark-themed interface, a cleaner layout, and sections for Music library, Video library, Play queue, and Playlists — all accessible from the left panel. It also includes an ‘Open file(s)’ button right on the home screen, making it quick to load any audio or video file without needing to browse a library first.
The new Media Player app is what opens by default when launching media files on an updated Windows 11 system. It is sleek, fast, and handles most common formats without needing extra setup.
That said, the classic Windows Media Player is still available on Windows 11 under the name ‘Windows Media Player Legacy.’ It carries all the same features long-time users are familiar with — library management, playlist creation, device syncing, and more. Both apps can be installed and used at the same time, so there is no need to choose one over the other. This guide covers Windows Media Player and its features in depth, but it is worth knowing the new Media Player app exists as a capable modern alternative built right into Windows 11.
How to Enable Windows Media Player Legacy in Windows 11
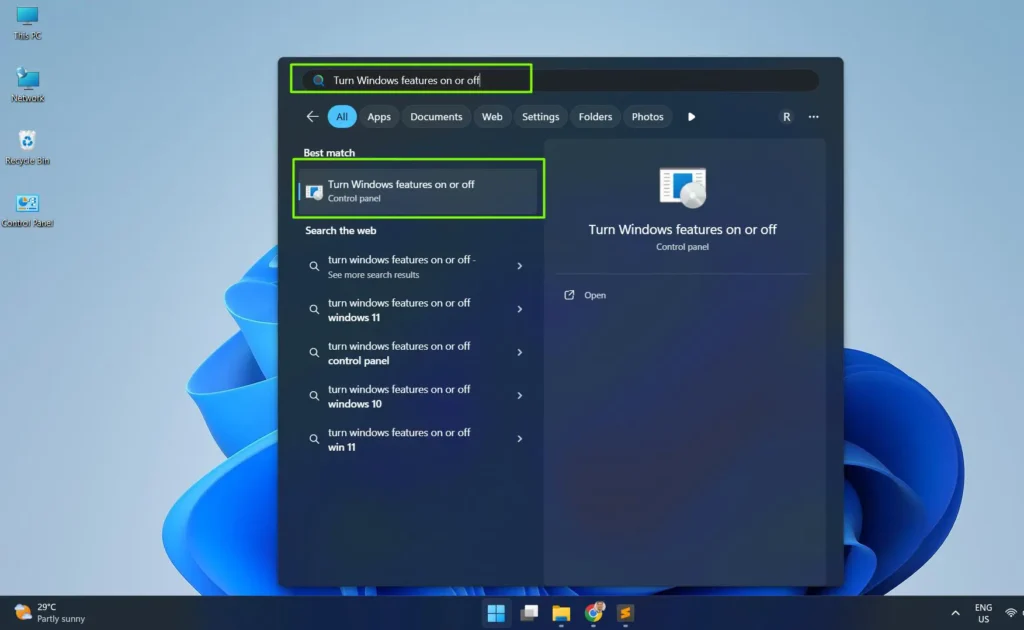
Windows Media Player is not always turned on by default in Windows 11. Here is how to enable it before anything else.
Step 1: Open the Start menu and search for ‘Turn Windows features on or off’
Step 2: Click on the result to open the Windows Features panel
Step 3: Scroll down and find ‘Media Features’ — click the arrow to expand it
Step 4: Check the box next to ‘Windows Media Player Legacy’

Step 5: Click OK and restart the computer if prompted
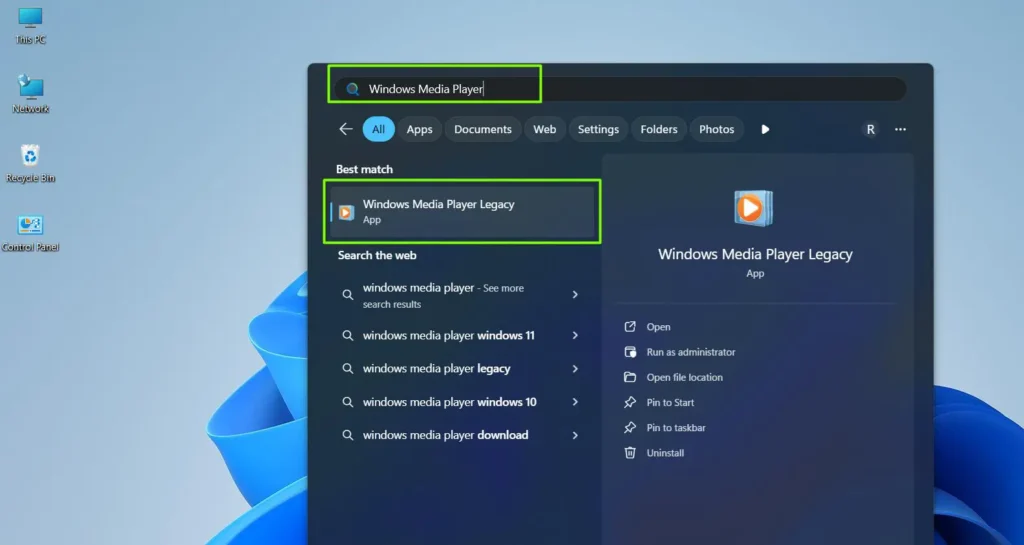
After restarting, search for ‘Windows Media Player’ in the Start menu and it should appear ready to use.
On Windows 11, Microsoft has shifted focus to the new Media Player app as the default, but the classic Windows Media Player is still fully available through this method. Both versions can coexist on the same machine without any issues.
How to Open and Set Up Windows Media Player for the First Time
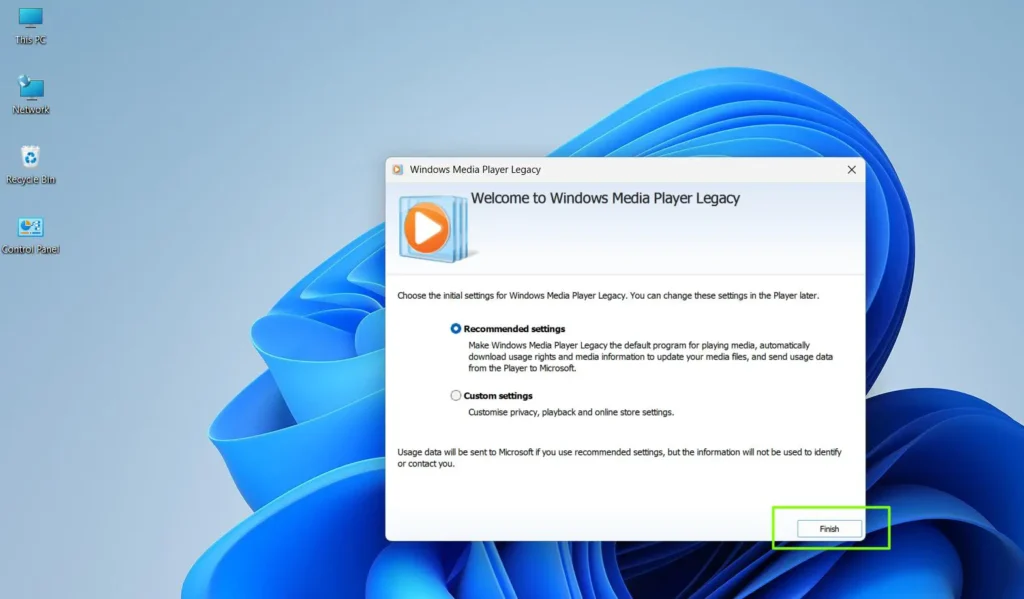
The first time Windows Media Player opens, it will ask to choose a setup option.
Step 1: Open the Start menu, type Windows Media Player in the search bar, then click the app to launch it.
Step 2: Choose ‘Recommended settings’ for the quickest setup — this sets WMP as the default player for most media types
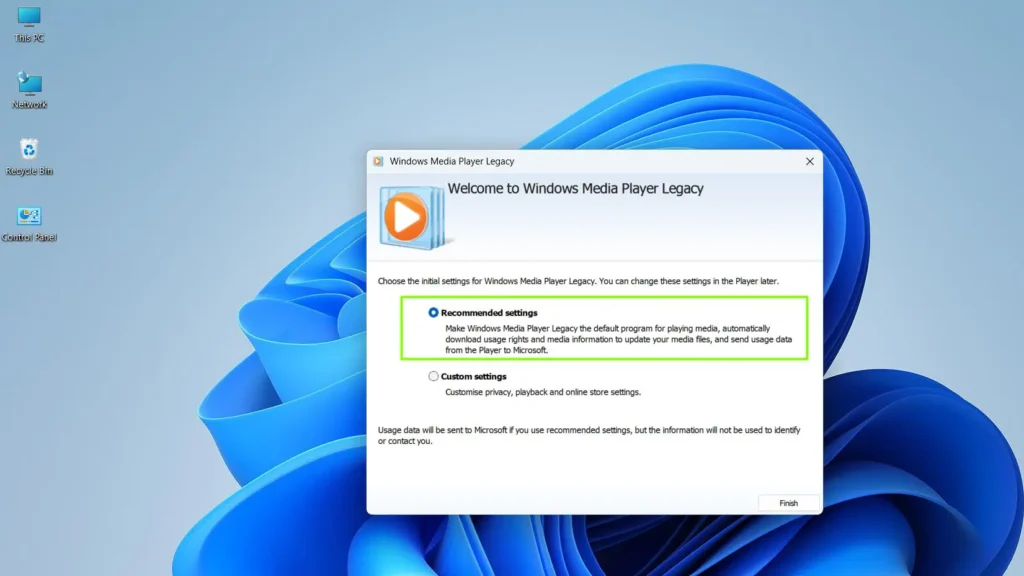
Step 3: Click Finish to complete the initial setup
The player will launch and show the main library view. From here, media files can be added, playlists created, and settings adjusted.
How to Add Music, Videos, and Photos to the Library
Windows Media Player organizes everything through its library system. Adding files is straightforward.
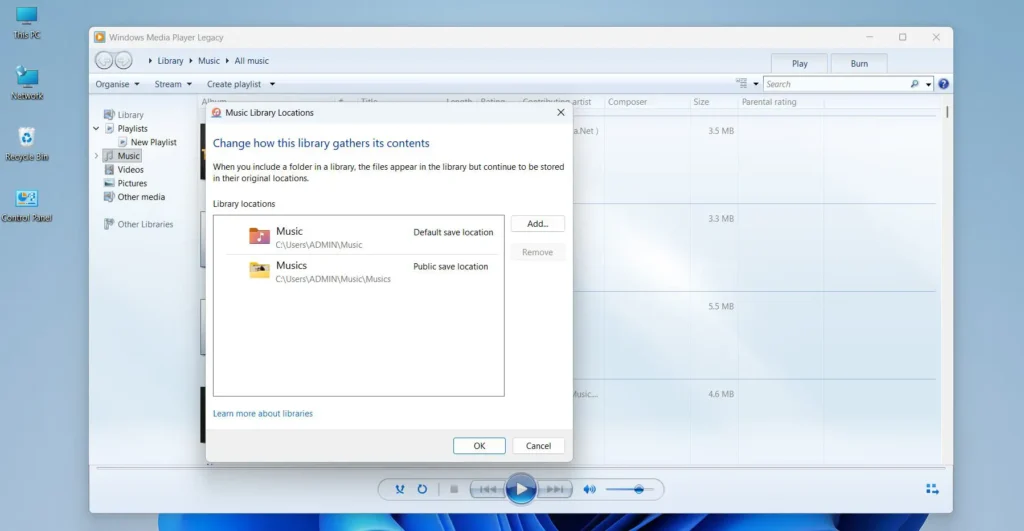
Step 1: Open Windows Media Player
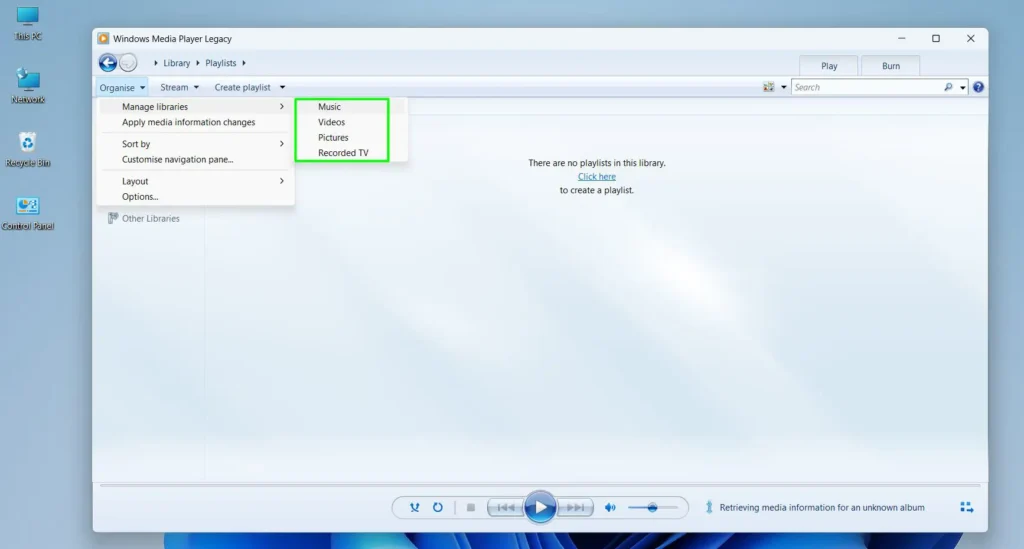
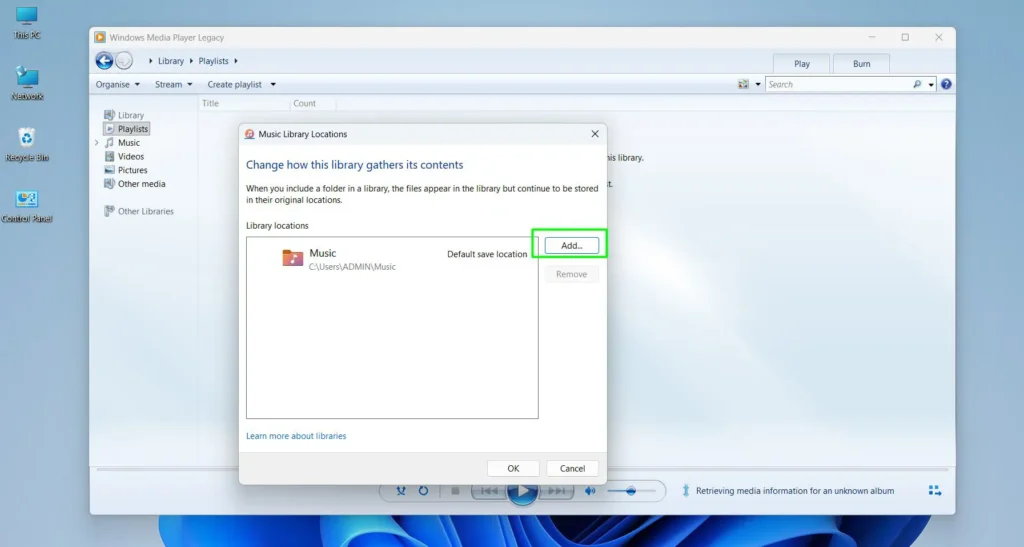
Step 2: Click ‘Organize’ in the top-left toolbar, then select ‘Manage libraries’
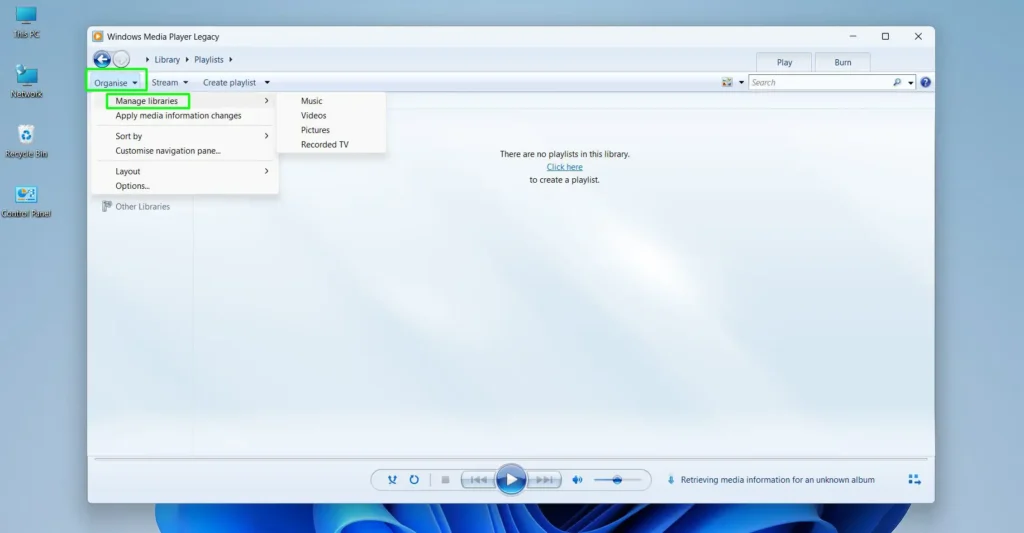
Step 3: Choose the type of media to manage — Music, Videos, or Pictures
Step 4: Click ‘Add’ to include a new folder location
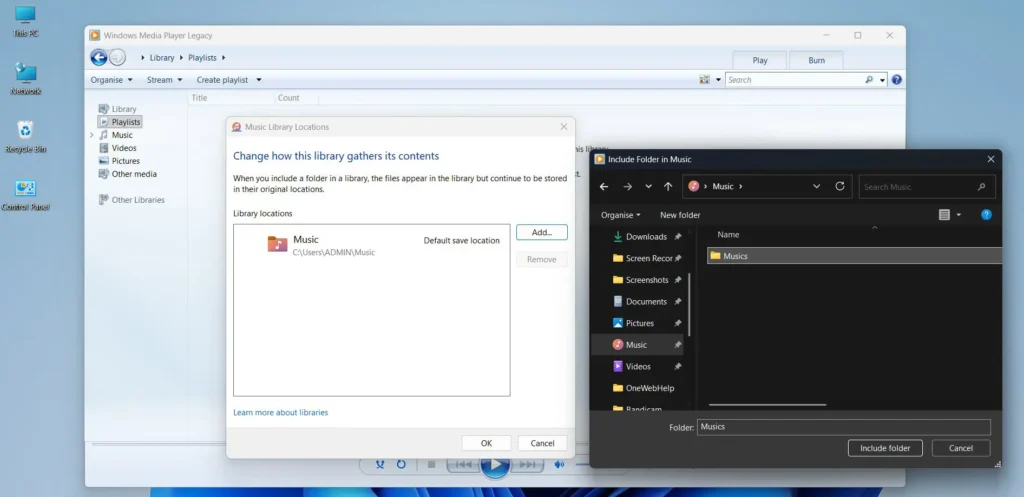
Step 5: Browse to the folder where media files are stored and click ‘Include folder’
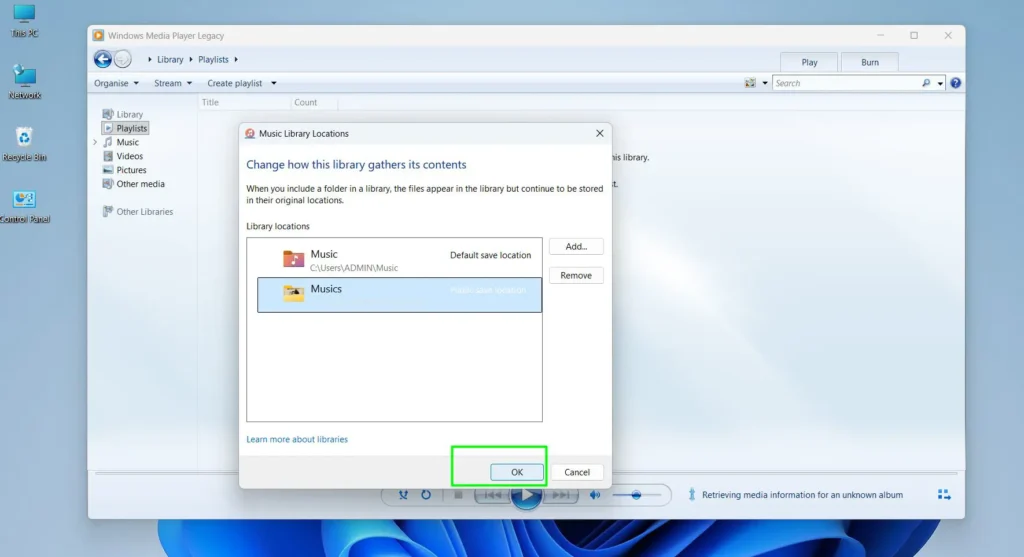
Step 6: Click OK to save the changes
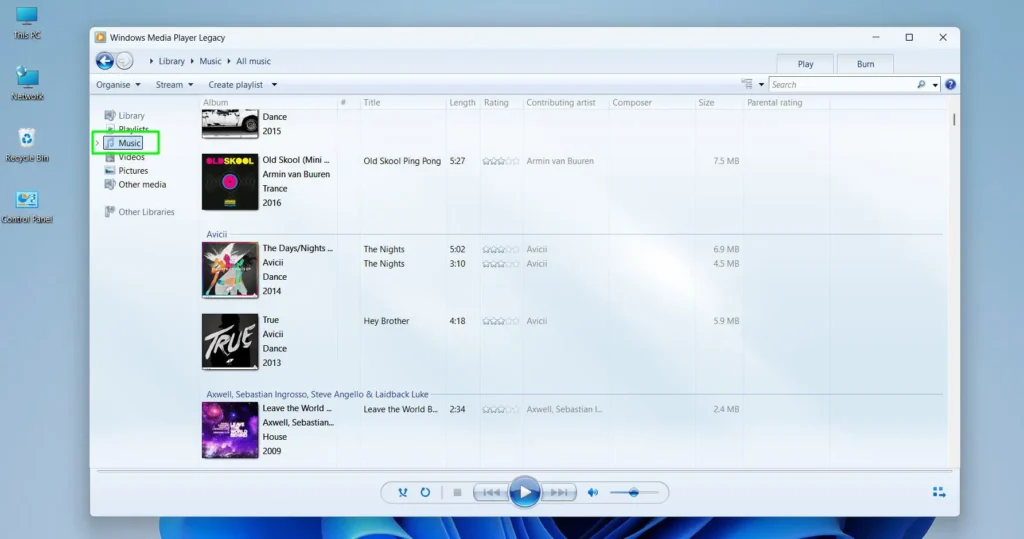
Windows Media Player will automatically scan those folders and add all supported files to the library. This works best when media files are organized in dedicated folders like Documents, Music, or an external drive.
Files can also be added manually by dragging and dropping them directly into the player window while in library view.
How to Play Music and Audio Files
Playing music in Windows Media Player is one of the most common uses. Here is the direct way to do it.
Step 1: Open Windows Media Player and go to the Music section in the left panel
Step 2: Browse by Artist, Album, or Genre using the tabs at the top
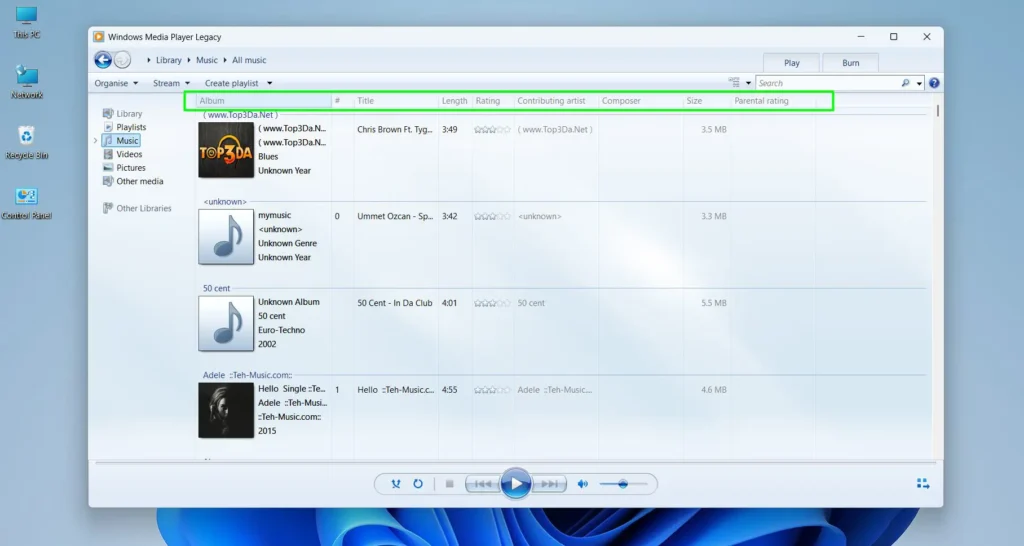
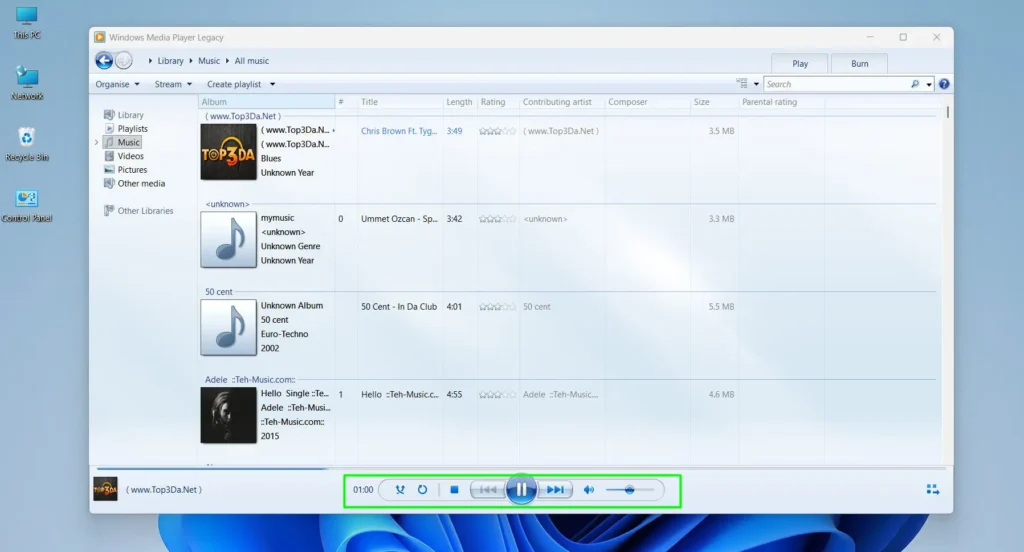
Step 3: Double-click any song or right click to start playing
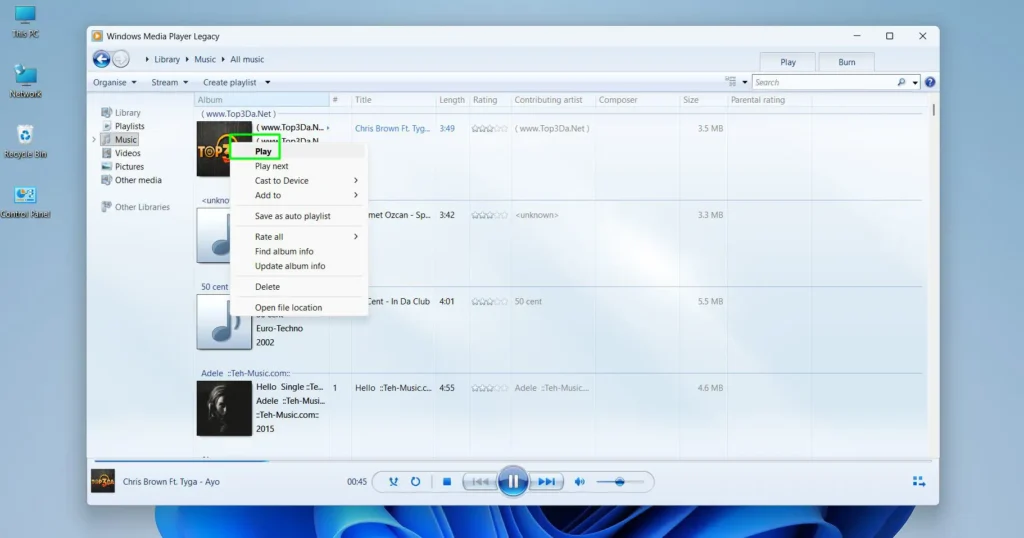
Step 4: Use the controls at the bottom — Play/Pause, Skip, Volume, and Shuffle
To play a specific audio file from File Explorer without adding it to the library, right-click the file and select ‘Play with Windows Media Player.’ This opens the file directly without needing to navigate the library.
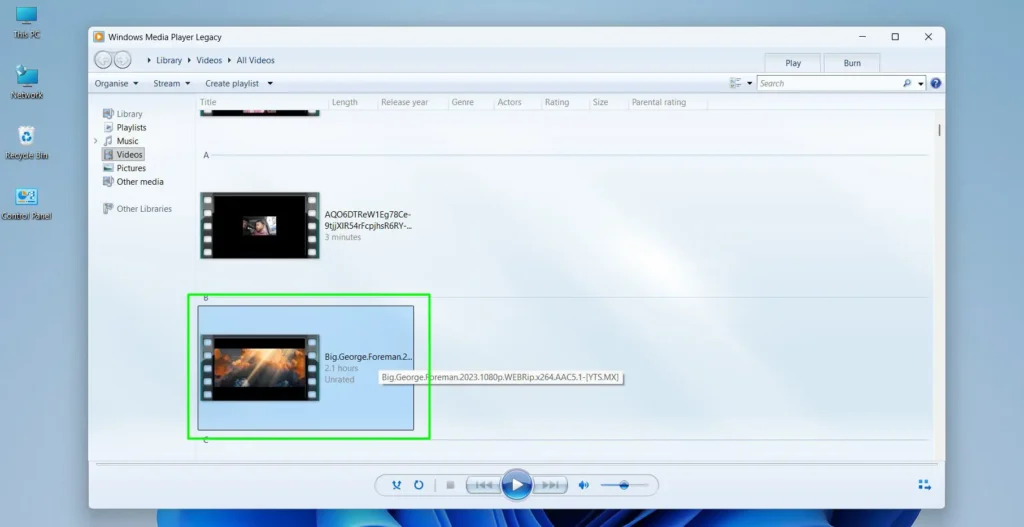
How to Play Video Files in Windows Media Player
Playing videos works similarly to music, but there are a few things to keep in mind regarding file format compatibility.
Step 1: Open Windows Media Player
Step 2: Click ‘Videos’ in the left-side navigation panel
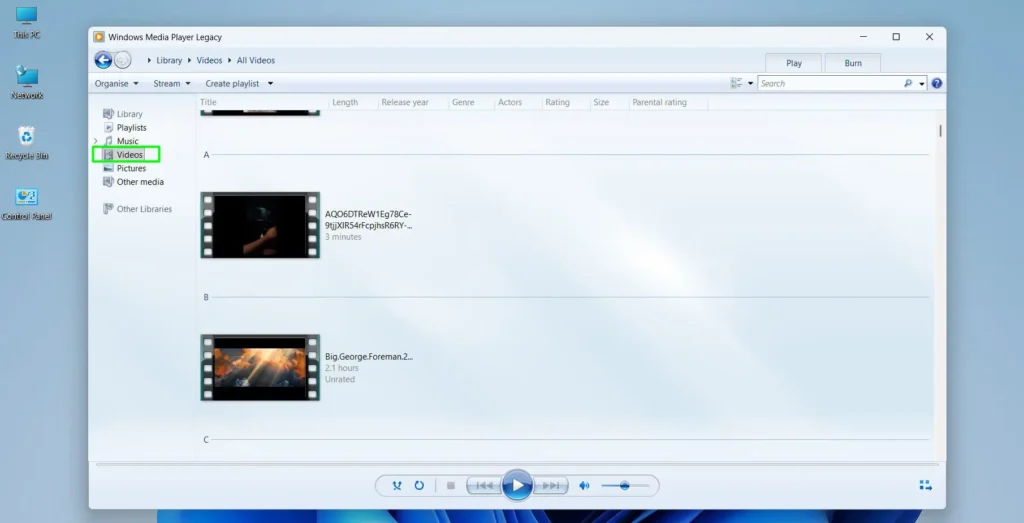
Step 3: Double-click the video to begin playback
Alternatively, right-click any video file in File Explorer and choose ‘Play with Windows Media Player’ to launch it directly.
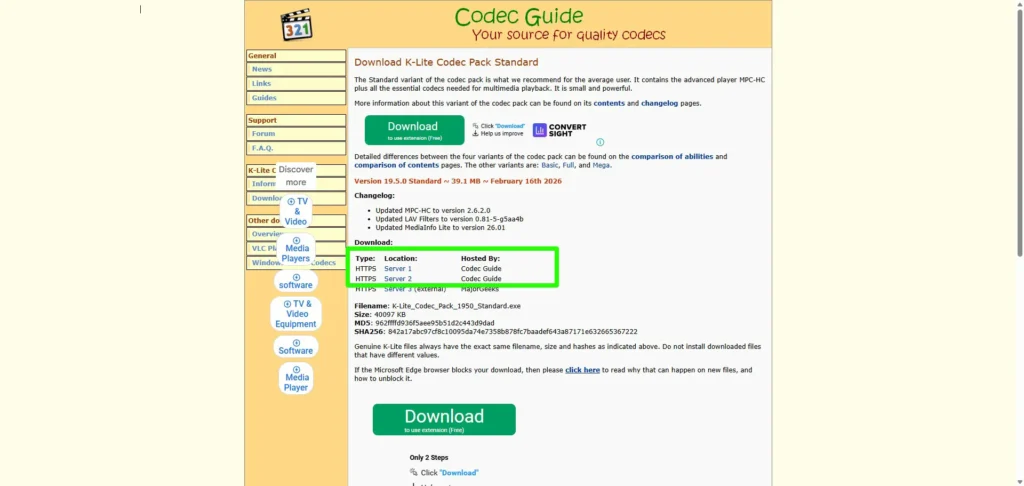
Windows Media Player on Windows 11 natively supports formats like AVI, WMV, MP4, MOV, and MP3. If a video file does not play, it usually means the required codec is missing. The most common fix is to install the K-Lite Codec Pack, which adds support for nearly all video formats including MKV and HEVC. This is a trusted and widely used solution that most people rely on.
How to Install Codecs for Unsupported File Formats
When a file shows an error or plays without audio or video, a missing codec is almost always the reason.
Step 1: Visit the official K-Lite Codec Pack website at codecguide.com
Step 2: Download the ‘Basic’ or ‘Standard’ version depending on the need
Step 3: Run the installer and follow the on-screen steps
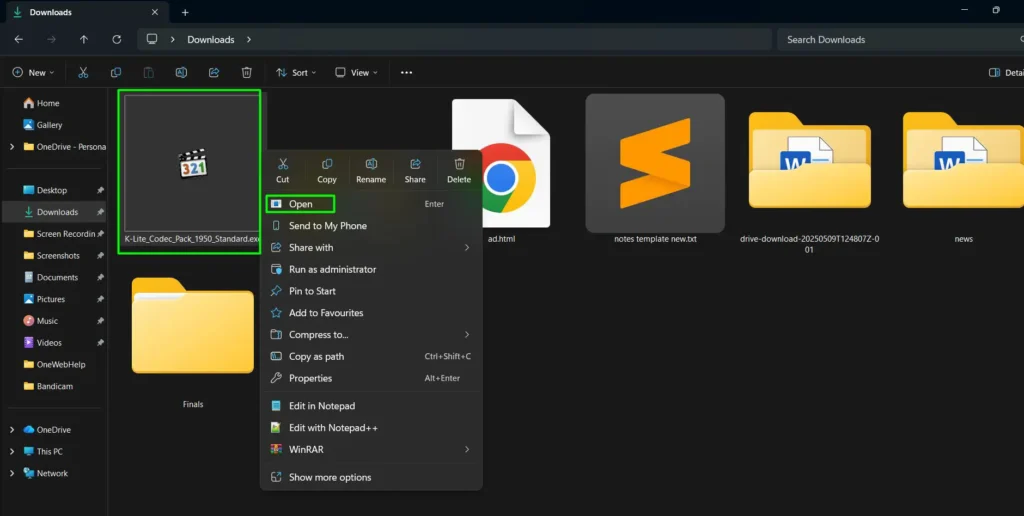
Step 4: Restart Windows Media Player after installation
Step 5: Try playing the file again
After installing the codec pack, most files that previously failed to play will work without any additional changes.
Pro-Tip: Always download codec packs from the official source. Third-party sites often bundle unwanted software. K-Lite from codecguide.com is the most trusted and cleanest option available.
How to Create and Manage Playlists
Creating playlists in Windows Media Player Legacy allows for a custom listening experience and keeps media organized exactly the way it is needed. The process is simple and takes less than a minute to set up.
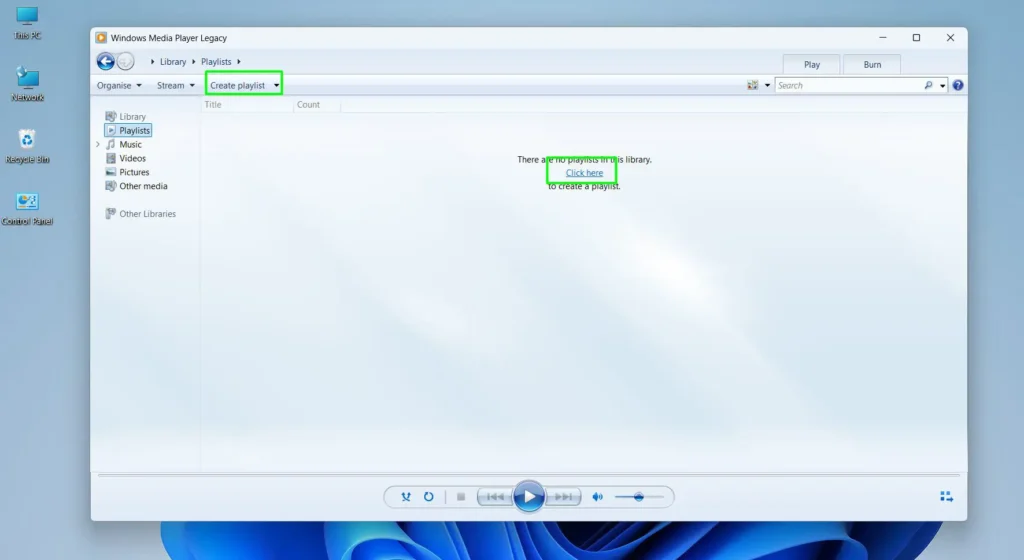
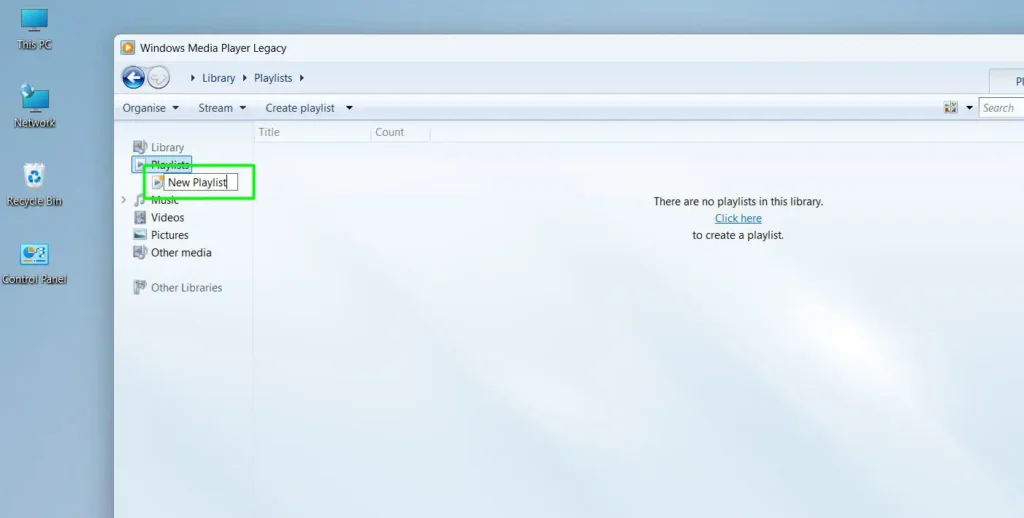
Step 1: Open Windows Media Player and look at the left navigation panel
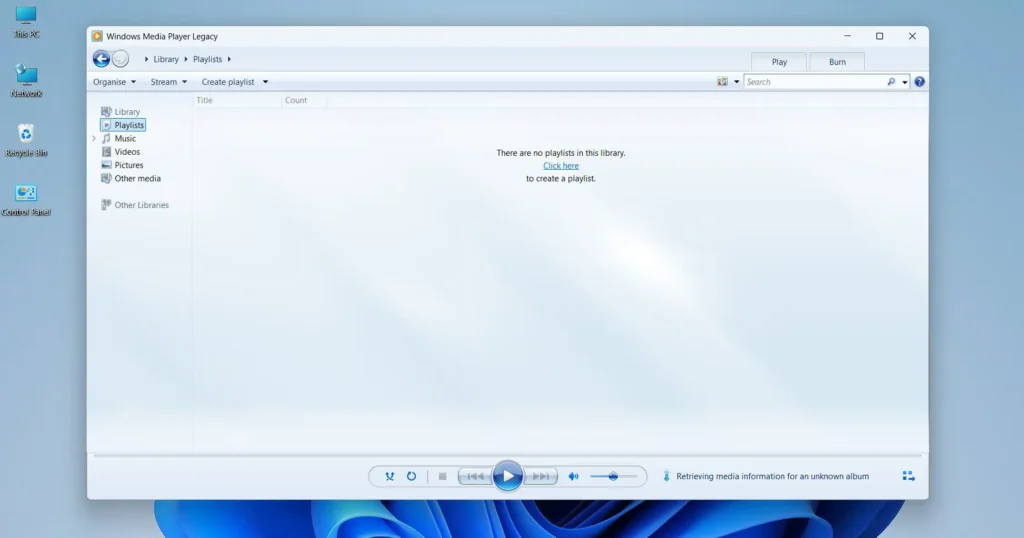
Step 2: Click on ‘Playlists’ in the left panel — if no playlists exist yet, the main area will show a message that says ‘There are no playlists in this library’
Step 3: Click the ‘Create playlist’ button in the top toolbar, or click the ‘Click here’ link shown in the main area to create the first playlist
Step 4: A ‘New Playlist’ entry will appear under the Playlists section in the left panel
Step 5: Type a name for the playlist and press Enter to save it
Once the playlist is created and named, it is ready to receive media files. This is where most people find the drag-and-drop method to be the fastest way to build out a playlist.
Step 6: Navigate to Music, Videos, or any media section in the left panel
Step 7: Select the songs or files to add — hold Ctrl to select multiple files at once
Step 8: Drag the selected files directly onto the playlist name in the left panel and release
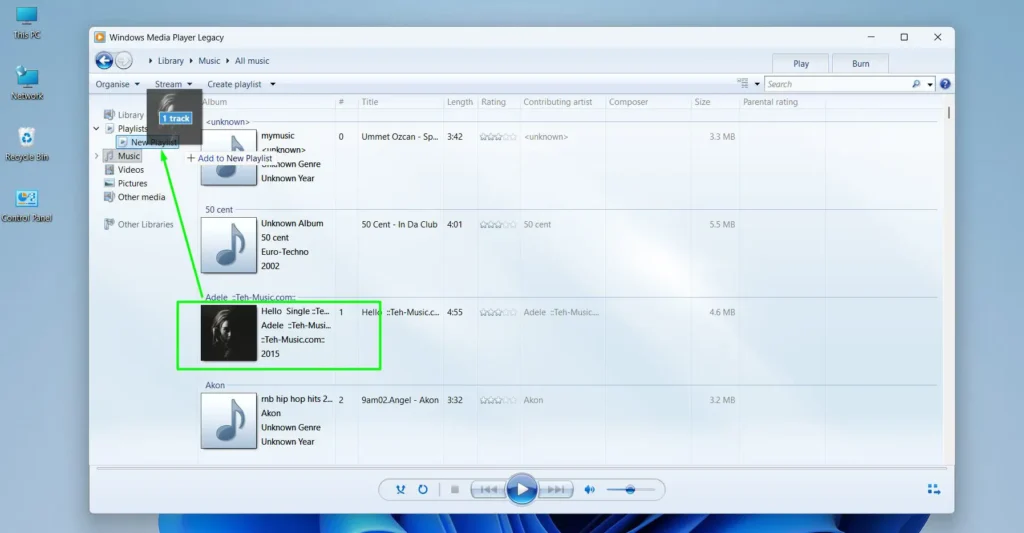
The songs will be added to the playlist immediately. Double-click the playlist name at any time to load and play it. To edit a playlist later, right-click it in the left panel and select ‘Edit in list pane’ — from there, tracks can be removed or reordered by dragging them up or down.
Pro-Tip: After naming the playlist, keep the left panel visible while browsing the music library. Dragging songs directly onto the playlist name in the panel is the quickest way to build a large playlist without extra clicks.
How to Change the Default File Associations for Windows Media Player
To make Windows Media Player the default app for playing specific file types on Windows 11, the file associations need to be updated in Settings.
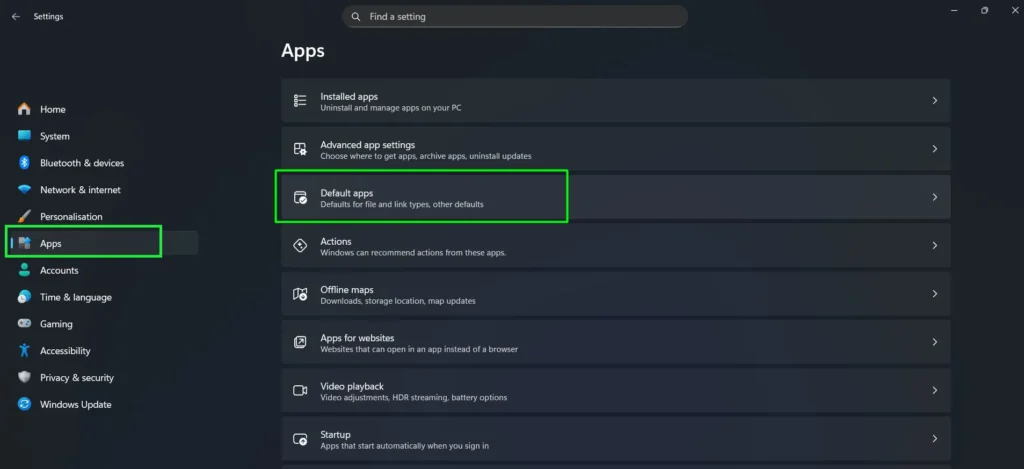
Step 1: Open the Start menu and go to Settings
Step 2: Click on ‘Apps’ and then select ‘Default apps’
Step 3: Scroll down and click on ‘Windows Media Player Legacy’
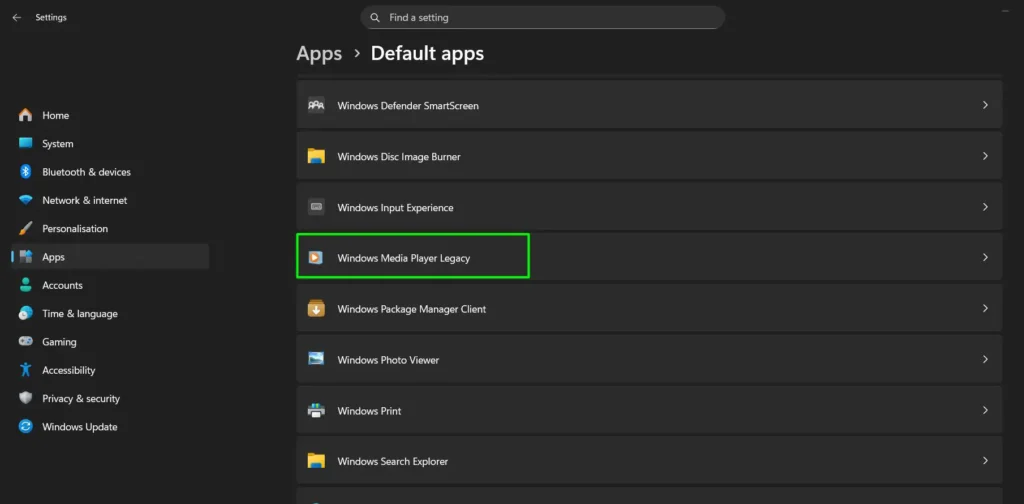
Step 4: A list of file types will appear — click each one and choose ‘Windows Media Player’ as the default
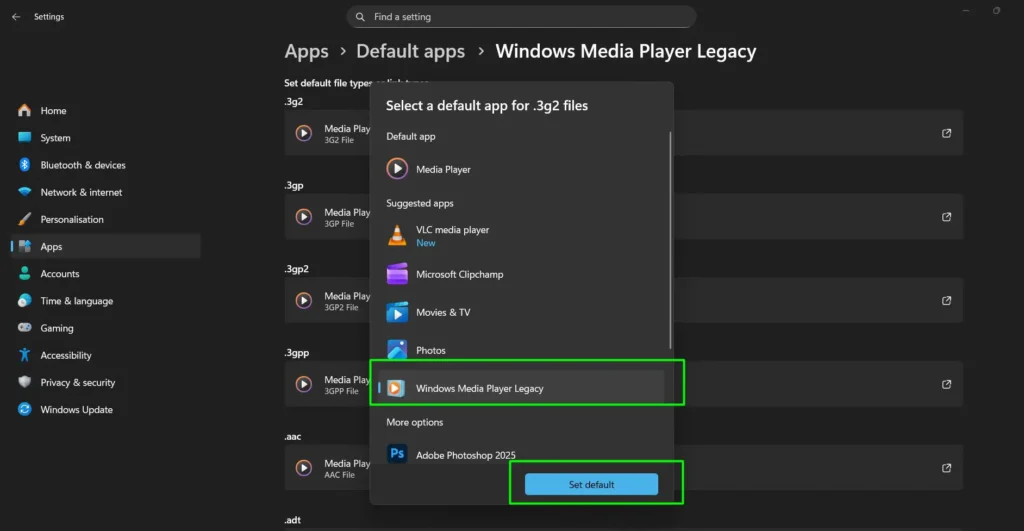
Alternatively, right-click any media file in File Explorer, hover over ‘Open with,’ and select ‘Choose another app.’ Select Windows Media Player and check the box that says ‘Always use this app to open [file type] files.’
How to Update Windows Media Player on Windows 11
Windows Media Player updates come through Windows Update, not as standalone downloads. Keeping Windows 11 up to date ensures the latest version of WMP is installed.
Step 1: Open the Start menu and go to Settings
Step 2: Click on ‘Windows Update’
Step 3: Click ‘Check for updates’
Step 4: Install any available updates and restart if required
There is no separate way to update Windows Media Player outside of the Windows Update process. Regular Windows 11 system updates keep everything current, including media playback components.
Common Windows Media Player Problems and How to Fix Them
Even on a fully updated Windows 11 system, Windows Media Player can run into a few recurring issues. Most of them have straightforward fixes that take only a minute or two to apply.
Windows Media Player Will Not Open
Sometimes clicking the app does nothing or it crashes immediately on launch. This is usually caused by a corrupted player process or a background instance that is stuck.
Step 1: Press Ctrl + Shift + Esc to open Task Manager
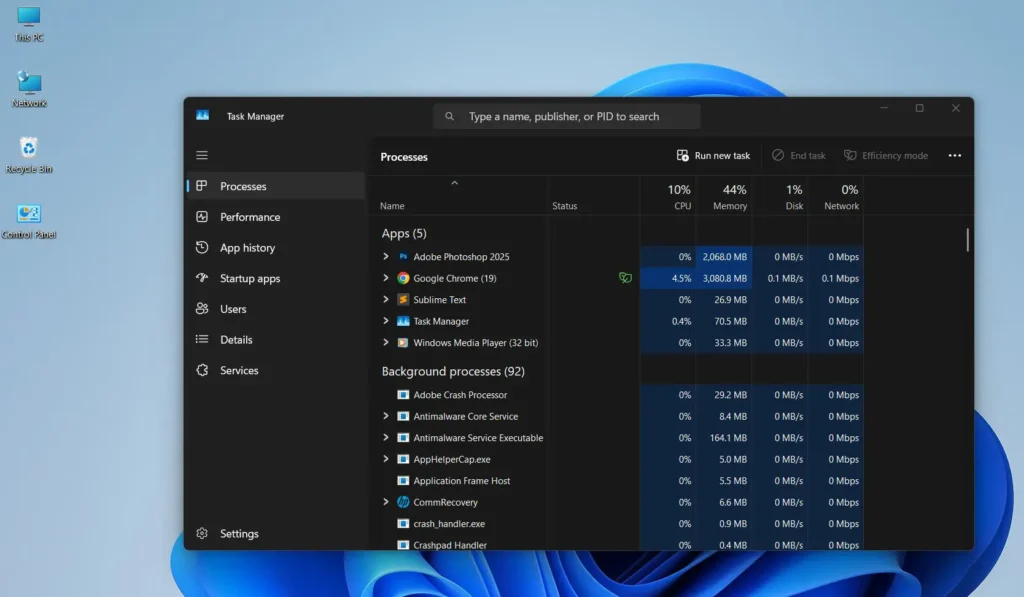
Step 2: Look for any ‘Windows Media Player’ process under the Processes tab
Step 3: Right-click it and select ‘End task’

Step 4: Try launching Windows Media Player again
If that does not help, open the Windows Features panel, uncheck Windows Media Player, restart the computer, then re-enable it and restart again. This essentially reinstalls the player cleanly.
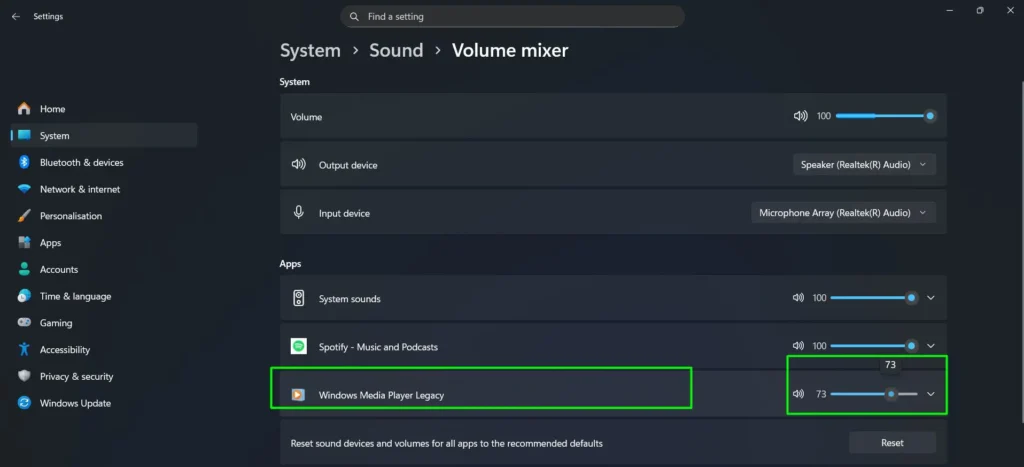
No Sound During Playback
Audio playing silently is one of the most reported Windows Media Player issues. The key is to check multiple audio layers since Windows 11 manages sound at both the system and application level.
Step 1: Check that the volume slider inside Windows Media Player is not set to zero or muted

Step 2: Right-click the speaker icon in the taskbar and select ‘Open Volume mixer’
Step 3: Find Windows Media Player in the mixer and make sure its volume is turned up
Step 4: Check that the correct audio output device is selected by right-clicking the speaker icon and going to ‘Sound settings’
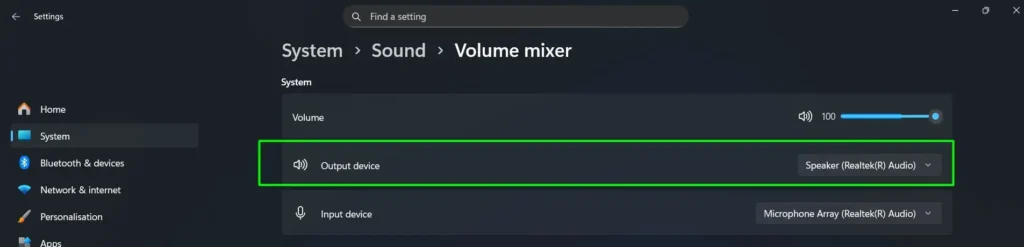
Step 5: Under Output, confirm the right speakers or headphones are set as the default device
If audio still does not work, right-click the speaker icon, select ‘Troubleshoot sound problems,’ and let Windows run its built-in audio diagnostics.
Video Plays But There Is No Audio on Certain Files
This happens when the video file uses an audio codec that Windows Media Player does not support natively. The video plays fine but the audio track stays silent because the decoder is missing.
Step 1: Install the K-Lite Codec Pack from codecguide.com as described earlier in this guide
Step 2: Restart Windows Media Player after the codec installation completes
Step 3: Play the file again — the audio should now work
This issue is very common with MKV files that use AAC or Opus audio tracks. The codec pack resolves it immediately in most cases.
Windows Media Player Says ‘Server Execution Failed’
This error typically appears when Windows Media Player is launched and means there is a conflict with the Windows Media Player Network Sharing Service running in the background.
Step 1: Press Windows + R, type ‘services.msc’ and press Enter
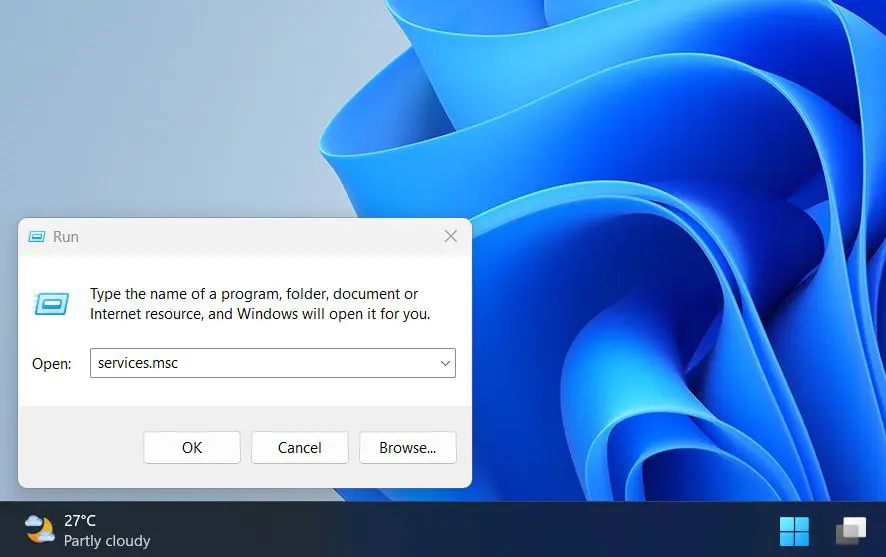
Step 2: Scroll down and find ‘Windows Media Player Network Sharing Service’
Step 3: Right-click it and select ‘Stop’
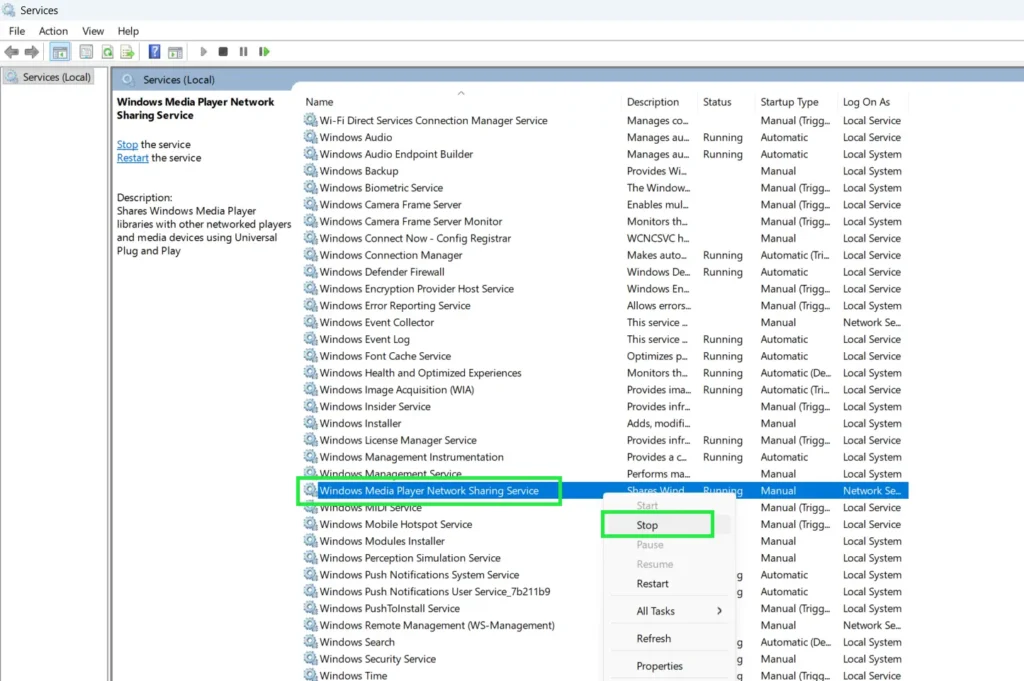
Step 4: Close the Services window and relaunch Windows Media Player
Most people find that this single fix permanently resolves the ‘Server Execution Failed’ error without needing to do anything else.
Library Is Empty or Not Showing Files
After adding folders, sometimes the library still appears blank or media files fail to show up. This is often a database indexing issue.
Step 1: Open Windows Media Player and click ‘Organize’ then ‘Manage libraries’ and select ‘Music’
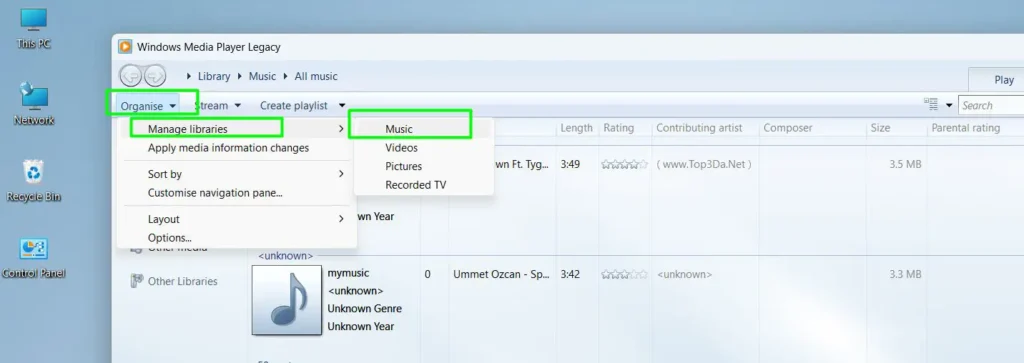
Step 2: Confirm the correct folders are listed — remove and re-add them if needed
Step 3: If the library is still empty, close Windows Media Player
Step 4: Press Windows + R, type ‘%LOCALAPPDATA%\Microsoft\Media Player’ and press Enter
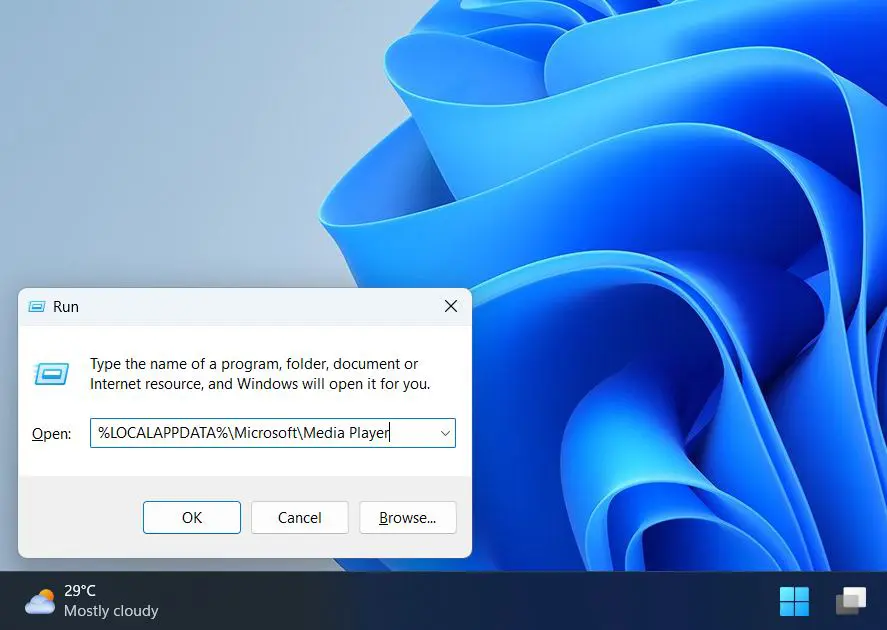
Step 5: Delete all files inside that folder (these are the database cache files, not media files)

Step 6: Reopen Windows Media Player — it will rebuild the library database automatically
Pro-Tip: Deleting the cache files in the Media Player folder is completely safe. None of the actual music or video files are stored there — only the index database. This reset fixes the majority of library-related display issues on Windows 11.
Windows Media Player Is Running Slow or Freezing
Slow performance or freezing during playback usually points to the library database growing too large over time. The most reliable fix is to clear and rebuild the library cache entirely.
Step 1: Close Windows Media Player completely
Step 2: Press Windows + R, type ‘%LOCALAPPDATA%\Microsoft\Media Player’ and press Enter
Step 3: Select all files inside that folder and delete them — these are only database cache files, not actual media files
Step 4: Reopen Windows Media Player and let it rebuild the library automatically
Performance usually returns to normal after the rebuild completes. If the library is very large, the initial scan may take a few minutes but playback speed should feel noticeably smoother once it finishes.
File Format Not Supported Error
When Windows Media Player shows a ‘Windows Media Player cannot play the file’ error, it means the file format or codec is not recognized. This happens frequently with newer formats like HEVC, VP9, or AV1 video.
Step 1: Note the file extension (such as .mkv, .flv, .webm, or .hevc)
Step 2: Install the K-Lite Codec Pack from codecguide.com to cover most unsupported formats
Step 3: For HEVC specifically, search for ‘HEVC Video Extensions’ in the Microsoft Store and install it — this is the official Microsoft codec for H.265 video
Step 4: Restart Windows Media Player and try the file again
Between K-Lite and the HEVC extension from the Microsoft Store, virtually all modern video formats will play correctly in Windows Media Player on Windows 11.
How to Access More Media Guides and Tips
For more detailed guides on media players, streaming tools, and digital audio management, visit the guides section which covers a wide range of practical media topics in depth.
Frequently Asked Questions
Is Windows Media Player still available in Windows 11?
Yes. Windows Media Player is still available in Windows 11 and can be enabled through the ‘Turn Windows features on or off’ panel. Windows 11 also includes a newer Media Player app as the default, but the classic version remains fully accessible for those who prefer it.
Why does Windows Media Player say it cannot play the file?
This usually means the codec required to decode the file format is not installed. Installing a codec pack like K-Lite from the official codecguide.com website resolves this for most file types including MKV, FLAC, and HEVC video.
How do you convert audio files using Windows Media Player?
Windows Media Player does not have a built-in format converter. However, when ripping a CD, the output format can be set to MP3, WMA, AAC, or WAV under Rip settings. For converting existing files between formats, a dedicated tool is needed.
Can Windows Media Player play MP4 files on Windows 11?
Yes, Windows Media Player supports MP4 files on Windows 11 natively. If an MP4 file does not play, the issue is likely with the specific codec used to encode the video inside the file rather than the MP4 container itself.
How do you increase the volume in Windows Media Player beyond the slider limit?
The volume slider in Windows Media Player only controls the player volume, not the system volume. To get louder audio, increase the system volume from the taskbar sound icon or use the Windows Volume Mixer to boost the application output.
How do you make Windows Media Player the default player on Windows 11?
Go to Settings, then Apps, then Default apps. Find Windows Media Player in the list and set it as the default for the desired file types. Alternatively, right-click a media file, go to ‘Open with,’ select Windows Media Player, and check the ‘Always use’ option.
What causes the ‘Server Execution Failed’ error in Windows Media Player?
This error is caused by a conflict with the Windows Media Player Network Sharing Service. Stopping and disabling that service through the Services panel (services.msc) fixes the issue permanently in most cases.
Why is the Windows Media Player library empty after adding folders?
This is usually a corrupted library database. Deleting the cache files inside ‘%LOCALAPPDATA%\Microsoft\Media Player’ and restarting the player forces it to rebuild the database cleanly, which restores all library content.