The Windows audio troubleshooter is an essential built-in diagnostic tool that helps identify and resolve sound issues in Windows 11. Whether you’re experiencing no sound, crackling audio, or problems with audio devices, this comprehensive guide will walk you through using the Windows audio troubleshooter to fix audio problems in Windows 11 quickly and effectively.
Key Takeaways
| Topic | Details |
|---|---|
| Tool | Windows 11 Built-in Audio Troubleshooter |
| Best For | No sound, crackling audio, wrong output device, driver issues |
| Fastest Fix | Right-click speaker icon → “Troubleshoot sound problems” |
| Also Fixes | Microphone issues, Bluetooth audio, disabled devices |
| When to Escalate | Hardware failure, corrupted system files, persistent driver conflicts |
Understanding the Windows Audio Troubleshooter
The Windows audio troubleshooter is a powerful automated diagnostic utility integrated into Windows 11 that scans your system for common audio-related issues. Specifically, it examines audio drivers, device configurations, system settings, and hardware connections to detect problems and apply fixes automatically. As a result, this tool saves time by eliminating the need for manual troubleshooting. Moreover, it works effectively for most common audio issues including disabled audio devices, incorrect default settings, outdated drivers, and service conflicts.
Before You Begin: Quick Fixes for No Sound on Windows 11
- Check Your Volume Settings – Make sure the system is not muted and the volume is turned up. Also check the app’s own volume slider, as it is independent from the system level.
- Check Physical Connections – Ensure all cables and jacks are firmly plugged in. For Bluetooth devices, disconnect and reconnect — or try unpairing and re-pairing completely.
- Restart Your Computer – A simple restart clears temporary system glitches that can silently kill audio without any obvious cause.
- Check the Default Playback Device – Windows sometimes switches to a different output after an update. Right-click the speaker icon → Sound settings → confirm the correct device appears under Output.
If none of these resolve the issue, the full troubleshooter walkthrough below will dig deeper.
How to Access and Run the Windows Audio Troubleshooter
Method 1: Through Windows Settings
Step 1: Press the Windows key + I on your keyboard to open the Settings app.
Step 2: Next, click on “System” in the left sidebar menu.
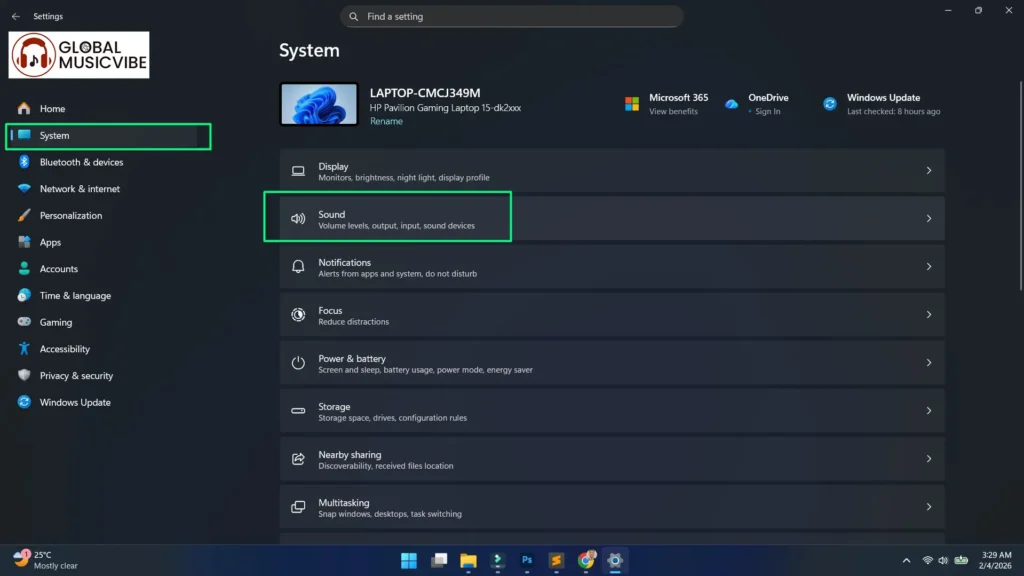
Step 3: Then, scroll down and select “Sound” from the list of options.
Step 4: After that, scroll down to the “Advanced” section and click on “Output devices” or look for the troubleshoot option.
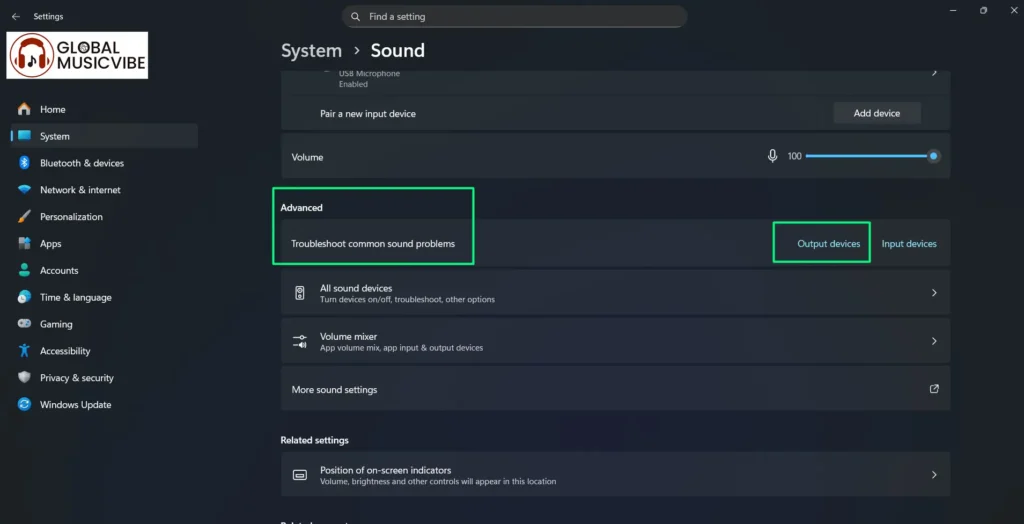
Step 5: Now, click on “Troubleshoot” next to your audio device or find the “Troubleshoot common sound problems” link.
Step 6: The Windows audio troubleshooter will launch automatically and begin scanning for issues.
Step 7: Simply follow the on-screen instructions and allow the troubleshooter to detect problems.
Step 8: If the scan finds issues, the troubleshooter will display them and offer automatic fixes. Click “Apply this fix” when prompted.
Step 9: Finally, wait for the repair process to complete and test your audio afterward.
Method 2: Through Quick Settings
Step 1: First, right-click on the speaker icon in the system tray at the bottom-right corner of your screen.
Step 2: Then, select “Troubleshoot sound problems” from the context menu.
Step 3: The Windows audio troubleshooter will open immediately and start diagnosing your audio system.
Step 4: Next, allow the scan to complete and review any detected issues.
Step 5: Finally, click on the recommended fixes to apply them automatically.
Method 3: Through Control Panel
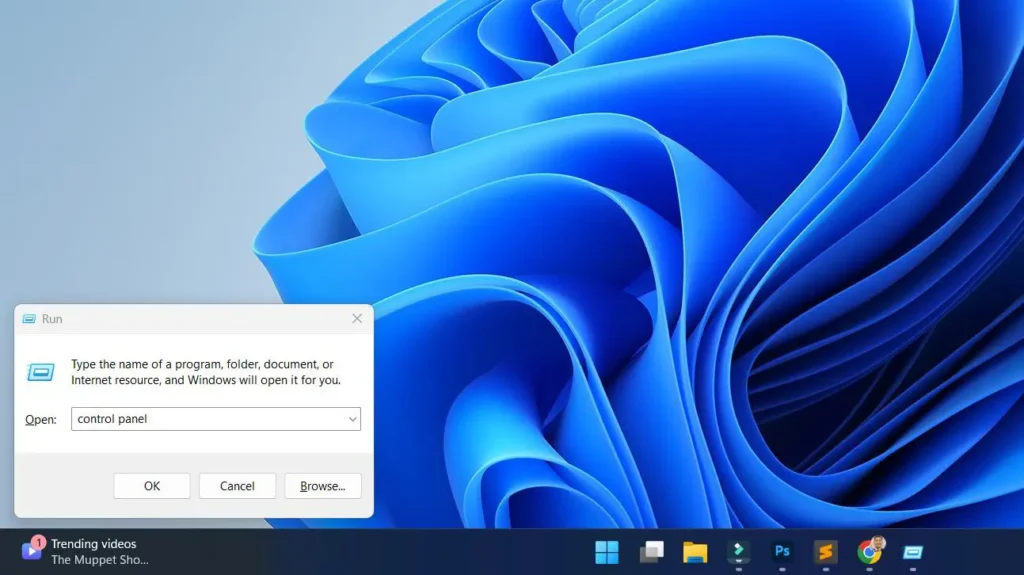
Step 1: First, press Windows key + R to open the Run dialog box.
Step 2: Next, type “control panel” and press Enter.
Step 3: Then, change the “View by” option in the top-right to “Large icons” or “Small icons”.
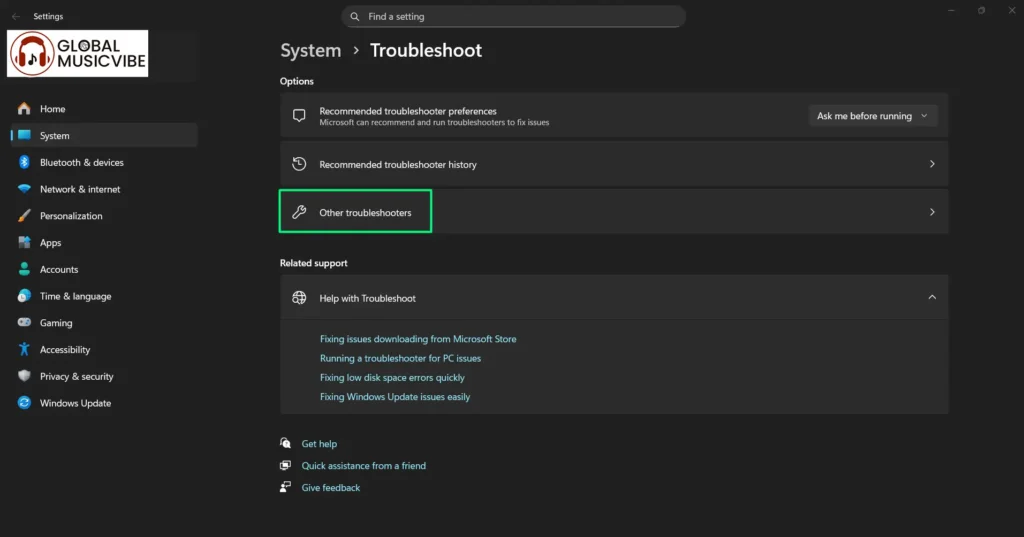
Step 4: After that, click on “Troubleshooting”.
Step 5: The Windows Settings Troubleshoot window will open automatically.
Step 6: Now, click on “Other troubleshooters” to view all available troubleshooting options.
Step 7: Then, scroll down and locate “Audio” under the Most frequent section.
Step 8: Next, click the “Run” button next to “Audio” to start the Windows audio troubleshooter.
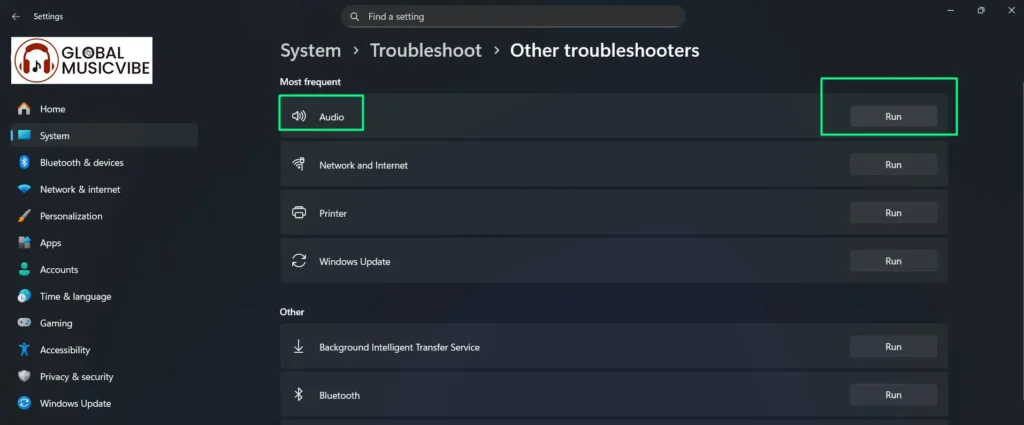
Step 9: Afterward, select the device you want to troubleshoot from the list and click “Next”.
Step 10: Finally, follow the prompts and apply any fixes that the troubleshooter recommends.
Common Audio Problems the Troubleshooter Can Fix
The Windows audio troubleshooter in Windows 11 resolves numerous audio-related issues. For instance, it detects and re-enables disabled audio devices that users or system updates may have turned off accidentally. In addition, the tool automatically corrects incorrect default audio device settings that cause sound to play through the wrong output.
Furthermore, it identifies and repairs corrupted or outdated audio drivers by reinstalling or updating them as needed. The troubleshooter also restarts essential audio services like Windows Audio and Windows Audio Endpoint Builder if they stop running. Finally, it detects hardware connection problems and guides you through reconnecting audio devices properly.
Advanced Audio Troubleshooting Steps
Update Audio Drivers Manually
Step 1: First, right-click on the Start button and select “Device Manager”.

Step 2: Next, expand the “Sound, video and game controllers” section.
Step 3: Then, right-click on your audio device and select “Update driver”.
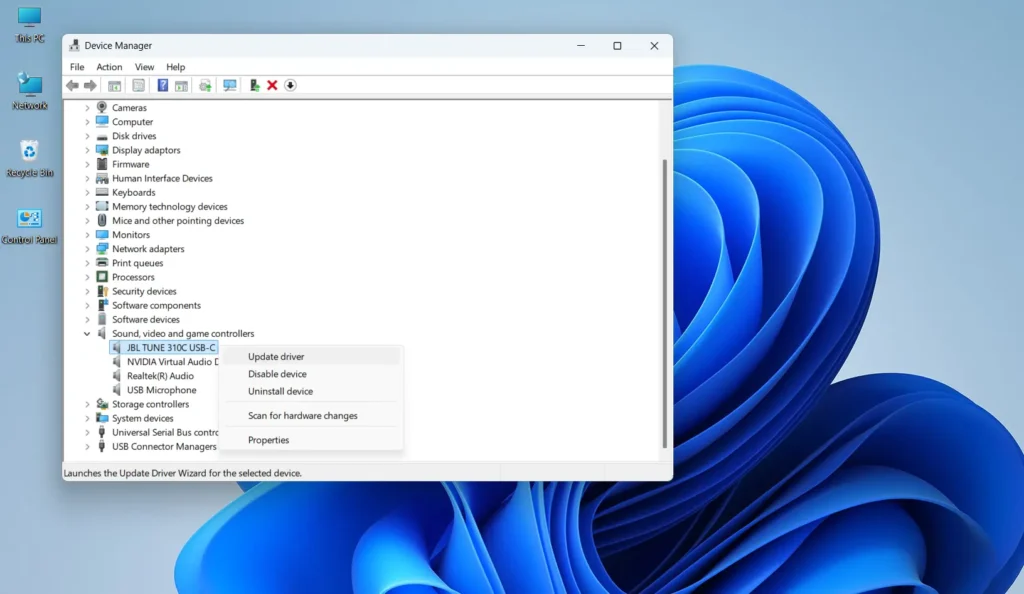
Step 4: After that, choose “Search automatically for drivers” and let Windows find the latest driver.
Step 5: If Windows does not find a new driver, visit your computer manufacturer’s website or audio device manufacturer’s website to download the latest driver manually.
Step 6: Finally, install the downloaded driver and restart your computer.
Check Audio Services
Step 1: First, press Windows key + R to open the Run dialog.
Step 2: Next, type “services.msc” and press Enter.
Step 3: Then, scroll down and locate “Windows Audio” in the services list.
Step 4: After that, right-click on “Windows Audio” and select “Properties”.
Step 5: Now, confirm that the “Startup type” reads “Automatic”.
Step 6: If the service is not running, click the “Start” button to activate it.
Step 7: Repeat steps 4–6 for the “Windows Audio Endpoint Builder” service as well.
Step 8: Finally, click “Apply” and “OK”, then restart your computer.
Set Correct Default Audio Device

Step 1: First, right-click the speaker icon in the system tray.
Step 2: Then, select “Sound settings” from the menu.
Step 3: Under “Output”, click on the dropdown menu to see all available audio devices.
Step 4: Next, select your preferred audio device from the list.
Step 5: Finally, test the audio by playing a sound or video to confirm the change works.
Read our comprehensive guide: Setting Up Default Audio Device in Windows 11: Complete Guide.
Additional Solutions for Persistent Audio Issues
Disable Audio Enhancements
Step 1: First, right-click the speaker icon and select “Sound settings”.
Step 2: Next, scroll down and click on “More sound settings” under Advanced.
Step 3: In the Sound window, select your playback device and click “Properties”.
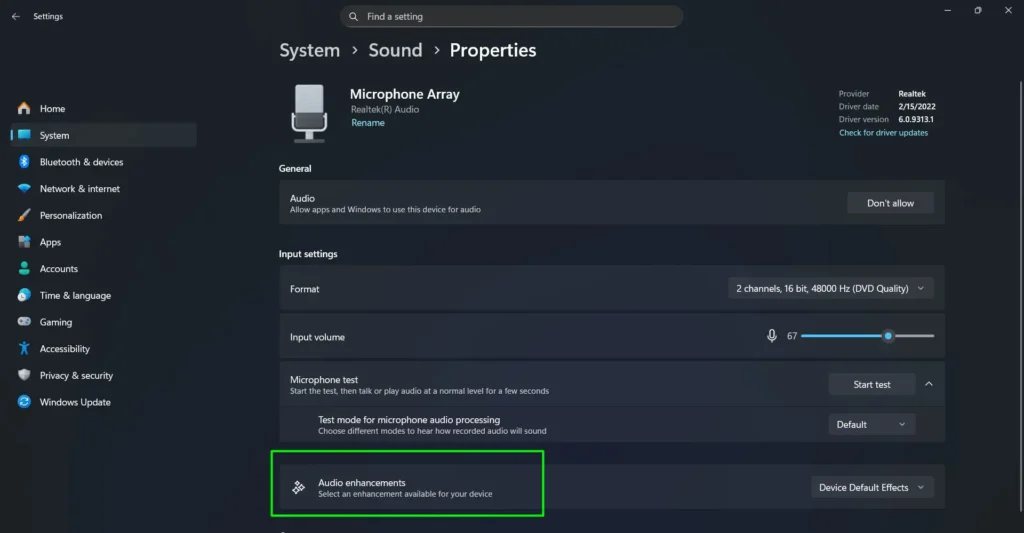
Step 4: Then, navigate to the “Enhancements” tab or “Advanced” tab.
Step 5: After that, check the box that says “Disable all enhancements” or “Disable all sound effects”.
Step 6: Now, click “Apply” and “OK” to save the changes.
Step 7: Finally, test your audio to see if the issue is resolved.
When to Seek Additional Help
If the Windows audio troubleshooter cannot resolve your audio problems after multiple attempts, you may need to consider additional solutions. In some cases, hardware failure is the culprit, requiring professional inspection or replacement of audio components. Alternatively, incompatible or severely corrupted drivers may need complete uninstallation and a fresh installation from the manufacturer’s website.
Some audio issues also stem from Windows 11 system file corruption, which you can repair using the System File Checker tool by running “sfc /scannow” in Command Prompt as administrator. For complex problems, you might need to explore helpful troubleshooting guides or contact Microsoft Support directly.
Preventing Future Audio Problems
To maintain optimal audio performance in Windows 11, keep your system and drivers updated through Windows Update regularly. Additionally, avoid installing multiple audio driver versions simultaneously, as this can create conflicts. You should also exercise caution when adjusting advanced audio settings unless you fully understand their function.
Furthermore, create a system restore point before making significant changes to audio configurations so you can revert if problems occur. Finally, using quality audio hardware and keeping connections clean and secure helps prevent many common audio issues from developing in the first place.
Frequently Asked Questions
How do I open the Windows audio troubleshooter in Windows 11?
The quickest way to open the Windows audio troubleshooter in Windows 11 is to right-click the speaker icon in the system tray and select “Troubleshoot sound problems”. Alternatively, go to Settings, then System, then Sound, and click the Troubleshoot option under your audio device.
Why is my audio not working even after running the troubleshooter?
If audio still does not work after running the troubleshooter, the issue might involve hardware, severely corrupted drivers, or system file corruption. In that case, try updating or reinstalling your audio drivers manually, checking physical connections, running the System File Checker tool, or testing with different audio devices to isolate the problem.
Can the Windows audio troubleshooter fix microphone problems?
Yes, Windows 11 includes a dedicated recording audio troubleshooter that diagnoses and fixes microphone issues. You can access it through Sound settings under the Input section or by searching for “Recording Audio” troubleshooter in Windows search. It resolves problems like disabled microphones, incorrect permissions, and driver issues.
How often should I run the audio troubleshooter?
You should run the Windows audio troubleshooter only when you experience audio problems, as there is no need to use it as a regular maintenance tool. However, if you frequently encounter audio issues after system updates, running it after major Windows updates can help you catch and resolve problems proactively.
Will running the audio troubleshooter delete my audio settings?
No, the Windows audio troubleshooter does not delete your custom audio settings. Instead, it only scans for problems and applies fixes to system configurations that cause issues. Your personal preferences for volume levels, audio enhancements, and device selections typically stay intact unless they are the source of the problem.
What should I do if the troubleshooter says no problems were found but I still have no sound?
If the troubleshooter finds no problems but sound still does not work, first check whether your audio device is muted and confirm the correct output device is active. Also ensure the volume is turned up both in Windows and on your physical device. Beyond that, check cable connections, try a different audio port, or test with different speakers or headphones to determine whether the issue involves hardware.
Can I use the audio troubleshooter for Bluetooth audio devices?
Yes, the Windows audio troubleshooter works with Bluetooth audio devices in Windows 11. However, for Bluetooth-specific issues like pairing problems or connection drops, you may also need to use the Bluetooth troubleshooter found in Settings under Bluetooth & devices, or ensure your Bluetooth drivers are up to date.