If you’ve ever tried watching a 24fps movie on a typical 60Hz monitor and noticed a small “hiccup” every few seconds, you’ve run into one of the most common playback issues on Windows: judder. I’ve seen this happen even on powerful PCs where the GPU and CPU are barely working—because the real problem is that the display refresh rate doesn’t divide cleanly into the video’s frame rate. Windows will happily output 60Hz while the video is encoded at 24fps, which forces the player to repeat certain frames longer than others. That uneven timing is what creates the subtle but annoying stutter during panning scenes.
What Refresh Rate Sync Actually Does
Think of refresh rate like a metronome. The display refreshes at a fixed beat — say, 60 times per second. But video content often plays at 24fps, 30fps, or 25fps. When those beats do not match, the result is judder or stutter because the monitor has to repeat or drop frames to compensate. Syncing the refresh rate means setting the display to a rhythm that matches the content, so every frame lands cleanly without duplication or skipping.
Windows 11 has both manual settings and automatic tools to handle this. Using the right one for the right situation makes a noticeable difference in everyday viewing.
For most film and TV content, these refresh rate multiples work best:
- 24fps (cinema, streaming) — 24Hz, 48Hz, 72Hz, 96Hz, or 120Hz
- 25fps (European broadcasts, PAL) — 25Hz, 50Hz, 75Hz, 100Hz, or 125Hz
- 30fps (standard video, TV) — 30Hz, 60Hz, 90Hz, or 120Hz
- 60fps (sports, gaming, live content) — 60Hz, 120Hz, or 240Hz
Method 1: Change the Display Refresh Rate Manually in Windows 11
This is the most direct approach and works well for anyone who watches content at a consistent frame rate — like 24fps movies or 60fps gaming videos.
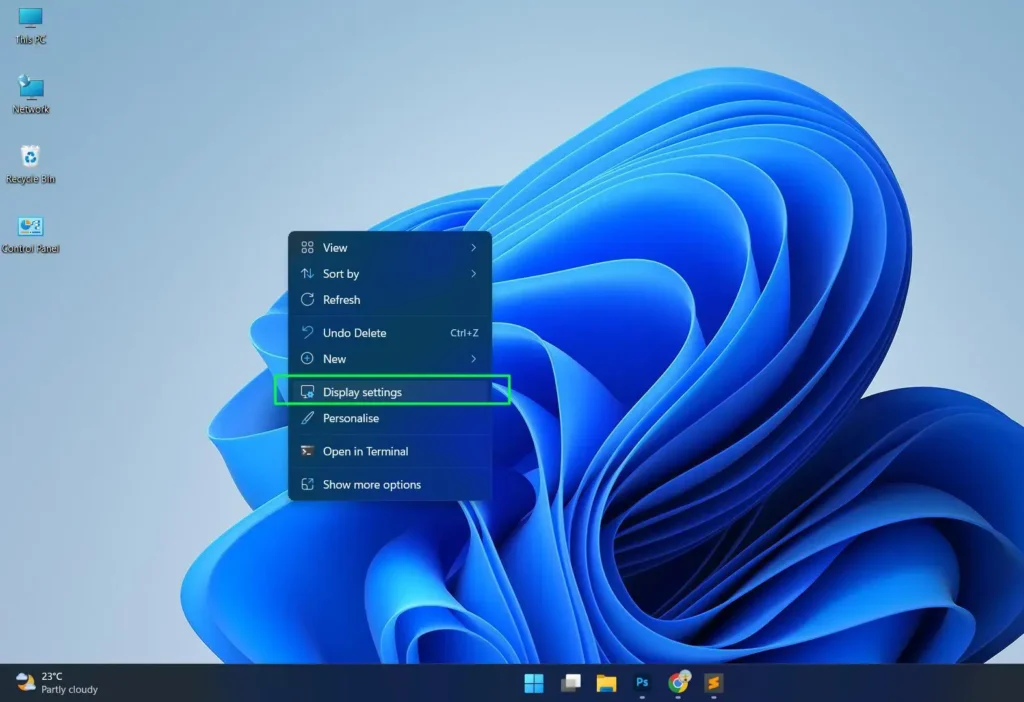
Step 1: Right-click on the desktop and select Display settings.
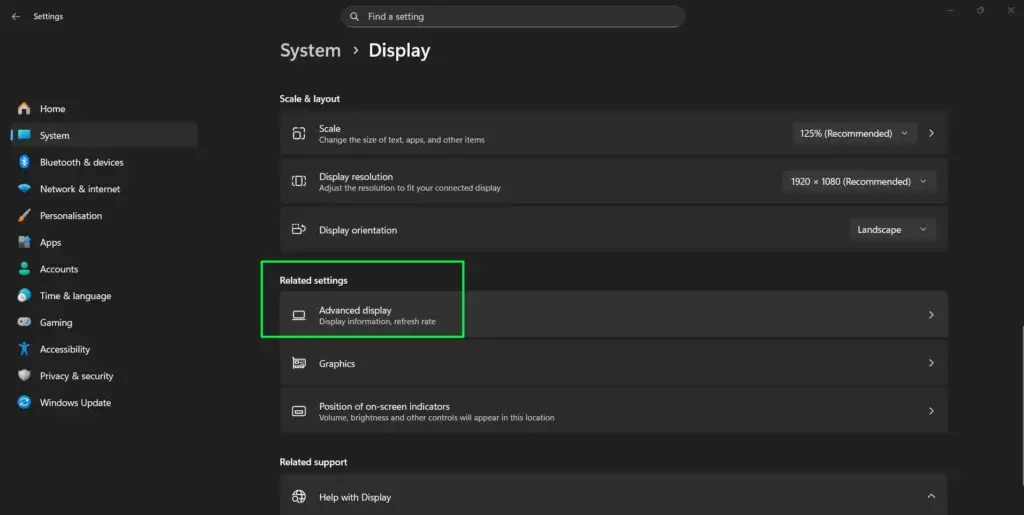
Step 2: Scroll down and click Advanced display.
Step 3: Under “Choose a refresh rate,” open the dropdown menu.
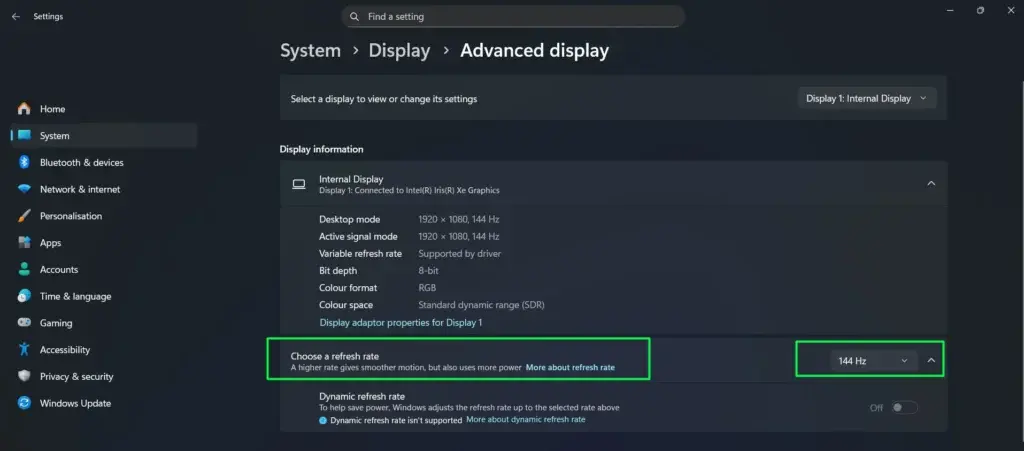
Step 4: From the dropdown, select a refresh rate that matches or is a clean multiple of your content’s frame rate (refer to the chart above).
Note: Most Windows displays will show options like 60Hz, 120Hz, 144Hz, or 240Hz — if lower options like 24Hz or 50Hz do not appear, that is normal for PC monitors.

Step 5: Click Keep changes when prompted.
This works best when there is one primary type of content being watched. For mixed-use setups where you switch between movies, gaming, and browsing, the automatic methods below are more practical.
Method 2: Enable Dynamic Refresh Rate (DRR) in Windows 11
Windows 11 introduced Dynamic Refresh Rate, which automatically adjusts the display refresh rate based on what is happening on screen. This feature is available on supported displays and drivers and requires no manual switching once enabled.
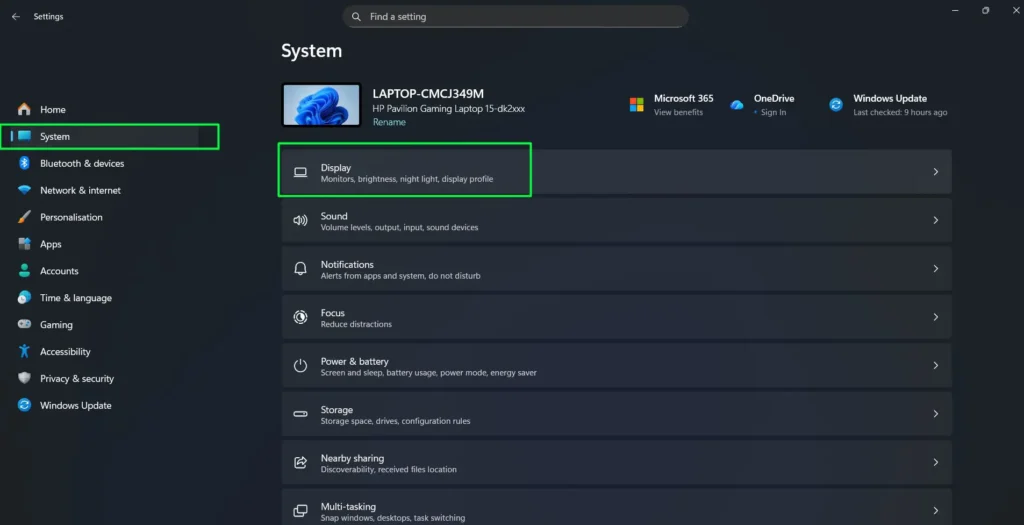
Step 1: Open Settings and go to System > Display.
Step 2: Click on Advanced display.
Step 3: Under “Choose a refresh rate,” look for the Dynamic refresh rate option in the dropdown.
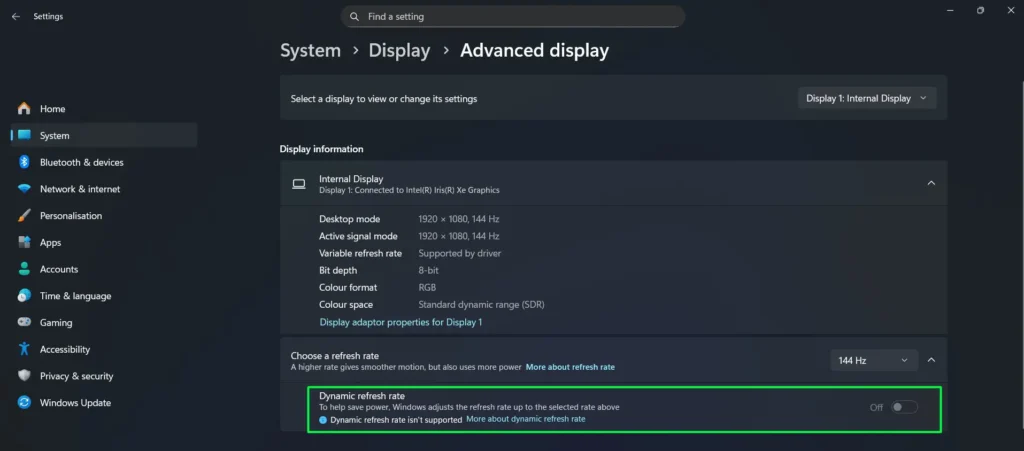
Step 4: Select Dynamic refresh rate to enable it. Note: This option only appears if your display hardware supports variable refresh rates. If it is not listed, proceed to the manual method instead.
Step 5: Close Settings — Windows will now handle refresh rate adjustments automatically based on what is on screen.
Pro Tip: Dynamic Refresh Rate works best on laptops and monitors with VRR or HDMI 2.1 support. Update your GPU driver through Windows Update or the manufacturer’s website before enabling DRR to ensure the best compatibility and smoothest results.
Method 3: Use VRR (Variable Refresh Rate) via Graphics Settings
For NVIDIA graphics card users, enabling VRR at the driver level adds another layer of sync that works directly alongside Windows 11 display settings — giving more precise control over how frames are delivered to the screen.
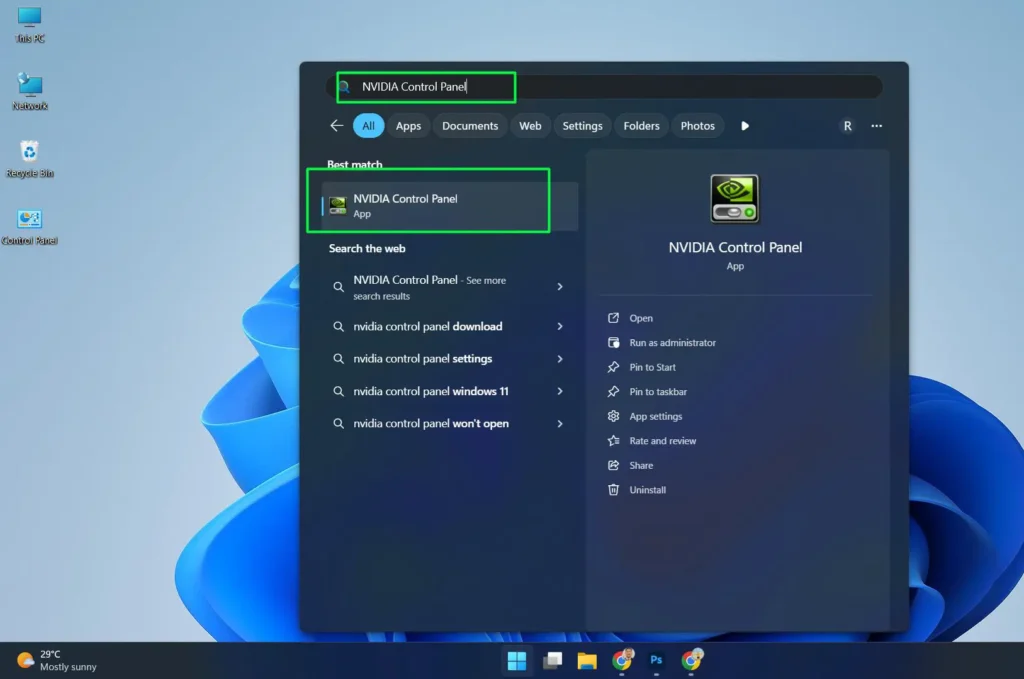
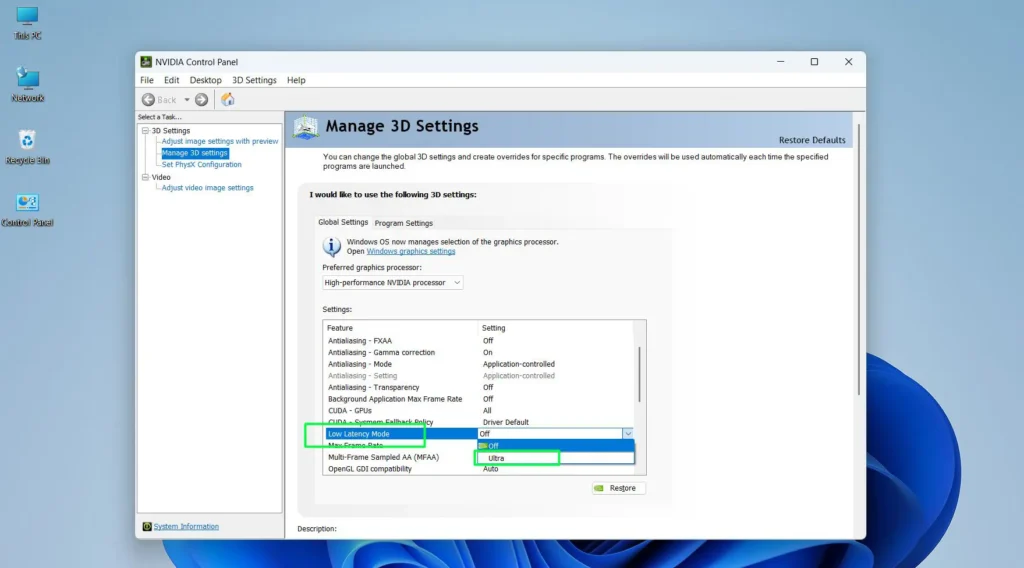
Step 1: Press the Windows key, type NVIDIA Control Panel in the search bar, and click it to open.
Step 2: In the left sidebar, expand 3D Settings and click Manage 3D Settings.
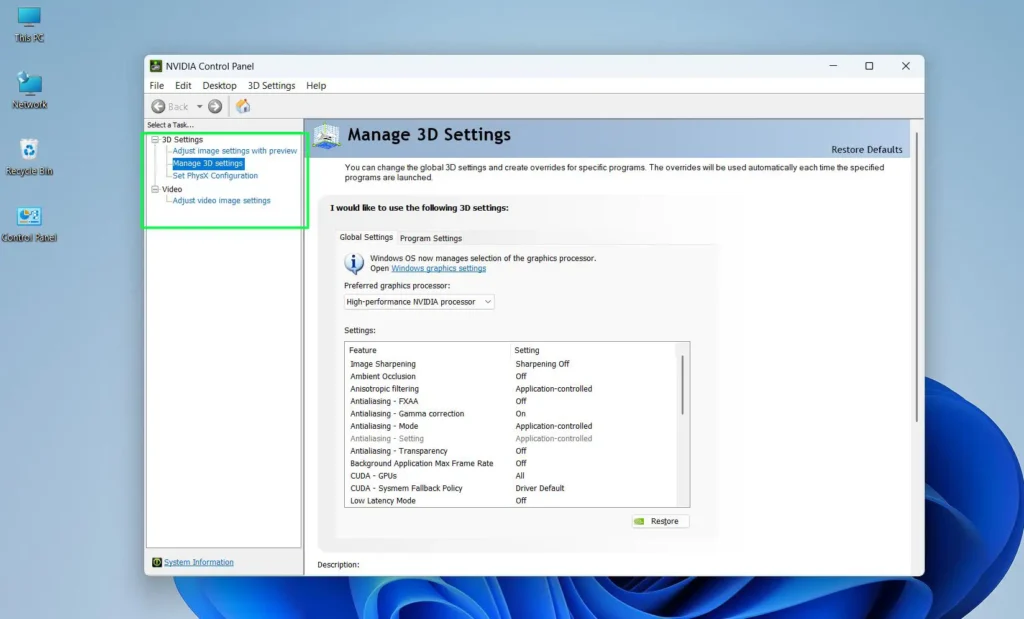
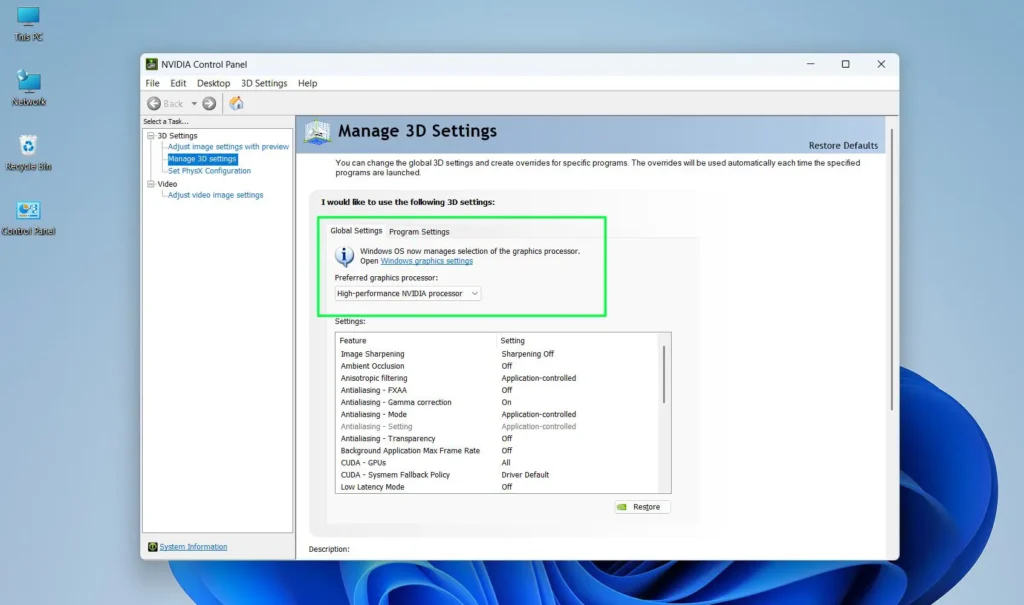
Step 3: Under the Global Settings tab, confirm that Preferred graphics processor is set to High-performance NVIDIA processor using the dropdown.
Step 4: Scroll through the settings list, locate Low Latency Mode, and set it to Ultra for the best frame sync performance during playback.
Step 5: In the left sidebar, expand the Video section and click Adjust video image settings.
Step 6: Select the display to apply settings to — either the laptop screen or a connected external monitor.
Step 7: If you have an RTX card, check whether RTX Video Enhancement and Super Resolution are available and enable them to improve upscaled video clarity during playback.
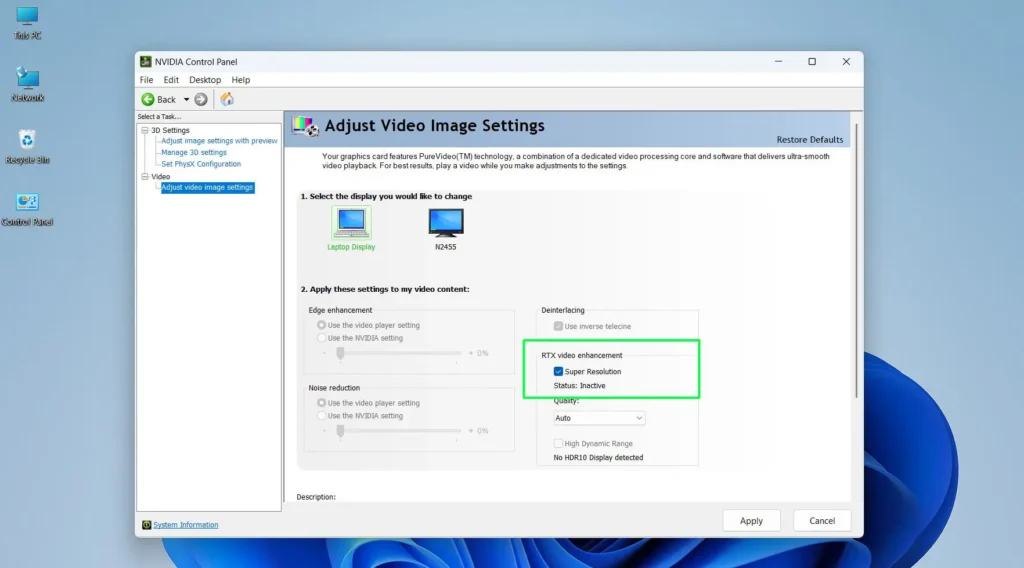
Step 8: Click Apply at the bottom of the panel and restart the system if prompted.
Method 4: Match Refresh Rate to Video Content Using VLC Media Player
VLC has a built-in option to sync video output directly to the display refresh rate. This is especially useful for anyone watching local movie files where frame rate mismatches cause visible judder on a standard 60Hz display.
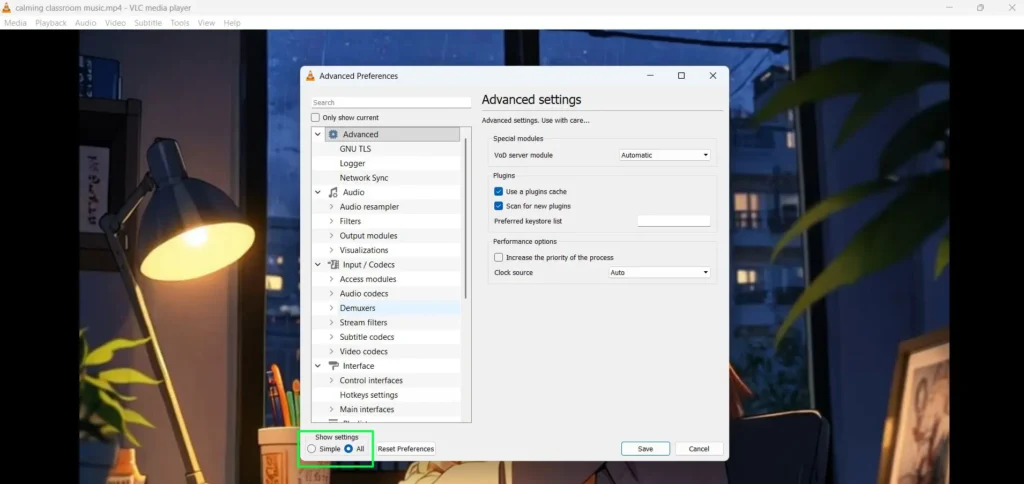
Step 1: Open VLC Media Player and go to Tools in the top menu, then click Preferences.

Step 2: At the bottom left of the Preferences window, under Show settings, select All to reveal the full settings list.
Step 3: In the left sidebar, expand Video and click Output modules.
Step 4: Select Direct3D11 video output — this is the recommended option for Windows 11 and provides the best display sync compatibility.
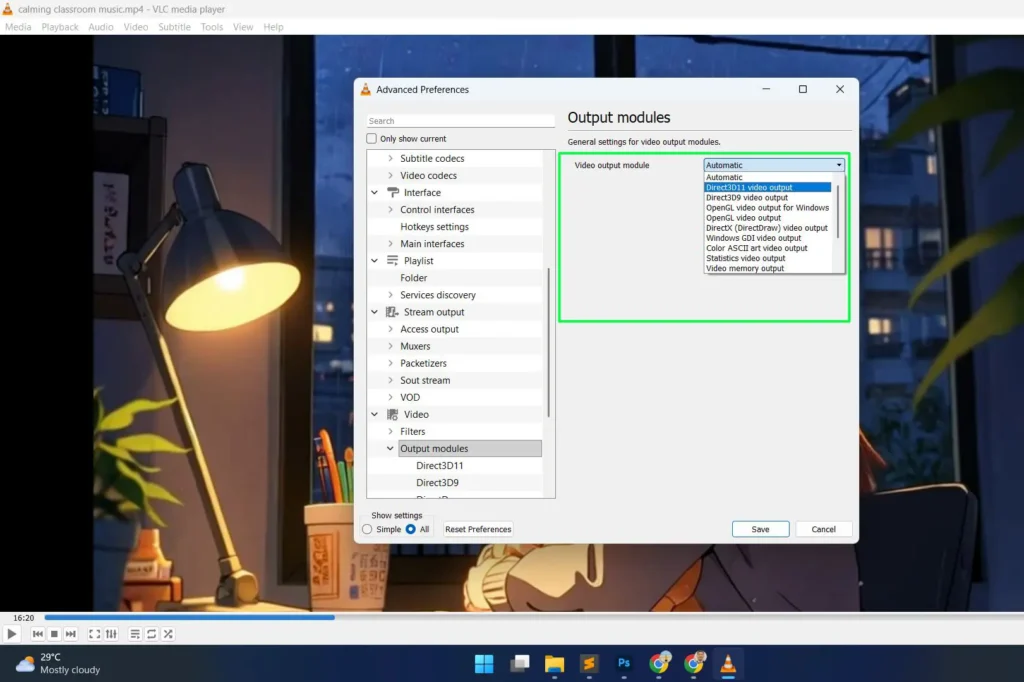
Step 5: Click Save and restart VLC for the changes to take effect.
Step 6: Play a video file and check whether playback motion feels smoother — this is particularly noticeable on 24fps content that previously juddered on a 60Hz display.
Pro Tip: For the best results in VLC, pair the Direct3D11 output module with hardware decoding enabled under Input / Codecs > Hardware-accelerated decoding. This combination offloads video processing to the GPU, keeps frame delivery consistent, and reduces CPU-related stutter during high-bitrate playback.
Method 5: Update Graphics Drivers for Optimal Refresh Rate Handling
Outdated drivers are one of the most overlooked reasons refresh rate sync fails in Windows 11. A fresh driver install can resolve sync issues that no amount of setting changes seem to fix.
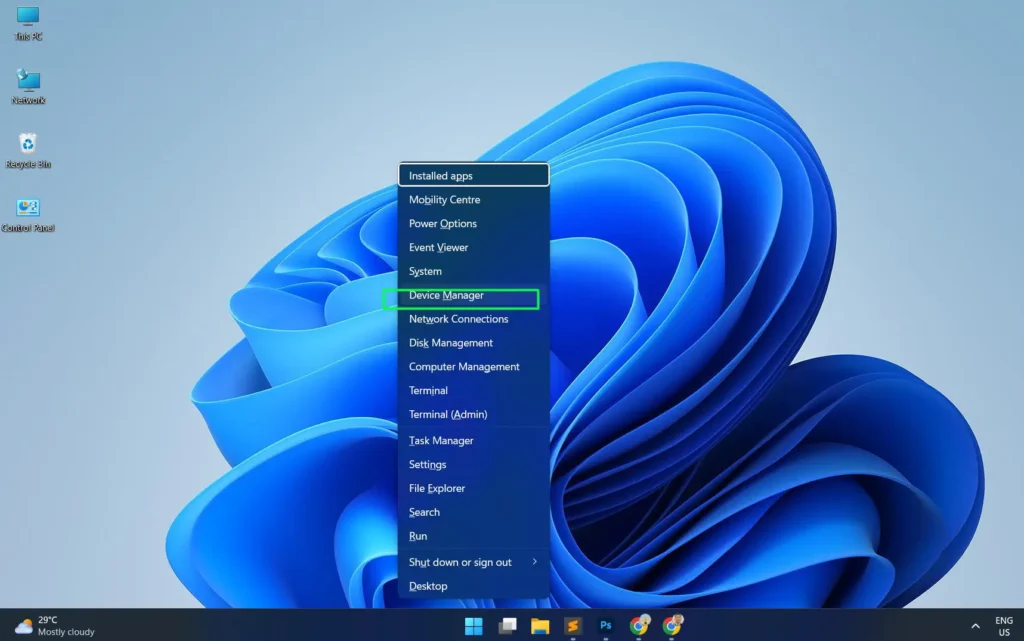
Step 1: Press Windows + X and select Device Manager.
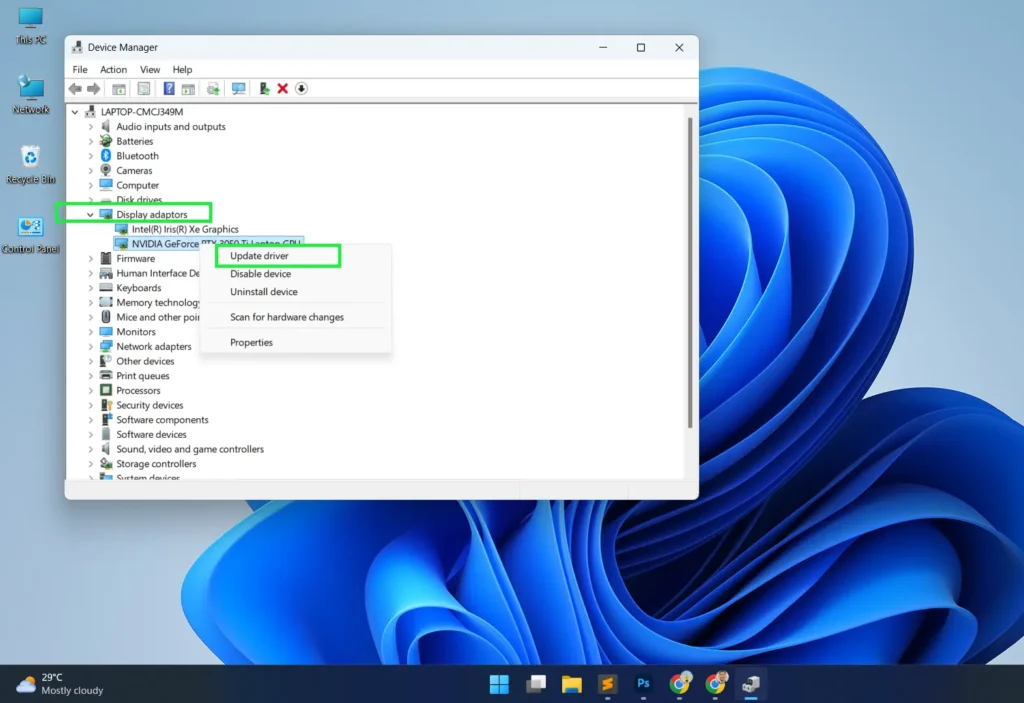
Step 2: Expand Display adapters and right-click your GPU.
Step 3: Select Update driver and choose Search automatically for drivers.
Step 4: Alternatively, visit the NVIDIA, AMD, or Intel website directly and download the latest driver for your specific GPU model for the most up-to-date version.
Step 5: Install the driver, restart the system, and recheck your refresh rate settings to confirm they held.
Pro Tip: For NVIDIA and AMD cards, using the manufacturer’s own software — GeForce Experience or AMD Adrenalin — to handle driver updates is more reliable than relying on Windows Update alone. These tools also send automatic notifications when new drivers are available.
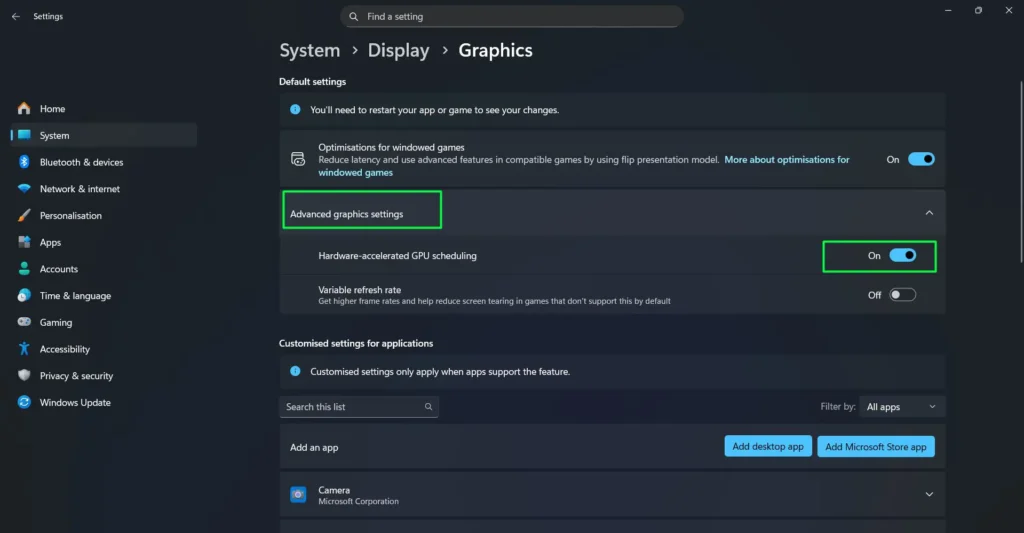
Method 6: Enable Hardware-Accelerated GPU Scheduling
Hardware-Accelerated GPU Scheduling (HAGS) in Windows 11 reduces latency and improves the consistency of frame delivery, which directly supports smoother playback when refresh rates are synced.
Step 1: Open Settings > System > Display.
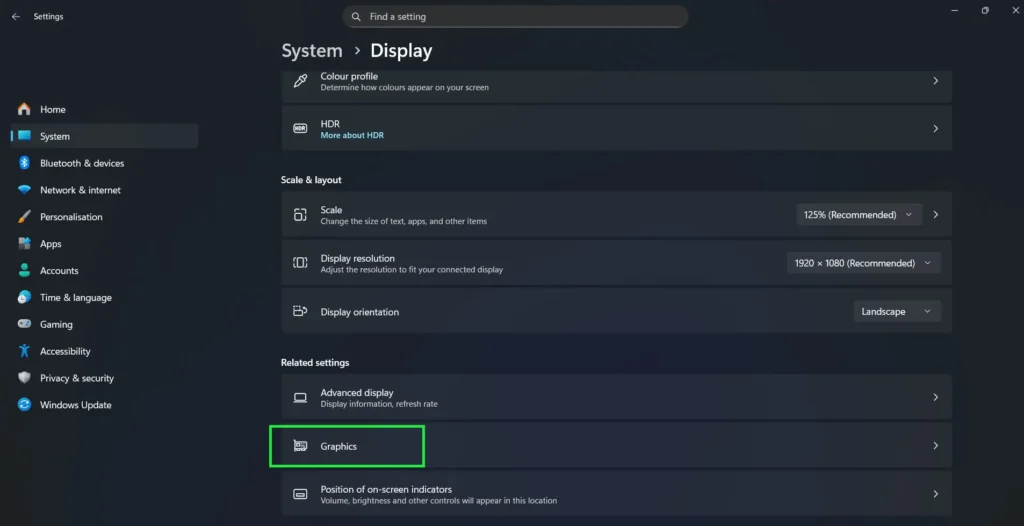
Step 2: Scroll down and click Graphics.
Step 3: Click Advanced graphics settings to expand it.
Step 4: Toggle on Hardware-accelerated GPU scheduling.
Step 5: Restart the computer to apply the change.
This setting pairs well with Dynamic Refresh Rate and VRR, making the overall sync more responsive and stable during playback across both video and gaming content.
Tips for Getting the Best Refresh Rate Sync Results
Getting refresh rate sync working correctly is one thing — keeping it consistent and optimized is another. These tips come from real-world use and make a noticeable difference in day-to-day playback quality.
Use a High-Quality Cable
A cheap HDMI or DisplayPort cable can silently limit the refresh rate the monitor actually receives from the GPU. For anything above 60Hz, HDMI 2.0 or DisplayPort 1.4 is the minimum. For 4K at high refresh rates, HDMI 2.1 is the right choice.
Update the Display Driver and Windows 11 Together
A driver update without a matching Windows update — or the other way around — can break Dynamic Refresh Rate functionality. The safest approach is to run Windows Update first, then update the GPU driver separately through the manufacturer’s tool like GeForce Experience or AMD Adrenalin.
Avoid Running Multiple Monitors at Different Refresh Rates During Playback
Windows 11 can handle mixed refresh rate setups, but in some configurations the system defaults to the lowest common refresh rate for rendering. Setting the primary monitor as the only active display during critical viewing sessions eliminates this issue entirely.
Enable PC Mode or Game Mode on TVs Used as Monitors
Many TVs apply heavy post-processing — like motion smoothing or noise reduction — that interferes with proper refresh rate sync from Windows 11. Turning those processing modes off lets the signal display exactly as the PC sends it.
Plug Laptops into Power Before Adjusting Refresh Rate Settings
On battery, Windows 11 often throttles display performance to conserve energy, which can prevent higher refresh rates from activating or cause Dynamic Refresh Rate to behave inconsistently. Plugging in ensures full performance is available when making changes.
Test Playback After Every Change
Rather than adjusting multiple settings at once, change one setting at a time and play a short video clip to evaluate the result. This makes it far easier to identify which specific change fixed — or caused — a smoothness issue.
Use a Frame Rate Test Video to Verify Sync
Sites like testufo.com or a downloaded 24fps test clip are reliable tools for confirming whether a refresh rate change actually took effect. Visual confirmation is always more reliable than judging based on general feel alone.
Recommended Tools and Software for Refresh Rate Management
Beyond Windows 11’s built-in settings, these well-regarded tools make managing and monitoring refresh rate sync much easier — especially for users who switch between different content types regularly.
CRU (Custom Resolution Utility)
A trusted utility that allows adding custom resolutions and refresh rates that the GPU driver does not expose by default. Particularly useful for unlocking 23Hz or 25Hz on monitors that do not natively list those rates. Works well with both NVIDIA and AMD cards.
RefreshRateControl
A lightweight tool that lets you switch display refresh rates quickly from the system tray without going into Windows settings every time. Ideal for anyone who regularly switches between watching movies at 24Hz and browsing at 60Hz or higher.
Kodi Media Center
Beyond being a full media player, Kodi’s refresh rate whitelist feature is one of the most reliable automatic sync solutions available on Windows 11. It detects the frame rate of each video file and switches the display to match — completely hands-free once configured.
MPC-BE (Media Player Classic – Black Edition)
A lightweight but powerful media player with renderer options that support display sync natively. The MPC Video Renderer included with it is regularly updated and handles refresh rate sync cleanly without requiring third-party add-ons.
NVIDIA Control Panel / AMD Adrenalin Software
The official driver control panels from both manufacturers remain the most reliable place to configure G-SYNC, FreeSync, and VRR settings. These should always be the first stop before exploring any third-party tools.
HWiNFO64
A detailed system monitoring tool that shows real-time GPU and display information, including the current refresh rate output. Useful for confirming that a refresh rate change actually registered at the hardware level — not just in the Windows settings panel.
Windows 11 Xbox Game Bar (Built-in)
Often overlooked for video use, the Game Bar overlay can display real-time frame rate and performance stats during playback. Press Windows + G to open it and enable the performance widget to monitor frame delivery during any video.
Choosing the Right Refresh Rate for Different Content Types
Not all content runs at the same frame rate, so the ideal refresh rate setting varies depending on what is being watched. Here is a quick reference.
- Movies and streaming films: 24Hz or 48Hz — most cinematic content is mastered at 23.976fps
- TV shows and sports: 50Hz or 60Hz — broadcast content typically runs at 25fps or 29.97fps
- YouTube and online video: 60Hz — covers the majority of online content uploaded at 30fps or 60fps
- Gaming: Match the monitor’s maximum refresh rate (144Hz, 165Hz, etc.) and enable VRR for best results
Knowing what you watch most often makes it easy to pick the right default refresh rate — or to know which whitelist entries to add in Kodi or a similar player for fully automatic switching.
For more helpful guides on display settings, media playback, and tech optimization, explore the full guides section for step-by-step tutorials on a wide range of topics.
Frequently Asked Questions
What refresh rate should be used for watching movies on Windows 11?
For movies, 24Hz or 48Hz is ideal since most films are produced at 23.976fps. Setting the display to 24Hz eliminates the judder that occurs when a 60Hz monitor has to unevenly repeat or drop frames to compensate for the mismatch.
Does Dynamic Refresh Rate work on all Windows 11 monitors?
No. Dynamic Refresh Rate requires a monitor that supports variable refresh rates along with a compatible GPU and up-to-date graphics driver. Most monitors with HDMI 2.1 or DisplayPort 1.4 and VRR support are compatible. Older monitors without these features will not show the Dynamic option in the dropdown.
Why does video still stutter even after changing the refresh rate in Windows 11?
Stutter after a refresh rate change can come from an outdated GPU driver, an incompatible video renderer in the media player, or hardware that does not fully support the selected sync method. Updating drivers and checking the media player’s renderer settings usually resolves the issue.
Is VRR the same as G-SYNC or FreeSync?
VRR (Variable Refresh Rate) is the umbrella term for technology that adjusts display refresh rate dynamically. G-SYNC is NVIDIA’s implementation and FreeSync is AMD’s. Both achieve the same goal — keeping the monitor in sync with the GPU output — through slightly different hardware implementations.
Can refresh rate sync improve streaming video quality on Windows 11?
Yes. Syncing the refresh rate to the frame rate of streaming content reduces judder and makes motion look cleaner and more natural. This is especially noticeable on 24fps content played on a 60Hz display, where mismatched rates cause uneven frame pacing that is visible even on casual viewing.
Does Hardware-Accelerated GPU Scheduling help with playback smoothness?
Yes. Enabling HAGS reduces the latency between the GPU and the display, which supports more consistent frame delivery. When combined with Dynamic Refresh Rate or VRR, it contributes to noticeably smoother playback across both video and gaming content.