The Snipping Tool in Windows 11 is already installed and ready to use — no downloads, no setup. Whether the goal is capturing a specific part of the screen, grabbing a full window, or recording a clip, this tool handles it all from one clean interface. This guide covers every method step by step, so the right capture gets done right the first time.
Key Takeaways
- Press Windows + Shift + S to instantly open the screenshot toolbar — no need to open the app first
- Press Windows + Shift + R to jump straight into screen recording mode
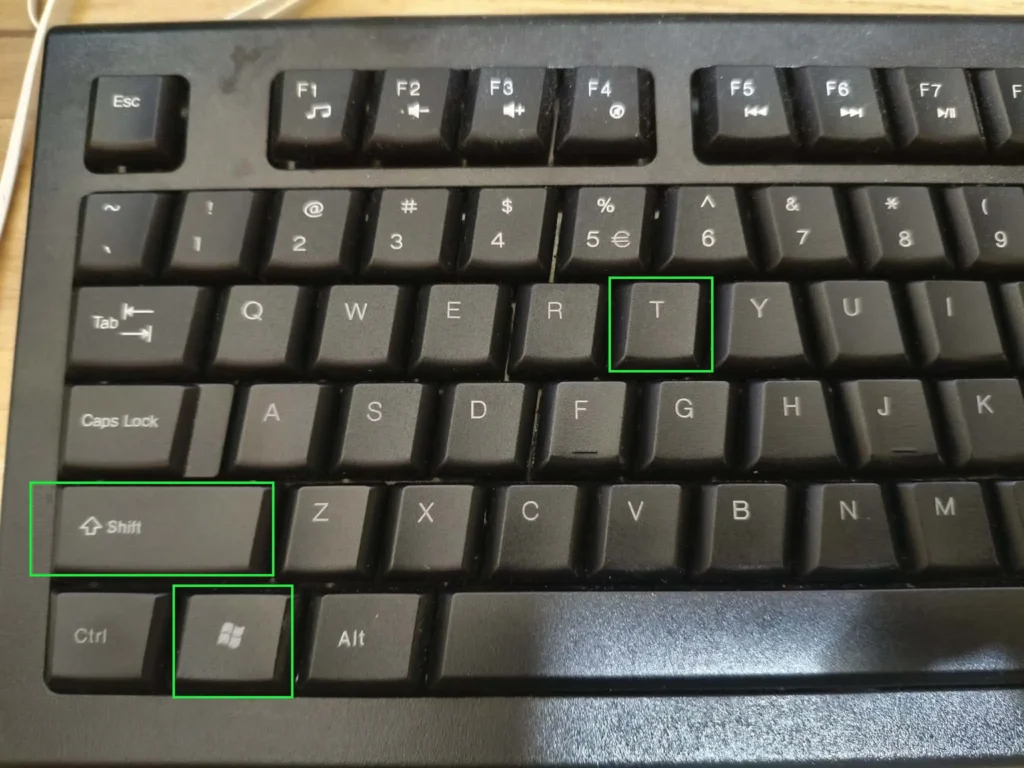
- Press Windows + Shift + T to extract and copy any visible text from the screen using Text Extractor
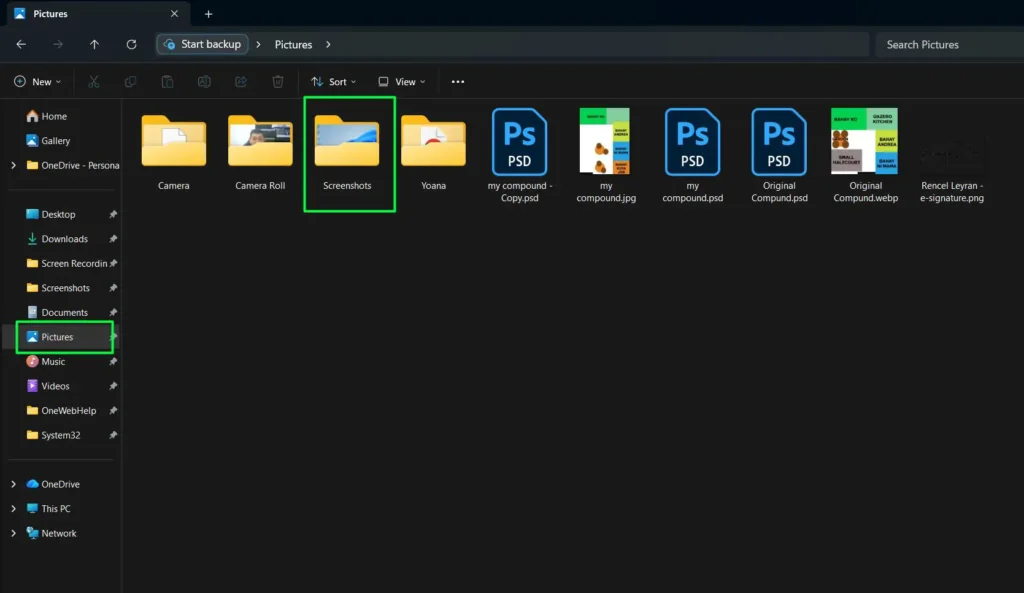
- All screenshots automatically save to Pictures > Screenshots and are copied to the clipboard at the same time
- All screen recordings automatically save to Videos > Screen Recordings as MP4 — no manual save needed
- Microphone audio is muted by default in screen recordings — it must be manually enabled before clicking Start
- The delay timer (3 or 10 seconds) is only available in the full Snipping Tool app, not the keyboard shortcut
- Screen recording and Text Extractor require Windows 11 version 22H2 or later — update via Microsoft Store if the icons are missing
How to Open Snipping Tool in Windows 11
There are a few ways to launch the Snipping Tool depending on what feels most natural.
Keyboard Shortcut (Fastest)
Press Windows + Shift + S on the keyboard simultaneously. The screen dims and a small toolbar appears at the top instantly — no need to open the app first.

From the Start Menu
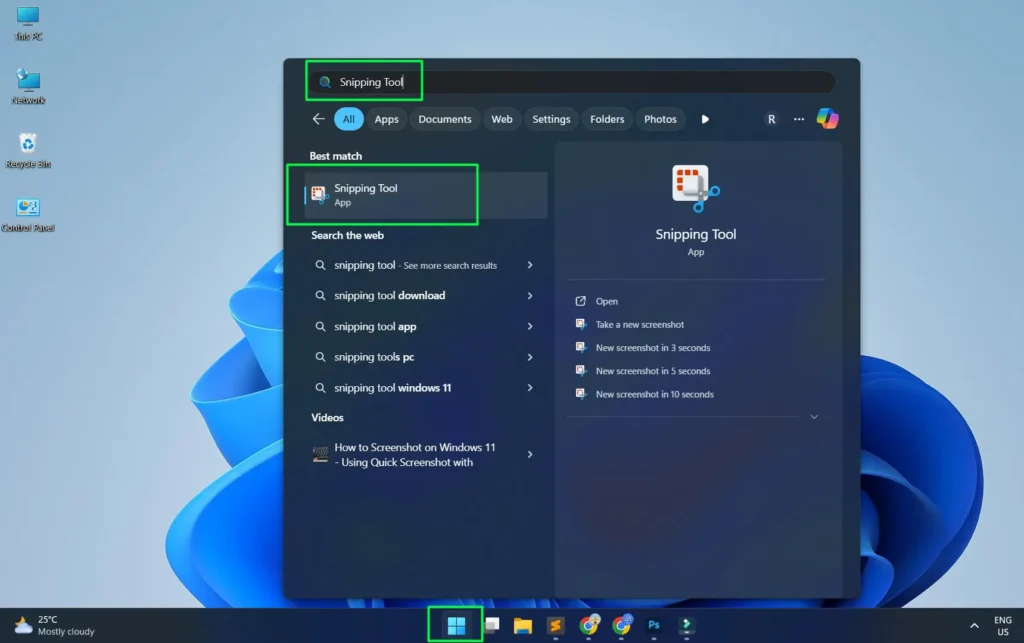
Step 1: Click the Start button and type ‘Snipping Tool’ in the search bar.
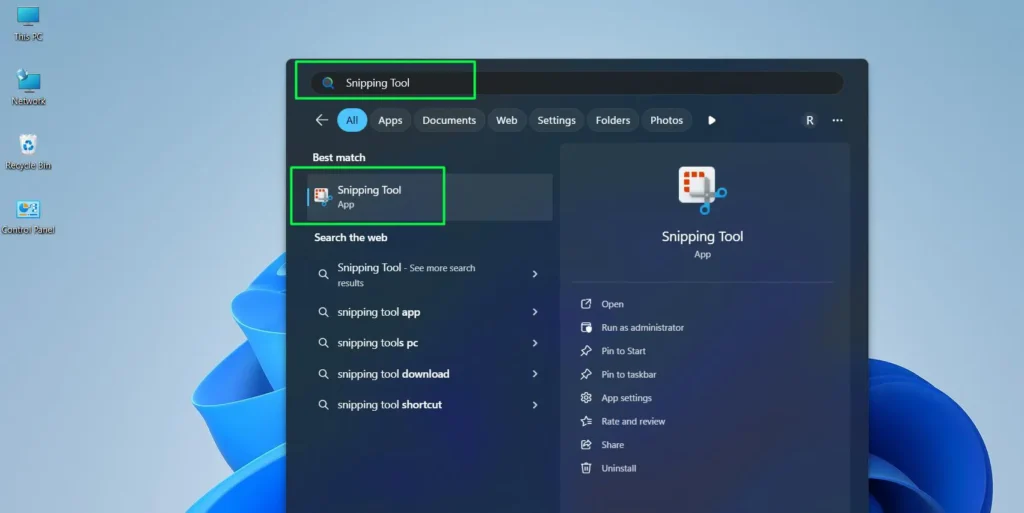
Step 2: Press Enter or click the app from the results to open it.
Step 3: Pin it to the taskbar for one-click access going forward.
How to Take a Screenshot with Snipping Tool
The Snipping Tool offers four capture modes, each built for a different situation. Here is what each one does and how to use it.
Video Tutorial on How to Take a Screenshot with Snipping Tool
Rectangular Snip
This is the most commonly used mode. It lets users draw a box around any part of the screen to capture only what is needed — nothing extra.
Step 1: Press Windows + Shift + S or open Snipping Tool from the Start menu.
Step 2: The screen dims and a toolbar appears at the top — click the rectangular snip icon (first option).
Step 3: Click and drag across the desired area of the screen.
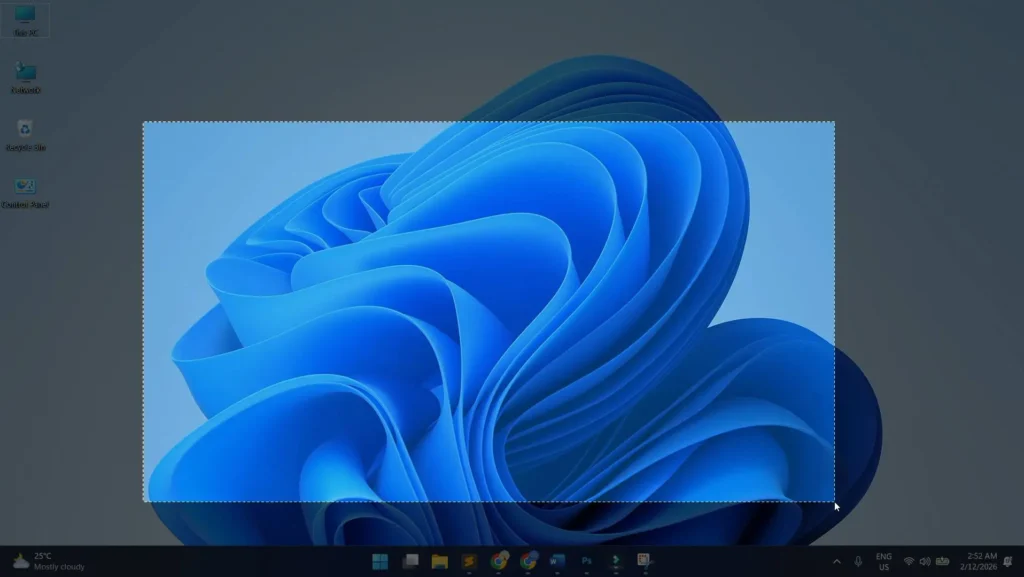
Step 4: Release the mouse to capture the selection.
Step 5: The screenshot opens in the Snipping Tool editor — annotate or crop if needed.
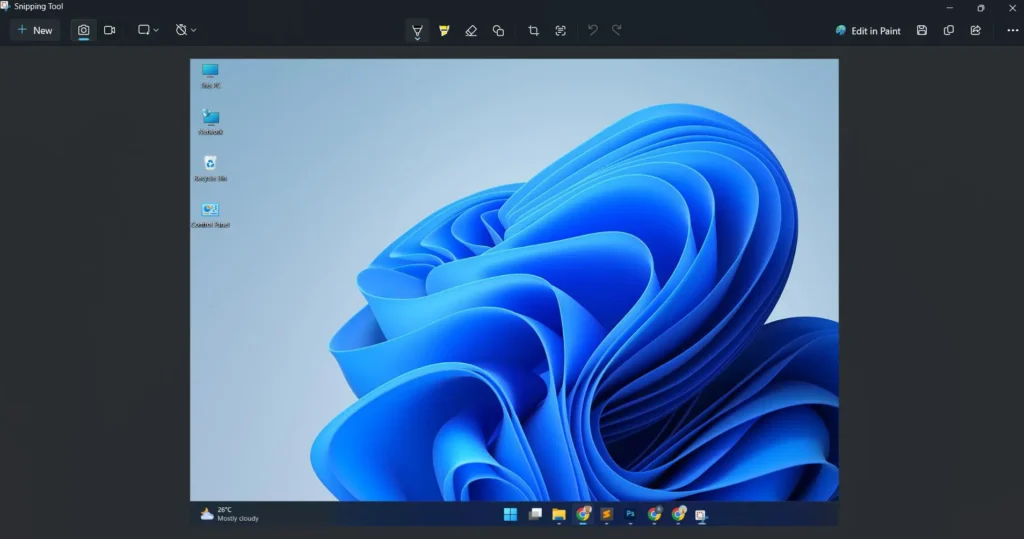
Step 6: The screenshot is automatically saved to Pictures > Screenshots and also copied to the clipboard simultaneously.
Pro-Tip: Since the screenshot is already on the clipboard the moment it is captured, it can be pasted straight into an email, chat, or document with Ctrl + V right away — no need to hunt for the saved file.
Freeform Snip
Freeform snip allows drawing any irregular shape around the content to capture. This works well when the area to grab does not fit neatly into a rectangle or when excluding content that sits right next to what is needed.
Step 1: Press Windows + Shift + S to open the toolbar.
Step 2: Click the third icon ‘Snipping Area’ and select ‘Freeform’.
Step 3: Click and hold while drawing around the desired area.
Step 4: Release to complete the capture.
Step 5: The screenshot automatically saves to Pictures > Screenshots and opens in the editor for any additional edits.
Window Snip
Window snip automatically detects and captures a specific open application window with clean edges. No manual dragging needed — just click the window and it handles the rest, including rounded corners and transparent effects.
Step 1: Press Windows + Shift + S to open the toolbar.
Step 2: Click the third icon ‘Snipping Area’ and select ‘Window’.
Step 3: Move the cursor over the window to capture — it will highlight.
Step 4: Click the window and it captures instantly.
Step 5: The screenshot automatically saves to Pictures > Screenshots and opens in the editor ready to annotate if needed.
Fullscreen Snip
Fullscreen snip captures everything visible across all connected monitors in a single shot and opens it immediately in the Snipping Tool editor. For multi-monitor setups, it captures all displays as one wide image.
Step 1: Open the Snipping Tool from the Start menu.
Step 2: Click the third icon ‘Snipping Area’ and select ‘Fullscreen’.
Step 3: The entire screen captures instantly and opens in the editor.
Step 4: The screenshot automatically saves to Pictures > Screenshots — annotate or copy from the editor as needed.
How to Use the Delay Timer
The delay timer is essential for capturing menus, tooltips, or dropdown elements that disappear the moment the mouse moves away. It gives a few seconds to set up the screen before the capture fires.
Step 1: Open Snipping Tool from the Start menu (the keyboard shortcut does not include the delay option).
Step 2: Click the clock icon labeled ‘Delay snip’ in the toolbar.
Step 3: Choose a delay of 3, 5 or 10 seconds.

Step 4: Click ‘New’ to start the countdown.
Step 5: Quickly set up the screen — open the menu, hover over the tooltip, or trigger the element.
Step 6: The Snipping Tool activates automatically when the timer runs out — then make the selection.
How to Annotate Screenshots in Snipping Tool
After a screenshot is captured, the built-in editor opens it up for quick mark-up before saving or sharing. Right-click an existing captured screenshot, select ‘Open With’, and choose ‘Snipping Tool’ to edit a saved image the same way.
The available tools in the editor are straightforward. The Pen draws freehand in multiple colors and thicknesses — useful for circling or underlining. The Highlighter applies a transparent color over text to draw attention without covering it. The Eraser removes any annotation without affecting the original screenshot. The Crop tool trims the image to focus on the relevant section. The Text tool adds typed annotations with adjustable font and size.
Most people find that the pen and highlighter cover nearly everything needed for everyday screenshots.
Where Are Screenshots and Recordings Saved
Both screenshots and recordings save automatically — no manual save button needed.
Screenshots save automatically to Pictures > Screenshots as PNG files the moment the capture is made. They are also copied to the clipboard simultaneously, so pasting directly into an email, chat, or document with Ctrl + V works right away without opening the saved file.
Screen recordings save automatically to Videos > Screen Recordings as MP4 files the moment the Stop button is clicked. No save dialog appears — the file is already there.
To change the file format for screenshots, open the Snipping Tool app, go to Settings, and look for the save format option. PNG is the default and the best choice for screenshots with text or UI elements since it preserves sharp edges without compression. JPG reduces file size but can blur fine details, making text harder to read.
Pro-Tip: Always use PNG for screenshots that contain text or interface elements. JPG compression blurs fine details and makes text harder to read, which defeats the purpose of a precise capture.
How to Screen Record in Windows 11 with Snipping Tool
Screen recording is built directly into the Snipping Tool in Windows 11 (version 22H2 or later). There are two ways to start — a keyboard shortcut for speed, or opening the app manually for more visual control.
Video tutorial on How to Screen Record in Windows 11 with Snipping Tool
Method 1: Screen Record Using Windows + Shift + R
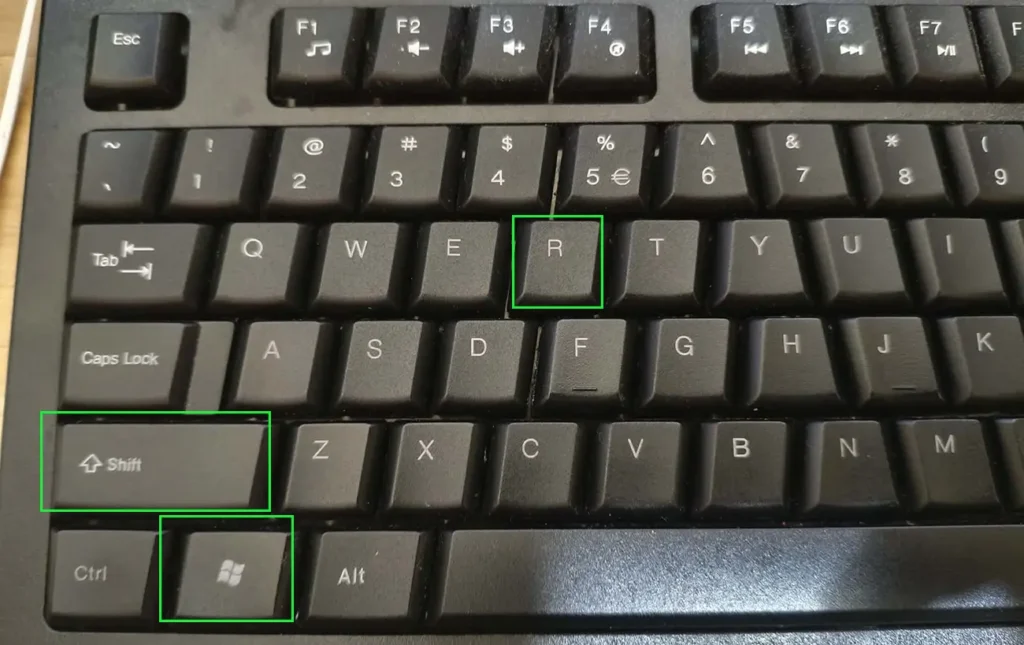
This is the fastest way to start a screen recording. Pressing Windows + Shift + R opens the Snipping Tool directly into recording mode — no need to open the app first.
Step 1: Press Windows + Shift + R on the keyboard at the same time.
Step 2: The screen dims slightly and a small toolbar appears at the top.

Step 3: Choose between ‘Rectangle’ mode (click and drag to select a custom area) or ‘Window’ mode (click on a specific app window).

Step 4: Click and drag across the area to record, or click the window to capture it.
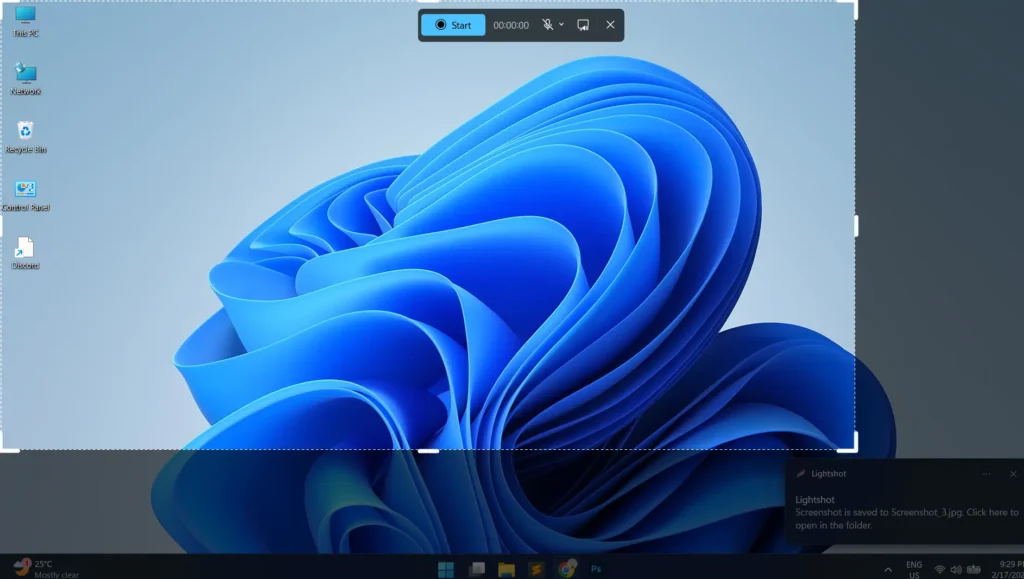
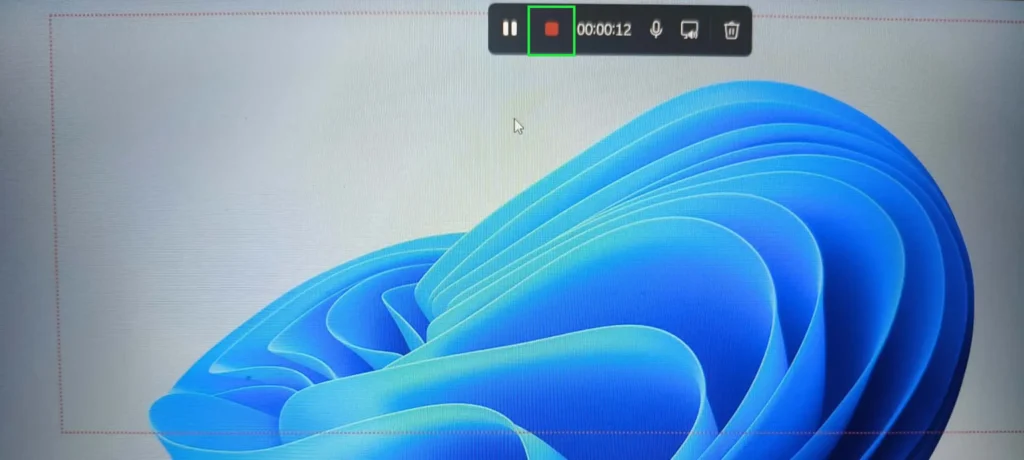
Step 5: Once the selection is made, a recording bar appears at the top with a Start button and a timer showing 00:00:00.
Step 6: To record with audio, click the microphone dropdown arrow — ‘Mute’ is checked by default. Click ‘Mute’ to uncheck it, then select the preferred microphone from the list.
Step 7: Click the Start button to begin recording.

Step 8: When finished, click the red Stop button in the recording bar.
Step 9: The recording automatically saves as an MP4 file to the Screen Recordings folder inside the Videos folder — no manual saving needed.
Pro-Tip: Before clicking Start, click the microphone dropdown to see all connected audio input devices including USB microphones and built-in arrays. Selecting the right one before the recording starts avoids having to redo the whole thing. If no audio is needed, leaving it on ‘Mute’ keeps the recording clean with visuals only.
Method 2: Screen Record Using the Snipping Tool App
Opening Snipping Tool manually gives the same recording result through a visual interface. This works well when the app is already open, or when switching from taking screenshots to recording in the same session.
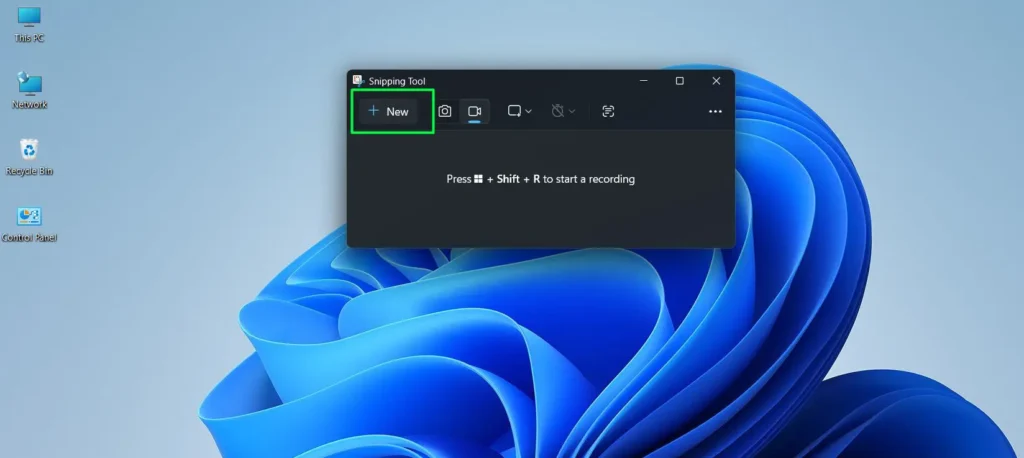
Step 1: Click the Start Menu, type ‘Snipping Tool’ in the search bar, then press Enter to open it.
Step 2: In the Snipping Tool window, click the video camera icon in the top toolbar (the third icon, between the screenshot camera and the text capture button) to switch to video recording mode.
Step 3: Click the dropdown arrow on the Recording Area icon, then choose ‘Rectangle’ to draw a custom area or ‘Window’ to capture a specific open application window.
Step 4: Click the ‘New’ button in the top-left of the Snipping Tool window to begin the screen selection process.
Step 5: The screen dims and a selection cursor appears — click and drag to select the area if using Rectangle mode, or click the desired window if using Window mode.

Step 6: After the selection is made, the recording toolbar appears at the top with the Start button, timer, and audio controls.
Step 7: To record with audio, click the microphone dropdown and uncheck ‘Mute’, then select the preferred microphone.
Step 8: Click ‘Start’ to begin the recording — a brief countdown appears before it starts.
Step 9: Click the red Stop button in the toolbar when the recording is complete.
Step 10: The recording automatically saves as an MP4 to the Screen Recordings folder inside the Videos folder — no manual save required.

After stopping, the Snipping Tool allows trimming the clip before the file is finalized. Drag the trim handles on the playback timeline to cut out any unwanted seconds at the start or end. This eliminates the need for a separate video editor for simple clean-up. The MP4 output is compatible with virtually every video player, editor, and sharing platform without any conversion needed.
If the video camera icon is missing from the toolbar, open the Microsoft Store, search for ‘Snipping Tool’, and click Update to get the latest version with screen recording enabled.
How to Use Text Extractor in Snipping Tool
Text Extractor is one of the most underrated features in the Snipping Tool in Windows 11. Instead of taking a screenshot, it reads and lifts any visible text directly off the screen — then copies it straight to the clipboard. No image saved, no manual typing needed.
The best way to think about it: if the text can be seen on screen, Text Extractor can grab it. This includes text inside images, error messages, video frames, PDFs that block copying, subtitles, and any app that does not allow normal text selection. It essentially turns anything visible into editable, pasteable text in seconds.
How to Open Text Extractor
There are two ways to launch it:
Using the Keyboard Shortcut
Press Windows + Shift + T on the keyboard. The screen dims instantly and the cursor changes to a crosshair — ready to select.
From the Snipping Tool App
Open the Snipping Tool from the Start menu and click the Text Extractor icon in the toolbar. It is the last icon before the three-dot menu on the right — the fifth icon in the toolbar. Hovering over it shows the tooltip ‘Text extractor (Windows + Shift + T)’ to confirm it is the right one.
How to Extract Text from the Screen
Step 1: Press Windows + Shift + T or click the Text Extractor icon in the Snipping Tool toolbar.
Step 2: The screen dims and the cursor becomes a crosshair.
Step 3: Click and drag across the area of the screen where the text is located.
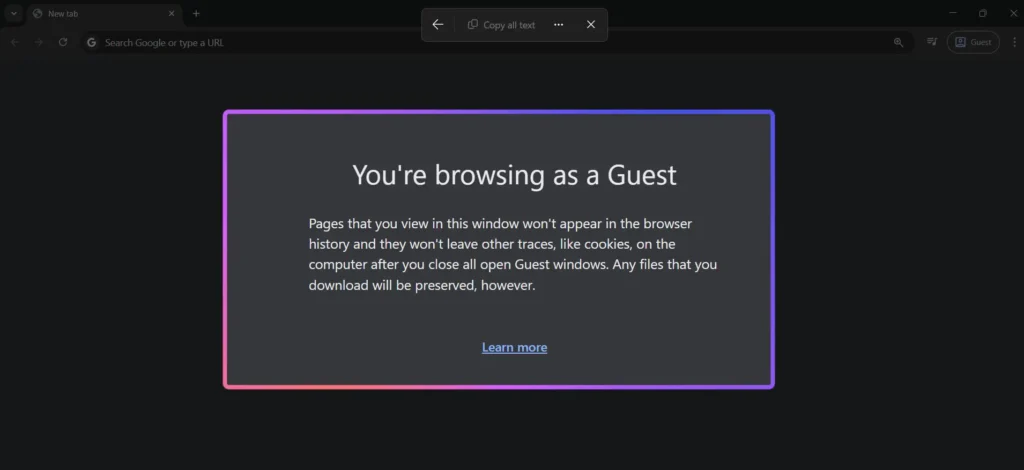
Step 4: Release the mouse — a small toolbar appears at the top of the screen with a ‘Copy all text‘ button.
Step 5: Click ‘Copy all text‘ to copy all the extracted text to the clipboard.

Step 6: Paste it anywhere using Ctrl + V.
The toolbar also has a back arrow to go back and reselect a different area, and a three-dot menu for additional options. If only part of the extracted text is needed, paste into Notepad first using Ctrl + V, then manually select and copy just the portion needed before using it elsewhere.
What Text Extractor Works Best For
Text Extractor handles a wide range of practical situations that come up regularly. Copying an error message that cannot be selected normally is one of the most common uses — instead of retyping the whole thing, drag over it and paste. Grabbing text from a screenshot or photo works just as well. Pulling a web address from a non-clickable image, lifting a quote from a video paused at the right moment, or copying text from a locked PDF are all situations where this feature saves real time.
It also supports multiple languages. If working with foreign-language content or multilingual apps, Text Extractor can pull that text just as reliably as English — the accuracy depends on text clarity and size rather than language.
Pro-Tip: Text Extractor works best on large, clean, high-contrast text. Small or decorative fonts, low-resolution images, or text on busy backgrounds may produce occasional errors. If the result looks off, zoom into the content on screen first to make the text larger, then run Text Extractor again — the accuracy improves noticeably with larger text.
Useful Keyboard Shortcuts for Snipping Tool
- Windows + Shift + T — Open Text Extractor to copy text from anywhere on screen
- Windows + Shift + S — Open the snip toolbar instantly
- Windows + Shift + R — Open Snipping Tool directly in recording mode
- Alt + N — Start a new snip using the last-used mode
- Ctrl + S — Save the current screenshot
- Ctrl + C — Copy the screenshot to clipboard
- Ctrl + Z — Undo the last annotation
- Ctrl + P — Print the screenshot
- Esc — Cancel a capture in progress
Getting these into muscle memory makes the whole workflow noticeably faster, especially when taking multiple captures in a row. For more step-by-step tech guides like this one, browse the full guides collection.
Common Snipping Tool Problems and How to Fix Them
Most Snipping Tool issues have quick fixes. Here are the most common ones and exactly what to do about each.
Keyboard Shortcut Not Working (Windows + Shift + S or Windows + Shift + R)
If pressing Windows + Shift + S or Windows + Shift + R does nothing, the most likely cause is that the Snipping Tool app has been disabled or is not set as the default handler for those shortcuts.
Step 1: Click the Start button and type ‘Snipping Tool’ to confirm the app is installed.
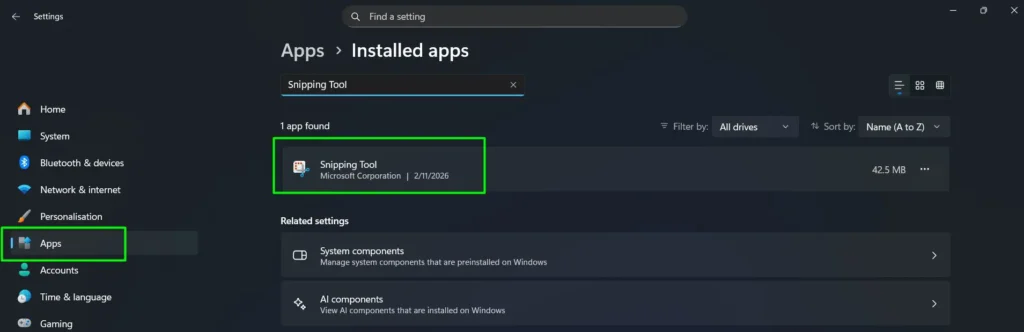
Step 2: Go to Settings > Apps > Installed Apps, search for ‘Snipping Tool’, and make sure it is not disabled.
Step 3: Restart the PC and try the shortcut again.
Step 4: If the shortcut still does not respond, open the Snipping Tool manually from the Start menu at least once — this re-registers it as the active handler for the shortcut.
Screen Recording Icon Missing from the Toolbar
If the video camera icon is not visible in the Snipping Tool toolbar, the app is running on an outdated version. Screen recording was added in Windows 11 version 22H2 and requires the app to be updated.
- Step 1: Open the Microsoft Store from the Start menu.
- Step 2: Click the search bar and type ‘Snipping Tool’.
- Step 3: If an Update button appears, click it and wait for the update to complete.
- Step 4: Reopen the Snipping Tool — the video camera icon should now appear in the toolbar.
Screenshot Not Appearing in the Expected Folder
Screenshots taken with Snipping Tool automatically save to Pictures > Screenshots. If a screenshot cannot be found there, it may have been saved under a different name or the folder location may have been changed.
- Step 1: Open File Explorer and navigate to Pictures > Screenshots — this is the default auto-save location.
- Step 2: Sort files by ‘Date modified’ to find the most recent capture at the top.
- Step 3: If the file is not there, press Ctrl + V in Paint or Word — the screenshot is still on the clipboard and can be recovered and saved manually from there.
- Step 4: To check or change the default save location, open Snipping Tool, go to Settings, and look for the save folder option.
Snipping Tool App Crashes or Won’t Open
If the Snipping Tool crashes on launch or freezes mid-capture, a quick reset usually solves it without needing to reinstall anything.
- Step 1: Go to Settings > Apps > Installed Apps and search for ‘Snipping Tool’.
- Step 2: Click the three-dot menu next to the app and select ‘Advanced Options’.
- Step 3: Scroll down and click ‘Repair’ first — this fixes the app without touching any saved data.
- Step 4: If it still crashes after repairing, click ‘Reset’ to restore the app to its default state.
- Step 5: If neither works, uninstall the app from the same menu and reinstall it from the Microsoft Store for free.
Delay Timer Not Showing
The delay timer is only available when the Snipping Tool is opened as a full app — not when using the Windows + Shift + S keyboard shortcut. The shortcut opens a minimal toolbar that does not include the delay option.
- Step 1: Open Snipping Tool from the Start menu instead of using the keyboard shortcut.
- Step 2: Look for the clock icon in the toolbar at the top of the Snipping Tool window.
- Step 3: If the clock icon is still not visible, click the three-dot menu in the top-right corner of the app and check Settings — some versions place the delay option there.
Screen Recording Has No Audio
Audio does not record by default. The microphone is set to ‘Mute’ every time a new recording session starts, so it needs to be manually enabled each time before clicking Start.
- Step 1: After making the screen selection, look at the recording toolbar that appears at the top.
- Step 2: Click the microphone dropdown arrow next to the mute icon.
- Step 3: Click ‘Mute’ to uncheck it — this enables audio recording.
- Step 4: Select the correct microphone from the list (built-in, USB, or Bluetooth).
- Step 5: Click Start to begin the recording with audio active.
- Step 6: If no audio input devices appear in the list, check that the microphone is connected and enabled in Settings > System > Sound > Input.
Frequently Asked Questions
Is Snipping Tool available on all Windows 11 versions?
Yes, the Snipping Tool comes pre-installed on all editions of Windows 11 including Home, Pro, and Enterprise. No download is needed. If it is missing, search for ‘Snipping Tool’ in the Microsoft Store and install it for free.
Does Snipping Tool screen recording support audio?
Yes, but audio is muted by default. To record with audio, click the microphone dropdown arrow in the recording toolbar, uncheck ‘Mute’, and select the preferred microphone before hitting Start. Both built-in and USB microphones are supported.
Where are Snipping Tool screen recordings saved?
Screenshots automatically save to Pictures > Screenshots as PNG files the moment the capture is made. Screen recordings automatically save to Videos > Screen Recordings as MP4 files when the Stop button is clicked. Neither requires a manual save step.
What is the difference between Windows + Shift + S and Windows + Shift + R?
Windows + Shift + S opens the Snipping Tool in screenshot mode. Windows + Shift + R opens it directly in screen recording mode. Both shortcuts skip opening the app manually and go straight into the capture or record selection.
How do you capture a dropdown menu or tooltip with Snipping Tool?
Use the delay timer inside the Snipping Tool app. Set the delay to 3 or 10 seconds, click ‘New’, then quickly trigger the menu or tooltip. The Snipping Tool will activate automatically after the countdown and capture whatever is on screen at that moment.
What file formats does Snipping Tool support?
Snipping Tool supports PNG, JPG, and GIF. PNG is recommended for screenshots containing text or UI elements as it preserves sharp edges. JPG is better when file size is a priority. GIF works for basic compatibility needs.
What is the Text Extractor feature in Snipping Tool?
Text Extractor is a built-in OCR tool in the Snipping Tool that copies any visible text from the screen — including text inside images, videos, PDFs, and apps that block normal text selection. Press Windows + Shift + T, drag over the area containing the text, then click ‘Copy all text‘ in the toolbar that appears. The text is instantly copied to the clipboard, ready to paste anywhere. No separate app or plugin needed.
Screen recording requires Windows 11 version 22H2 or later. If the video camera icon is not visible in the toolbar, open the Microsoft Store, search for ‘Snipping Tool’, and click Update to get the latest version.