To reset audio settings in Windows 11, open Settings, go to System > Sound > Volume Mixer, and click the Reset button next to “Reset Sound Devices and Volumes for All Apps to the Recommended Defaults.” That is the fastest fix — but Windows 11 offers seven additional methods for resetting audio settings depending on your exact problem, from restarting the audio service to reinstalling the driver entirely.
Key Points
- Reset all app volume settings: Settings > System > Sound > Volume Mixer > click Reset.
- Restart the audio service: services.msc > Windows Audio > right-click > Stop, then right-click > Start.
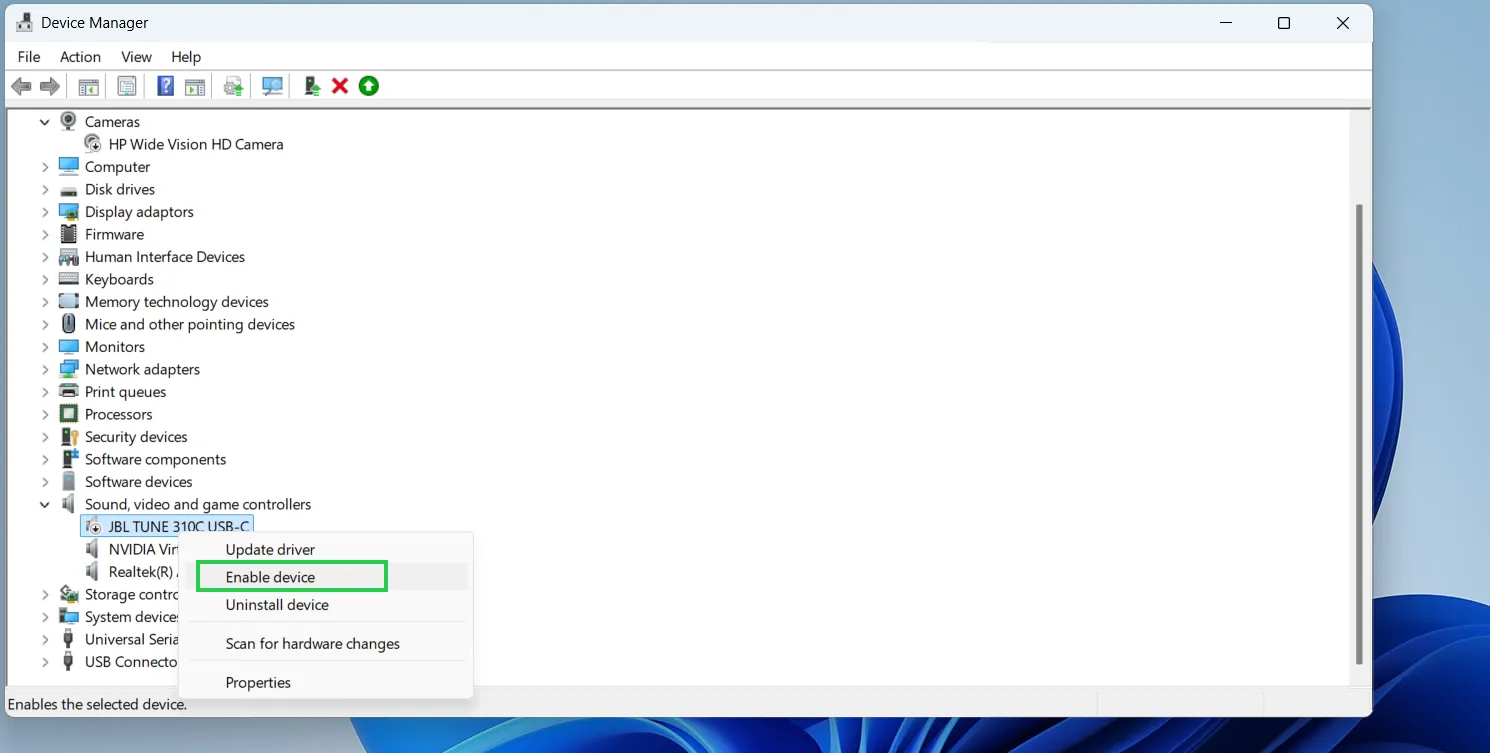
- Restart the audio driver: Device Manager > Sound, video and game controllers > right-click device > Disable device, then Enable device.
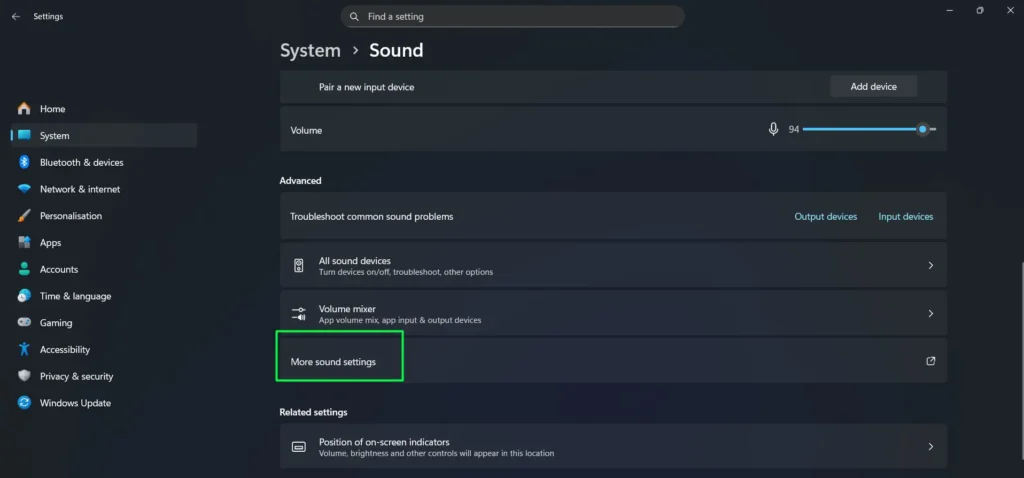
- Reset a single device: Settings > System > Sound > More sound settings > double-click device > Restore Defaults on the Advanced, Enhancements, and Spatial Sound tabs.
- Reset system sounds: Settings > System > Sound > More sound settings > Sounds tab > select Windows Default.
When to Reset Audio Settings
Consider resetting your audio settings in Windows 11 when:
- Audio stops working after a Windows update
- Apps have changed volume or output settings without your input
- You have tweaked settings and need to return to defaults
- Sound plays distorted, too quiet, or from the wrong device
- You want a clean slate before professional audio work
Resetting is quick, safe, and does not delete personal files. It serves as a smart first step before trying advanced troubleshooting like reinstalling drivers or contacting support.
Before You Start: Quick Checks
Before running any reset, confirm these basics first — they resolve most audio issues in seconds:
- Check the mute button. Look at the speaker icon in the taskbar. A small X beside it means your audio is muted. Click it or press the mute key on your keyboard to unmute.
- Check the volume level. Right-click the speaker icon and open Volume Mixer to confirm no app is muted or set to zero.
- Confirm the correct output device. Click the speaker icon, then click the arrow next to the volume slider to verify Windows is sending audio to the right device.
- Check physical connections. Ensure cables are firmly plugged in, or that Bluetooth devices are properly paired and connected.
If audio still does not work after those checks, proceed with the methods below.
Methods to Reset Audio Settings in Windows 11
- Reset All App Volume Levels via Volume Mixer
- Restart the Windows Audio Service
- Restart the Audio Driver
- Reset a Specific Audio Device to Defaults
- Reset System Sounds to Windows Default
- Disable Audio Enhancements
- Use the Audio Troubleshooter
- Reinstall the Audio Driver
Method 1: Reset All App Volume Levels via Volume Mixer
This is the fastest way to reset all audio volumes across every app on your Windows 11 PC back to the recommended defaults. It takes less than a minute and requires no restart. Start here before trying anything else.
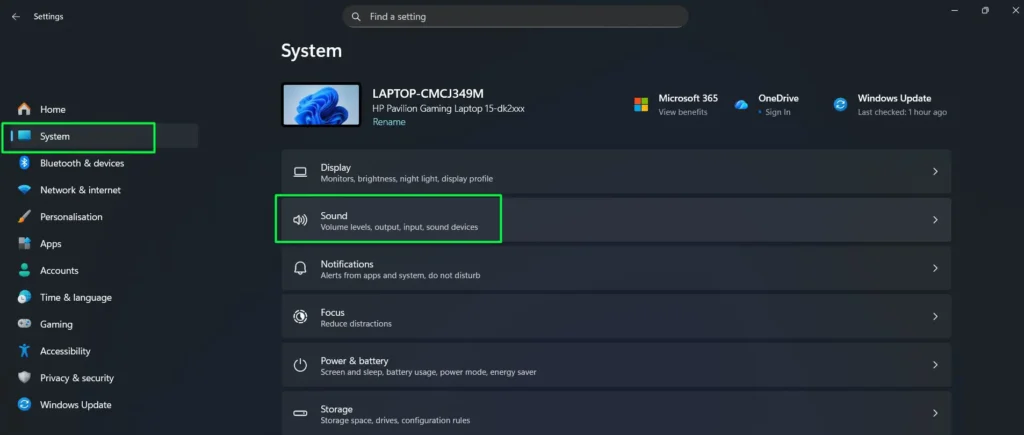
- Step 1: Press Windows + I to open Settings, or click the Windows icon and select Settings.
- Step 2: In the left sidebar, click System.
- Step 3: On the right side, click Sound.
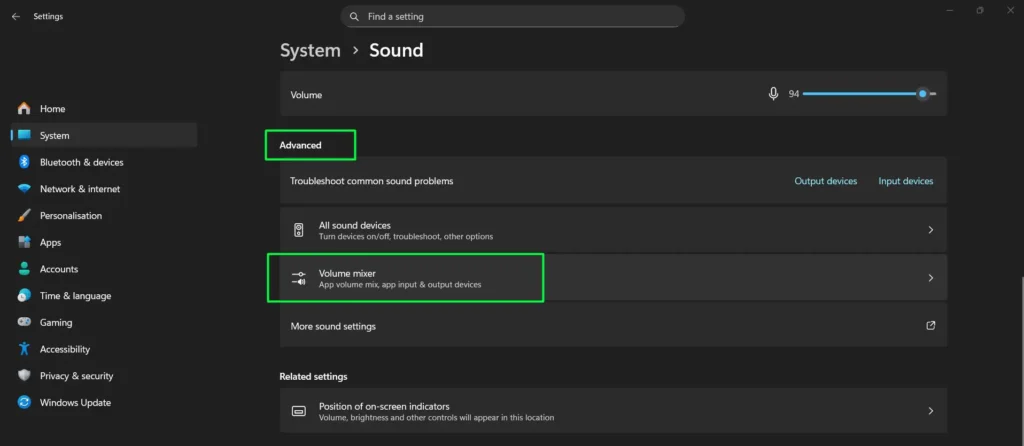
- Step 4: Scroll down to the Advanced section and click Volume mixer.
- Step 5: At the bottom of the Volume Mixer page, locate the option that reads “Reset Sound Devices and Volumes for All Apps to the Recommended Defaults.”
- Step 6: Click the Reset button next to that option.
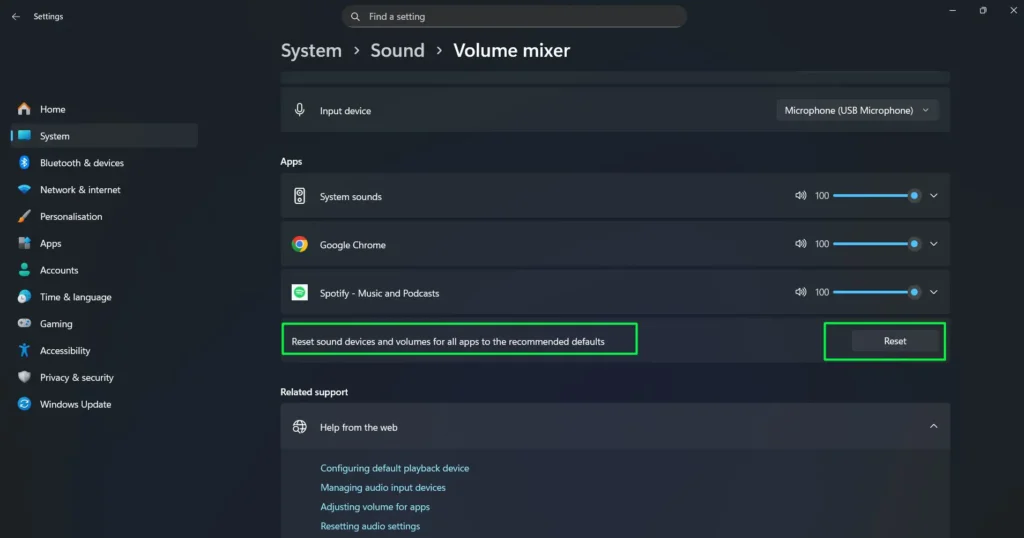
Your volume levels for all apps and devices return to their default values immediately. This method proves particularly useful when individual applications have different volume levels that cause confusion or make certain programs difficult to hear.
Method 2: Restart the Windows Audio Service
Sometimes the audio service running in the background gets stuck or stops responding. Stopping and restarting it clears temporary errors without changing any of your settings. This approach proves effective when audio suddenly stops working even though all settings appear correct — and requires no restart.
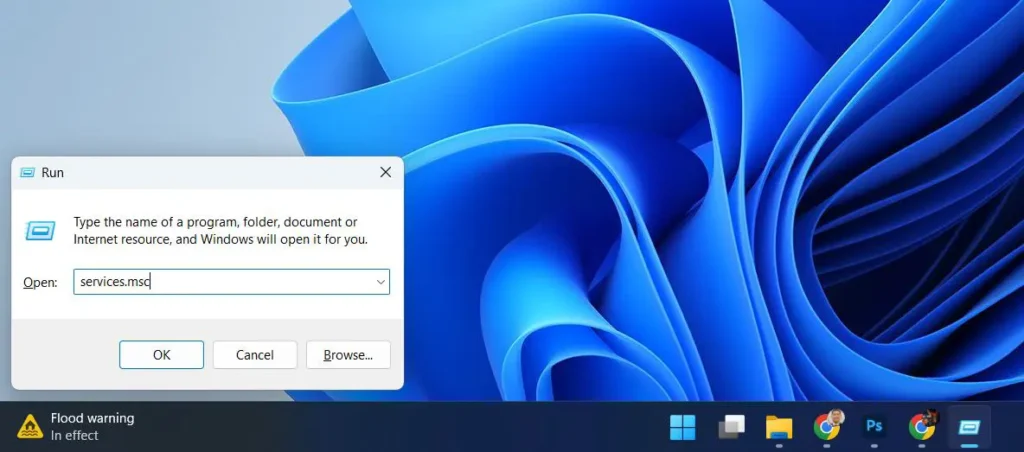
- Step 1: Press Windows + R to open the Run dialog box.
- Step 2: Type services.msc and press Enter.
- Step 3: In the Services window, scroll down and locate Windows Audio.
- Step 4: Right-click on Windows Audio and select Stop from the dropdown menu.
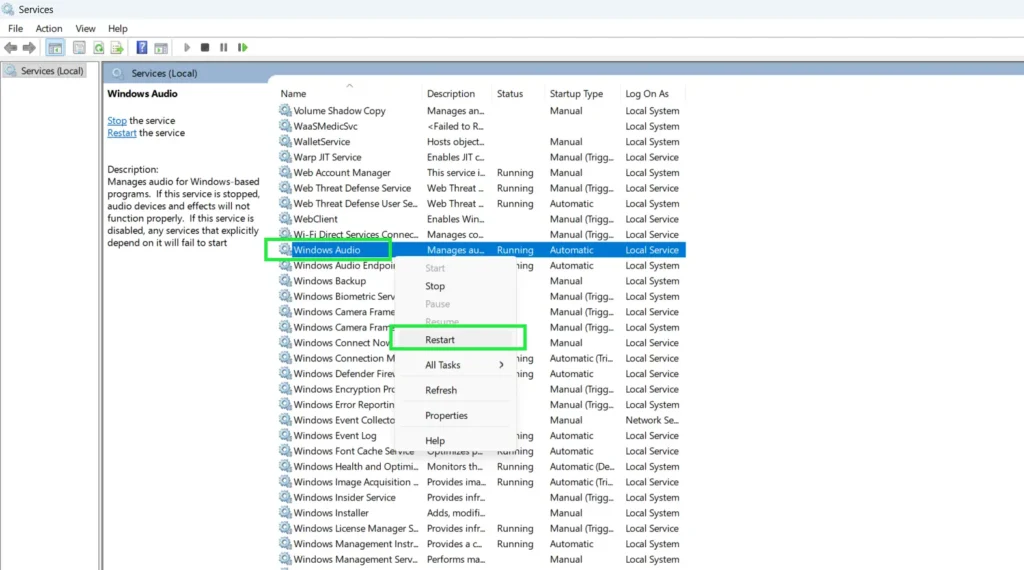
- Step 5: Right-click on Windows Audio again and select Start.
- Step 6: Locate Windows Audio Endpoint Builder in the same list.
- Step 7: Right-click on Windows Audio Endpoint Builder and select Stop.
- Step 8: Right-click on Windows Audio Endpoint Builder again and select Start.
Once you stop and restart both services, test your audio. These two services manage all audio functionality in Windows 11, and restarting them often fixes temporary glitches that prevent sound from playing without requiring a full system reboot.
Method 3: Restart the Audio Driver
Restarting the audio driver forces Windows to reload all driver settings from scratch without needing a full system reboot or reinstalling any files. This is the recommended approach when your audio device suddenly stops responding or produces no sound despite all settings appearing correct.
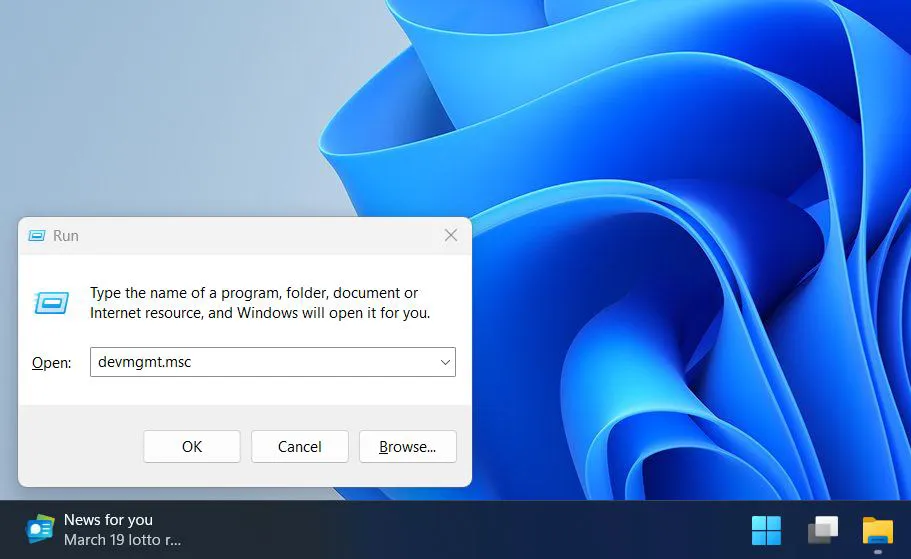
- Step 1: Press Windows + R to open the Run dialog box.
- Step 2: Type devmgmt.msc and press Enter to open Device Manager.
- Step 3: Expand the category called Sound, video and game controllers.
- Step 4: Right-click your audio device and select Disable device.
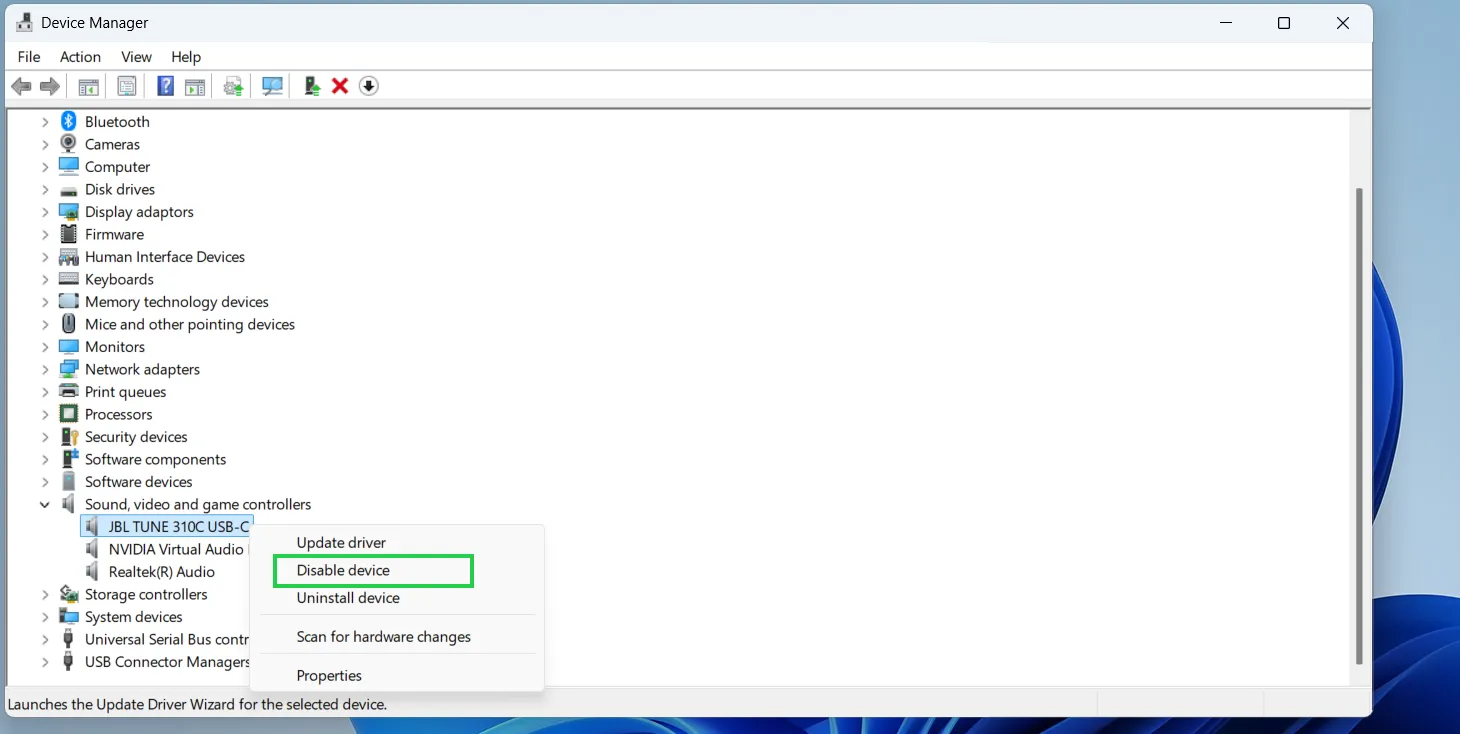
- Step 5: Click Yes on the confirmation prompt to disable the device.
- Step 6: Right-click the same audio device again and select Enable device.
- Step 7: Wait a few seconds for the driver to reload, then test your audio.
Disabling and re-enabling the device forces Windows to reinitialize the driver without deleting any driver files or settings. This is a lighter and faster option compared to a full driver reinstall, and it resolves many cases of sudden audio failure without requiring a restart.
Method 4: Reset a Specific Audio Device to Defaults
If only one particular speaker or headphone output causes trouble, you can reset just that device without touching the rest of your audio setup. This targeted approach works best when you have multiple audio devices connected and only one malfunctions.
- Step 1: Press Windows + I to open Settings.
- Step 2: Navigate to System > Sound.
- Step 3: Click on More sound settings at the bottom of the page.
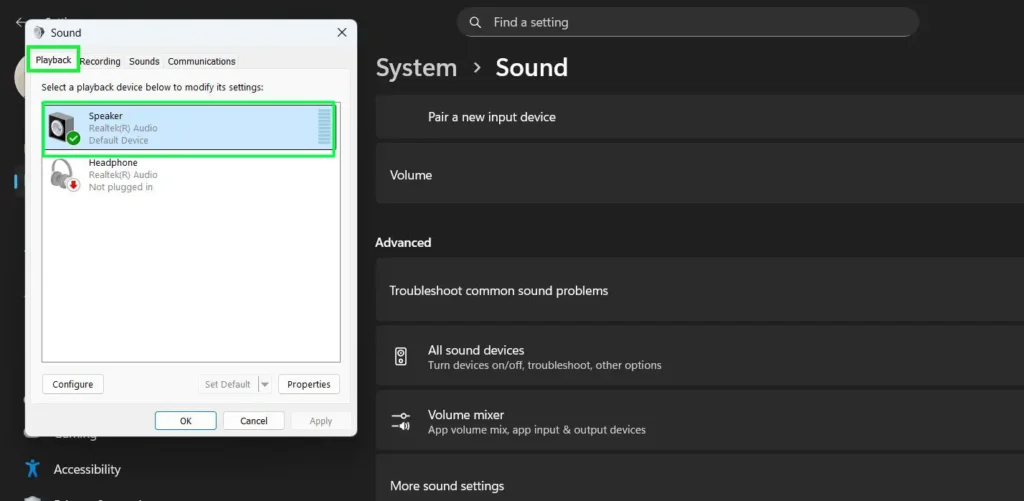
- Step 4: In the Sound window that appears, make sure the Playback tab is selected.
- Step 5: Double-click the audio device you want to reset, such as your speakers or headphones.
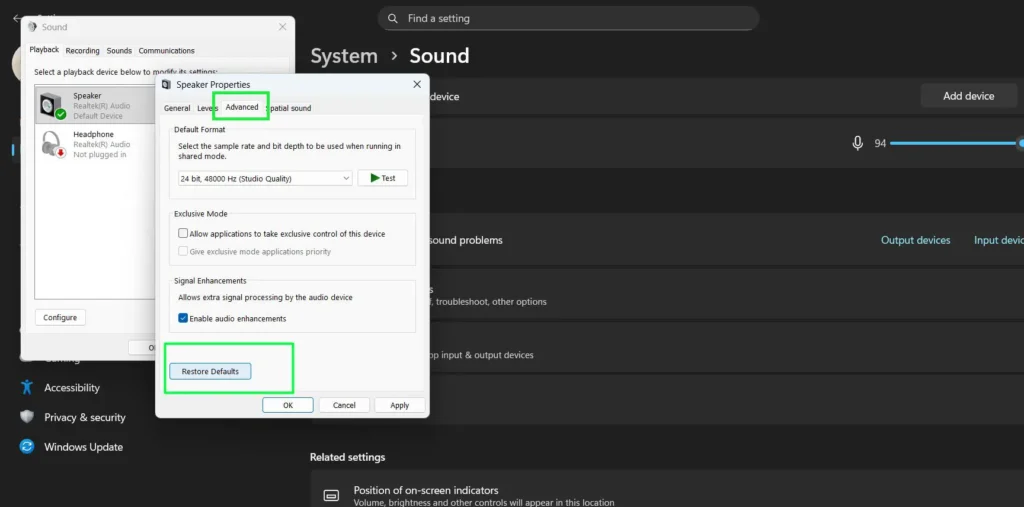
- Step 6: In the device properties window, click the Advanced tab.
- Step 7: Click the Restore Defaults button at the bottom of that tab.
- Step 8: Click the Spatial Sound tab and click Restore Defaults on that tab as well.
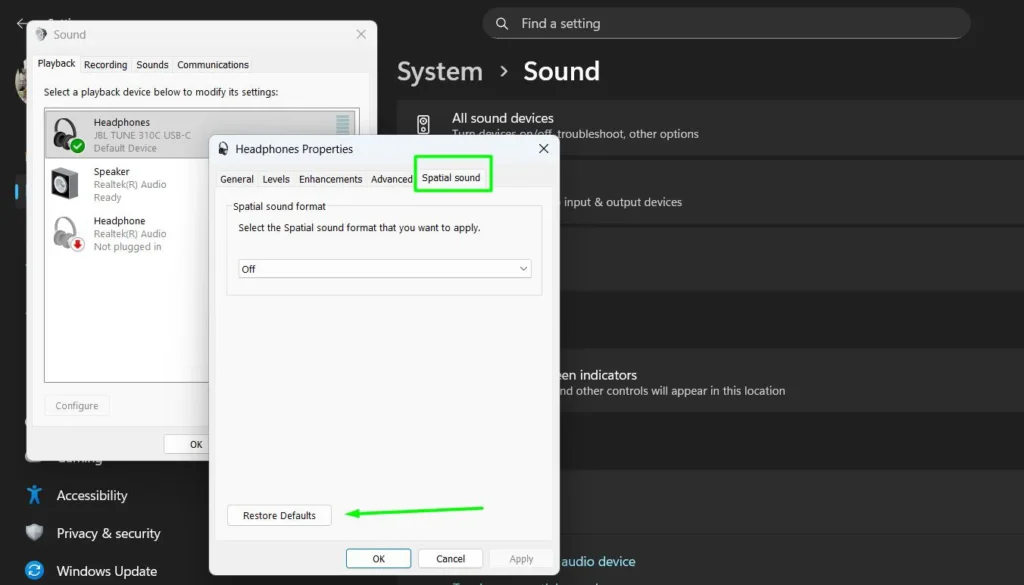
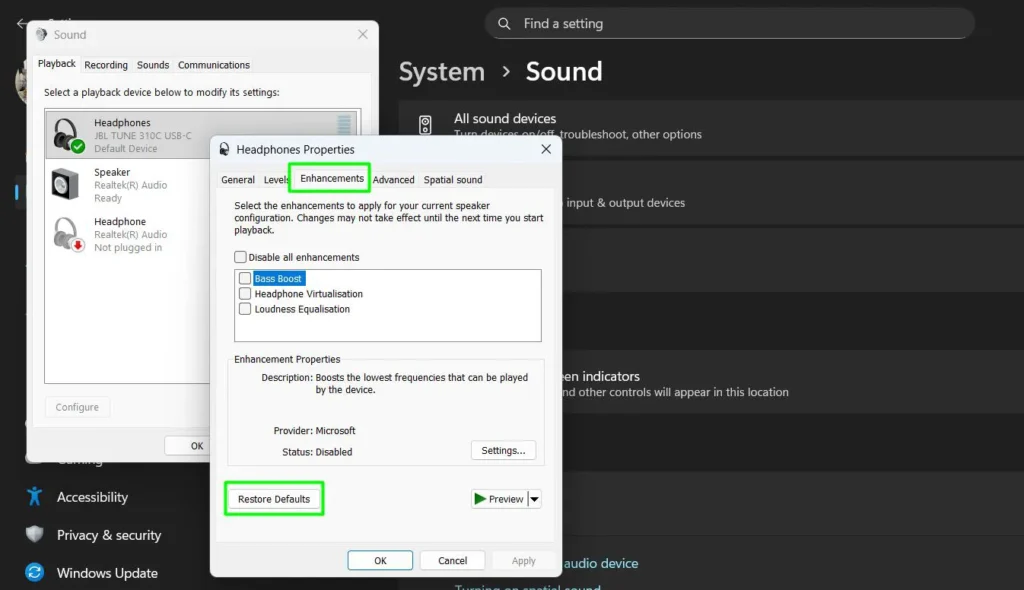
- Step 9: If an Enhancements tab is visible, click it and click Restore Defaults there too.
- Step 10: Click Apply, then OK.
Note: If you have multiple audio devices, repeat these steps for each one to fully reset all connected devices. If the Restore Defaults button appears grayed out on any tab, that section already uses default settings. This method preserves your other audio configurations while addressing problems with specific output devices.
Method 5: Reset System Sounds to Windows Default
Windows 11 plays notification sounds, error alerts, and startup chimes using a Sound Scheme. If someone has changed or deleted these system sounds — or if a third-party app has modified the scheme — you can restore everything back to the original Windows defaults in a few clicks.
- Step 1: Press Windows + I to open Settings and navigate to System > Sound.
- Step 2: Click More sound settings at the bottom of the page.
- Step 3: In the Sound window, click the Sounds tab (not the Playback tab).
- Step 4: In the Sound Scheme dropdown at the top of the window, select Windows Default.
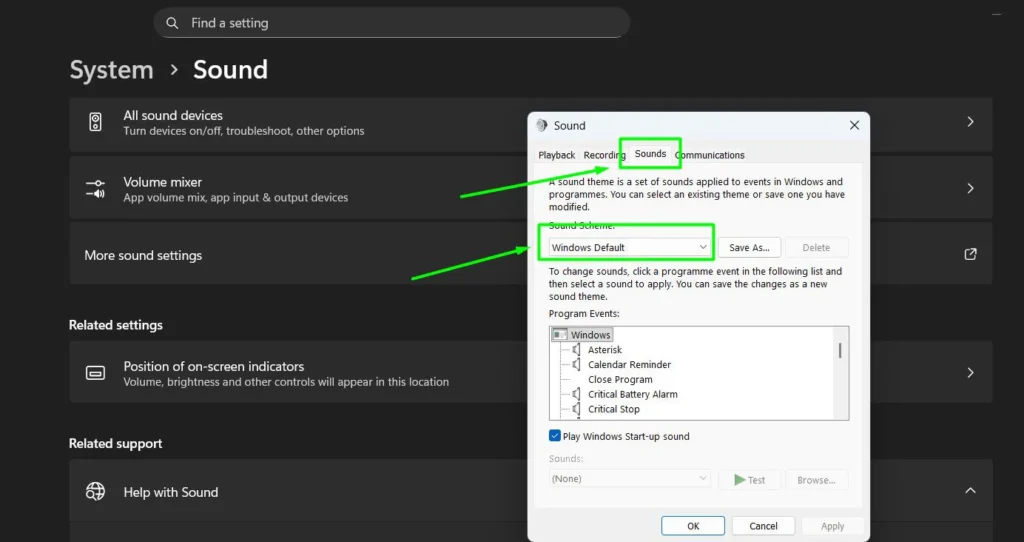
- Step 5: Click Apply, then OK.
This restores all notification sounds, error beeps, and system event audio to their original Windows 11 defaults. This method does not affect your speaker volume or output device settings — it only resets the Sound Scheme.
Method 6: Disable Audio Enhancements
Audio enhancements are special effects Windows 11 applies to improve sound quality, but they can sometimes cause distortion, stuttering, or prevent audio from playing altogether. Disabling them returns your audio output to its unprocessed state.
Windows 11 offers two ways to reach this setting. Use whichever matches your Windows build:
Newer path (Settings app):
- Step 1: Press Windows + I and go to System > Sound.
- Step 2: Under Output, click on your active audio device (such as Speakers or Headphones).
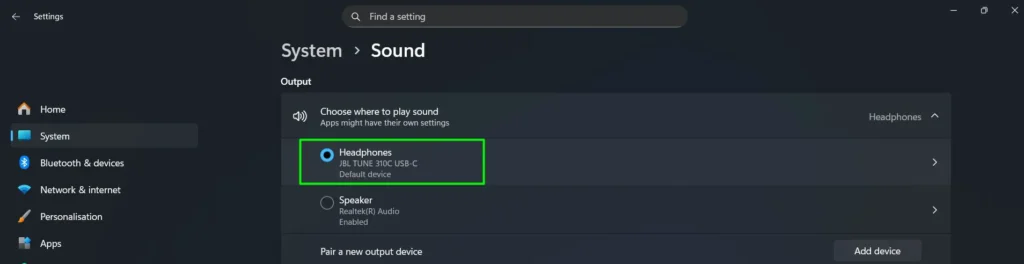
- Step 3: Scroll down to Advanced settings and set the Audio enhancements dropdown to Off.
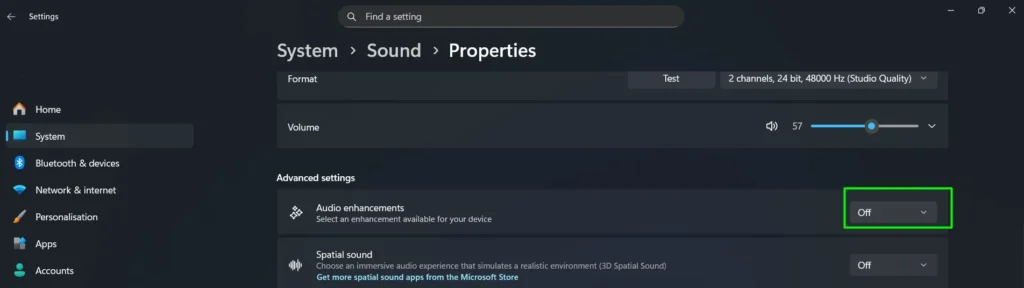
- Step 4: The change applies immediately — no restart required.
Older path (Control Panel):
- Step 1: Press Windows + I and navigate to System > Sound.
- Step 2: Click More sound settings at the bottom.
- Step 3: In the Sound window, select the Playback tab.
- Step 4: Double-click your active audio device, then click the Advanced tab.
- Step 5: Uncheck the box that says “Enable audio enhancements.”
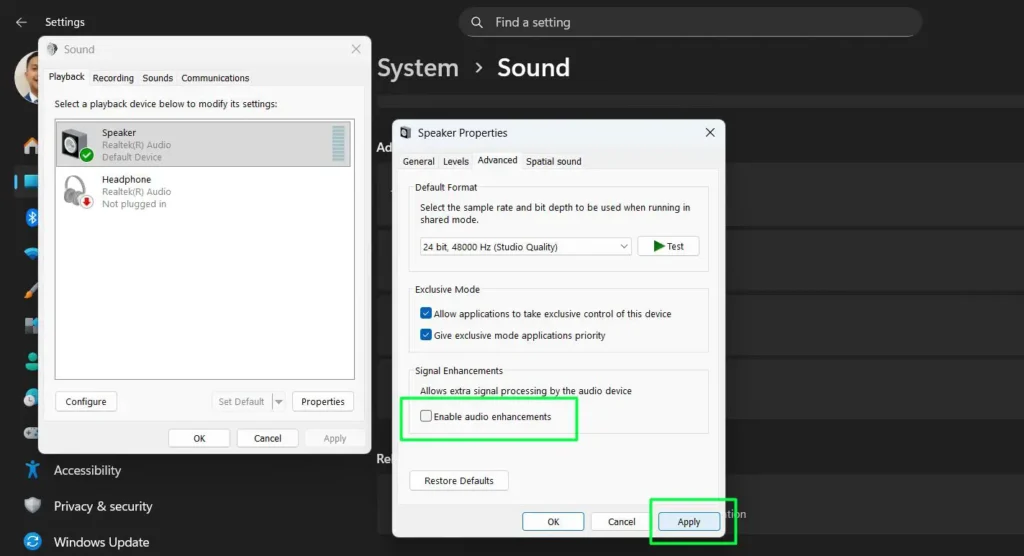
- Step 6: Click Apply, then OK.
Test your audio after disabling enhancements. If this resolves the issue, you can re-enable individual enhancements one at a time to identify which specific effect caused the problem.
Method 7: Use the Audio Troubleshooter
Windows 11 includes a built-in audio troubleshooter that automatically detects and fixes common sound problems. This tool runs a series of diagnostic tests and applies fixes without requiring manual intervention — making it ideal when you are unsure what is causing the problem.
- Step 1: Press Windows + I to open Settings.
- Step 2: Click System in the left sidebar.
- Step 3: Select Sound on the right side.
- Step 4: Scroll down and under “Troubleshoot common sound problems,” click Output devices to fix speaker or headphone issues, or Input devices to fix microphone issues.
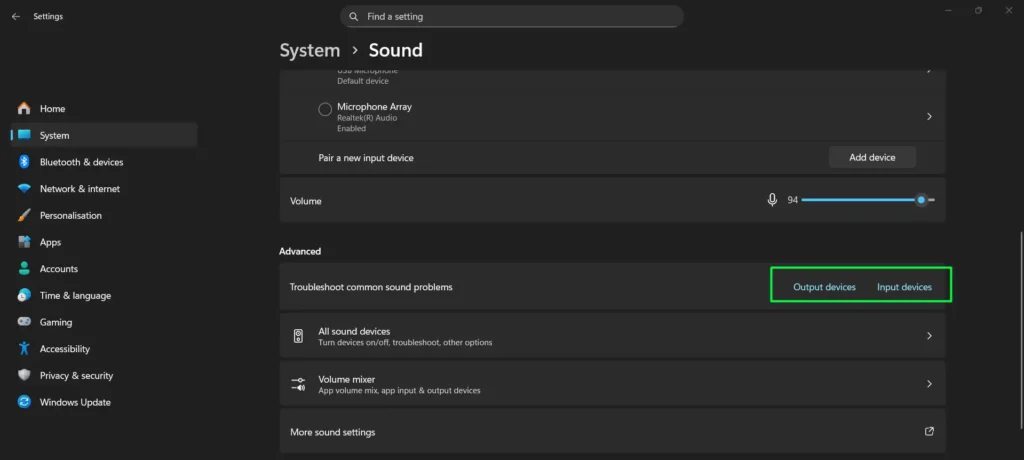
- Step 5: Follow the on-screen instructions as the troubleshooter runs its diagnostic tests and applies fixes.
The troubleshooter checks multiple potential problem areas in one process, including device selection, volume levels, driver status, and audio service state. It is one of the most comprehensive single-step solutions for resetting audio settings in Windows 11.
Method 8: Reinstall the Audio Driver
If none of the above methods fix your sound, reinstalling the audio driver itself often resolves deeper software conflicts that settings adjustments alone cannot fix. Windows 11 will automatically reinstall the driver after a restart. Use this as a last resort after trying the disable/enable method in Method 3 first.
- Step 1: Right-click the Start button and select Device Manager.

- Step 2: Expand the category called Sound, video and game controllers.
- Step 3: Right-click on your audio device and select Uninstall device.
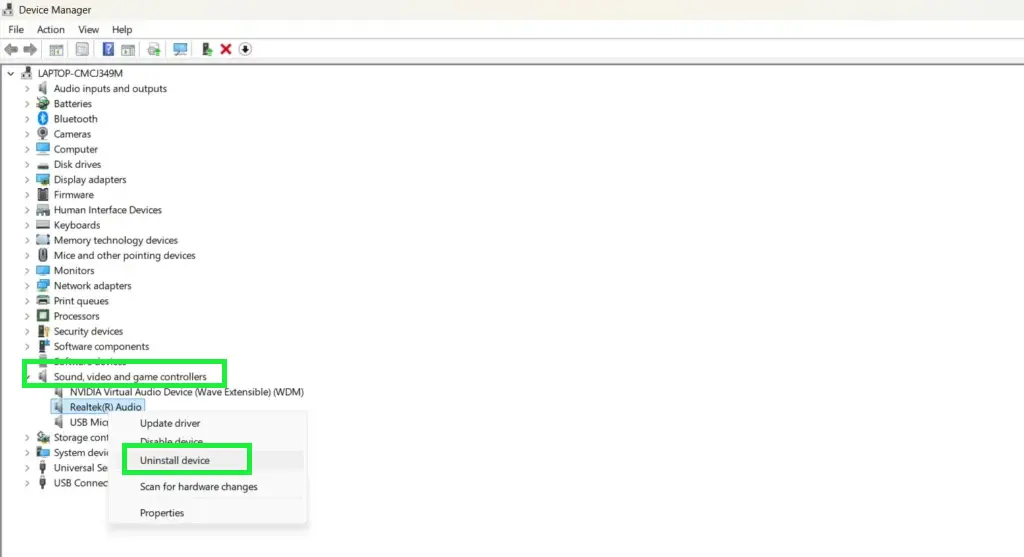
- Step 4: Click Uninstall to confirm. Leave the option to delete driver files unchecked — Windows will handle the reinstallation automatically.
- Step 5: Restart your Windows 11 PC.
- Step 6: After the restart, Windows will automatically detect and reinstall the audio driver.
Test your audio once the desktop finishes loading. If Windows does not reinstall the driver automatically, open Device Manager, click the Action menu, and select Scan for hardware changes. Driver reinstallation resolves issues caused by corrupted or outdated driver files and gives you a clean installation of the latest compatible audio driver for your hardware.
Pro Tip: Start with Method 1 (Volume Mixer reset) for the quickest fix. If that does not work, restart the audio service (Method 2) and audio driver (Method 3) before anything else — both take under a minute and require no restart. Move to resetting individual devices, then enhancements, then the troubleshooter, and only reinstall the driver as a final step. Keep your system updated, restart weekly, and check your Volume Mixer periodically to maintain optimal sound performance.
Tips to Keep Your Audio Settings Working Properly
- Keep Windows 11 up to date. System updates regularly include fixes for audio bugs, driver compatibility issues, and sound service improvements. Installing updates helps prevent recurring audio problems.
- Restart your PC at least once a week. Restarting clears temporary files and refreshes background services, which helps avoid audio glitches caused by memory buildup or long-running processes.
- Disconnect Bluetooth audio devices when not in use. Leaving Bluetooth headphones or speakers connected can confuse audio routing and cause sound to stop working. Always disconnect devices properly through Bluetooth settings.
- Check the Volume Mixer occasionally. Apps can accidentally lower or mute their own volumes. Reviewing the Volume Mixer every few weeks ensures all apps are at the correct level and saves troubleshooting time later.
- Install manufacturer audio drivers when available. Generic drivers from Windows Update work for most users, but motherboard and sound card manufacturers often release specialized drivers that improve stability and prevent settings from resetting after updates.
Frequently Asked Questions
Does resetting audio settings delete my music or personal files?
No. Resetting audio settings in Windows 11 only returns sound-related configurations to their default values. Your music, photos, apps, documents, and all other personal data remain completely untouched. The reset only affects settings like volume levels, audio enhancements, audio output routing, and the sound scheme.
How often should I reset my audio settings?
There is no set schedule for resetting audio settings. Only do it when you experience a sound issue that simpler adjustments — like checking the volume or switching the output device — cannot fix. Resetting too frequently is unnecessary and can undo any custom audio preferences you have intentionally configured.
What is the difference between restarting and reinstalling the audio driver?
Restarting the audio driver (disabling then re-enabling it in Device Manager) reloads the existing driver without removing any files — it is fast, requires no reboot, and resolves most temporary driver glitches. Reinstalling the driver completely removes the current driver files and lets Windows install a fresh copy after a restart. Use the restart method first; only uninstall and reinstall if the restart does not fix the problem.
What if my audio still does not work after a reset?
If your sound remains broken after trying all the reset methods, the issue may be hardware-related. First, test with different speakers or headphones to rule out a problem with your output device itself. Check for Windows 11 updates at Settings > Windows Update, as Microsoft may have released a fix for your audio hardware. If problems persist after that, download the latest audio driver directly from your motherboard or sound card manufacturer’s website rather than relying on Windows Update alone. If the problem continues, your sound card or audio hardware may need professional inspection.
Can I reset audio settings in Windows 11 without restarting my computer?
Yes. The Volume Mixer reset, restarting the Windows Audio Service, the individual device reset through More Sound Settings, disabling audio enhancements, and restarting the audio driver via Device Manager all work without a full system restart. Only the audio driver reinstallation method (Method 8) requires you to restart Windows 11 afterward.
Why does my Windows 11 PC keep switching audio output devices automatically?
This usually happens when you plug in a new audio device or when a Bluetooth device reconnects. Windows 11 is configured by default to switch to newly connected devices automatically. You can change this behavior by going to Settings > System > Sound and adjusting the settings under “Choose where to play sound,” or by right-clicking your preferred device in More sound settings and selecting “Set as Default Device.”
Why do my audio settings keep resetting after every restart?
If your audio format, spatial audio, or volume settings reset every time you restart, the cause is usually one of two things. First, Windows may be using the generic Microsoft High Definition Audio Device driver instead of your manufacturer’s driver — installing the correct Realtek, Intel, or AMD driver from your motherboard maker’s website usually fixes this. Second, Windows Fast Startup can prevent some audio settings from saving correctly. To disable it, go to Control Panel > Power Options > Choose what the power buttons do, click “Change settings that are currently unavailable,” and uncheck Turn on fast startup.
How do I set a default audio device in Windows 11?
Press Windows + I to open Settings, navigate to System > Sound, and under the Output section, click the dropdown next to “Choose where to play sound” and select your preferred device. Alternatively, open More sound settings, right-click your desired device on the Playback tab, and select “Set as Default Device.”