Managing audio input devices in Windows 11 and Windows 10 means selecting, configuring, and troubleshooting microphones and audio inputs to ensure optimal performance across video calls, gaming, recording, and live streaming. Whether you use a built-in microphone, USB headset, XLR interface, or professional condenser mic, properly configuring your input devices makes a noticeable difference in audio quality.
This complete guide covers everything from basic microphone selection to advanced input management and troubleshooting — all steps reflect the actual Windows 11 interface you will see on your screen, with Windows 10 equivalents noted where they differ.
What Are Audio Input Devices?
An audio input device is anything that captures sound and sends it to your computer — your built-in laptop microphone, a USB desk mic, a headset, a webcam microphone, or a professional audio interface connected via XLR. Windows 11 and Windows 10 both support multiple input devices simultaneously, but only one acts as the default at any time. Apps use the system default unless you configure them individually to use a different device.
Effectively managing your audio inputs involves six core areas:
- Selecting the right device — Knowing how to switch between a built-in mic, USB microphone, or headset is fundamental when you have multiple devices connected.
- Adjusting settings — Tuning input levels, enabling noise suppression, and setting the correct audio format directly affects recording and call quality.
- Per-app configuration — Different applications such as Teams, Zoom, Discord, and OBS each support their own microphone selectors that override the Windows default.
- Privacy permissions — Windows 11 privacy controls determine which apps can access your microphone and are silently reset by major Windows updates.
- Driver and service management — Keeping audio drivers and Windows Audio services in good shape prevents most recognition failures and post-update issues.
- Troubleshooting — Knowing how to fix low volume, echo, undetected microphones, and default-switching issues saves time and avoids unnecessary reinstalls.
1. Accessing Audio Input Settings in Windows 11
Windows 11 provides direct access to input device management through the redesigned Settings app. Follow these steps to reach your audio input settings.
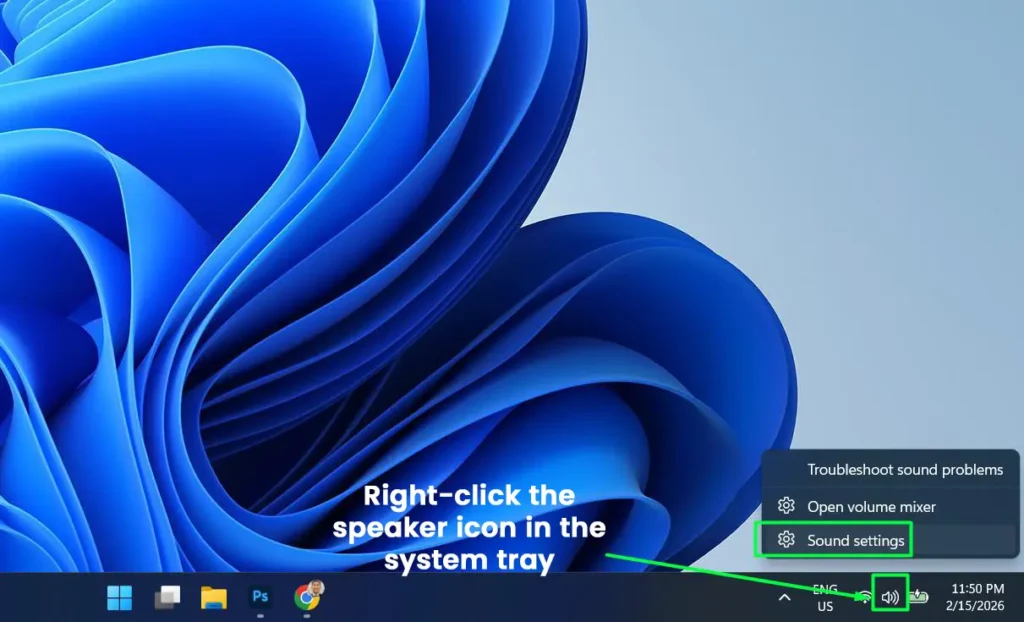
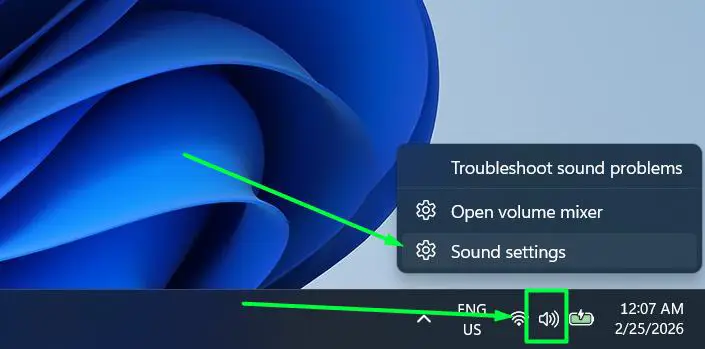
- Step 1: Right-click the speaker icon in the system tray then click Sound settings.
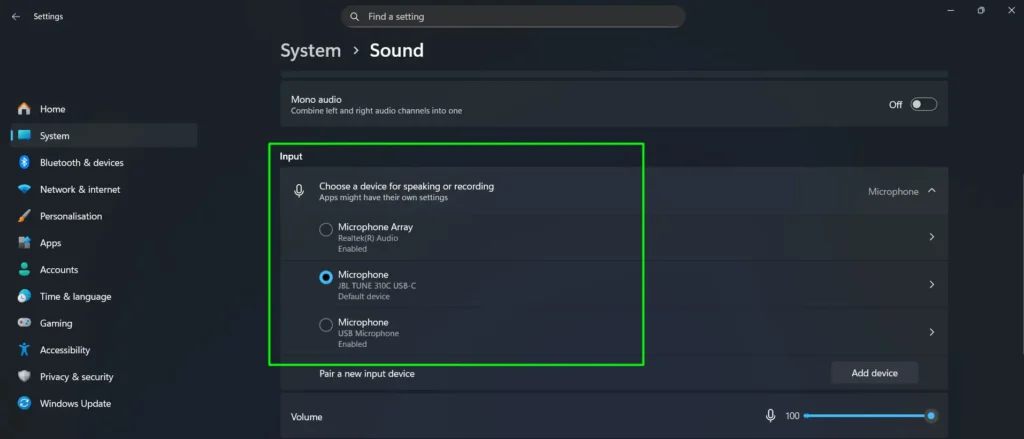
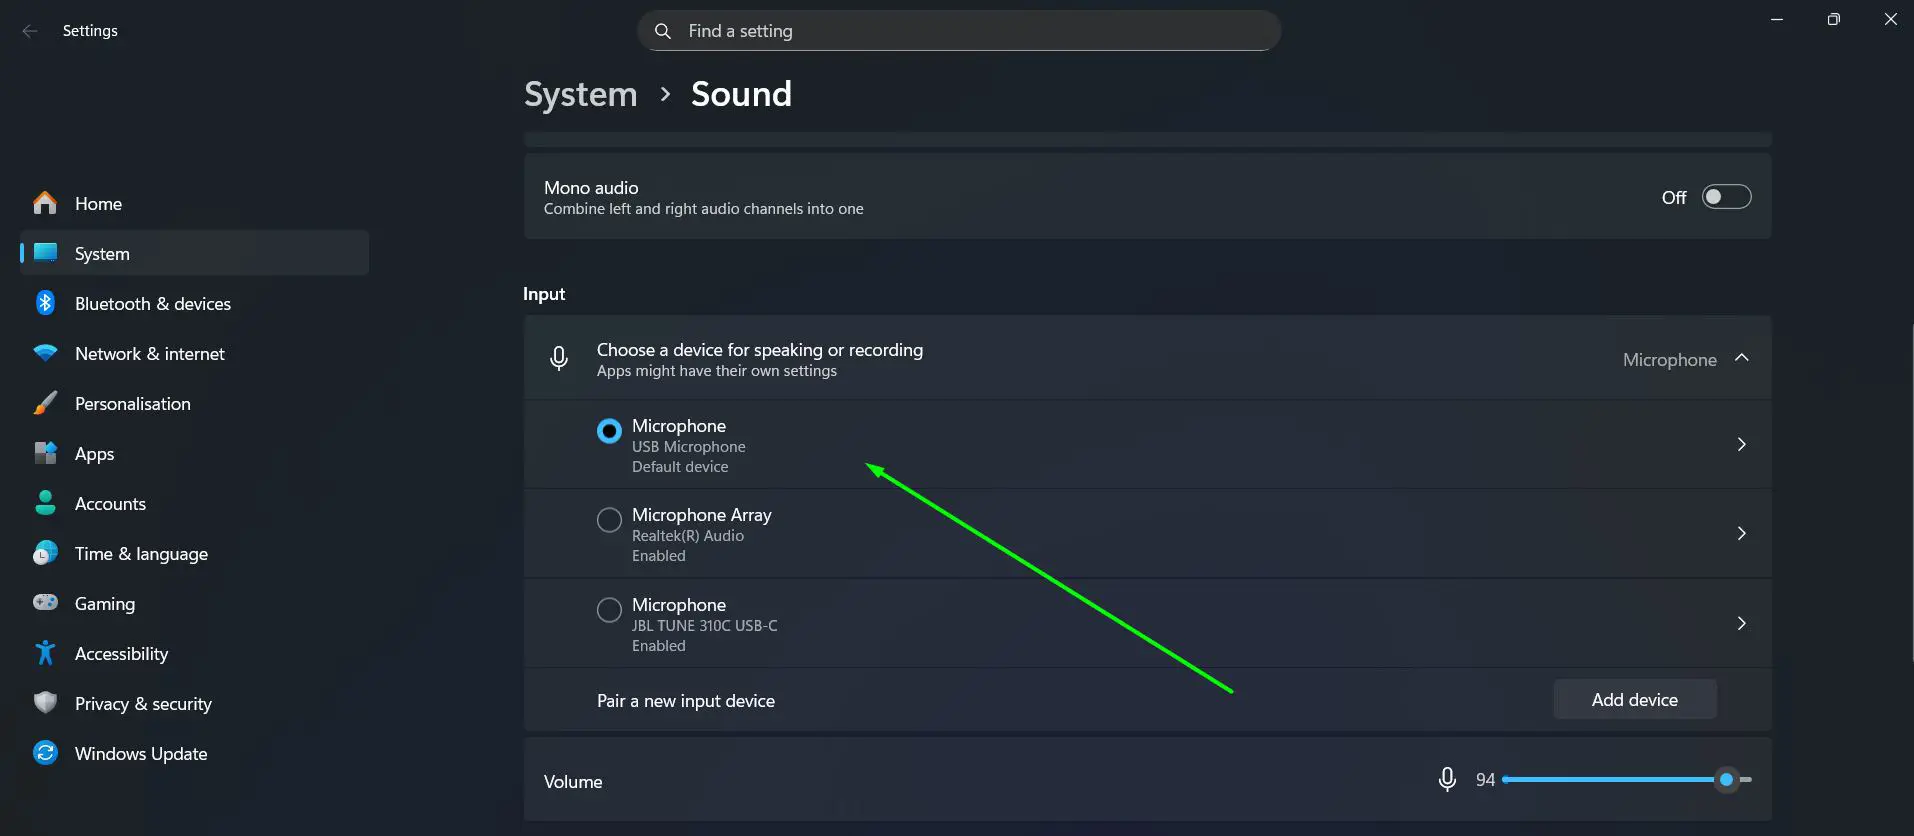
- Step 2: Scroll down to the Input section where you will find “Choose a device for speaking or recording” along with a list of all available microphones and input devices.
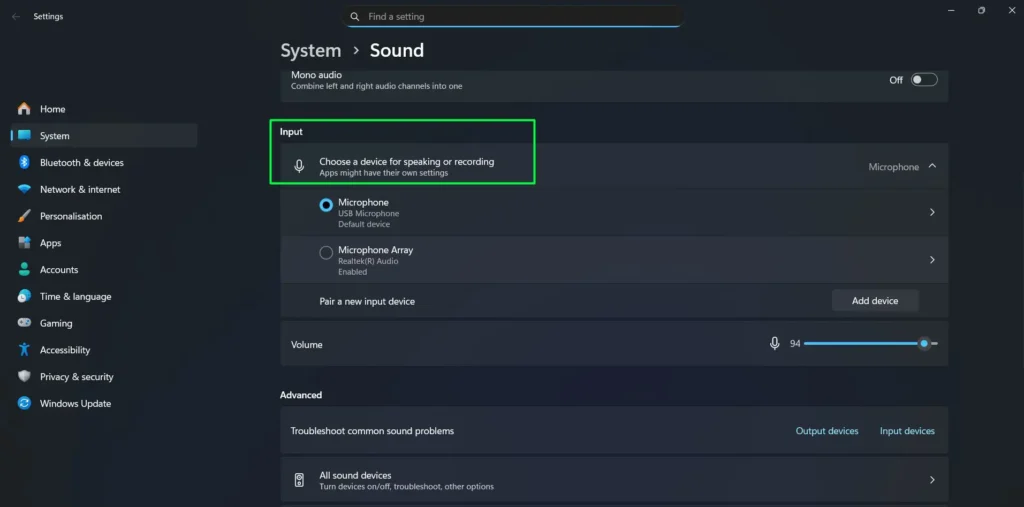
- Step 3: Click on your preferred input device to select it as your default. Windows 11 displays the device name along with its connection type, making it easy to identify which microphone you are selecting.
Below the device selection, you will see an input volume slider and a real-time test bar that moves when Windows detects sound. Speak into your microphone and watch the blue bar respond to confirm it is receiving audio input — no additional apps needed.
Windows 10 shortcut: Press Windows + I to open Settings, then go to System > Sound and use the “Choose your input device” dropdown under the Input section.
2. Setting the Default Input Device in Windows 11
Setting the correct default input device ensures Windows and all your applications use the right microphone automatically. You can set the default through the modern Settings app or the classic Sound Control Panel depending on your preference.
Using the Settings app:
- Step 1: Open Settings > System > Sound and scroll to the Input section.
- Step 2: Click on your preferred microphone from the device list. The selected device immediately becomes the system default input.
Using the Sound Control Panel (recommended for permanent defaults):
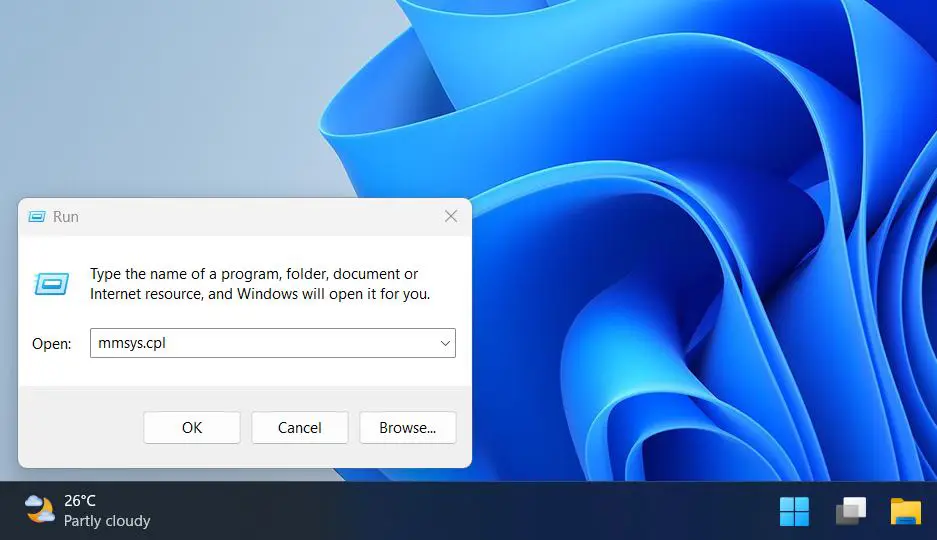
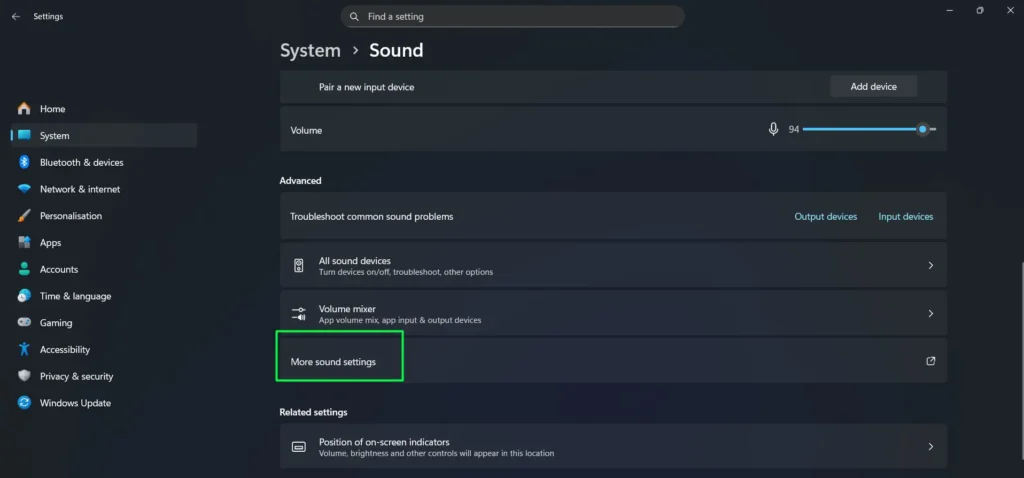
- Step 1: Press Windows + R, type mmsys.cpl, and press Enter to open the classic Sound Control Panel directly. Alternatively, click More sound settings at the bottom of the Sound Settings page.
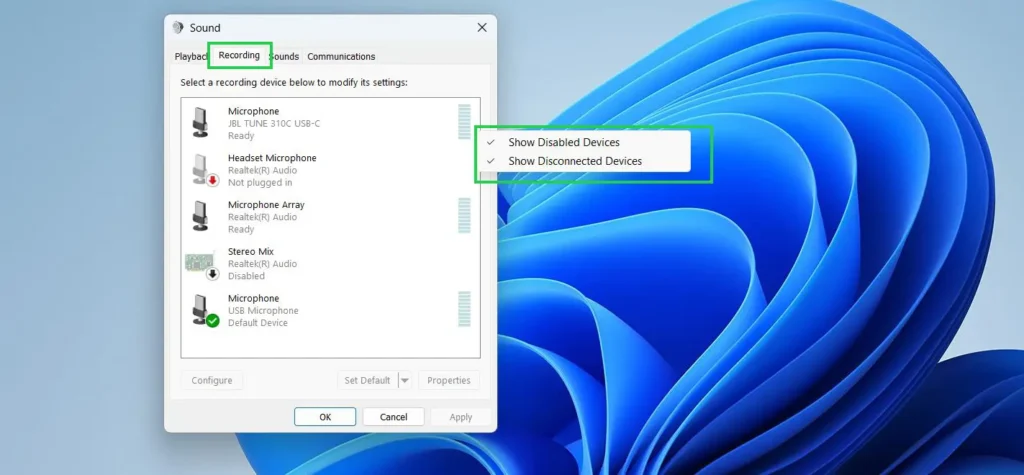
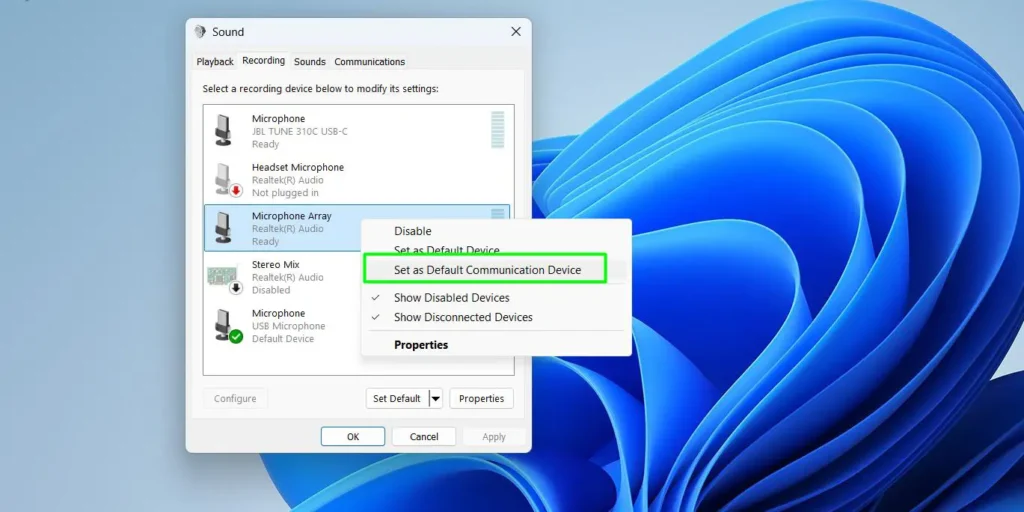
- Step 2: Click the Recording tab to view all available input devices. Right-click any empty area and check “Show Disabled Devices” and “Show Disconnected Devices” to reveal microphones that Windows may be hiding.
- Step 3: Right-click your preferred microphone and select “Set as Default Device.” This ensures all applications that rely on the Windows default will automatically use this microphone.
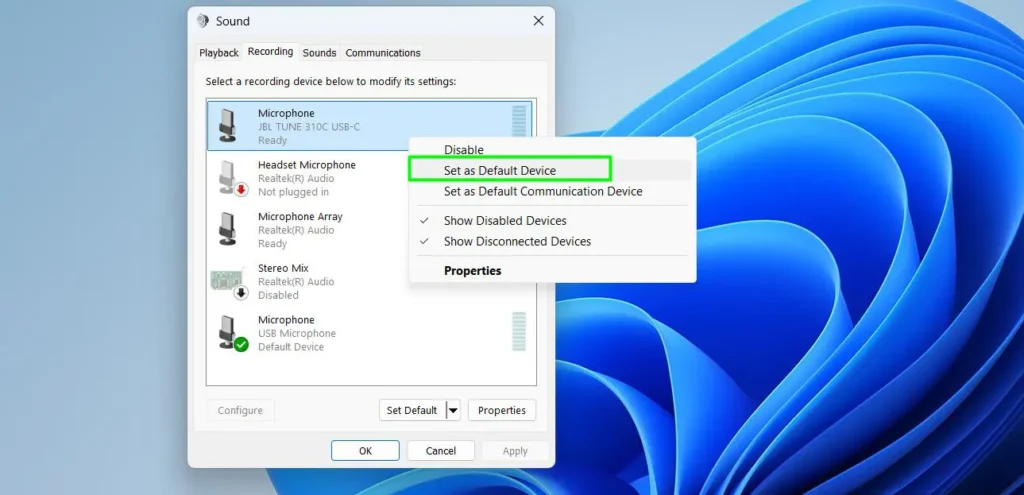
- Step 4: To set a separate default for communications apps like Teams or Zoom, right-click the same microphone again and also select “Set as Default Communication Device.” This lets you use one microphone for recordings and a different one for calls simultaneously.
Setting a proper default device prevents Windows from randomly switching to a different microphone when you plug in new devices like headsets or webcams.
3. Switching Between Microphones Quickly
If you regularly switch between a headset microphone and a desk mic, you do not need to dig through Settings every time. Windows 11 provides a faster method for changing your active input device on the fly.
- Step 1: Right-click the speaker icon in the system tray at the bottom-right corner of your taskbar and select Sound settings.
- Step 2: The Sound settings page opens directly. Scroll down to the Input section where all connected microphones are listed.
- Step 3: Click on the microphone you want to switch to. Windows applies the change immediately as the new default input — no restart required.
- Step 4: Alternatively, open Settings > System > Sound and use the “Choose a device for speaking or recording” dropdown at the top of the Input section to switch between available microphones in two clicks.
Note: The Windows Quick Settings panel (Windows + A) only switches output devices such as speakers and headphones — it does not include microphone or audio input switching. Always use Sound settings or the Settings app to change your active input device.
4. Configuring Input Device Properties and Advanced Settings
Windows 11 offers detailed configuration options through the device properties page. Follow these steps to access and adjust your advanced input settings including volume, format, and microphone testing.
- Step 1: In the Sound Settings Input section, click the arrow next to your selected input device to expand its options.
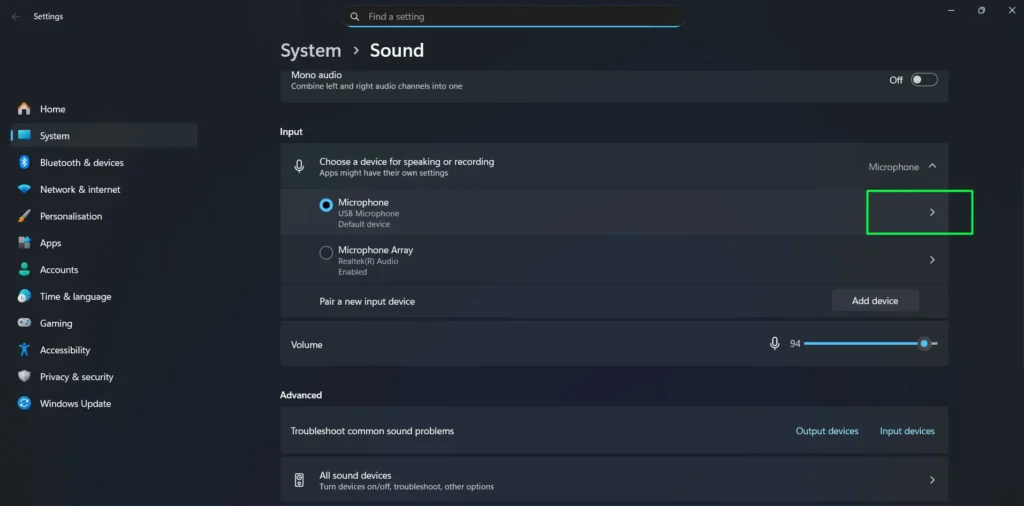
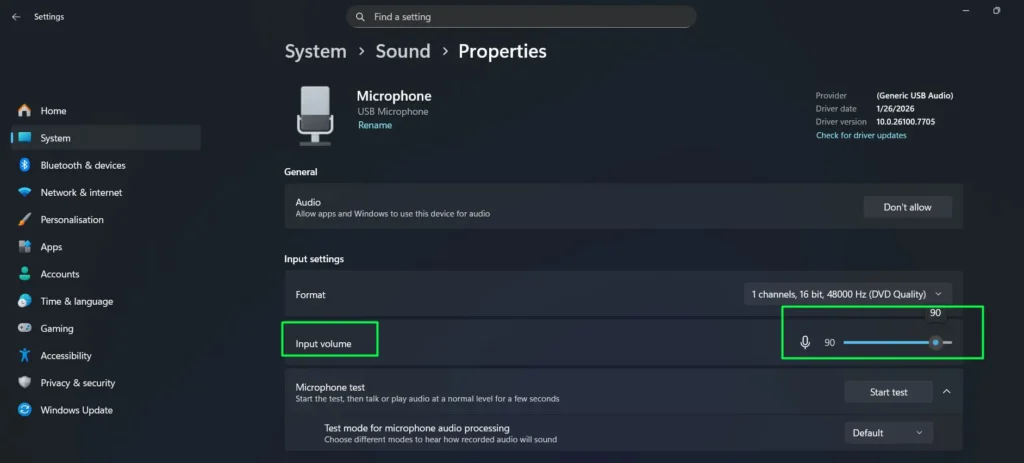
- Step 2: The device properties page displays key controls including the input volume slider, format selection, and additional settings.
- Step 3: Use the Input volume slider to adjust your microphone’s sensitivity level. This slider controls how loud your microphone input appears to Windows and all connected applications. Start around 75–80% for most microphones and fine-tune from there.
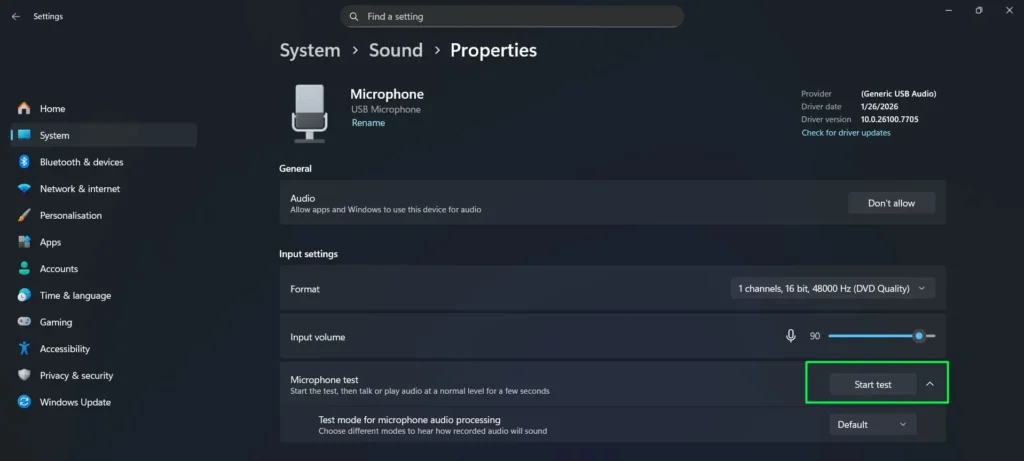
- Step 4: Click “Start test” under the Test your microphone section. Speak normally and watch the progress bar fill up to confirm the microphone is capturing audio properly.
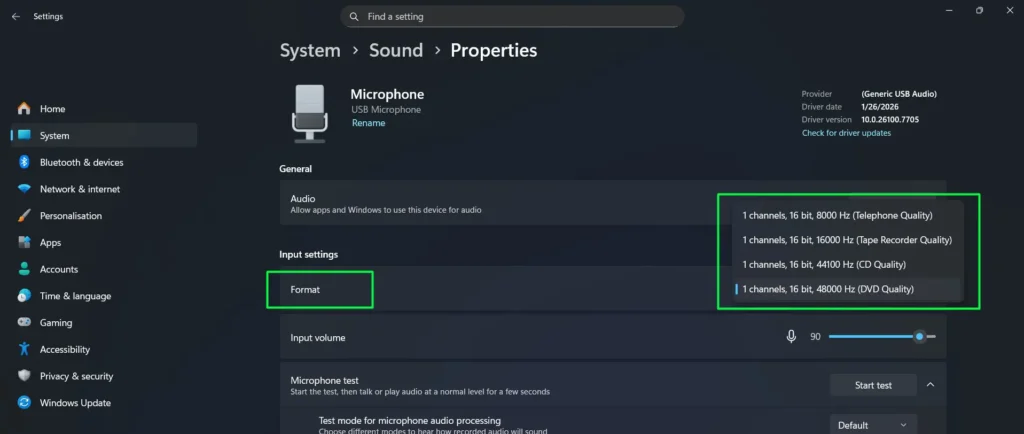
- Step 5: Under the Format dropdown, select your preferred audio quality. Common options include 1 channel, 16 bit, 44100 Hz (CD Quality) or 1 channel, 16 bit, 48000 Hz (DVD Quality) for standard use, with higher quality options available for professional applications.
At the bottom of the device properties page, you will also find links to More sound settings — which opens the classic Sound Control Panel for advanced configuration — and Troubleshoot common sound problems for automated problem resolution.
5. Using the Legacy Sound Control Panel for Advanced Control
While Windows 11’s modern Settings interface handles most tasks, the classic Sound Control Panel provides additional advanced options not available elsewhere — including Exclusive Mode, fine-grained level boost, and Enhancements. Follow these steps to access them.
- Step 1: Go to System > Sound in the Settings app, scroll to the bottom, and click “More sound settings” to open the classic Sound Control Panel. You can also press Windows + R, type mmsys.cpl, and press Enter to open it directly.
- Step 2: In the Sound window, click the “Recording” tab to view all audio input devices. Right-click any empty area and enable “Show Disabled Devices” to reveal microphones Windows may not be displaying in the modern Settings app.
- Step 3: Locate your active microphone in the list — it will show a green checkmark and moving green bars when receiving audio.
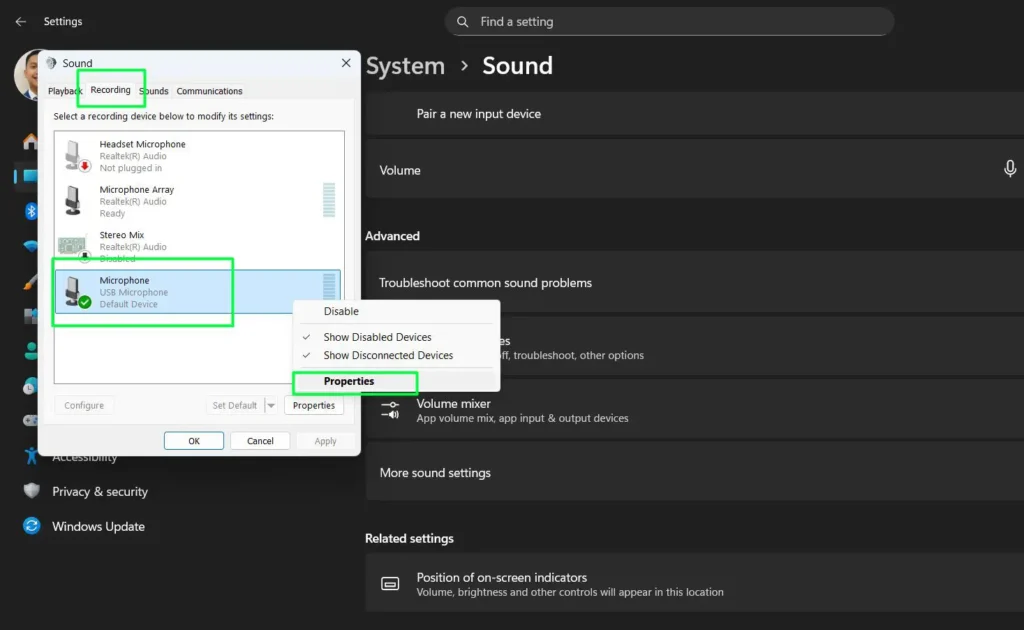
- Step 4: Right-click your microphone and select “Properties.”
- Step 5: Navigate through the available tabs — General, Listen, Levels, Enhancements, and Advanced — for full configuration options.
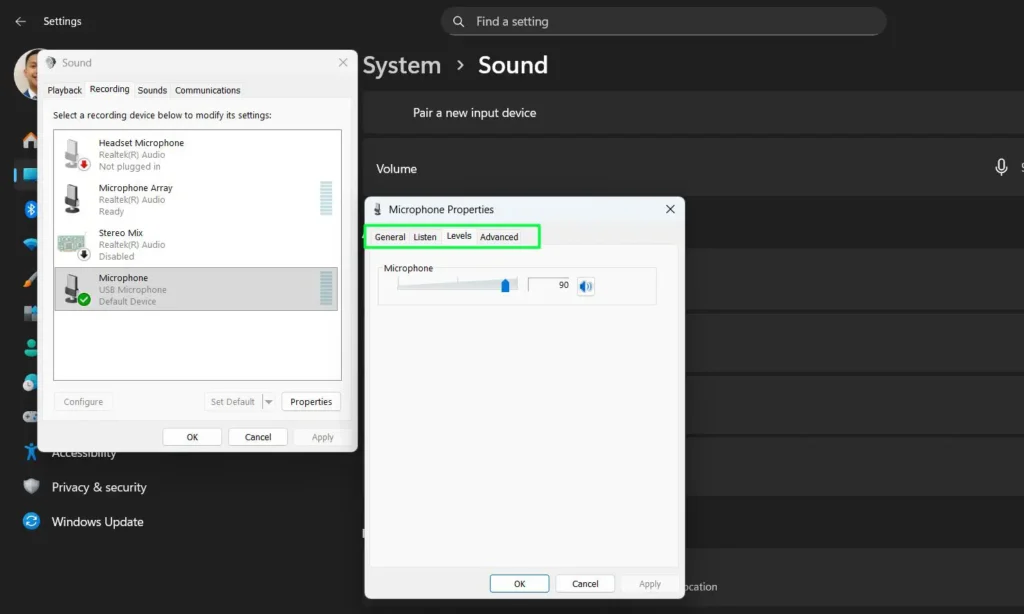
- Step 6: In the Levels tab, adjust the main volume slider and the Microphone Boost slider in dB increments for finer control than the modern Settings app allows. Increase boost gradually — excessive boost amplifies background noise along with your voice.
- Step 7: In the Advanced tab, consider unchecking “Allow applications to take exclusive control of this device.” Exclusive Mode allows one application to lock your microphone and prevent any other app from using it simultaneously — disabling this prevents unexpected mic conflicts between programs.
The General tab shows device info and lets you enable or disable the device. The Listen tab lets you hear your microphone through your speakers in real time, though this can cause feedback. Always confirm “Listen to this device” is unchecked if you experience echo during calls.
6. Enabling Audio Enhancements
Windows 11 includes several audio enhancements that improve audio quality through digital signal processing. Follow these steps to configure them.
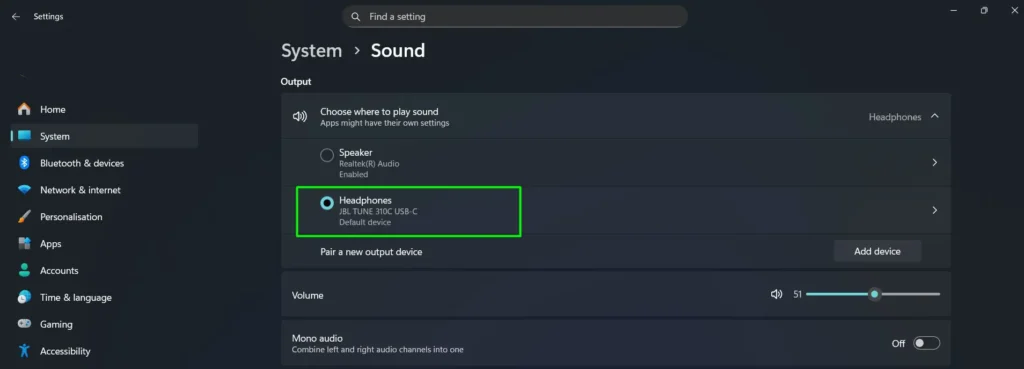
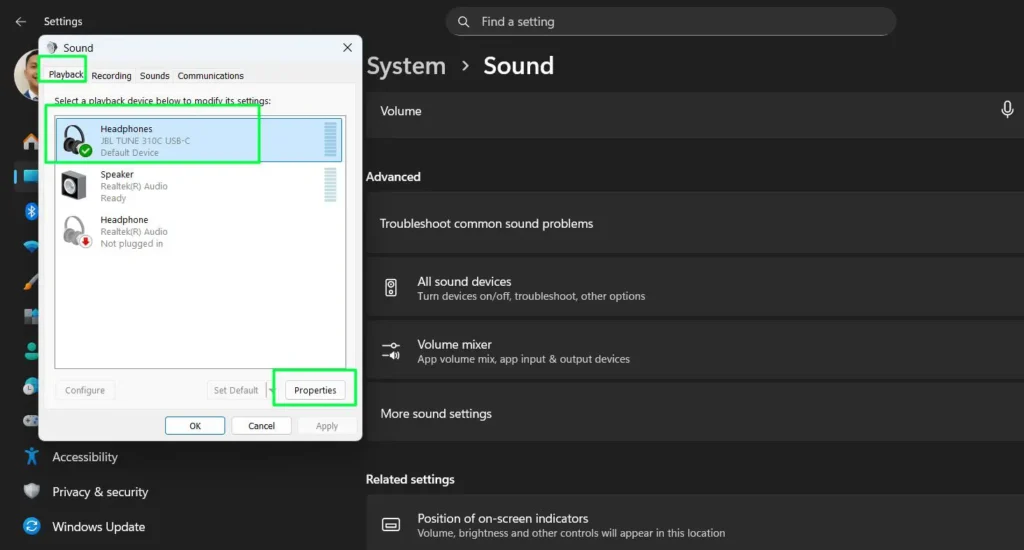
- Step 1: Go to System > Sound, scroll to the bottom, and click “More sound settings.”
- Step 2: In the Sound window, click the “Playback” tab, right-click your audio device, and select “Properties.”
- Step 3: In the Properties window, click the “Enhancements” tab to view available audio processing options.
- Step 4: Review the available enhancements. Common options include Bass Boost (boosts the lowest frequencies the device can play), Headphone Virtualisation (simulates a surround sound experience through headphones), Noise Suppression (filters ambient background noise), and Acoustic Echo Cancellation (prevents microphone audio from feeding back through speakers).
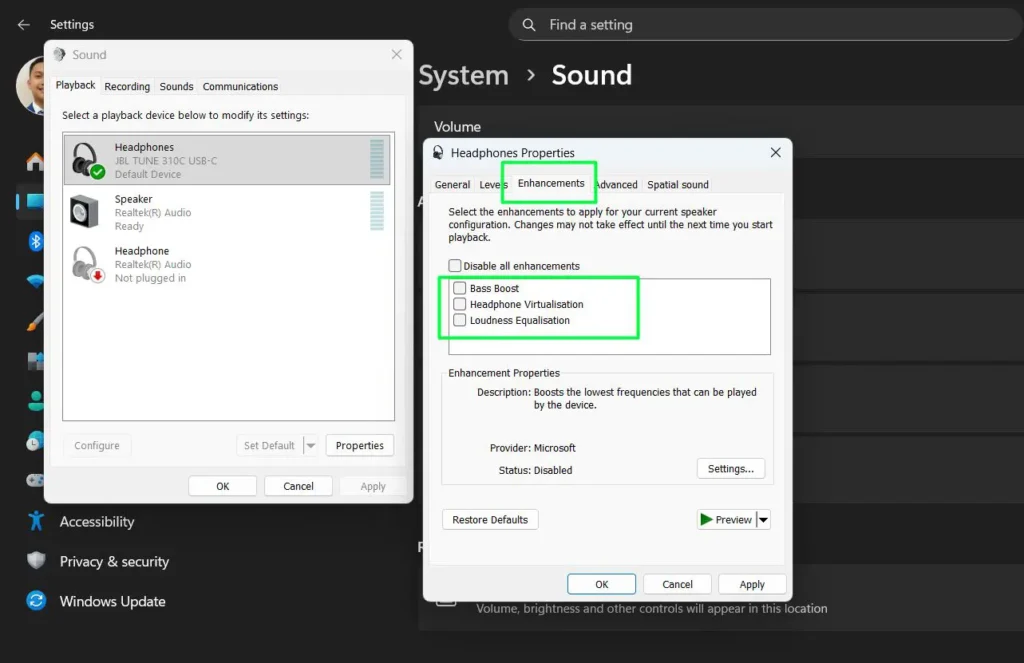
- Step 5: Check the boxes next to the enhancements you want to enable. Check “Disable all enhancements” if you prefer to use raw audio without any processing — recommended for professional recording and podcasting where you handle processing in your DAW.
- Step 6: Click “Apply” to test the enhancements in real time, then click “OK” to save your settings.
7. Configuring Per-App Audio Input Settings
Windows does not natively assign different microphones to different applications at the system level for inputs — but most professional apps include their own audio device selectors that override the Windows default. Here is how to configure per-app microphone settings for the most common applications.
- Step 1: Open the application you want to configure and navigate to its audio or device settings. The location varies by app but is typically found under Settings > Audio or Settings > Devices.
- Step 2: For Microsoft Teams — go to Settings > Devices and use the Microphone dropdown to select your preferred input device independently of the Windows default.
- Step 3: For Zoom — go to Settings > Audio and use the Microphone dropdown to assign a specific input device for all Zoom calls.
- Step 4: For Discord — go to User Settings > Voice & Video and change the Input Device to whichever microphone you want Discord to use.
- Step 5: For OBS Studio — go to Settings > Audio and configure the Mic/Auxiliary Audio inputs to route specific microphones to specific tracks in your recording or stream.
- Step 6: For advanced multi-app routing — use virtual audio cable software such as VoiceMeeter to create virtual inputs that can direct different physical microphones to different applications simultaneously, bypassing Windows default assignment entirely.
8. Configuring Microphone Privacy and Permissions
Windows 11 includes comprehensive privacy controls for managing which applications can access your microphone. If your mic is set up correctly but apps still cannot detect it, checking these permissions is always the first troubleshooting step. These settings are also silently reset by major Windows updates — always recheck them after updating.
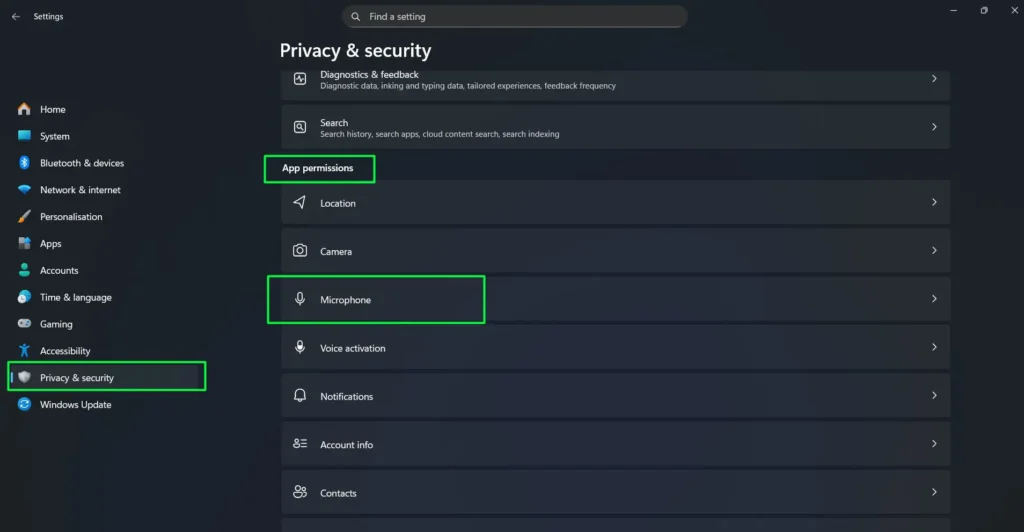
- Step 1: Open Settings and select Privacy & security.
- Step 2: Scroll down to the App permissions section and click “Microphone.”
- Step 3: At the top of the page, ensure “Microphone access” is toggled On. This is the master switch — if it is off, no app on your system can use the microphone.
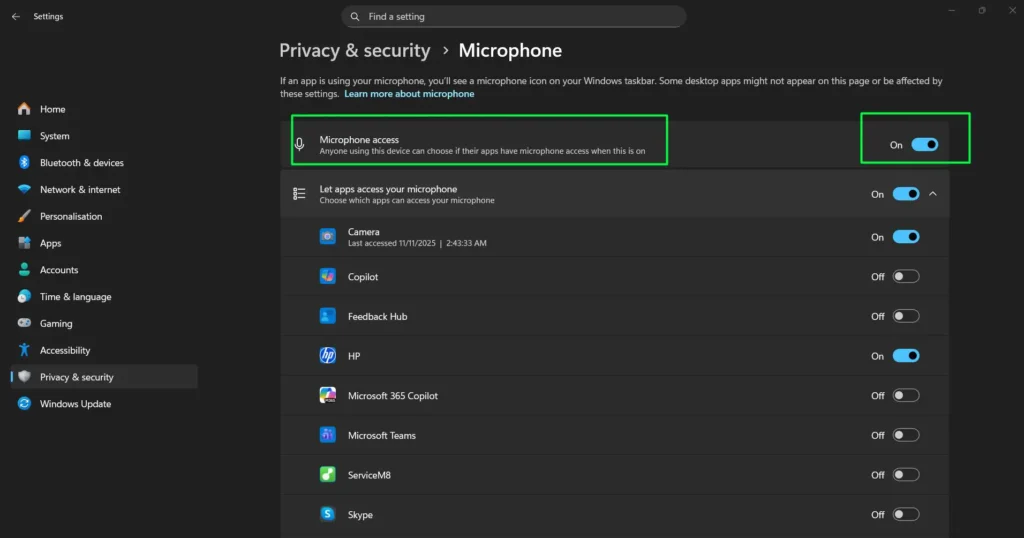
- Step 4: Enable “Let apps access your microphone” to allow Microsoft Store apps — such as Camera, Copilot, Microsoft Teams, and Skype — to use your microphone. Toggle individual apps on or off based on your preferences.
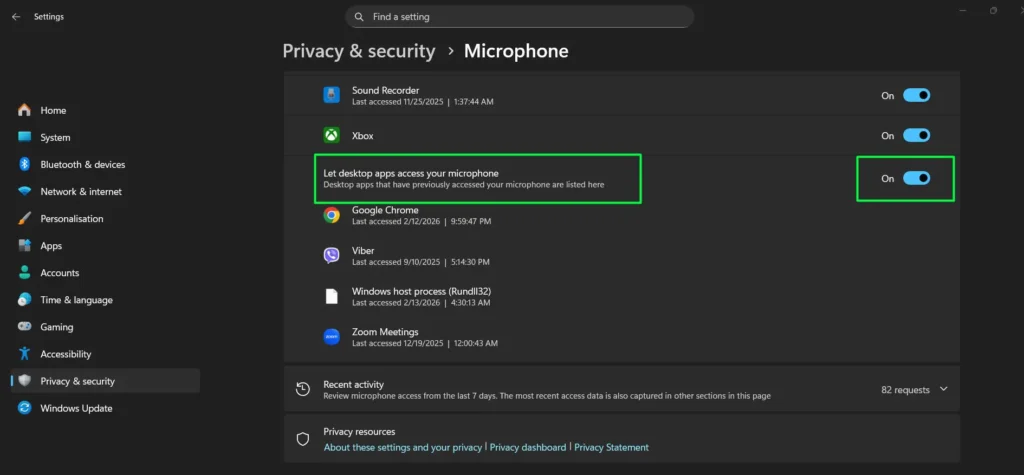
- Step 5: Scroll down and enable “Let desktop apps access your microphone” to allow traditional desktop applications such as Google Chrome, Viber, and Zoom to access your microphone. This is the most commonly overlooked toggle — if your mic works in the browser but not in a desktop app, this setting is almost certainly the cause.

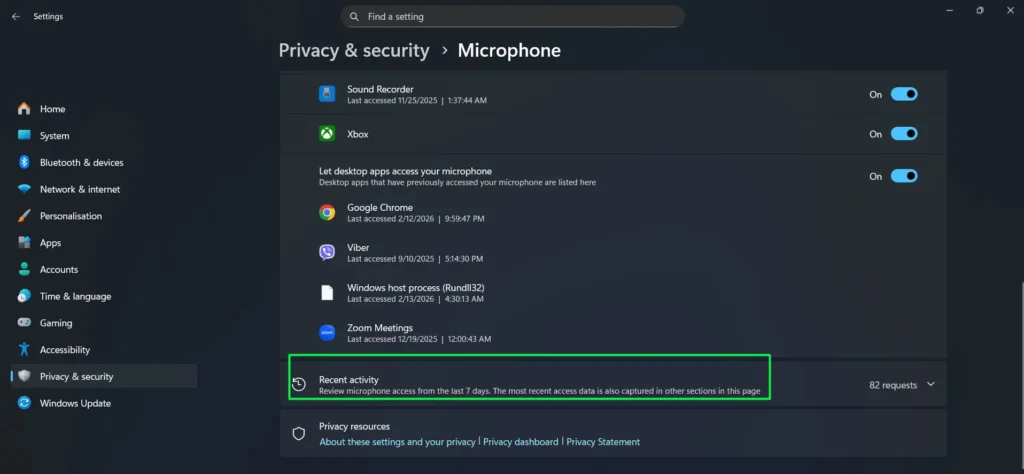
- Step 6: Review the Recent activity section, which shows microphone access requests from the last 7 days. This helps you monitor which apps have been using your microphone and identify any unexpected access.
- Step 7: Toggle individual application permissions on or off based on your privacy preferences and which programs you trust with microphone access.
9. Managing Bluetooth Audio Input Devices
Bluetooth microphones and headsets behave differently from wired audio input devices in Windows. They operate using two audio profiles — A2DP (high-quality stereo audio for playback only) and HFP/HSP (Hands-Free Profile, which supports microphone input but at lower audio quality). Windows switches between these profiles automatically depending on whether an app requests microphone access, which is a frequent source of audio quality drops during calls.
- Step 1: Go to Settings > Bluetooth & devices and confirm your Bluetooth headset is paired and shown as Connected.
- Step 2: Open Settings > System > Sound > Input. Your Bluetooth headset should appear as a separate input device. Select it to set it as the default input.
- Step 3: If the Bluetooth device does not appear in the Input list, open the Sound Control Panel using Windows + R > mmsys.cpl > Recording tab. Right-click any empty area, enable “Show Disabled Devices,” and look for your headset in the expanded list.
- Step 4: To fix the audio quality drop during calls — open mmsys.cpl > Recording tab, right-click your Bluetooth headset, and select Properties > Advanced. Set the Default Format to the highest supported sample rate for your device, typically 16000 Hz (16 bit) for Bluetooth microphones.
- Step 5: If your Bluetooth microphone keeps disconnecting or has noticeable lag, open Device Manager, expand Bluetooth, right-click your Bluetooth adapter, and select Update driver to install the latest firmware from your adapter manufacturer.
10. Updating and Reinstalling Audio Input Drivers
Outdated, corrupt, or missing audio input drivers are one of the top causes of microphone detection failures in Windows 11 and Windows 10. This is especially common after a major Windows update or a fresh OS installation. Follow these steps to update or reinstall your audio driver correctly.
- Step 1: Press Windows + X and select Device Manager from the menu.
- Step 2: Expand the “Audio inputs and outputs” section. Look for any device showing a yellow warning triangle — this indicates a driver problem.
- Step 3: Right-click your microphone and select Update driver > Search automatically for drivers. Windows will check online and install any available updates. Restart your PC after the update completes.
- Step 4: If the automatic update does not fix the issue, right-click the device again and select Uninstall device. Check the box to “Attempt to remove the driver for this device” before confirming. Restart Windows — it will automatically reinstall the driver on boot.
- Step 5: For laptops from Dell, HP, Lenovo, ASUS, or other branded manufacturers, visit your manufacturer’s official support page and download the official Realtek or Waves audio driver for your specific model. Manufacturer-specific drivers frequently resolve issues that Windows Update misses entirely because generic Windows drivers do not always fully support branded audio hardware.
11. Restarting Windows Audio Services
If your microphone suddenly stops showing up in Settings despite correct drivers and privacy settings, the underlying Windows Audio service may have crashed or become unresponsive. This is more common than most people expect and resolves quickly with a service restart.
- Step 1: Press Windows + R, type services.msc, and press Enter to open the Windows Services manager.
- Step 2: Scroll down to Windows Audio in the list and double-click it to open its properties.
- Step 3: Click Stop, wait five seconds, then click Start. Confirm the Startup type is set to Automatic — if it shows Disabled, change it to Automatic before starting the service.
- Step 4: Repeat the same process for Windows Audio Endpoint Builder — right-click it in the services list and select Restart.
- Step 5: For a faster restart, press Windows + X and select Terminal (Admin) or Command Prompt (Admin), then type:
net stop audiosrv && net start audiosrvand press Enter. Your audio devices should reappear within a few seconds.
If Windows Audio is set to Disabled rather than Automatic, this explains the “no audio devices installed” error that appears after a Windows reinstall. Changing the Startup type to Automatic and starting the service resolves it immediately.
12. Testing Your Audio Input Device
After making any changes to your audio input settings, always test your microphone before jumping into a meeting, recording session, or live stream. Here are three reliable ways to confirm your microphone is working correctly in Windows 11 and Windows 10.
- Step 1: Go to Settings > System > Sound, scroll to the Input section, and click the arrow next to your microphone to expand device properties. Click “Start test,” speak normally, and watch the progress bar confirm your microphone is capturing audio. Click “Stop test” — Windows will show the percentage of maximum input volume recorded.
- Step 2: Open the classic Sound Control Panel via mmsys.cpl > Recording tab. Watch for green bars moving next to your microphone when you speak — this confirms the correct device is active and receiving audio in real time.
- Step 3: Search for Voice Recorder in the Start menu, hit Record, speak a short phrase, and play it back. This confirms both that the correct microphone was used and that the audio quality is acceptable before any important session.
If the test bar in Sound Settings stays completely flat, your microphone is either muted, disabled, or not correctly set as the default input — work through the troubleshooting steps in the next section.
Troubleshooting Common Audio Input Problems in Windows 11
Even with correct settings, audio input issues can still occur. These are the most common problems and exactly how to fix them in Windows 11 and Windows 10.
Microphone Not Recognised
If Windows 11 cannot detect your microphone, work through these checks in order:
- Step 1: Check the physical connection — unplug and firmly reconnect your microphone. For USB mics, try a different port, preferably a USB 3.0 port directly on your motherboard rather than through a hub.
- Step 2: Open Device Manager and expand “Audio inputs and outputs.” Look for any devices showing a yellow warning symbol.
- Step 3: Right-click the flagged device and select Update driver or Uninstall device, then reconnect the microphone to allow Windows to reinstall it automatically.
- Step 4: Open the Sound Control Panel via mmsys.cpl > Recording tab, right-click any empty area, and enable “Show Disabled Devices.” If your microphone appears grayed out, right-click it and select Enable.
- Step 5: Verify microphone privacy settings are enabled under Settings > Privacy & security > Microphone.
- Step 6: Run the built-in troubleshooter — go to Settings > System > Troubleshoot > Other troubleshooters, find Recording Audio, and click Run. Windows will automatically detect driver issues, disabled devices, and incorrect default settings.
- Step 7: Test the microphone on another computer to rule out hardware failure. If it works elsewhere, the issue is Windows-specific. If it fails there too, the hardware needs replacement.
Microphone Volume Too Low
- Step 1: Open the Sound Control Panel, go to the Recording tab, right-click your microphone, and select Properties.
- Step 2: Go to the Levels tab and raise the microphone volume and the microphone boost slider gradually. Use boost carefully — too much boost amplifies background noise alongside your voice.
- Step 3: Confirm the microphone is not muted in the system tray or within the application you are using.
Echo or Feedback on Microphone
- Step 1: Open microphone Properties through the Sound Control Panel and go to the Listen tab. Confirm “Listen to this device” is unchecked — enabling it routes your mic audio through your speakers and causes echo.
- Step 2: Lower speaker volume or switch to headphones to prevent audio from the speakers re-entering the microphone.
- Step 3: Enable Acoustic Echo Cancellation in the Enhancements tab if your device supports it.
Windows Keeps Switching the Default Microphone
- Step 1: Open mmsys.cpl > Recording tab and set your preferred microphone as both Default Device and Default Communication Device by right-clicking it.
- Step 2: Open the microphone Properties > Advanced tab and uncheck “Allow applications to take exclusive control of this device.” This prevents newly connected devices and applications from silently overriding your default.
- Step 3: Avoid unplugging and replugging headsets frequently — each time a new audio device connects, Windows may reassign the default input. Set your primary microphone as default again after connecting any new audio device.
Microphone Not Working After a Windows Update
- Step 1: After any major Windows update, first check that your default input device is still correctly set in Settings > System > Sound.
- Step 2: Verify microphone permissions under Privacy & security > Microphone have not been reset — updates frequently reset all three main toggles.
- Step 3: Open Device Manager, find your microphone under “Audio inputs and outputs,” right-click it, and select Update driver.
- Step 4: Restart both Windows Audio and Windows Audio Endpoint Builder services via services.msc. As a last resort, visit the manufacturer’s website and install the latest driver manually to restore full functionality.
Tips for Optimising Audio Input Quality in Windows 11
Beyond the basic settings, these practical optimisation tips help you get the best possible audio quality from any input device connected to your Windows 11 system.
Adjust Input Levels Correctly
Set your input gain carefully to avoid two common problems: levels that are too low produce quiet, hard-to-hear recordings, while levels that are too high cause clipping and distortion. Use the real-time test bar in Sound Settings to visually confirm your volume is hitting the right range before important calls or sessions.
Reduce Background Noise
Use the noise suppression feature available in your microphone’s Enhancements tab to filter out ambient sounds. Keep microphone boost to a minimum — excessive boost amplifies background noise along with your voice. Positioning your microphone closer to your mouth also improves the signal-to-noise ratio significantly. For persistent noise issues, third-party tools like Krisp or NVIDIA Broadcast offer more sophisticated processing than Windows 11’s built-in enhancements.
Regularly Update Drivers
Keeping your audio drivers up to date prevents compatibility issues and improves performance. Check for driver updates monthly by visiting your microphone or audio interface manufacturer’s website. After major Windows 11 updates, always re-test your microphone configuration — updates can sometimes reset audio settings or require new drivers to function correctly.
Choose the Right Audio Format
Match your audio format to your use case. For general use and video conferencing, 16-bit 44100 Hz or 48000 Hz provides excellent quality with minimal system resource usage. For professional recording, podcasting, and content creation, 24-bit 48000 Hz or higher captures more detail and gives more flexibility during editing. Gaming and streaming typically work well with 16-bit 48000 Hz as it balances quality with performance.
Maintaining Optimal Input Device Performance
Regular maintenance ensures your audio input devices continue performing at their best. Keep the following tips in mind to avoid gradual quality degradation.
Physical Cleaning
Clean physical microphones regularly according to manufacturer guidelines. Use compressed air for grilles and gentle cleaning solutions for foam covers to prevent buildup that can muffle audio over time.
Settings Documentation
Document your optimal settings for each microphone — including volume levels, boost, format, and enhancements — so you can quickly restore them if a Windows update or system change resets your configuration.
Quality Monitoring
Create a monthly audio test recording using the same script to monitor for any gradual degradation in quality or sensitivity. Noticeable changes in gain levels, increased background noise, or reduced clarity may indicate a hardware issue rather than a Windows configuration problem.
Cable and Connection Inspection
Inspect cables and connections quarterly for signs of wear, fraying, or corrosion. Physical damage is one of the most common — and most overlooked — causes of audio quality issues.
Backup Devices
For critical applications such as streaming or professional recording, keep a backup microphone available to avoid unexpected downtime if your primary device fails during a session.
Pro Tip: If issues persist despite good maintenance, consider professional repair or device replacement rather than further Windows configuration adjustments. Sometimes the problem is hardware, not settings.
Frequently Asked Questions
How do I manage audio input devices in Windows 11?
Right-click the speaker icon in the system tray and select Sound settings. Scroll to the Input section and click your preferred microphone to set it as the default. Click the arrow next to the device to expand properties where you can adjust input volume, test the mic, and change the audio format. For deeper control including hidden devices and Exclusive Mode, press Windows + R, type mmsys.cpl, and use the Recording tab in the legacy Sound Control Panel.
How do I view all connected audio input devices in Windows 11?
Press Windows + I to open Settings, then go to System > Sound and scroll to the Input section. All connected microphones and input devices will be listed under “Choose a device for speaking or recording.” For a more complete view that includes disabled and disconnected devices, press Windows + R, type mmsys.cpl, press Enter, go to the Recording tab, right-click any empty area, and enable “Show Disabled Devices.”
How do I set a default audio input device in Windows 11?
Open Settings > System > Sound > Input and select your preferred microphone from the list. For a permanent default that survives new device connections, open mmsys.cpl, go to the Recording tab, right-click your microphone, and choose “Set as Default Device.” Also set it as “Default Communication Device” if you want it used for calls in Teams and Zoom.
How do I fix microphone permissions in Windows 11?
Go to Settings > Privacy & security > Microphone and confirm all three main toggles are enabled: “Microphone access,” “Let apps access your microphone,” and “Let desktop apps access your microphone.” The third toggle is the most commonly missed — if your mic works in a browser but not in a desktop app like Zoom or Discord, enabling that toggle fixes it immediately. If the toggles are grayed out, your organisation may have applied group policies that restrict microphone access.
Why does my microphone sound muffled in Windows 11?
Muffled microphone audio typically results from incorrect sample rate settings or excessive enhancements. Open your microphone Properties from Sound settings, go to the Advanced tab, and try different format options starting with 16-bit 48000 Hz. Disable all audio enhancements in the Enhancements tab. Also confirm your physical microphone is not obstructed and that any foam covers are clean and properly positioned.
How can I reduce background noise on my microphone in Windows 11?
Enable noise suppression through your microphone’s Properties window in the Enhancements tab. Keep microphone boost to a minimum — excessive boost amplifies background noise along with your voice. Positioning your microphone closer to your mouth also improves the signal-to-noise ratio significantly. For persistent noise issues, third-party tools like Krisp or NVIDIA Broadcast offer more sophisticated processing than Windows 11’s built-in enhancements.
Can I use two microphones simultaneously in Windows 11?
Windows 11 allows only one default input device at a time for standard applications. However, you can use multiple microphones simultaneously with professional audio software or virtual audio cable tools like VoiceMeeter, which create virtual inputs that combine signals from multiple physical microphones. Some professional audio interfaces also support multiple microphones through their own control software.
Why is my USB microphone not showing up in Windows 11?
Try connecting the microphone to a different USB port — preferably a USB 3.0 port directly on your motherboard rather than through a hub. Check Device Manager for any devices showing warning symbols under “Audio inputs and outputs.” Update or reinstall drivers by right-clicking the device. Open mmsys.cpl, go to the Recording tab, right-click any empty area, and enable “Show Disabled Devices” to check if the microphone appears as disabled. Verify the microphone works on another computer to rule out hardware failure. Some USB microphones also require manufacturer-specific drivers downloaded from the brand’s website to work properly in Windows 11.
How do I set different microphones for different apps in Windows 11?
Windows 11 does not provide native per-application input device assignment the way it does for outputs. However, many applications include their own audio device selection in their settings. Open each app’s audio settings and manually select the desired microphone — Teams, Zoom, Discord, and OBS Studio all support this. For more advanced control, virtual audio cable software can route different microphones to different programs independently of Windows defaults.
What is the best audio format for my microphone in Windows 11?
For general use and video conferencing, 16-bit 44100 Hz or 48000 Hz provides excellent quality with minimal system resource usage. For professional recording, podcasting, and content creation, 24-bit 48000 Hz or higher captures more detail and gives more flexibility during editing. Gaming and streaming typically work well with 16-bit 48000 Hz as it balances quality with performance. Set your format through the device properties page using the Format dropdown.
How do I test if my microphone is working in Windows 11?
Go to Settings > System > Sound, scroll to the Input section, and select your microphone. Click the arrow to expand device properties, then click “Start test” under the Test your microphone section. Speak normally and watch the progress bar respond. You can also open the classic Sound Control Panel, go to the Recording tab, and watch for green bars moving next to your microphone when you speak. The built-in Voice Recorder app is another quick way to test — record a short clip and play it back to confirm quality.
Why does Windows keep switching my default microphone automatically?
Windows reassigns the default input device whenever a new audio device connects — such as plugging in a USB microphone or a headset. To stop this, open mmsys.cpl, go to the Recording tab, right-click your preferred microphone, and set it as both the Default Device and Default Communication Device. Then open the microphone Properties, go to the Advanced tab, and uncheck “Allow applications to take exclusive control of this device.” This prevents newly connected devices and applications from silently overriding your preferred default.
What should I do if my microphone is not working after a Windows 11 update?
Windows updates occasionally reset audio settings or introduce driver conflicts. After an update, first check that your default input device is still correctly set in Settings > System > Sound. Then verify microphone permissions under Privacy & security have not been reset. If the device still fails, open Device Manager, find your microphone under “Audio inputs and outputs,” right-click it, and select Update driver. You can also restart the Windows Audio service via services.msc — stop and restart both Windows Audio and Windows Audio Endpoint Builder. As a last resort, visit the manufacturer’s website and install the latest driver manually to restore full functionality.