Enabling microphone for specific apps in Windows 11 is one of those things that sounds complicated but is actually handled in just a few clicks. Whether a video call app is refusing to pick up audio, a recording tool keeps getting blocked, or a newly installed program can’t seem to hear anything – the answer almost always lives inside the Windows 11 Privacy and security settings. The steps in this guide come directly from the latest version of Windows 11 and are guaranteed to work.
Understanding how Windows 11 manages microphone access per app is genuinely useful. It’s not just a one-toggle situation. There’s a layered system at play, and knowing how each layer works makes the whole process much faster to navigate – especially when dealing with different types of apps.
Why Windows 11 Controls Microphone Access Per App
Windows 11 was built with privacy at the forefront. Rather than letting every installed program tap into the microphone freely, it gives the user full control over which apps are allowed and which ones aren’t. Think of it like a building with a security desk – visitors (apps) have to be approved before they can access certain floors (hardware like the mic or camera).
This system matters in real, everyday situations. A work laptop might have Zoom approved for microphone access while keeping casual apps like games or browsers restricted. A home setup might want Chrome and Spotify both enabled. The point is flexibility – and Windows 11 delivers exactly that through its microphone permission settings.
How to Enable Microphone for Specific Apps in Windows 11
These steps are pulled directly from the latest Windows 11 build. Follow them in order and the microphone will be active for whichever app needs it. No guesswork, no unnecessary detours.
Step 1: Click the Start button on the taskbar.
Step 2: Click the Settings icon (it looks like a gear).
Step 3: In the Settings window, select Privacy & security from the left sidebar.
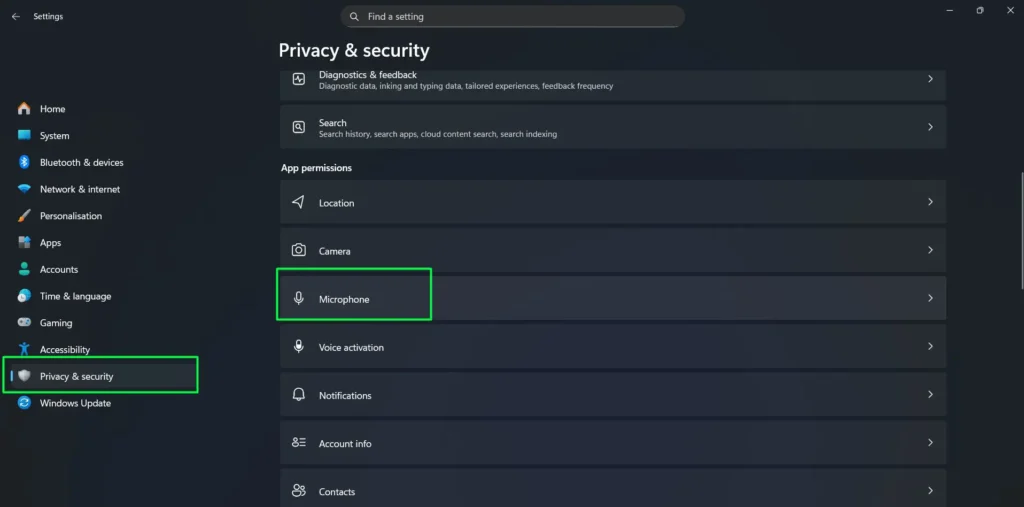
Step 4: Scroll down and click Microphone under the App permissions section.
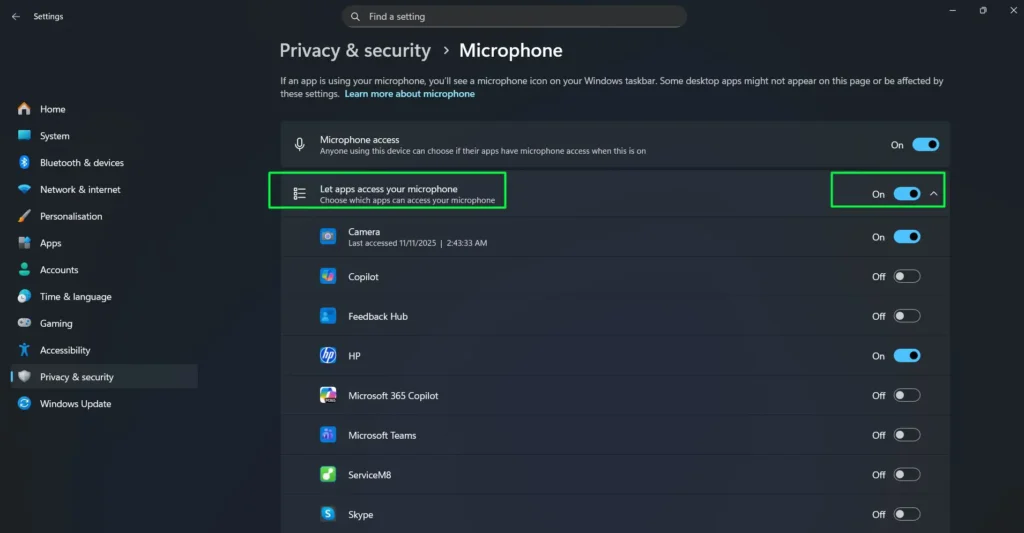
Step 5: Turn Microphone access On if it’s disabled.
Step 6: Turn Let apps access your microphone On.
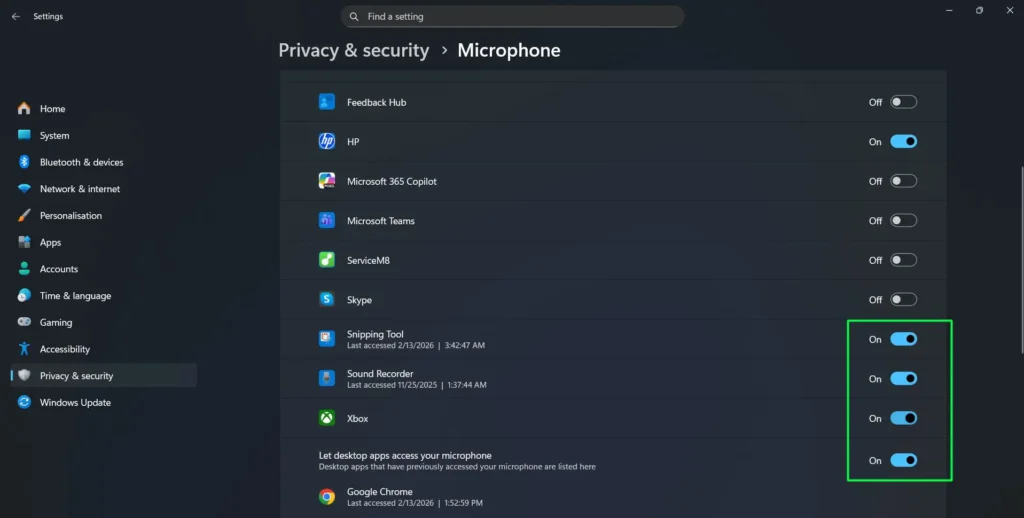
Step 7: Scroll down to Let desktop apps access your microphone and make sure it is On.

Step 8: Under the app list, toggle On the microphone access for the specific app you want to use.
Most people find that the master toggle being accidentally switched off is the most common reason an app can’t access the mic. Always check that first before anything else.
Watch this: Enabling Microphone for Specific Apps in Windows 11 Easily
Pro-Tip: After enabling an app’s microphone permission, close the app completely and reopen it. Some apps only check for microphone permissions at launch, so a fresh start ensures the new setting actually kicks in properly.
Understanding the Two App Categories in Microphone Settings
This is where a lot of people get confused – and understandably so. Windows 11 splits apps into two separate groups when it comes to microphone access, and they behave differently. Getting familiar with both makes the whole system click into place.
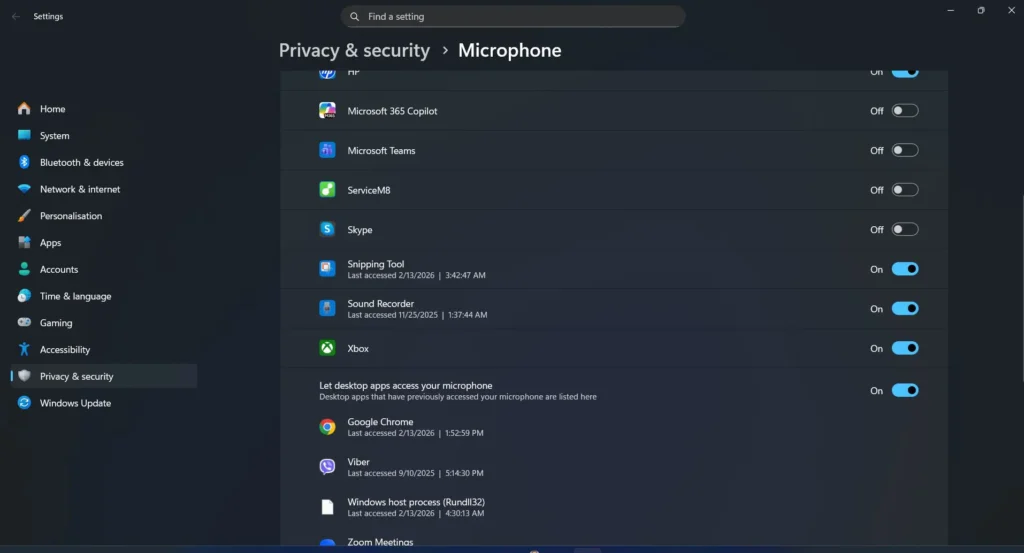
Microsoft Store Apps
Apps downloaded from the Microsoft Store appear in the upper section under ‘Let apps access your microphone.’ These include things like Microsoft Teams, Skype, Camera, Copilot, Xbox, Feedback Hub, Snipping Tool, and Sound Recorder. Each one gets its own individual toggle.
Turning one on or off only affects that specific app. Nothing else changes. This works best when there’s a need to give one communication app access while keeping another locked down – like allowing Teams but keeping Skype’s mic access off.
Desktop Apps
Traditional desktop applications – programs installed outside the Microsoft Store – fall under the separate ‘Let desktop apps access your microphone’ section at the bottom of the page. Apps like Google Chrome, Zoom Meetings, Viber, and other third-party software land here.
Unlike Store apps, desktop apps don’t have individual toggles. Instead, there’s one master toggle for the whole group. Windows 11 automatically lists which desktop apps have previously accessed the microphone along with a timestamp showing the exact date and time of the last access. This is incredibly useful for knowing which programs have been actively using the mic.
Pro-Tip: If a desktop app like Zoom or Chrome isn’t showing up in the desktop apps list yet, it likely means the app hasn’t requested microphone access for the first time yet. Simply open the app, start a call or recording session, and then check back – it will appear in the list automatically after the first access attempt.
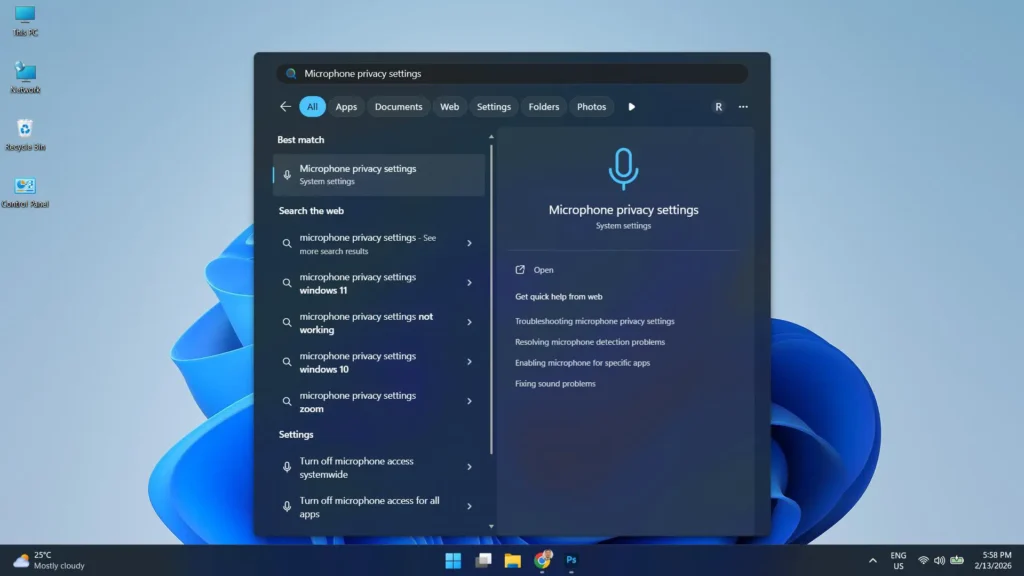
Fastest Way to Open Microphone Settings in Windows 11
Skip the navigation entirely. Press Windows key + I to open Settings instantly, then type Microphone in the search bar at the top. Click the Microphone privacy settings result and land directly on the permissions page in under five seconds.
Alternatively, press Windows key + S, type microphone privacy settings, and press Enter – both methods open the same page directly without going through any menus.
How to Quickly Find a Specific App in the Microphone List
When there are a lot of apps installed, scrolling through the microphone permissions list can take a moment. Here’s a faster way to get to the right settings page directly.
Step 1: Press Windows key + S to open the search bar.
Step 2: Type Microphone privacy settings and press Enter.
Step 3: Windows 11 will open the Microphone settings page directly, skipping manual navigation through Settings.
Step 4: Locate the app you want to manage and toggle microphone access On or Off as needed.
This shortcut is a real time-saver, especially when switching between different apps frequently or checking settings on the fly.
How to Enable Microphone Access via Windows Registry
Advanced users can control microphone permissions directly through the Windows Registry. This method is particularly useful when the Settings UI is unresponsive, when managing permissions across multiple user accounts, or when deploying settings on a managed device. Always back up the registry before making any changes.
Step 1: Press Windows key + R, type regedit, and press Enter. Click Yes if prompted by User Account Control.
Step 2: In the Registry Editor address bar, navigate to the following path:
HKEY_CURRENT_USER\Software\Microsoft\Windows\CurrentVersion\CapabilityAccessManager\ConsentStore\microphoneStep 3: In the right pane, double-click the Value entry named Value.
Step 4: Set the value data to Allow to enable microphone access, or Deny to block it. Capitalization matters – enter it exactly as shown.
Step 5: Click OK and close the Registry Editor. The change takes effect immediately.
To control microphone access for a specific Microsoft Store app individually, expand the microphone key in the left panel and locate the subfolder named after the app. Double-click its Value entry and set it to Allow or Deny the same way.
Note: The path above applies changes only to the current user account. To apply the setting to all users on the device, use the same path under HKEY_LOCAL_MACHINE instead of HKEY_CURRENT_USER. Administrator privileges are required to modify the HKEY_LOCAL_MACHINE branch.
How to Manage Microphone Access via Group Policy Editor
Windows 11 Pro, Enterprise, and Education editions include a Group Policy setting that can force-enable or force-deny microphone access across every user account on the device. This is the preferred method in managed, corporate, or shared environments where a consistent mic policy needs to be enforced regardless of individual user preferences.
Step 1: Press Windows key + R, type gpedit.msc, and press Enter.
Step 2: In the left panel of the Group Policy Editor, navigate to:
Computer Configuration > Administrative Templates > Windows Components > App PrivacyStep 3: In the right pane, locate and double-click Let Windows apps access the microphone.
Step 4: In the policy window that opens, select one of the following options:
- Not Configured – Default state. Users manage their own microphone permissions through Settings.
- Enabled > Force Allow – Overrides all individual settings and enables microphone access for all apps system-wide.
- Enabled > Force Deny – Blocks microphone access for all apps across all user accounts, regardless of any Settings toggles.
- Disabled – Behaves the same as Not Configured. Users retain individual control.
Step 5: Click Apply then OK, and close the Group Policy Editor.
Important: When Force Allow or Force Deny is active via Group Policy, it overrides the Settings page entirely. The individual app toggles inside Settings will appear grayed out and cannot be changed by the user until the policy is set back to Not Configured or Disabled. This option is not available on Windows 11 Home – Home edition users should use the Settings or Registry methods instead.
Troubleshooting Microphone Privacy Settings
When the microphone still isn’t working after checking permissions, there are a few targeted fixes worth trying:
- Update your audio drivers – Outdated drivers are a common but overlooked cause of microphone issues and can interfere with how Windows 11 communicates with the hardware.
- Check app-specific settings – Many programs like Zoom or Discord have their own microphone selection menus that are completely separate from Windows permissions. Make sure the correct mic is selected inside the app itself.
- Restart your computer – A simple restart can clear temporary conflicts that toggling settings alone won’t fix.
- Use Windows Troubleshooter – Go to Settings, then System, then Sound, and select Troubleshoot to let Windows automatically detect and resolve common microphone problems.
- Check Group Policy is not blocking access – On Pro or Enterprise editions, open gpedit.msc and verify that the microphone policy under App Privacy is not set to Force Deny. If it is, that overrides all Settings toggles.
- Check the Registry value – Navigate to the microphone ConsentStore key in regedit and confirm the Value entry is set to Allow, not Deny.
- Reset privacy settings – As a last resort, head back to Settings, then Privacy and Security, then Microphone, and toggle the master microphone access switch off and back on again to reset the permission state entirely.
Tips for Better Microphone Performance
Getting microphone permissions right is only part of the equation. A few simple habits go a long way toward keeping audio quality consistent:
- Check your connection – Always make sure the microphone is physically connected and recognized by the device before launching any app that relies on it.
- Reduce background noise – Windows privacy settings control access but don’t filter out ambient sound, so a quieter environment makes a noticeable difference in audio quality.
- Avoid multiple audio devices – Running more than one audio input simultaneously can cause Windows to route audio unpredictably, leading to unexpected mic behavior.
- Keep Windows 11 updated – Microsoft regularly releases fixes that address known mic-related bugs, keeping microphone privacy settings and audio drivers stable.
Checking Recent Microphone Activity by App
Windows 11 includes a Recent activity section at the very bottom of the Microphone settings page. This section shows a detailed log of every microphone access request made in the past 7 days. It includes the app name, the date, and the exact time of the request.
This is particularly helpful when there’s uncertainty about whether a specific app is even trying to use the mic. If an app shows up in Recent activity, it means Windows received a microphone request from it. If it doesn’t appear at all, the issue may be inside the app’s own audio settings rather than a Windows permission problem.
The key is to use Recent activity as a diagnostic first step. It gives a clear, timestamped picture of what’s been happening with microphone access across all apps – no guessing required.
Suggestions for Managing Microphone Permissions Effectively
Getting microphone permissions set up correctly is one thing. Keeping them organized over time is another. Here are some practical suggestions that make managing mic access much smoother in the long run.
Only Enable Apps That Actually Need the Microphone
It’s tempting to just toggle everything on and move on. But keeping microphone access limited to apps that genuinely need it is a smart privacy habit. A photo editing app or a file manager has no business using a microphone – if those toggles are on, turn them off. Less access means fewer potential privacy concerns down the line.
Review Microphone Permissions After Installing New Apps
Every time a new application gets installed, it’s worth popping back into the Microphone settings page to check whether it has appeared in the list and whether its toggle matches expectations. Some apps request permissions automatically upon first launch, and it’s easy to accidentally approve something without realizing it.
Use the Last Accessed Timestamp to Spot Unexpected Activity
The timestamps shown next to each app in the microphone list are more useful than they look. If an app shows a very recent ‘Last accessed’ time but it wasn’t being actively used at that moment, that’s worth noting. It doesn’t necessarily mean something suspicious is happening, but staying aware of which apps are accessing the mic – and when – is good practice for any Windows 11 user.
Keep Windows 11 Updated
Microsoft regularly updates how permissions and privacy settings behave in Windows 11. Keeping the system up to date ensures the microphone settings page looks and functions exactly as described in this guide. Updates also bring security improvements that affect how hardware like microphones is accessed at the system level. Staying current is always the right call.
For more step-by-step guides covering Windows settings and other practical tech topics, the guides section has a growing collection of tutorials built the same way – straightforward, verified, and easy to follow.
What the Microphone Settings Page Actually Shows
It helps to know what to expect when landing on the Microphone settings page for the first time. Here’s a quick breakdown of every element visible on the page:
- Microphone access – The top-level master toggle. Must be On for anything else to work.
- Let apps access your microphone – Enables the individual toggle list for Microsoft Store apps.
- Per-app toggles – Individual on/off switches for each Store app (Camera, Teams, Skype, Copilot, etc.).
- Let desktop apps access your microphone – Master toggle for all traditionally installed desktop apps.
- Desktop app list – Shows desktop apps that have previously accessed the mic, with last-accessed timestamps.
- Recent activity – A 7-day log of microphone access requests across all apps.
- Privacy resources – Links at the bottom for privacy-related information from Microsoft.
Knowing the layout makes navigating it feel natural rather than like hunting through an unfamiliar menu. Everything is logically placed once the structure is understood.
Frequently Asked Questions
Why doesn’t a specific app appear in the microphone permissions list?
Desktop apps like Chrome, Zoom, or Viber don’t appear in the main Store app list. They show up under the separate ‘Let desktop apps access your microphone’ section further down the Microphone settings page. If an app hasn’t accessed the mic yet, it won’t appear until it makes its first access request.
Do microphone permission changes take effect immediately in Windows 11?
Yes. Toggling microphone access on or off takes effect right away. No system restart is needed, though closing and reopening the specific app after the change is recommended so the app can register the updated permission.
Can microphone access be turned off for just one app without affecting others?
Absolutely. Each Microsoft Store app in the list has its own individual toggle. Turning one off has zero effect on any other app. Desktop apps share a single toggle for the group, but individual access history is still tracked per app.
What does the master ‘Microphone access’ toggle control?
It’s the top-level switch for the entire device. When this is off, no app – Store or desktop – can access the microphone regardless of any individual settings below it. This is always the first thing to check when troubleshooting mic access.
Why is Zoom or Chrome not listed under the individual app toggles?
Zoom and Chrome are traditional desktop applications installed outside the Microsoft Store. Windows 11 places them in the ‘Let desktop apps access your microphone’ section at the bottom of the Microphone settings page, which is separate from the Store app toggle list.
Is it safe to leave microphone access on for all apps?
It works, but it’s better practice to only enable microphone access for apps that genuinely require it. Limiting access to necessary apps only is a good privacy habit and reduces the number of programs that can tap into the microphone in the background.
Can I control microphone access using the Windows Registry?
Yes. Navigate to HKEY_CURRENT_USER\Software\Microsoft\Windows\CurrentVersion\CapabilityAccessManager\ConsentStore\microphone in Registry Editor and set the Value entry to Allow or Deny. To apply the change to all users on the device, use the same path under HKEY_LOCAL_MACHINE instead.
How do I block microphone access for all apps using Group Policy?
On Windows 11 Pro, Enterprise, or Education, open Group Policy Editor by pressing Windows key + R and typing gpedit.msc. Navigate to Computer Configuration > Administrative Templates > Windows Components > App Privacy and double-click ‘Let Windows apps access the microphone’. Set it to Enabled and choose Force Deny to block microphone access for all apps across all user accounts.
What is the fastest way to open microphone settings in Windows 11?
Press Windows key + I to open Settings, then type Microphone in the search bar and click Microphone privacy settings. Alternatively, press Windows key + S, type microphone privacy settings, and press Enter to open the page directly without navigating through any menus.
Can Windows 11 Home users use Group Policy to manage microphone access?
No. The Local Group Policy Editor is only available on Windows 11 Pro, Enterprise, and Education editions. Windows 11 Home users can manage microphone access through Settings or by editing the Windows Registry directly using the path described in this guide.