Adjusting audio output settings in Windows 11 is essential for optimizing your sound experience, whether you are listening to music, gaming, or conducting video calls. This complete guide covers all six methods to configure audio output — from instant volume changes using the taskbar, to the Settings app, Control Panel, Volume Mixer, Xbox Game Bar, and full no-sound troubleshooting.
Key Takeaways
Here are the most important things to know before reading the full guide:
- Use the taskbar speaker icon (Win + A) for the fastest way to switch audio output devices or adjust volume.
- The Settings app (System > Sound) lets you choose a default output device and adjust advanced device properties.
- The Sound Control Panel reveals hidden or disabled audio hardware and lets you set separate defaults for media and communications.
- The Volume Mixer lets you control individual app volumes and route different apps to separate output devices simultaneously.
- Xbox Game Bar (Win + G) lets you switch audio output without leaving your current window — ideal for gaming.
- If you have no sound, use the built-in troubleshooter, restart Windows Audio services, or roll back your driver — all covered in Method 6.
- To enable a 3.5mm jack that isn’t showing up, use Sound Control Panel > Playback tab > right-click empty area > Show Disabled Devices, then enable it from there.
Quick Answer: How to Adjust Audio Output Settings in Windows 11
Here are the four fastest ways to change your audio output device in Windows 11:
Using the Taskbar
- Click the Volume icon in the taskbar.
- Select the arrow next to the volume slider to view available audio output devices.
- Click on the desired device to set it as the active output.
Using Settings
- Open the Start menu and select Settings.
- Navigate to System > Sound.
- Under the Output section, choose your preferred audio device from the dropdown menu.
Using Control Panel
- Right-click the speaker icon in the taskbar and select More sound settings.
- Go to the Playback tab.
- Right-click on the desired device and select Set as Default Device, then click OK.
Using Volume Mixer
- Right-click the Volume icon in the taskbar and select Open Volume Mixer.
- Under Apps, locate the app you want to configure.
- Click the dropdown beneath that app and choose the desired output device.
For full step-by-step instructions with screenshots for each method, continue reading below.
Essential Checks Before You Begin
Before adjusting any audio settings, take a moment to confirm the following prerequisites so you can follow this guide smoothly and avoid the most common setup issues.
- Your audio device is physically connected — Ensure your speakers, headphones, or USB/Bluetooth audio device are properly plugged in or paired before opening any settings.
- Windows 11 is fully updated — Go to Settings > Windows Update and install any pending updates, as audio driver updates are often bundled with system updates.
- Your device appears in Device Manager — Press Win + X, open Device Manager, and expand “Sound, video and game controllers” to confirm your device is listed without a warning symbol.
- You have administrator privileges — Some advanced settings, such as driver updates and service restarts, require an admin account to complete successfully.
- You have noted your current settings — If modifying an existing configuration, record the current audio format, enhancement settings, and default device so you can restore them if needed.
- Bluetooth is enabled (for wireless devices) — If using Bluetooth headphones or speakers, confirm Bluetooth is turned on via Settings > Bluetooth & devices before proceeding.
Once you have confirmed all of the above, you are ready to proceed with any of the methods below.
6 Methods to Adjust Audio Output Settings in Windows 11
Windows 11 offers multiple ways to control and customize your audio output depending on how much control you need. Below are six methods — from quick volume changes via the taskbar, to the Settings app, Sound Control Panel, Volume Mixer, Xbox Game Bar, and complete no-sound troubleshooting — so you can manage sound output efficiently in any situation.
Method 1: Using the Taskbar and Quick Settings Panel
The taskbar speaker icon and Quick Settings panel provide the fastest way to adjust basic audio output settings — no menus required. This is the method most users should try first.
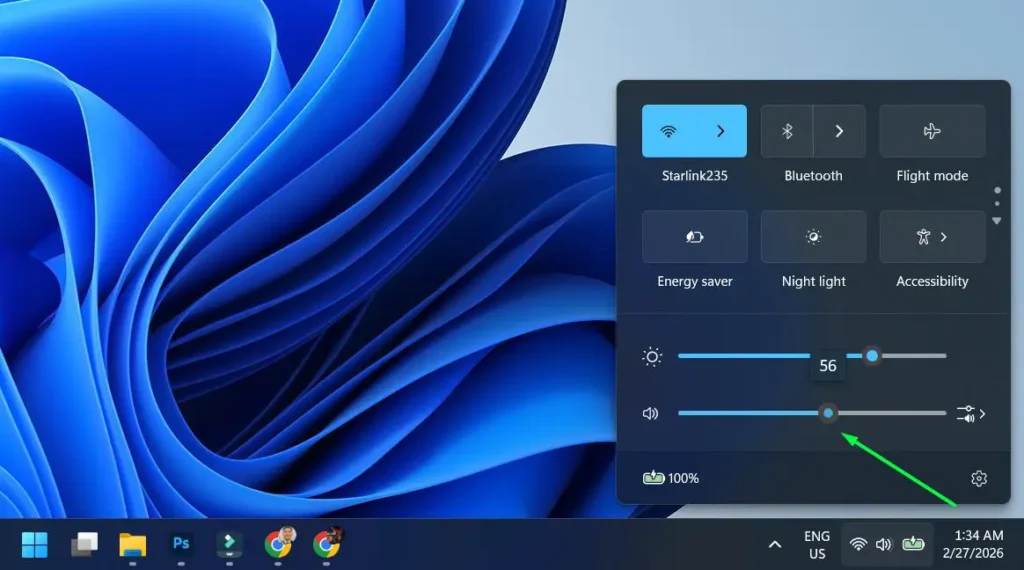
- Step 1: Click the Volume (speaker) icon in the system tray at the bottom-right corner of your taskbar, or press Windows key + A to open Quick Settings directly.

- Step 2: Locate the volume slider in the Quick Settings panel that appears.
- Step 3: Drag the slider left to decrease volume or right to increase it.
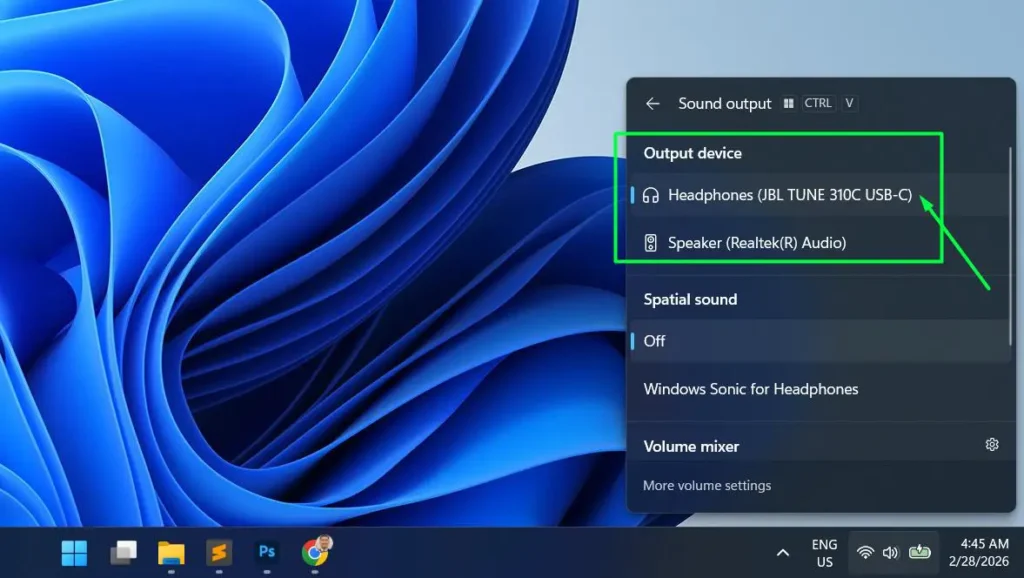
- Step 4: To switch output devices, click the arrow icon next to the volume slider to expand the list of available audio devices.

- Step 5: Click on your preferred output device from the list. The change takes effect immediately.
Method 2: Adjusting Audio Output Settings Through Windows Settings
The Settings app offers more comprehensive control over your audio output than the taskbar alone. This is the recommended method when you need to choose a default output device, adjust audio format, or access per-device properties.
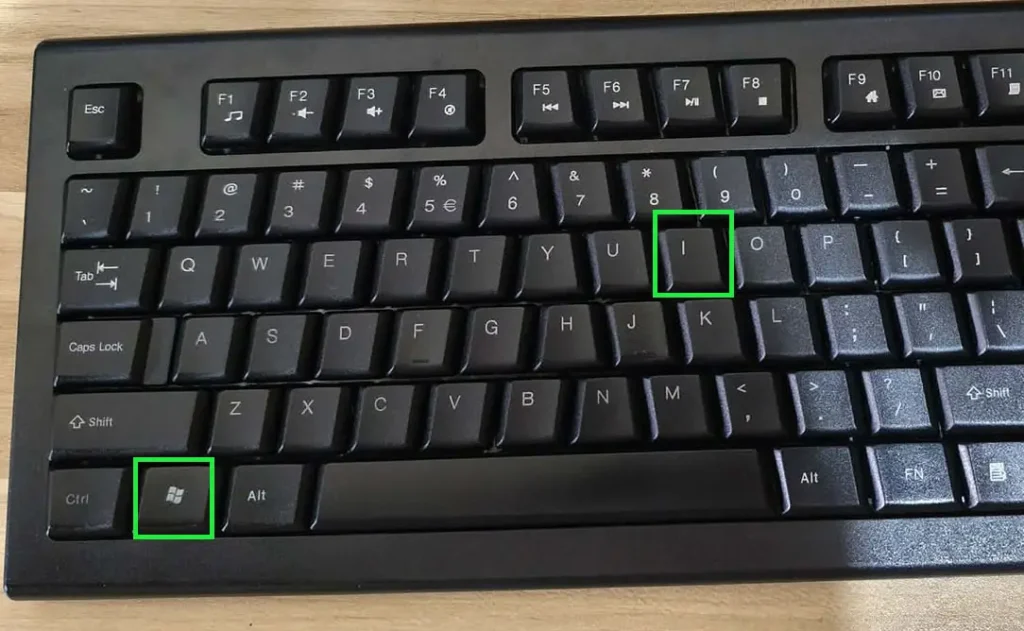
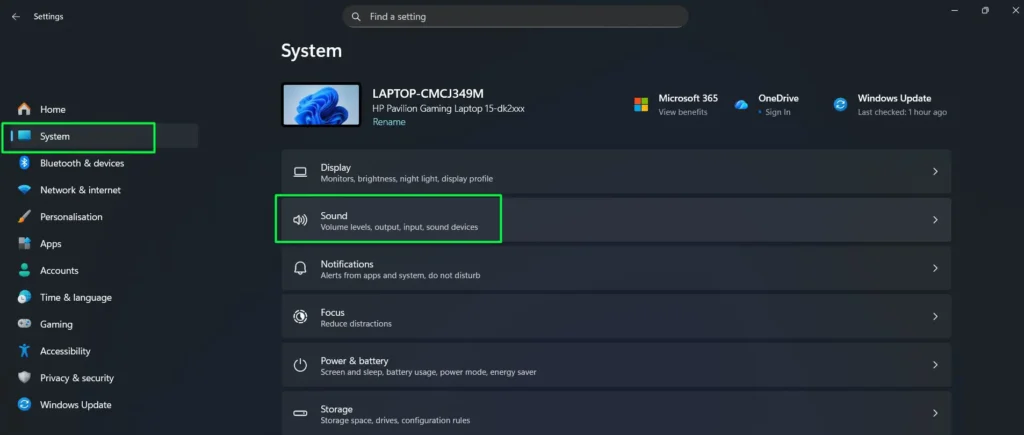
- Step 1: Press Windows + I to open Settings, or click Start and search for Settings.
- Step 2: In the left sidebar, click System.
- Step 3: Select Sound from the System menu.
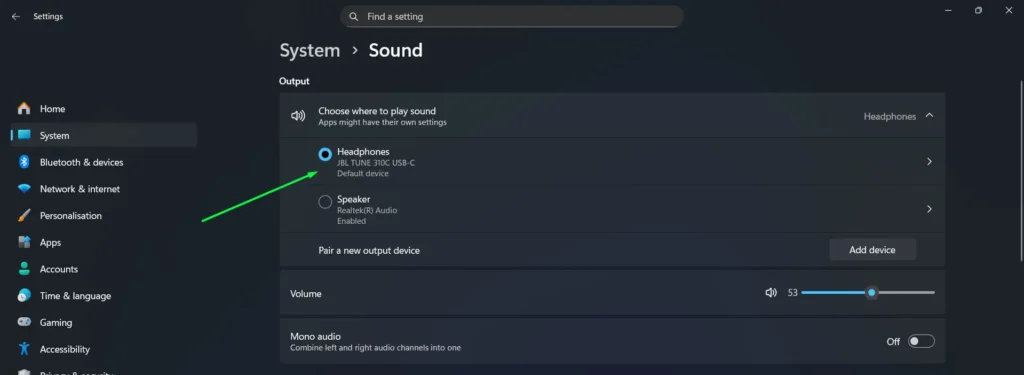
- Step 4: Under the Output section, click the dropdown labeled “Choose where to play sound” and select your desired output device.
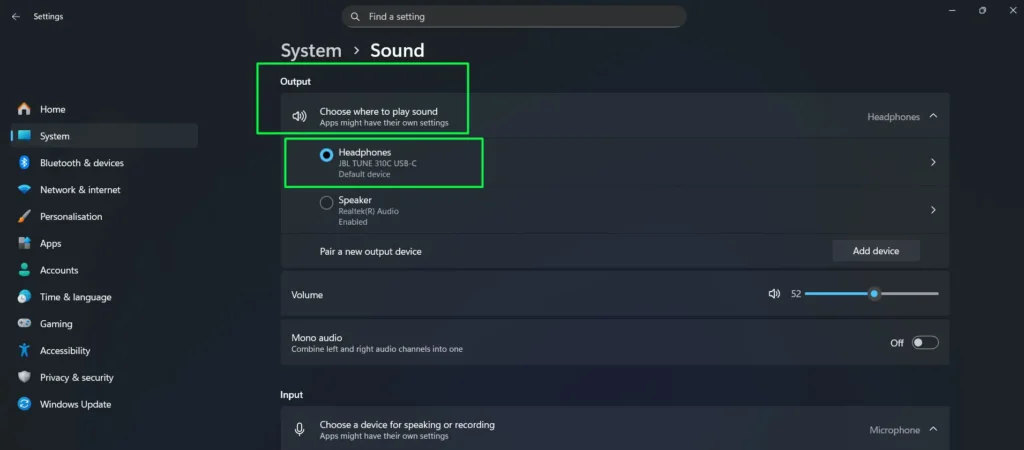
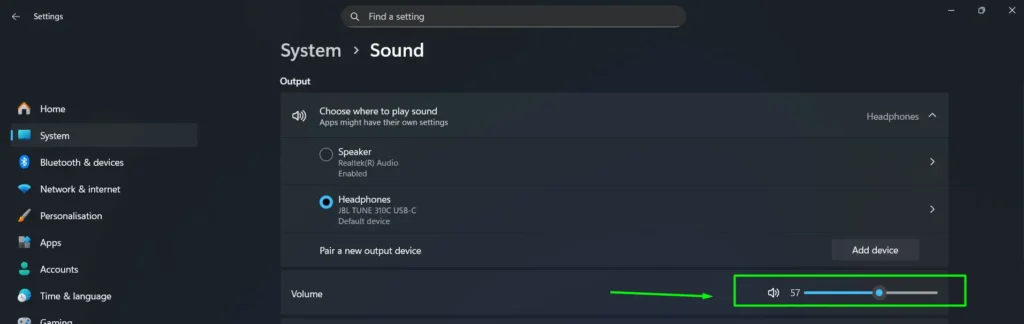
- Step 5: Once selected, adjust the volume slider for that output device as needed.
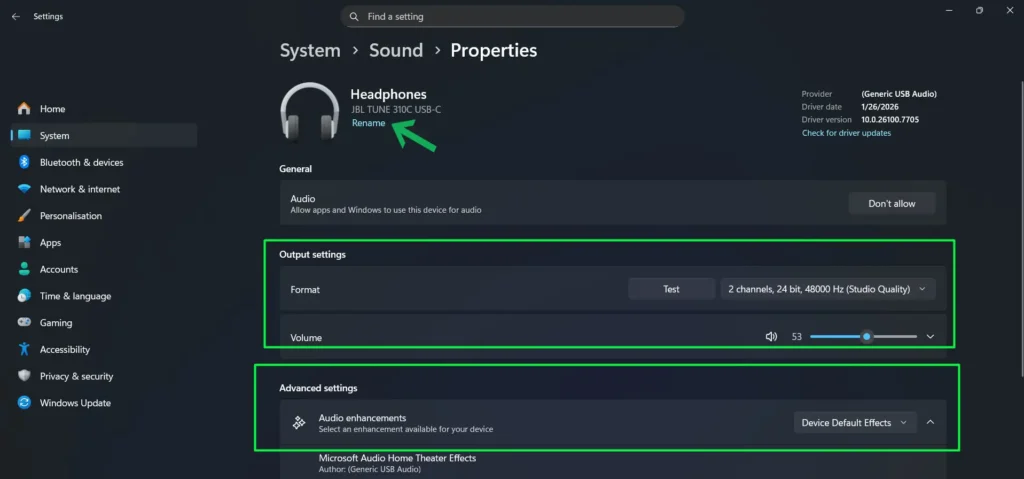
- Step 6: Click your output device name to open its advanced properties.
- Step 7: Inside device properties, you can rename the device, change the audio format, and disable audio enhancements. To make it the default, find “Set as default sound device” and choose “Use as default for audio” or “Use as default for communications” depending on your use case.
Method 3: Using the Sound Control Panel
The classic Sound Control Panel gives you access to advanced playback device options that are not always visible in the modern Settings app — including the ability to set a default device for communications, configure call audio ducking, and reveal hidden or disabled audio hardware.
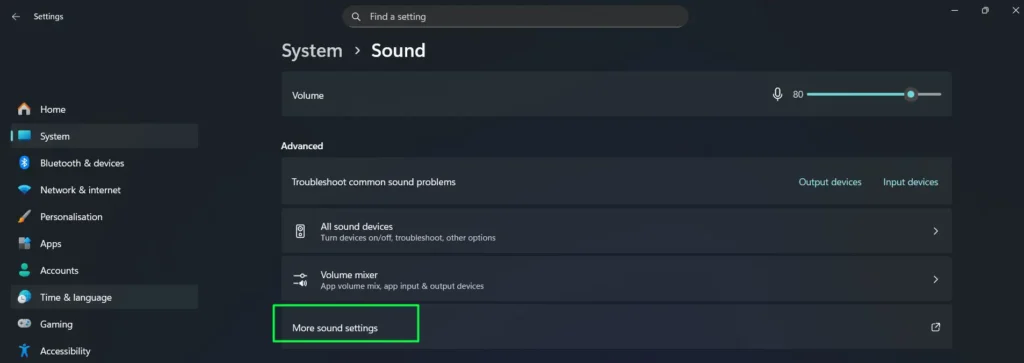
- Step 1: Right-click the speaker icon in the taskbar system tray.
- Step 2: Select “More sound settings” from the context menu. This opens the classic Sound Control Panel.
- Step 3: In the Playback tab, you will see all currently active audio output devices listed.
- Step 4: Right-click your preferred output device and select “Set as Default Device” to make it the primary audio output. To set a separate default specifically for phone calls and voice chat, right-click again and choose “Set as Default Communication Device.”
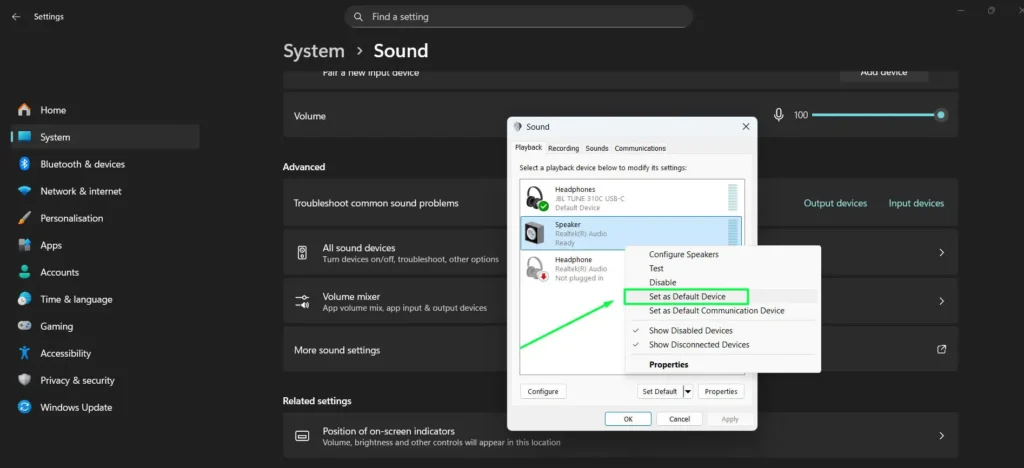
- Step 5: Click Apply, then OK to save the changes.
- Step 6: To configure automatic audio ducking during calls, click the Communications tab and choose your preferred option — such as reducing other sounds by 80% when you are on a call.
Pro tip: If you cannot see all your audio devices — including your 3.5mm jack — right-click any empty area inside the Playback tab and enable both “Show Disabled Devices” and “Show Disconnected Devices.” If the 3.5mm output appears with a down arrow, right-click it and select Enable. On Realtek systems, you may also need to open the Realtek Audio Console from the Start menu and confirm the correct jack function is assigned under Device advanced settings.
Method 4: Using Volume Mixer for App-Specific Audio Control
Unlike the basic volume controls, Windows 11’s Volume Mixer lets you control audio levels for individual applications independently and route different apps to separate output devices simultaneously — making it ideal for multitasking scenarios like gaming while on a call.
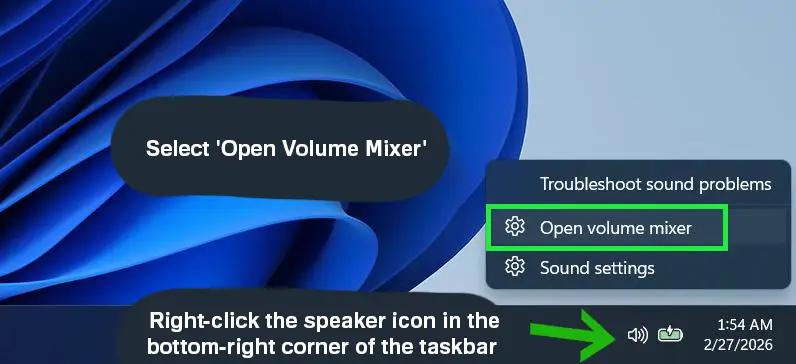
- Step 1: Right-click the speaker icon in the system tray.
- Step 2: From the context menu, select “Open volume mixer.”
- Step 3: In the mixer window, locate the application whose volume you want to adjust.
- Step 4: Drag the slider for that specific app to set its individual volume level.
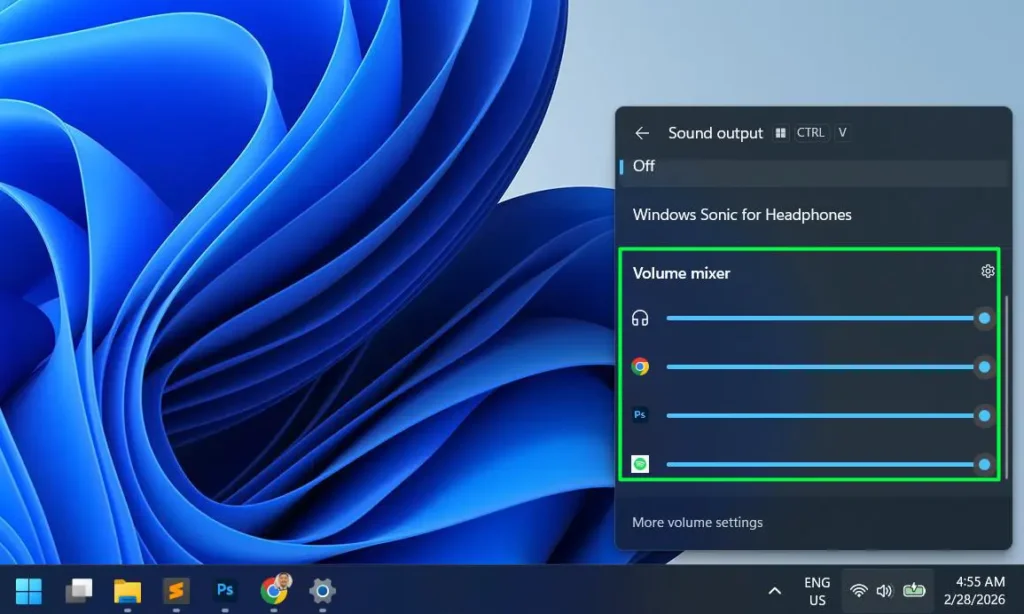
- Step 5: To route a specific app to a different output device, click the dropdown beneath that app’s slider and select the desired device. For example, you can send music to your speakers while routing voice chat to your headset.
Method 5: Using Xbox Game Bar
Xbox Game Bar is a built-in Windows 11 overlay that lets you switch audio output without leaving your current window or game — making it one of the most convenient options for gamers and power users who need instant device switching.
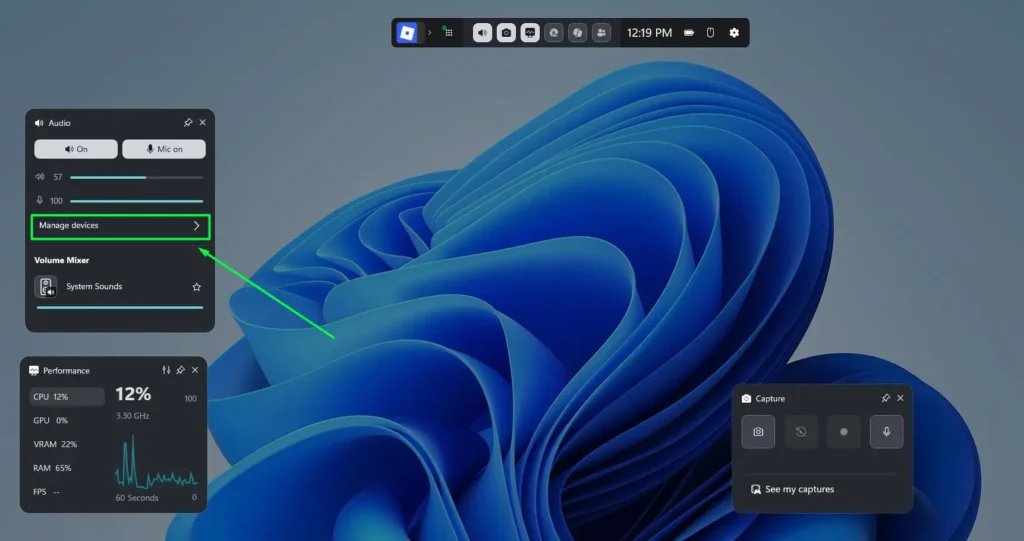
- Step 1: Press Windows key + G to open the Xbox Game Bar overlay.

- Step 2: If the Audio widget is not visible, click the Widget Menu (grid icon) at the top and select “Audio” to add it.
- Step 3: In the Audio widget, click “Manage devices” and locate the Output section.
- Step 4: Click the dropdown under Output and select your preferred audio output device from the list.
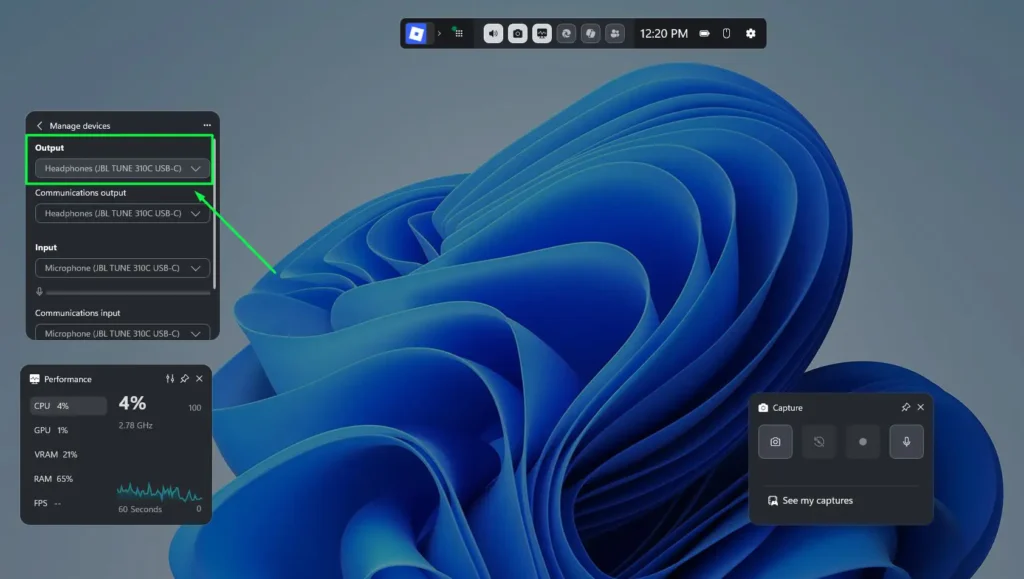
- Step 5: The change takes effect immediately. Press Escape or Windows + G again to close Game Bar and return to your current window.
Note: Xbox Game Bar must be enabled in Settings > Gaming > Xbox Game Bar for this method to work. If it is turned off, toggle it on before using this method.
Method 6: Fixing No Sound After Adjusting Audio Output Settings in Windows 11
If you have followed the steps above and still hear no sound, the issue is likely related to your audio driver, Windows Audio services, or a conflicting device setting — not the output selection itself. Work through the steps below in order until sound is restored.
- Step 1: Check your physical connections first — confirm that all cables are plugged into the correct ports and that your speakers or headphones are powered on. For Bluetooth devices, verify pairing is active.

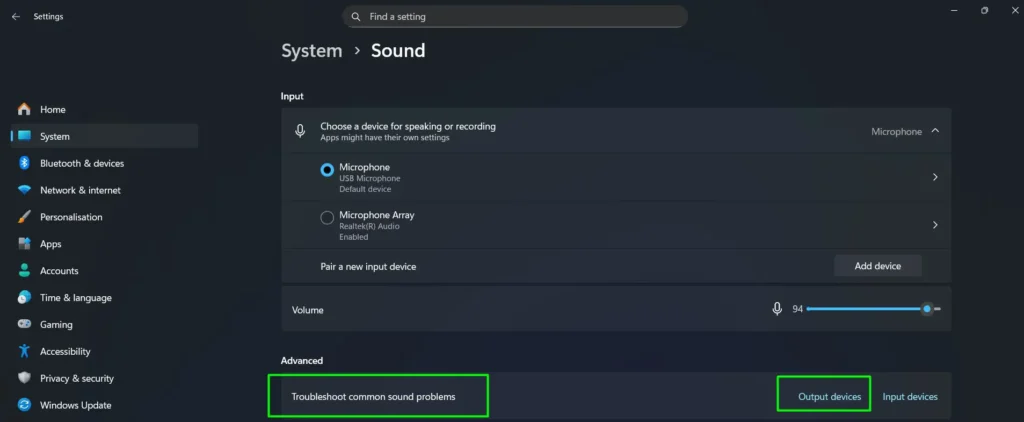
- Step 2: Run the built-in audio troubleshooter. Open Settings > System > Sound, scroll down to “Troubleshoot common sound problems,” and click Troubleshoot next to your output device. Windows will automatically detect and attempt to fix the most common issues.
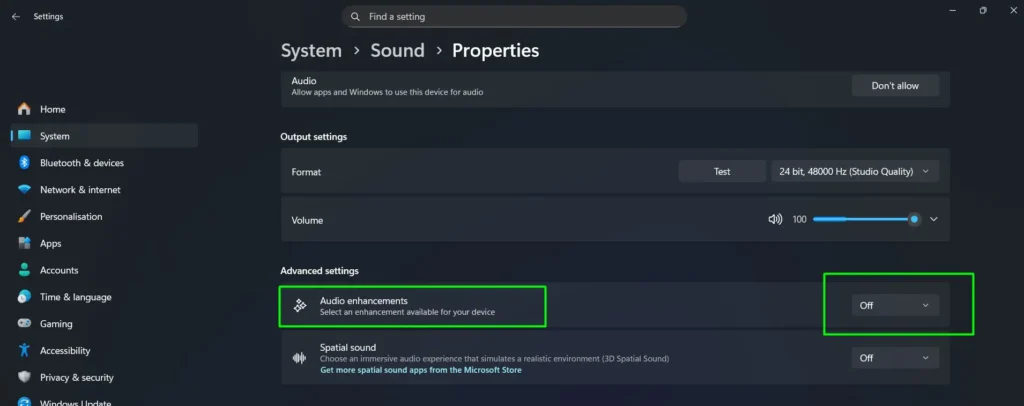
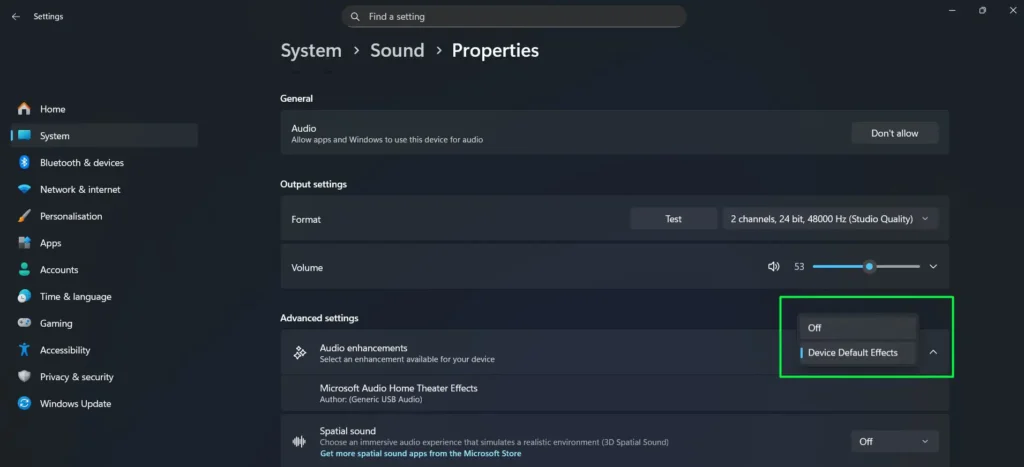
- Step 3: Disable audio enhancements. In Sound settings, select your output device, scroll to Advanced settings, and set Audio enhancements to Off. Enhancements can sometimes conflict with certain hardware and cause silence or distortion.
- Step 4: Update your audio driver. Press Win + X and open Device Manager. Expand “Sound, video and game controllers,” right-click your audio device, and choose Update driver > Search automatically for drivers. Restart your PC after the update completes.
- Step 5: If updating the driver does not help, right-click the same device in Device Manager and select Uninstall device. Restart your PC — Windows will automatically reinstall a clean version of the driver on reboot.
- Step 6: If the no-sound problem started immediately after a driver update, roll it back. In Device Manager, right-click your audio device, select Properties, go to the Driver tab, and click Roll Back Driver if the option is available.
- Step 7: Restart Windows Audio services. Press Win + R, type services.msc, and press Enter. Locate the following three services, right-click each one, and select Restart in this order: Windows Audio, Windows Audio Endpoint Builder, and Remote Procedure Call (RPC). This refreshes the audio stack without requiring a full system reboot.
Pro tip: These steps address both incorrect output device selection and deeper driver or service issues that cause no sound in Windows 11. If none of the above resolves the issue, check your motherboard or audio card manufacturer’s website for a dedicated driver package specific to your hardware model.
Understanding Windows 11 Audio Output Settings
Windows 11 introduced a redesigned Settings app that makes managing audio devices more intuitive than previous versions. The operating system lets you control volume levels, switch between audio devices, configure spatial sound, and fine-tune individual app volumes — all from centralized locations. As a result, most users can handle everything they need without touching the legacy Control Panel.
Advanced Audio Configuration Options
For users seeking professional-level control, Windows 11 offers advanced audio settings beyond what most guides cover.
Adjusting Audio Format
- Step 1: In Sound settings, click on your output device properties.
- Step 2: Scroll down to the Format section.
- Step 3: Click the dropdown menu to select your preferred bit depth and sample rate.
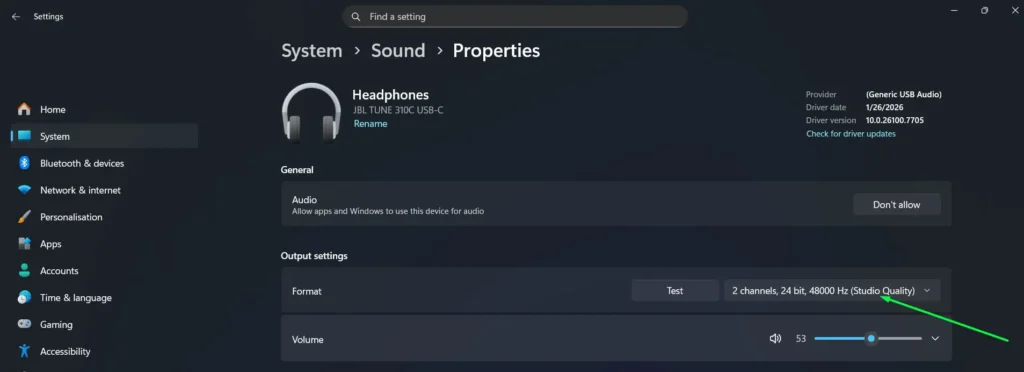
- Step 4: Higher values — such as “24 bit, 48000 Hz (Studio Quality)” — provide better audio fidelity, though they require more processing power.
Disabling Audio Enhancements
- Step 1: Access your output device properties through Sound settings.
- Step 2: Set Audio Enhancements to Off from the dropdown if you are experiencing distortion or prefer completely unprocessed sound.
- Step 3: Note that some audio devices may offer additional enhancement options through manufacturer-specific software installed separately.
Optimizing Audio Output Settings for Different Scenarios
Different activities benefit from specific audio configurations. Windows 11 makes it straightforward to adapt your setup to whatever you are doing.
For Music Production
Use studio-quality audio formats (24-bit, 48000 Hz or higher) and disable all audio enhancements to ensure the purest signal path. Additionally, consider using ASIO drivers if your audio interface supports them, as these bypass Windows audio processing entirely. You can explore more audio and music guides for specialized production tips.
For Gaming
Enable spatial sound features like Windows Sonic or Dolby Atmos to gain positional audio awareness, which can be a meaningful competitive advantage. Set your gaming headset as the default device and use the Volume Mixer to balance game audio against voice chat or music. For the fastest in-game device switching, use Method 5 (Xbox Game Bar) so you never have to alt-tab out.
For Video Calls
Select a dedicated headset to ensure clear two-way communication and test your audio levels before meetings start. Use the Volume Mixer to balance your communication app’s volume against other running applications so neither drowns the other out. You can also configure the Communications setting in Sound Control Panel to automatically reduce other audio during active calls.
Keyboard Shortcuts for Quick Audio Adjustments
Windows 11 also provides convenient keyboard shortcuts for rapid audio control, so you do not always need to open any settings panel at all.
- Press the volume up or volume down keys on your keyboard to adjust system volume incrementally.
- Use the mute key to instantly silence all audio output.
- Press Windows key + A to open Quick Settings for fast device switching from the taskbar.
- Press Windows key + G to open Xbox Game Bar for in-game audio switching.
- On laptops, Fn + volume keys may offer manufacturer-specific media controls depending on your hardware.
Frequently Asked Questions
Why is my audio output not working after updating to Windows 11?
Audio issues after updates typically occur due to driver incompatibility or disabled audio services. Run the built-in audio troubleshooter from Settings, then check Device Manager for driver warnings, and ensure your audio device is both enabled and set as default. If problems persist, update your audio drivers directly from the manufacturer’s website or roll back the recent driver update through Device Manager.
How do I switch between speakers and headphones quickly in Windows 11?
Click the speaker icon in the taskbar or press Windows key + A to open Quick Settings, then click the arrow next to the volume slider to see all available audio devices, and select your preferred output. This allows instant switching without navigating through any Settings menus at all.
Can I use different audio outputs for different applications simultaneously?
Yes, Windows 11 fully supports per-application audio routing. Open Volume Mixer by right-clicking the speaker icon, then use the dropdown menu next to each application to assign it to a specific output device. This lets you play music through speakers while simultaneously routing voice chat through headphones.
What is the difference between stereo and spatial sound in Windows 11?
Stereo sound uses two channels (left and right) for traditional audio playback, whereas spatial sound technologies like Windows Sonic create a three-dimensional audio environment that simulates sound coming from multiple directions. Spatial sound greatly enhances immersion in games and movies, but it may not benefit music production work where accurate stereo imaging matters more.
How do I fix audio distortion or crackling sounds in Windows 11?
Audio distortion often results from incorrect audio format settings, outdated drivers, or conflicting audio enhancements. Try disabling audio enhancements in your device properties and lowering the audio format to 16-bit 44100 Hz. If the issue continues, update your audio drivers and check whether any background applications are interfering with the audio pipeline. For Bluetooth devices specifically, ensure they are within proper range and free from physical obstacles.
Why can’t I see all my audio devices in Windows 11?
Hidden or disabled audio devices will not appear in the standard Sound settings. To reveal them, access the classic Sound Control Panel by right-clicking the speaker icon and selecting “More sound settings,” then right-click anywhere in the Playback tab and enable both “Show Disabled Devices” and “Show Disconnected Devices.” All installed audio hardware will then become visible.
How do I adjust microphone and speaker balance for video calls?
Open Volume Mixer to control your communication application’s volume independently from system sounds. Within your video calling application’s settings, select specific input and output devices rather than relying on system defaults. You can also configure the Communications setting in Sound Control Panel to automatically reduce other audio during active calls.
What audio format should I use for best quality in Windows 11?
For most users, 24-bit 48000 Hz (Studio Quality) provides excellent audio fidelity without excessive resource usage. Professional audio work may benefit from higher sample rates such as 96000 Hz or 192000 Hz — but only if your audio interface and source content actually support them. Using formats higher than your source material provides no quality benefit.
How do I use Xbox Game Bar to change audio output in Windows 11?
Press Windows key + G to open Xbox Game Bar, then locate the Audio widget and use the Output dropdown to select your preferred device. If the Audio widget is not visible, click the Widget Menu (grid icon) at the top and add it. This method is especially useful for gamers since it requires no alt-tabbing or closing your current application.
What is the difference between the Windows Settings Sound page and the Sound Control Panel?
The modern Windows Settings Sound page covers most everyday needs, including device selection, volume control, and format settings. The classic Sound Control Panel — accessible via “More sound settings” — provides additional options such as revealing disabled or disconnected devices, configuring the Communications tab for call audio ducking, and accessing legacy device properties not yet available in the modern interface.
How do I restart Windows Audio services to fix no sound?
Press Win + R, type services.msc, and press Enter. Find Windows Audio in the list, right-click it, and select Restart. Do the same for Windows Audio Endpoint Builder and Remote Procedure Call (RPC). Restarting these three services refreshes the entire audio stack and resolves many no-sound situations without requiring a full system reboot.
What is the difference between Use as default for audio and Use as default for communications?
“Use as default for audio” sets the selected device as the primary output for all system sounds, music, and media. “Use as default for communications” assigns the device specifically for voice calls and communication apps like Microsoft Teams or Zoom. Setting these separately lets you route media to speakers while keeping calls isolated to a headset — the recommended configuration for video call clarity.
How do I enable the 3.5mm jack on Windows 11?
If your 3.5mm headphone or speaker jack is not working in Windows 11, it may be disabled in the Sound Control Panel. Right-click the speaker icon in the taskbar, select More sound settings, go to the Playback tab, right-click any empty area, and enable “Show Disabled Devices.” If your 3.5mm output appears with a down arrow, right-click it and select Enable. Also check Device Manager under Sound controllers — if your Realtek or HD Audio device shows a yellow warning, update or reinstall the driver. On some laptops, the jack may only activate after you physically plug something in.